2017 Acura MDX ECO mode
[x] Cancel search: ECO modePage 228 of 581
227
Features
This chapter describes how to operate technology features.
Audio SystemAbout Your Audio System ................ 228
USB Ports ......................................... 229
Auxiliary Input Jack .......................... 230
Audio System Theft Protection ......... 230
Audio Remote Controls .................... 231
Audio System Basic Operation ........ 232
On Demand Multi-Use Display
TM....... 233
Audio/Information Screen ................ 239
Adjusting the Sound ........................ 243
Display Setup ................................... 244
Playing AM/FM Radio ....................... 245
Playing SiriusXM ® Radio ................... 249 Playing a CD .................................... 260
Playing an iPod ................................ 263
Playing Internet Radio ...................... 267
Playing a USB Flash Drive ................. 270
Playing
Bluetooth ® Audio................. 273
Siri Eyes Free .................................... 275
Audio Error Messages CD Player ......................................... 276
iPod/USB Flash Drive ........................ 277
Pandora ®......................................... 278
Aha
TM Radio ..................................... 280 General Information on the Audio
SystemSiriusXM ® Radio Service ................... 281
Recommended CDs ......................... 282
Compatible iPod, iPhone, and USB Flash Drives ................................................. 284
Customized Features ........................ 285
Defaulting All the Settings ............... 306
HomeLink ® Universal Transceiver ... 307
Bluetooth ® HandsFreeLink®
Using HFL ........................................ 310
HFL Menus ...................................... 312
Compass
*.......................................... 344
* Not available on all models
17 ACURA MDX-31TZ56300.book 227 ページ 2016年5月13日 金曜日 午後7時46分
Page 230 of 581
229
uuAudio System uUSB Ports
Features
USB Ports
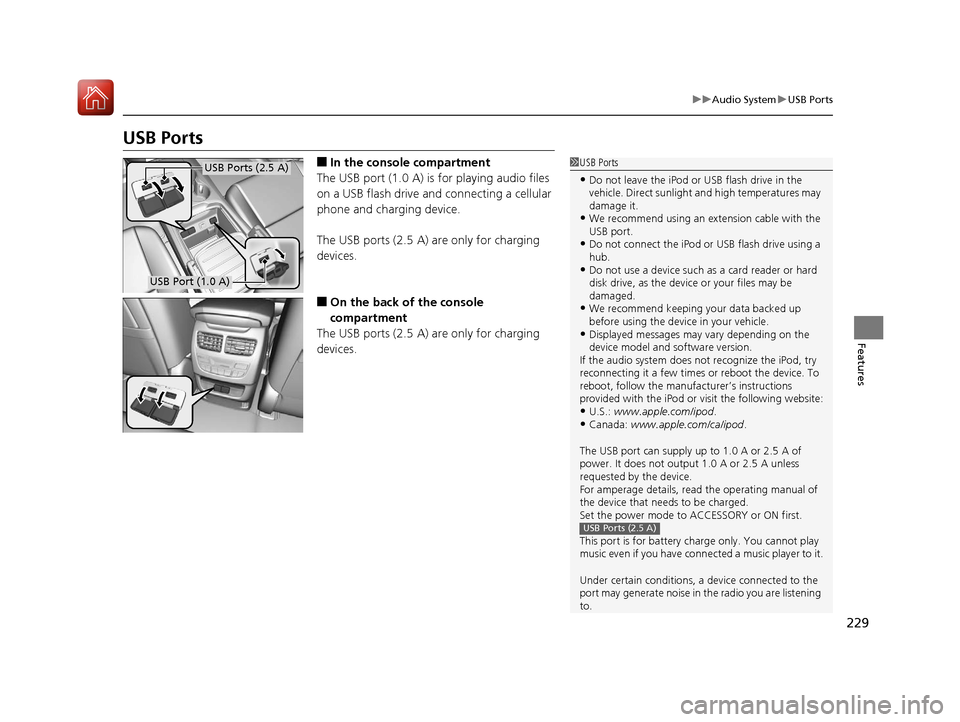
■In the consol e compartment
The USB port (1.0 A) is for playing audio files
on a USB flash drive and connecting a cellular
phone and charging device.
The USB ports (2.5 A) are only for charging
devices.
■On the back of the console
compartment
The USB ports (2.5 A) are only for charging
devices.
1 USB Ports
•Do not leave the iPod or USB flash drive in the
vehicle. Direct sunlight and high temperatures may
damage it.
•We recommend using an extension cable with the
USB port.
•Do not connect the iPod or USB flash drive using a
hub.
•Do not use a device such as a card reader or hard
disk drive, as the device or your files may be
damaged.
•We recommend keeping y our data backed up
before using the device in your vehicle.
•Displayed messages may vary depending on the
device model and software version.
If the audio system does not recognize the iPod, try
reconnecting it a few times or reboot the device. To
reboot, follow the manufac turer’s instructions
provided with the iPod or visit the following website:
•U.S.: www.apple.com/ipod .•Canada: www.apple.com/ca/ipod.
The USB port can supply up to 1.0 A or 2.5 A of
power. It does not output 1.0 A or 2.5 A unless
requested by the device.
For amperage details, read the operating manual of
the device that ne eds to be charged.
Set the power mode to ACCESSORY or ON first.
This port is for battery charge only. You cannot play
music even if you have conne cted a music player to it.
Under certain condi tions, a device connected to the
port may generate noise in the radio you are listening
to.
USB Ports (2.5 A)
USB Ports (2.5 A)
USB Port (1.0 A)
17 ACURA MDX-31TZ56300.book 229 ページ 2016年5月13日 金曜日 午後7時46分
Page 231 of 581
230
uuAudio System uAuxiliary Input Jack
Features
Auxiliary Input Jack
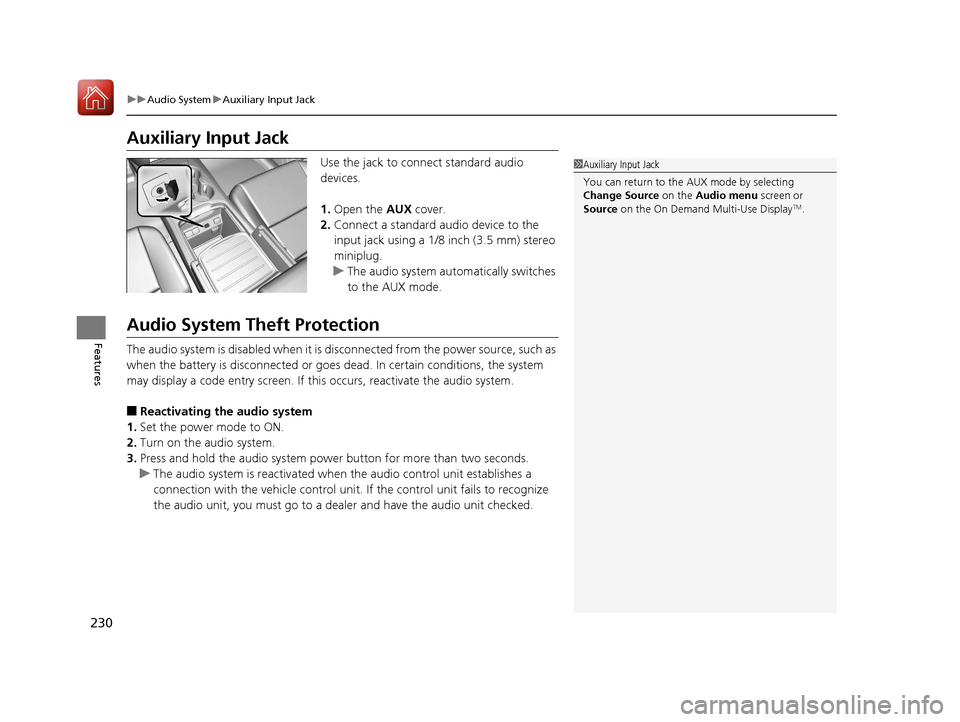
Use the jack to connect standard audio
devices.
1. Open the AUX cover.
2. Connect a standard audio device to the
input jack using a 1/8 inch (3.5 mm) stereo
miniplug.
u The audio system automatically switches
to the AUX mode.
Audio System Theft Protection
The audio system is disabled when it is di sconnected from the power source, such as
when the battery is disconnected or goes dead. In certain conditions, the system
may display a code entry screen. If this occurs, reactivate the audio system.
■Reactivating the audio system
1. Set the power mode to ON.
2. Turn on the audio system.
3. Press and hold the audio system power button for more than two seconds.
u The audio system is reac tivated when the audio co ntrol unit establishes a
connection with the vehicle control unit. If the control unit fails to recognize
the audio unit, you must go to a dealer and have the audio unit checked.
1 Auxiliary Input Jack
You can return to the AUX mode by selecting
Change Source on the Audio menu screen or
Source on the On Demand Multi-Use Display
TM.
17 ACURA MDX-31TZ56300.book 230 ページ 2016年5月13日 金曜日 午後7時46分
Page 233 of 581
232
Features
Audio System Basic Operation
To use the audio system, the power mode must be in ACCESSORY or ON.
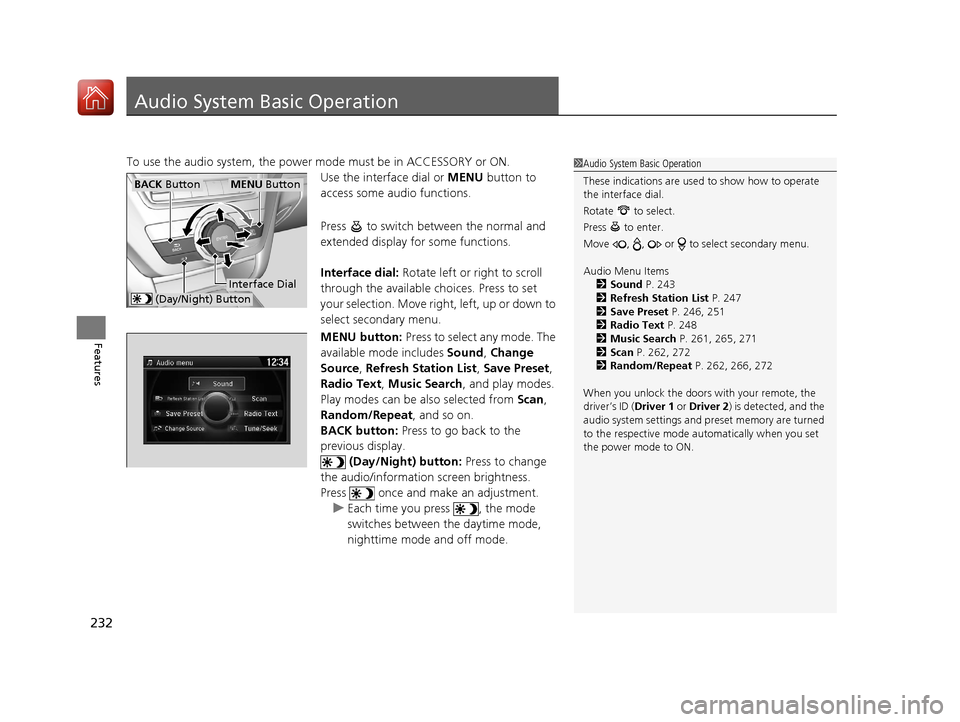
Use the interface dial or MENU button to
access some audio functions.
Press to switch between the normal and
extended display fo r some functions.
Interface dial: Rotate left or right to scroll
through the available choices. Press to set
your selection. Move right, left, up or down to
select secondary menu.
MENU button: Press to select any mode. The
available mode includes Sound, Change
Source , Refresh Station List , Save Preset ,
Radio Text, Music Search , and play modes.
Play modes can be also selected from Scan,
Random/Repeat , and so on.
BACK button: Press to go back to the
previous display.
(Day/Night) button: Press to change
the audio/information screen brightness.
Press once and make an adjustment. u Each time you press , the mode
switches between the daytime mode,
nighttime mode and off mode.1Audio System Basic Operation
These indications are used to show how to operate
the interface dial.
Rotate to select.
Press to enter.
Move , , or to select secondary menu.
Audio Menu Items 2 Sound P. 243
2 Refresh Station List P. 247
2 Save Preset P. 246, 251
2 Radio Text P. 248
2 Music Search P. 261, 265, 271
2 Scan P. 262, 272
2 Random/Repeat P. 262, 266, 272
When you unlock the doors with your remote, the
driver’s ID ( Driver 1 or Driver 2) is detected, and the
audio system settings and pr eset memory are turned
to the respective mode automatically when you set
the power mode to ON.
Interface Dial
MENU ButtonBACK Button
(Day/Night) Button
17 ACURA MDX-31TZ56300.book 232 ページ 2016年5月13日 金曜日 午後7時46分
Page 246 of 581
245
uuAudio System Basic Operation uPlaying AM/FM Radio
Continued
Features
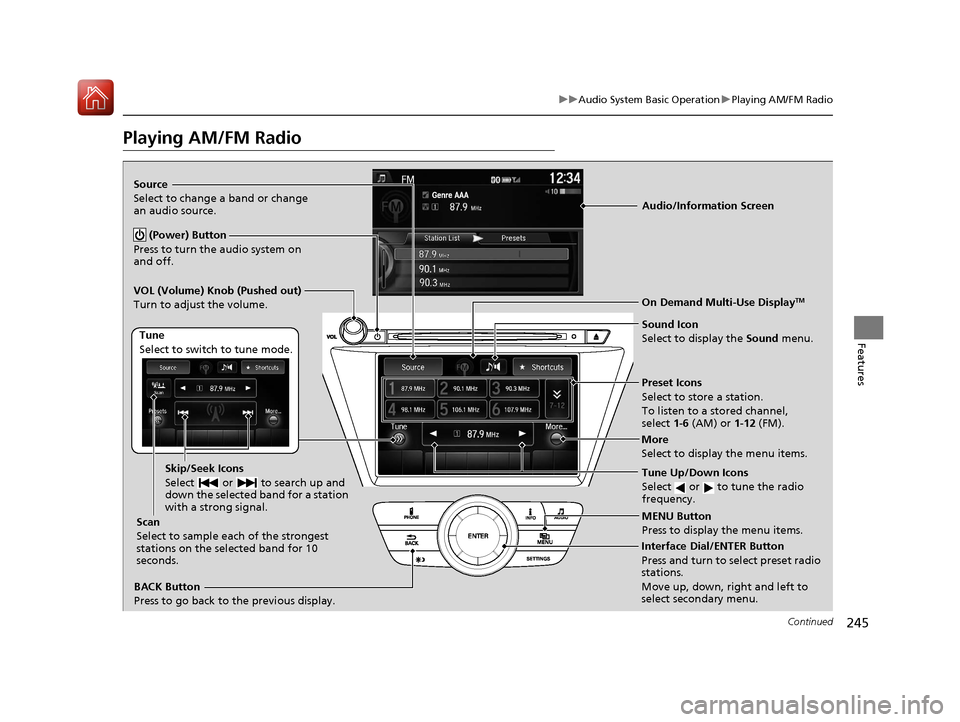
Playing AM/FM Radio
Audio/Information Screen
Tune Up/Down Icons
Select or to tune the radio
frequency.
MENU Button
Press to display the menu items.
(Power) Button
Press to turn the audio system on
and off.
Source
Select to change a band or change
an audio source.
More
Select to display the menu items.
BACK Button
Press to go back to the previous display.
VOL (Volume) Knob (Pushed out)
Turn to adjust the volume.
Interface Dial/ENTER Button
Press and turn to select preset radio
stations.
Move up, down, right and left to
select secondary menu.
Sound Icon
Select to display the
Sound menu.
On Demand Multi-Use DisplayTM
Tune
Select to switch to tune mode.
Preset Icons
Select to store a station.
To listen to a stored channel,
select 1-6 (AM) or 1-12 (FM).
Skip/Seek Icons
Select or to search up and
down the selected band for a station
with a strong signal.
Scan
Select to sample each of the strongest
stations on the selected band for 10
seconds.
17 ACURA MDX-31TZ56300.book 245 ページ 2016年5月13日 金曜日 午後7時46分
Page 247 of 581
uuAudio System Basic Operation uPlaying AM/FM Radio
246
Features
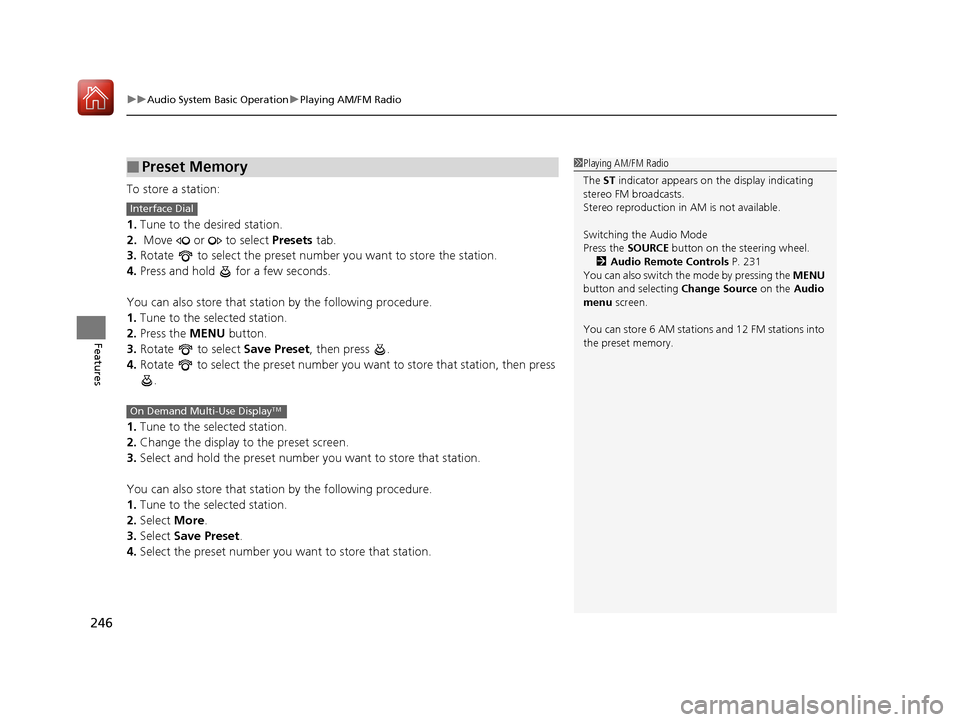
To store a station:
1. Tune to the desired station.
2. Move or to select Presets tab.
3. Rotate to select the preset number you want to store the station.
4. Press and hold for a few seconds.
You can also store that statio n by the following procedure.
1. Tune to the selected station.
2. Press the MENU button.
3. Rotate to select Save Preset, then press .
4. Rotate to select the preset number you want to store that station, then press
.
1. Tune to the selected station.
2. Change the display to the preset screen.
3. Select and hold the preset number you want to store that station.
You can also store that statio n by the following procedure.
1. Tune to the selected station.
2. Select More.
3. Select Save Preset .
4. Select the preset number you wa nt to store that station.
■Preset Memory1Playing AM/FM Radio
The ST indicator appears on the display indicating
stereo FM broadcasts.
Stereo reproduction in AM is not available.
Switching the Audio Mode
Press the SOURCE button on the steering wheel.
2 Audio Remote Controls P. 231
You can also switch the mode by pressing the MENU
button and selecting Change Source on the Audio
menu screen.
You can store 6 AM stations and 12 FM stations into
the preset memory.
Interface Dial
On Demand Multi-Use DisplayTM
17 ACURA MDX-31TZ56300.book 246 ページ 2016年5月13日 金曜日 午後7時46分
Page 255 of 581
uuAudio System Basic Operation uPlaying SiriusXM ® Radio
254
Features
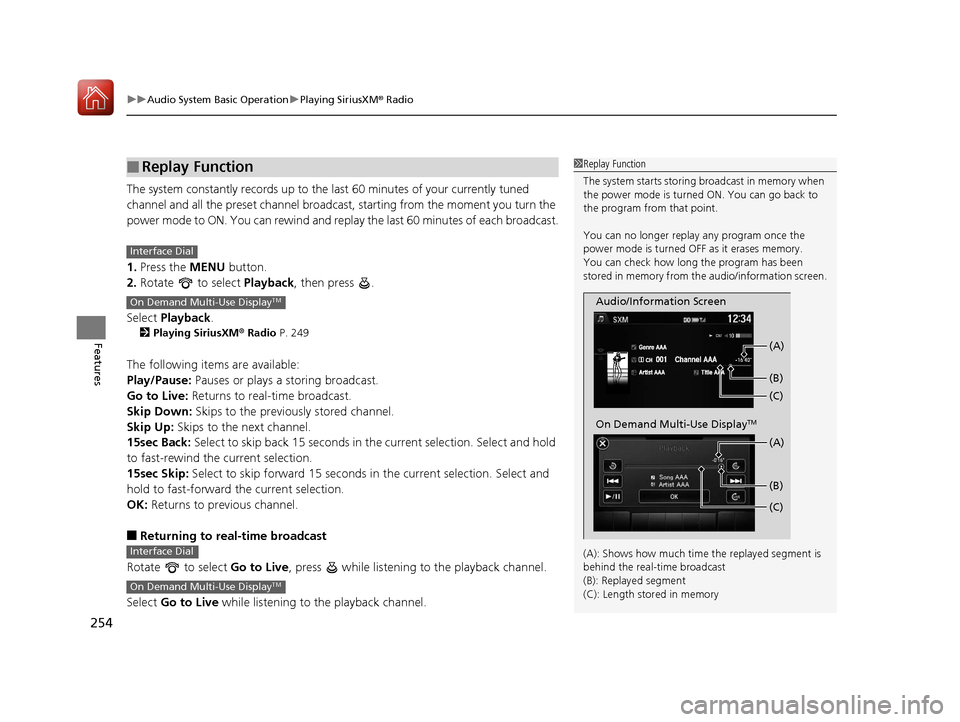
The system constantly records up to the la st 60 minutes of your currently tuned
channel and all the preset channel broadcas t, starting from the moment you turn the
power mode to ON. You can rewind and replay the last 60 minutes of each broadcast.
1. Press the MENU button.
2. Rotate to select Playback, then press .
Select Playback.
2Playing SiriusXM ® Radio P. 249
The following items are available:
Play/Pause: Pauses or plays a storing broadcast.
Go to Live: Returns to real-time broadcast.
Skip Down: Skips to the previously stored channel.
Skip Up: Skips to the next channel.
15sec Back: Select to skip back 15 seconds in the current selection. Select and hold
to fast-rewind the current selection.
15sec Skip: Select to skip forward 15 seconds in the current selection. Select and
hold to fast-forward the current selection.
OK: Returns to previous channel.
■Returning to real-time broadcast
Rotate to select Go to Live, press while listening to the playback channel.
Select Go to Live while listening to the playback channel.
■Replay Function1Replay Function
The system starts storing broadcast in memory when
the power mode is turned ON. You can go back to
the program from that point.
You can no longer repl ay any program once the
power mode is turned OFF as it erases memory.
You can check how long the program has been
stored in memory from th e audio/information screen.
(A): Shows how much time the replayed segment is
behind the real-time broadcast
(B): Replayed segment
(C): Length stored in memory
Audio/Information Screen (C) (B) (A)
On Demand Multi-Use DisplayTM
(C) (B) (A)
Interface Dial
On Demand Multi-Use DisplayTM
Interface Dial
On Demand Multi-Use DisplayTM
17 ACURA MDX-31TZ56300.book 254 ページ 2016年5月13日 金曜日 午後7時46分
Page 260 of 581

259
uuAudio System Basic Operation uPlaying SiriusXM ® Radio
Features
Sample each channel on the selected mode for 10 seconds.
1. Press the MENU button.
2. Rotate to select Scan, then press .
3. Rotate to select Scan Channels or Scan Songs in Presets , then press .
To turn off scan, press to select Stop Scan, or press the BACK button.
1. Select More.
2. Select Scan.
3. Select Scan Channels or Scan Songs in Presets .
To turn off scan, select Stop Scan.
■Scan1Scan
You can select desired channel by songs using Scan
Songs in presets.
The “Scan Songs in Preset s” function is based on
TuneScan
TM technology of SiriusXM ®.
The “Featured Channels ” function is based on
Featured Favorites
TM technology of SiriusXM ®.
TuneScan
TM and Featured FavoritesTM are registered
trademarks of SiriusXM ® Radio, Inc.
Scan Mode Menu Items
Scan Channels: Scans for channels with a strong
signal in the selected mode.
Scan Songs in Presets: Scans for desired preset
channel by songs. Select Skip Up or Skip Down to
skip to the next/previ ous stored selection.
Interface Dial
On Demand Multi-Use DisplayTM
17 ACURA MDX-31TZ56300.book 259 ページ 2016年5月13日 金曜日 午後7時46分