Page 105 of 126

Periodic maintenance an d a djustment
6-31
6
EAU23292
Checkin g the wheel b earings
The front and rear wheel bearings must
be checked at the intervals specified in
the periodic maintenance and lubrica-
tion chart. If there is play in the wheel
hub or if the wheel does not turn
smoothly, have a Yamaha dealer
check the wheel bearings.
EAU73300
Battery
NOTICE
ECA22960
Use only the specifie d genuine
YAMAHA battery. Usin g a d ifferent
b attery may cause the IMU to fail
an d the en gine to stall.
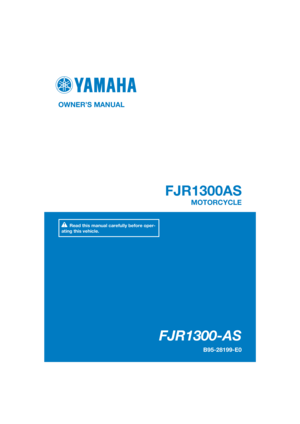
The battery is located under panel A.
(See page 6-7.)
This model is equipped with a VRLA
(Valve Regulated Lead Acid) battery.
There is no need to check the electro-
lyte or to add distilled water. However,
the battery lead connections need to
be checked and, if necessary, tight-
ened.
WARNING
EWA10761
Electrolyte is poisonous an d
d an gerous since it contains sul-
furic aci d, which causes severe
b urns. Avoid any contact with
skin, eyes or clothin g an d al-
ways shiel d your eyes when
1. Battery
2. Positive battery lead (red)
3. Negative battery lead (black)
1 2
3
UB95E0E0.book Page 31 Friday, February 19, 2016 2:15 PM
Page 106 of 126

Periodic maintenance an d a djustment
6-32
6 workin
g near b atteries. In case
of contact, ad minister the fol-
lowin g FIRST AID.
EXTERNAL: Flush with plenty of water.
INTERNAL: Drink lar ge quan-
tities of water or milk an d im-
me diately call a physician.
EYES: Flush with water for 15 minutes and seek prompt
me dical attention.
Batteries pro duce explosive hy-
d ro gen gas. Therefore, keep
sparks, flames, ci garettes, etc.,
away from the battery an d pro-
vi de sufficient ventilation when
char gin g it in an enclosed
space.
KEEP THIS AND ALL BATTER-
IES OUT OF THE REACH OF
CHILDREN.
To char ge the battery
Have a Yamaha dealer charge the bat-
tery as soon as possible if it seems to
have discharged. Keep in mind that the
battery tends to discharge more quick-
ly if the vehicle is equipped with op-
tional electrical accessories.
NOTICE
ECA16522
To char ge a VRLA (Valve Re gulate d
Lea d Aci d) battery, a special (con-
stant-volta ge) battery char ger is re-
quired . Using a conventional battery
char ger will dama ge the b attery.
To store the battery
1. If the vehicle will not be used for more than one month, remove the
battery, fully charge it, and then
place it in a cool, dry place. NOTICE:
When removin g the
b attery, be sure the key is
turne d to “OFF”, then d iscon-
nect the neg ative lead b efore
d isconnectin g the positive lea d.
[ECA16303]
2. If the battery will be stored for
more than two months, check it at
least once a month and fully
charge it if necessary.
3. Fully charge the battery before in- stallation. NOTICE: When install-
in g the b attery, be sure the key
is turne d to “OFF”, then connect
the positive lea d before con-
nectin g the ne gative lea d.
[ECA16841]
4. After installation, make sure that
the battery leads are properly con-
nected to the battery terminals.
NOTICE
ECA16531
Always keep the b attery charged .
Storin g a d ischar ged battery can
cause permanent b attery damag e.
UB95E0E0.book Page 32 Friday, February 19, 2016 2:15 PM
Page 107 of 126

If a fuse is blown, replace it as follows.1. T")
Periodic maintenance an d a djustment
6-33
6
EAU54515
Replacin g the fuses
The fuse boxes and individual fuses
are located under panel A. (See page
6-7.)
If a fuse is blown, replace it as follows.1. Turn the key to “OFF” and turn off the electrical circuit in question.
2. Remove the blown fuse, and then install a new fuse of the specified
amperage. WARNING! Do not
use a fuse of a hi gher ampera ge
ratin g than recommen ded to
avoi d causin g extensive dam-
a g e to the electrical system an d
possi bly a fire.
[EWA15132]
1. Main fuse
2. Spare fuse
3. Cruise control fuse
4. Brake light fuse
5. Fuse box
6. Main fuse 2
5
1
3
4
2
5 26
1. ABS motor fuse
2. ABS solenoid fuse
3. Fuel injection system fuse
4. Backup fuse (for clock and immobilizer sys-
tem)
5. Electronic throttle valve fuse
6. Headlight fuse
7. Spare fuse
8. YCC-S motor control fuse
9. Suspension fuse
10.Signaling system fuse
11.Terminal fuse 1 (for auxiliary DC jack)
12.ABS control unit fuse
13.Ignition fuse
14.Right radiator fan motor fuse
15.Left radiator fan motor fuse
16.Hazard fuse
17.Windshield motor fuse
15 7
11
10121314
71716
8
1
9
234
5
67
7
UB95E0E0.book Page 33 Friday, February 19, 2016 2:15 PM
Page 108 of 126

Periodic maintenance an d a djustment
6-34
6
3. Turn the key to “ON” and turn onthe electrical circuit in question to
check if the device operates.
4. If the fuse immediately blows again, have a Yamaha dealer
check the electrical system.
EAU72980
Vehicle li ghts
This model is equipped with full-LED
lighting. There are no user replaceable
bulbs.
If a light does not come on, check the
fuses and then have a Yamaha dealer
check the vehicle.
NOTICE
ECA16581
Do not affix any type of tinted film or
stickers to the head light lens.
Specifie d fuses:
Main fuse: 50.0 A
Main fuse 2:
30.0 A
Te r m i n a l f u s e 1 : 3.0 A
Headlight fuse: 7.5 A
Brake light fuse:
1.0 A
Signaling system fuse: 7.5 A
Ignition fuse: 20.0 A
Radiator fan motor fuse:
10.0 A × 2
Backup fuse: 7.5 A
Hazard fuse: 7.5 A
Fuel injection system fuse:
15.0 A
ABS control unit fuse: 7.5 A
ABS motor fuse: 30.0 A
ABS solenoid fuse:
20.0 A
Suspension fuse: 15.0 A
YCC-S motor control fuse: 30.0 A
Cruise control fuse:
1.0 A
Windshield motor fuse: 20.0 A
Electronic throttle valve fuse: 7.5 A
UB95E0E0.book Page 34 Friday, February 19, 2016 2:15 PM
Page 109 of 126

Periodic maintenance an d a djustment
6-35
6
EAU25872
Trou bleshootin g
Although Yamaha motorcycles receive
a thorough inspection before shipment
from the factory, trouble may occur
during operation. Any problem in the
fuel, compression, or ignition systems,
for example, can cause poor starting
and loss of power.
The following troubleshooting charts
represent quick and easy procedures
for checking these vital systems your-
self. However, should your motorcycle
require any repair, take it to a Yamaha
dealer, whose skilled technicians have
the necessary tools, experience, and
know-how to service the motorcycle
properly.
Use only genuine Yamaha replace-
ment parts. Imitation parts may look
like Yamaha parts, but they are often
inferior, have a shorter service life and
can lead to expensive repair bills.
WARNING
EWA15142
When checkin g the fuel system, d o
not smoke, an d make sure there are
no open flames or sparks in the ar-
ea, inclu din g pilot li ghts from water
heaters or furnaces. Gasoline or
g asoline vapors can i gnite or ex-
plo de, causin g severe injury or prop-
erty damag e.
UB95E0E0.book Page 35 Friday, February 19, 2016 2:15 PM
Page 110 of 126

Periodic maintenance an d a djustment
6-36
6
EAU63470
Trou bleshootin g charts
Startin g pro blems or poor en gine performance
1. FuelThere is enough fuel.
There is no fuel.
Check the battery.
Supply fuel.
The engine turns over
quickly.
The engine turns over
slowly.
The engine does not
start.
Check the battery.
Wipe off with a dry
cloth and correct the
spark plug gaps, or
replace the spark
plugs.
Check the battery
lead connections, and
have a Yamaha dealer
charge the battery if
necessary.
2. BatteryThe battery is good.
The engine does not
start.
Check the ignition.
3. IgnitionWetOperate the electric
starter.
Dry
There is compression.
There is no
compression.
The engine does not start.
Have a Yamaha dealer check the vehicle.
Have a Yamaha dealer check the vehicle.
The engine does not
start.
Check the
compression.Have a Yamaha
dealer check the
vehicle.
Remove the spark
plugs and check
the electrodes.
Operate the electric
starter.
Operate the electric
starter.
Check the fuel level
in the fuel tank.
4. Compression
UB95E0E0.book Page 36 Friday, February 19, 2016 2:15 PM
Page 111 of 126

Periodic maintenance an d a djustment
6-37
6
En
gine overheatin g
WARNING
EWAT1041
Do not remove the rad iator cap when the engine an d ra diator are hot.
Scal din g hot flui d an d steam may b e blown out un der pressure, which
coul d cause serious injury. Be sure to wait until the en gine has coole d.
Place a thick ra g, like a towel, over the rad iator cap, and then slowly ro-
tate the cap counterclockwise to the d etent to allow any residual pres-
sure to escape. When the hissin g soun d has stopped , press down on the
cap while turnin g it counterclockwise, an d then remove the cap.
TIP
If coolant is not available, tap water can be temporarily used instead, provided
that it is changed to the recommended coolant as soon as possible.
Wait until the engine
has cooled.
Check the coolant
level in the reservoir
and radiator.Add coolant.
(See TIP.)
The coolant level is
OK.
There is no leakage.
There is leakage.
The coolant level is
low.
Check the cooling
system for leakage.
Have a Yamaha
dealer check and
repair the cooling
system.
Start the engine. If the engine overheats again,
have a Yamaha dealer check and repair the cooling
system.
UB95E0E0.book Page 37 Friday, February 19, 2016 2:15 PM
Page 112 of 126

Motorcycle care and stora ge
7-1
7
EAU37834
Matte color caution
NOTICE
ECA15193
Some mo dels are equipped with
matte colore d finishe d parts. Be
sure to consult a Yamaha dealer for
a d vice on what pro ducts to use be-
fore cleanin g the vehicle. Usin g a
b rush, harsh chemical prod ucts or
cleanin g compoun ds when cleanin g
these parts will scratch or damag e
their surface. Wax also shoul d not
b e applied to any matte colored fin-
ishe d parts.
EAU54671
Care
While the open design of a motorcycle
reveals the attractiveness of the tech-
nology, it also makes it more vulnera-
ble. Rust and corrosion can develop
even if high-quality components are
used. A rusty exhaust pipe may go un-
noticed on a car, however, it detracts
from the overall appearance of a mo-
torcycle. Frequent and proper care
does not only comply with the terms of
the warranty, but it will also keep your
motorcycle looking good, extend its
life and optimize its performance.
Before cleanin g
1. Cover the muffler outlets with plastic bags after the engine has
cooled down.
2. Make sure that all caps and cov- ers as well as all electrical cou-
plers and connectors, including
the spark plug caps, are tightly in-
stalled.
3. Remove extremely stubborn dirt, like oil burnt onto the crankcase,
with a degreasing agent and a
brush, but never apply such prod-
ucts onto seals, gaskets and
wheel axles. Always rinse the dirt
and degreaser off with water.
Cleanin g
NOTICE
ECA10773
Avoi d usin g stron g aci dic wheel
cleaners, especially on spoke d
wheels. If such prod ucts are
use d on har d-to-remove dirt, do
not leave the cleaner on the af-
fected area any lon ger than in-
UB95E0E0.book Page 1 Friday, February 19, 2016 2:15 PM
 1
1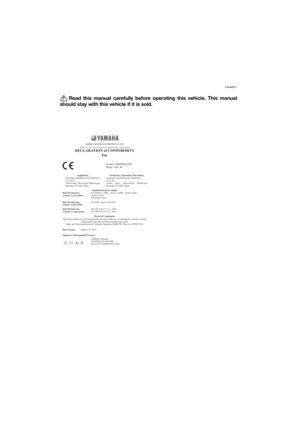 2
2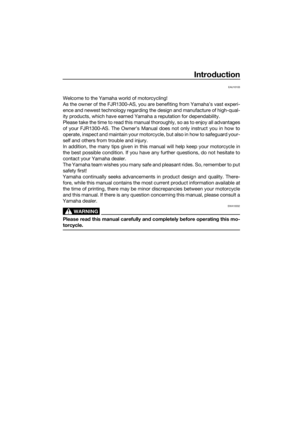 3
3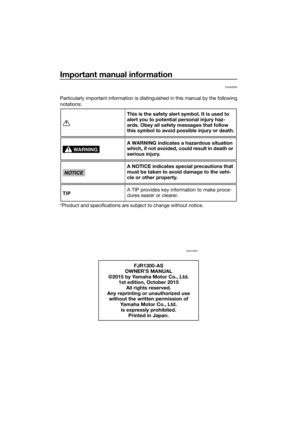 4
4 5
5 6
6 7
7 8
8 9
9 10
10 11
11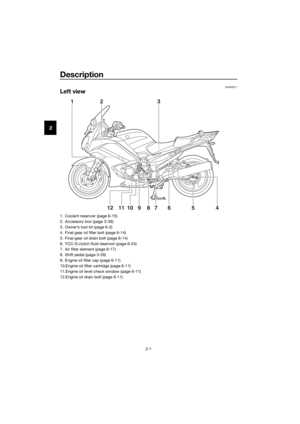 12
12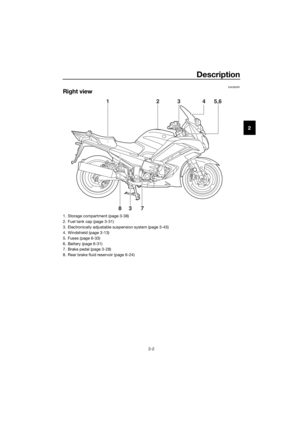 13
13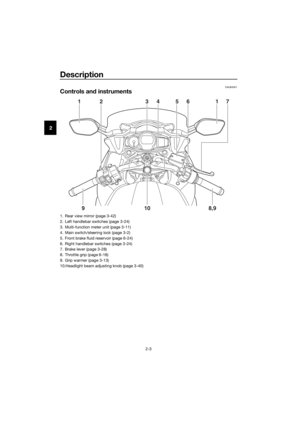 14
14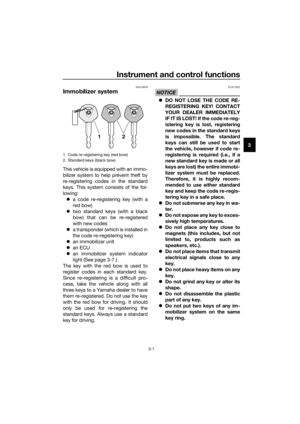 15
15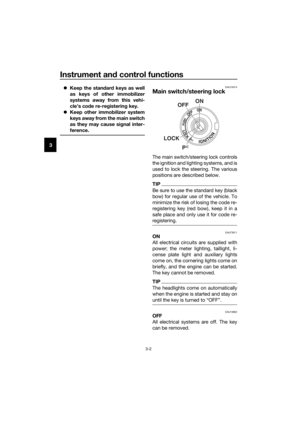 16
16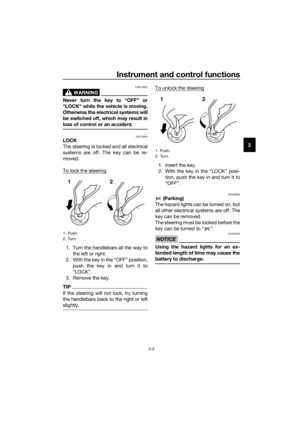 17
17 18
18 19
19 20
20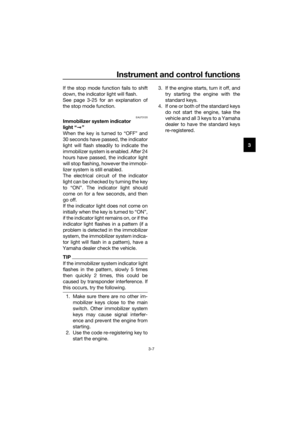 21
21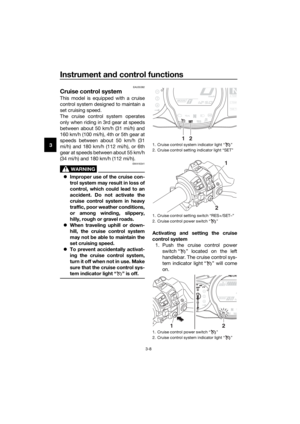 22
22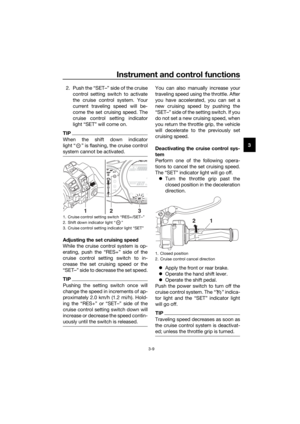 23
23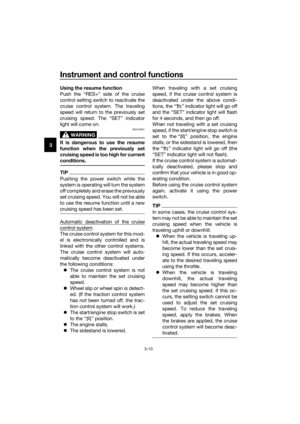 24
24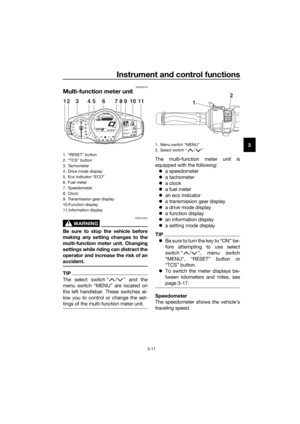 25
25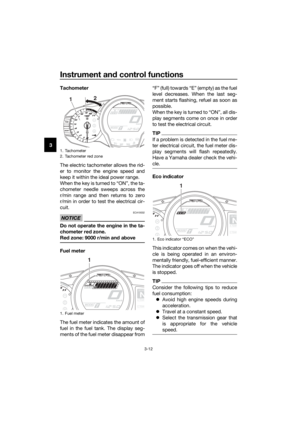 26
26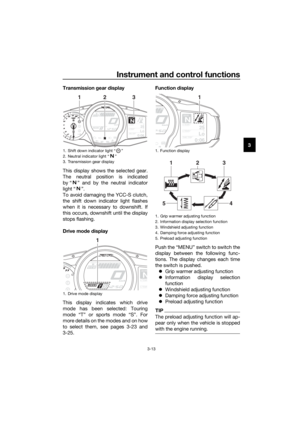 27
27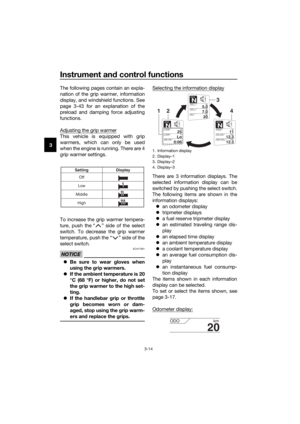 28
28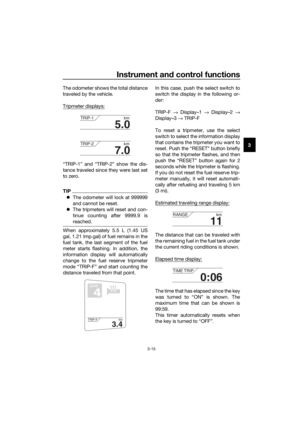 29
29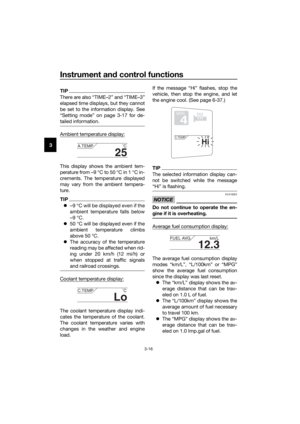 30
30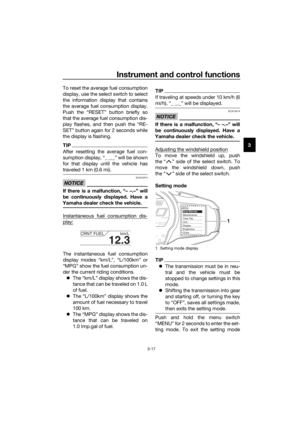 31
31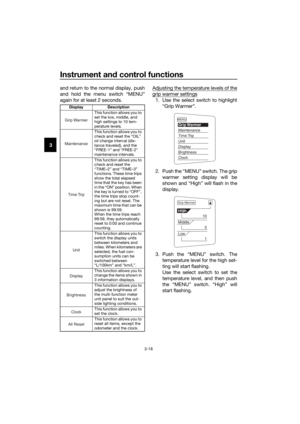 32
32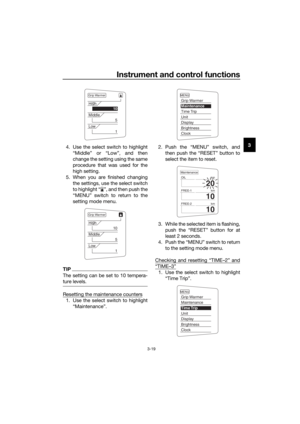 33
33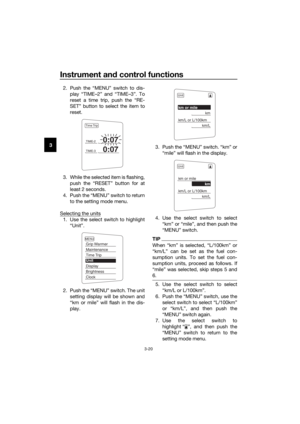 34
34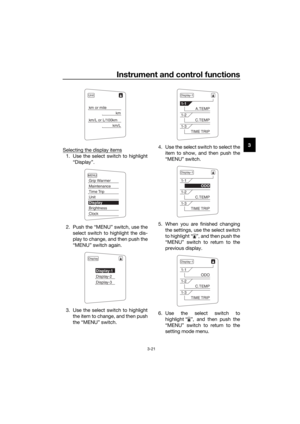 35
35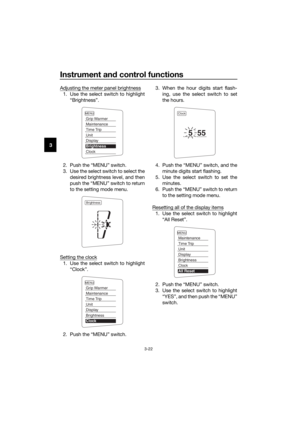 36
36 37
37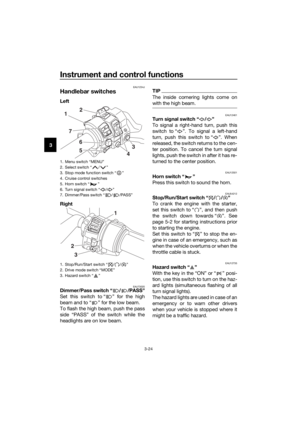 38
38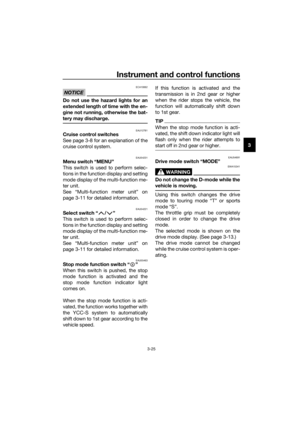 39
39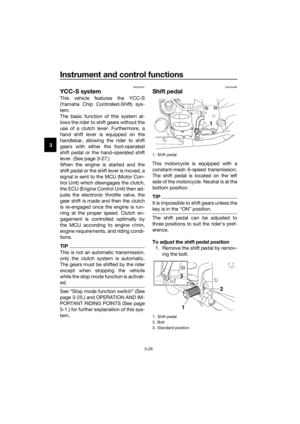 40
40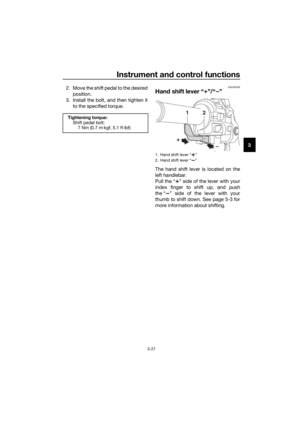 41
41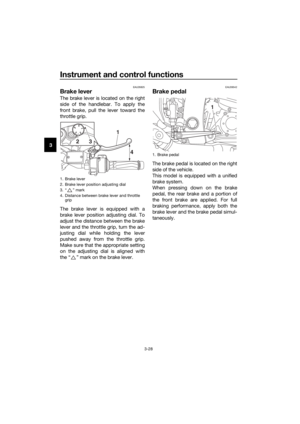 42
42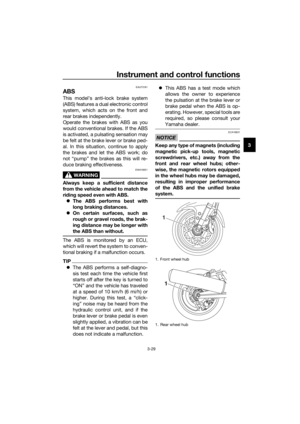 43
43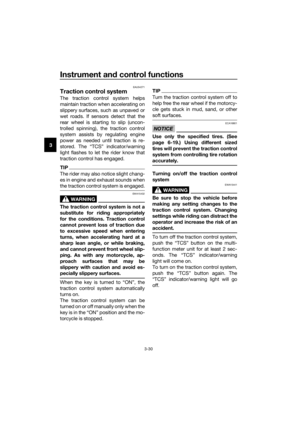 44
44 45
45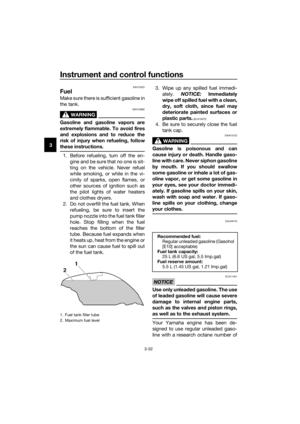 46
46 47
47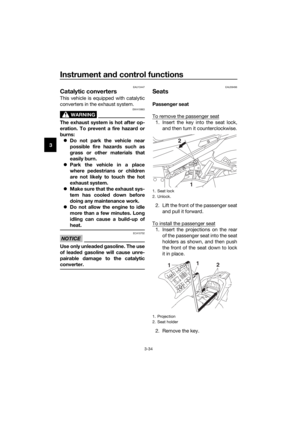 48
48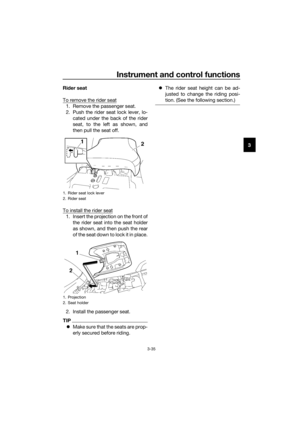 49
49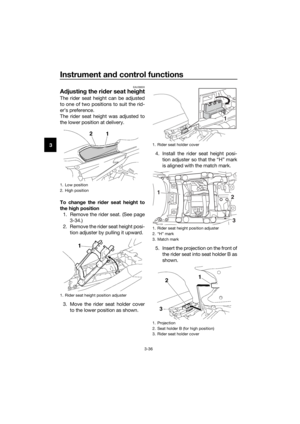 50
50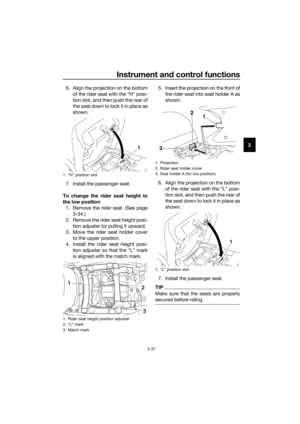 51
51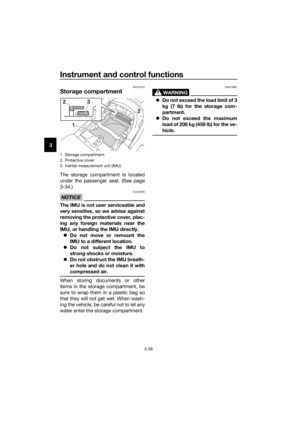 52
52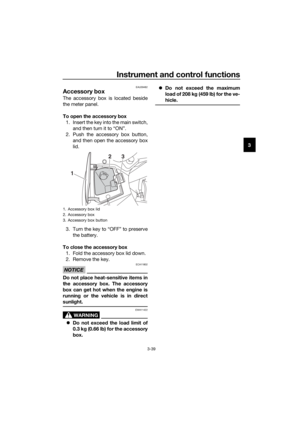 53
53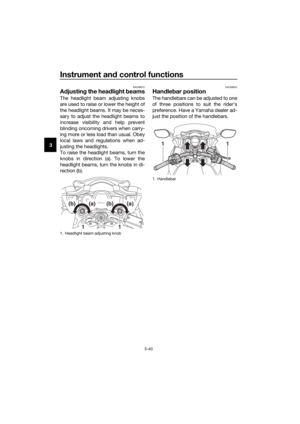 54
54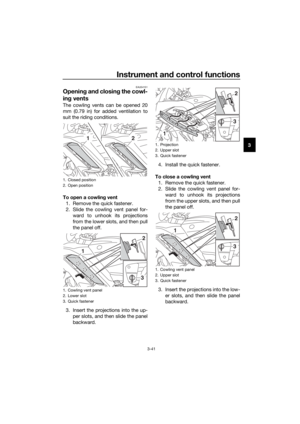 55
55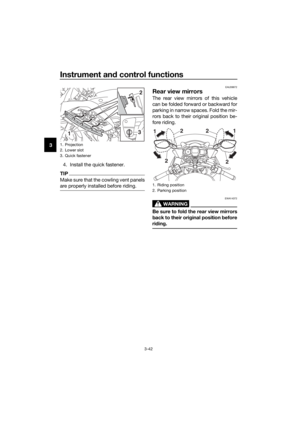 56
56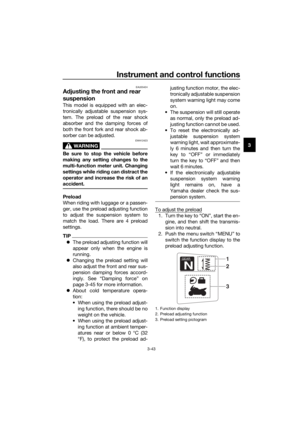 57
57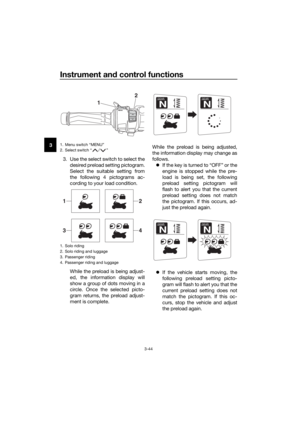 58
58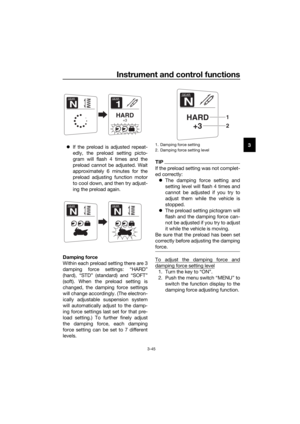 59
59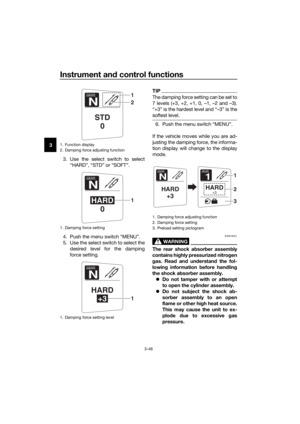 60
60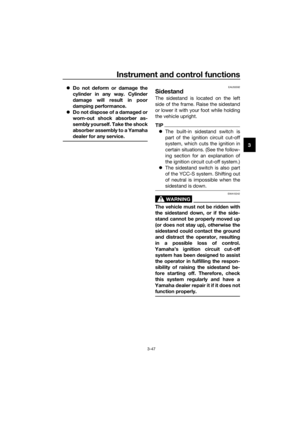 61
61 62
62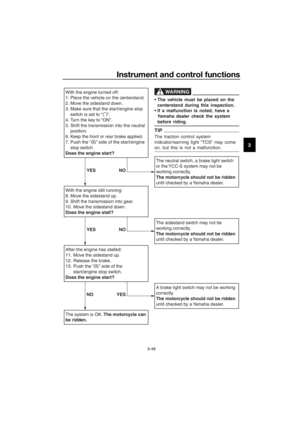 63
63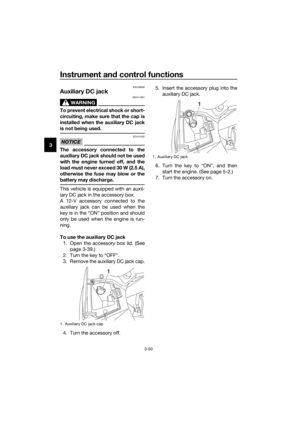 64
64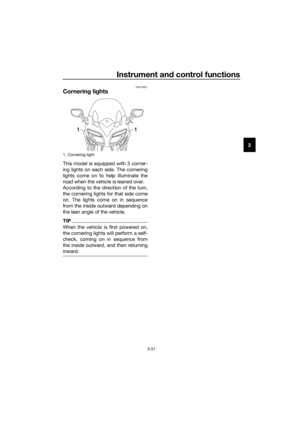 65
65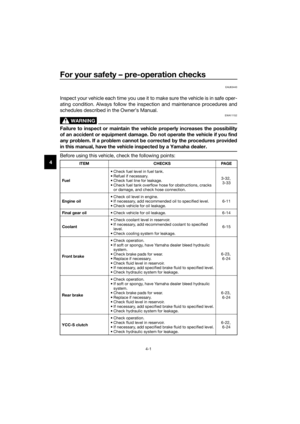 66
66 67
67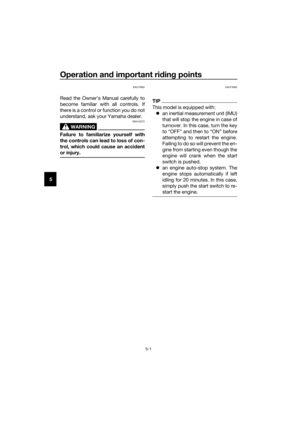 68
68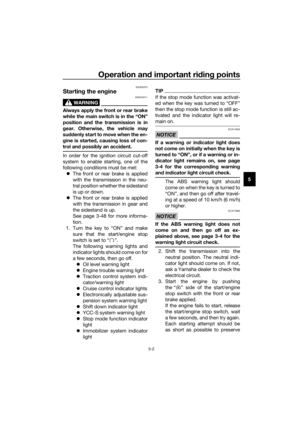 69
69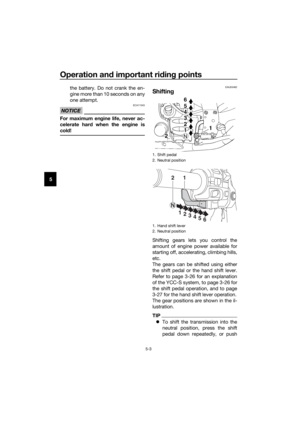 70
70 71
71 72
72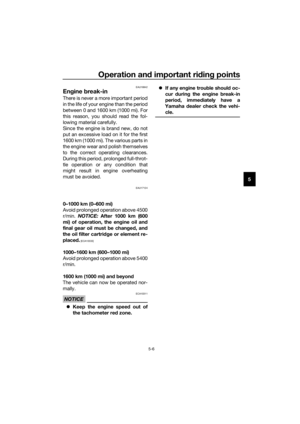 73
73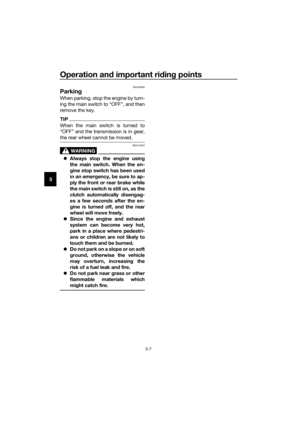 74
74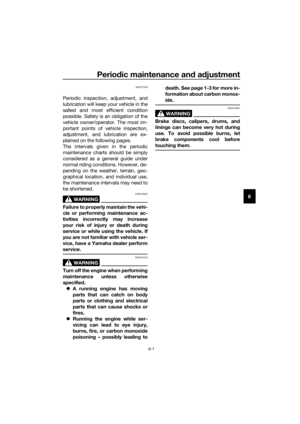 75
75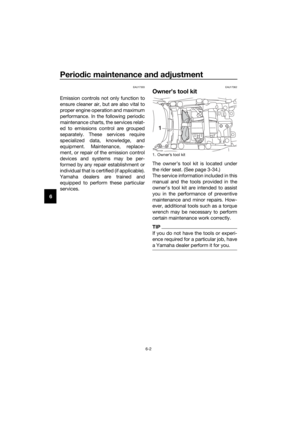 76
76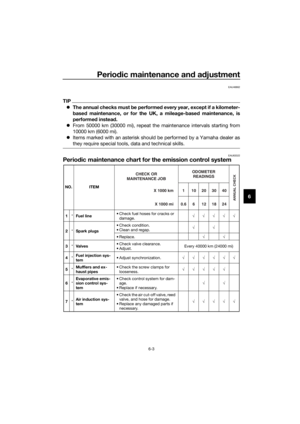 77
77 78
78 79
79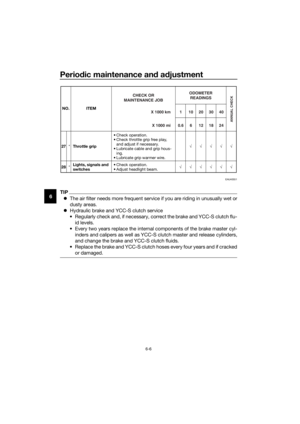 80
80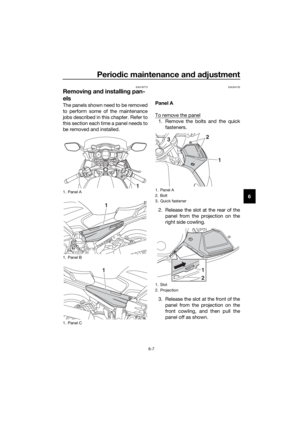 81
81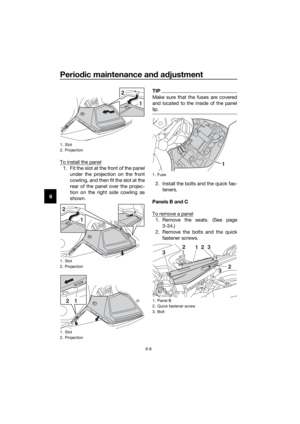 82
82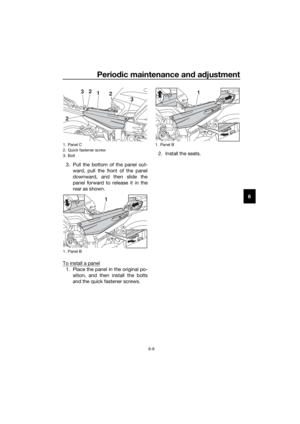 83
83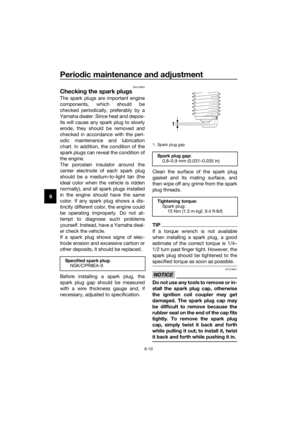 84
84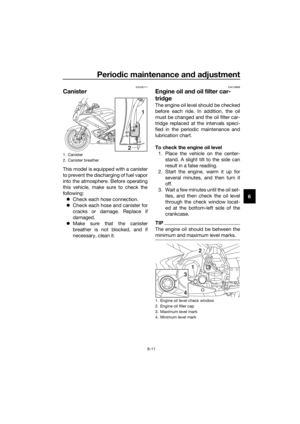 85
85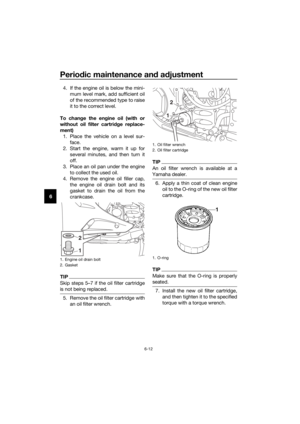 86
86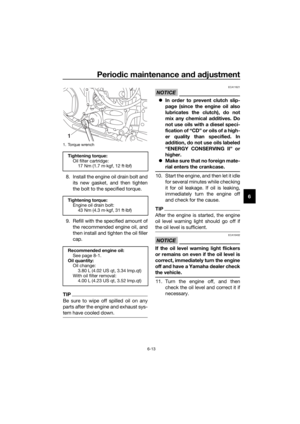 87
87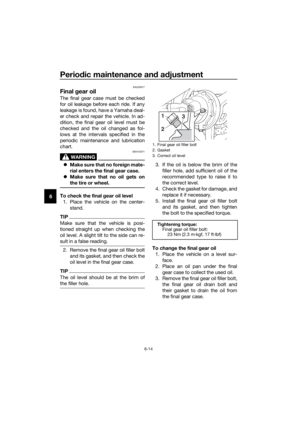 88
88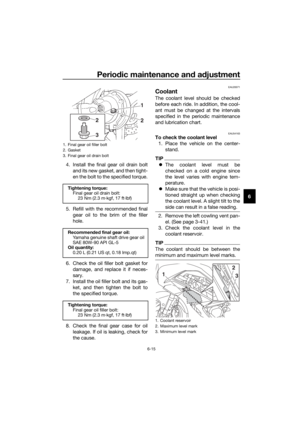 89
89 90
90 91
91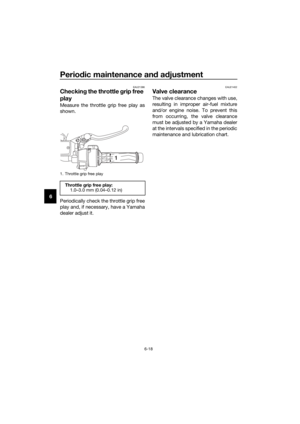 92
92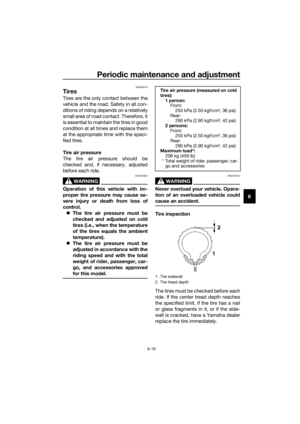 93
93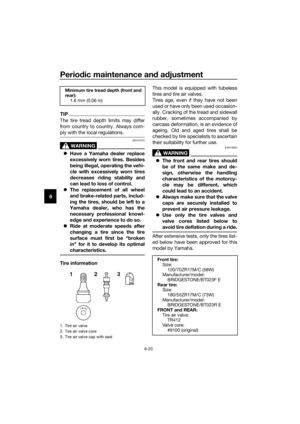 94
94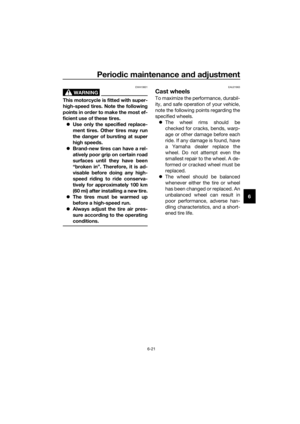 95
95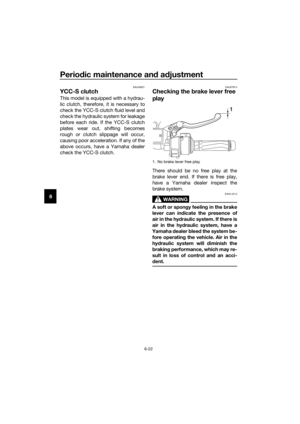 96
96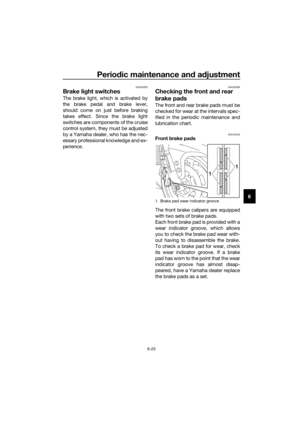 97
97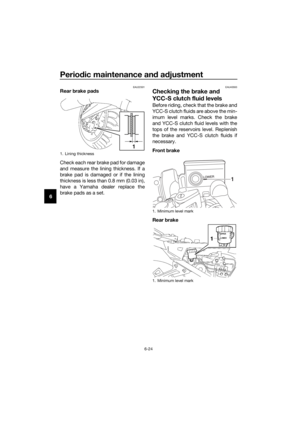 98
98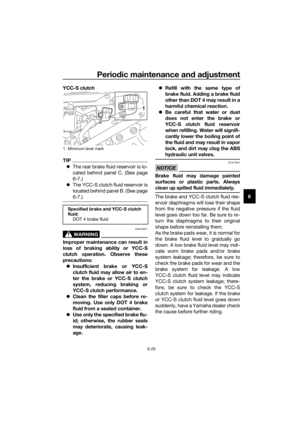 99
99 100
100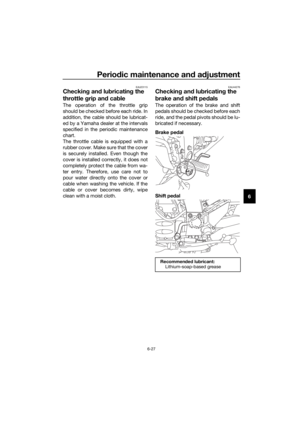 101
101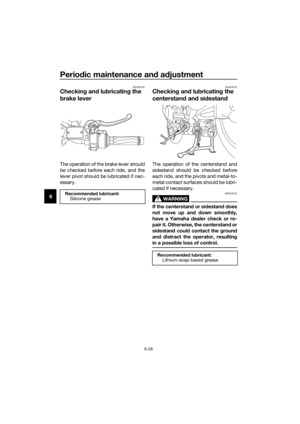 102
102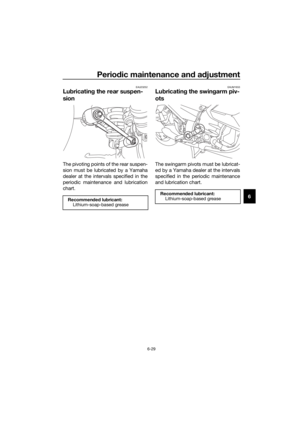 103
103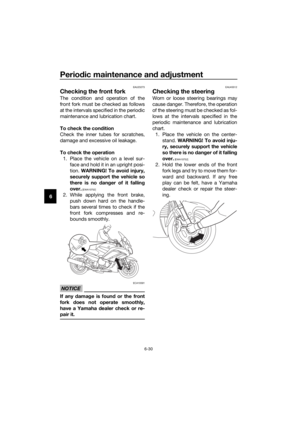 104
104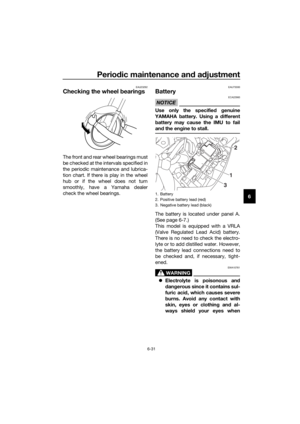 105
105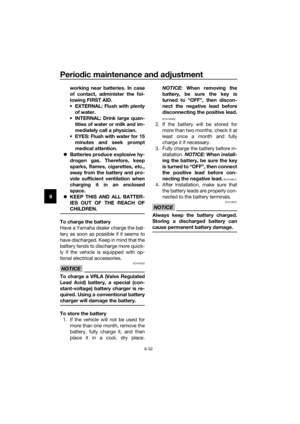 106
106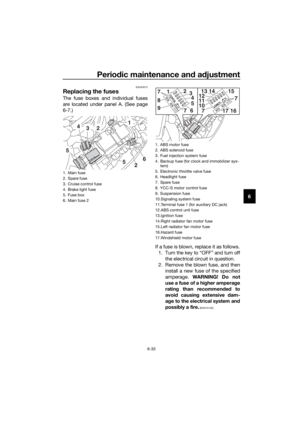 107
107 108
108 109
109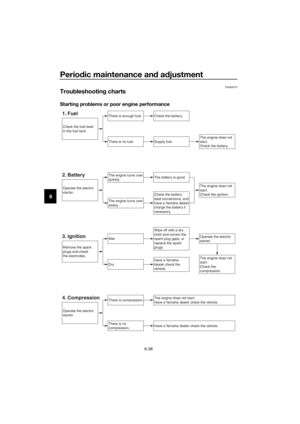 110
110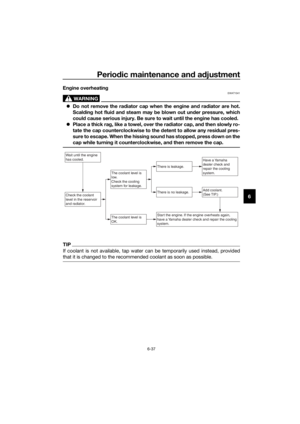 111
111 112
112 113
113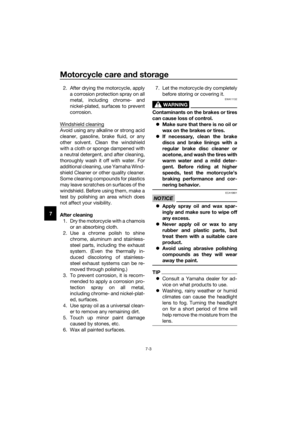 114
114 115
115 116
116 117
117 118
118 119
119 120
120 121
121 122
122 123
123 124
124 125
125