2016 VOLVO XC90 T8 key
[x] Cancel search: keyPage 249 of 546

LOCKS AND ALARM
}}
* Option/accessory, for more information, see Introduction.247
–Press the button14
on the lower edge of
the tailgate.
> The tailgate will close automatically but will not be locked .
–Press the button14
on the lower edge of
the tailgate.
> The tailgate will close automatically. The tailgate and doors will also be locked and
the alarm will be armed.
If the remote key is not close enough to the tail- gate, automatic locking/unlocking/opening/clos-ing will not be possible. Three short audible sig-nals will sound.
Interrupting opening/closing
–This can be done in five ways: • Press the button on the lighting panel
• Press the button on the remote key
• Press either of the buttons on the lower edge of the tailgate
• Press lightly on the rubber-covered buttonunder the tailgate's outside handle
• Move your foot under a sensor beneath the rear bumper
*
> The tailgate will stop moving
Programming the tailgate's maximum opening angle
The tailgate's maximum opening angle can be programmed, for example, if the tailgate has to beopened in a garage with a low ceiling. Programming the opening angle:
–Open the tailgate manually to the desired angle and press and hold the closing buttonon the tailgate's lower edge for at least 3seconds. Release the tailgate.
> Two audible signals will sound to indicate that the selected opening angle has been stored.
Erasing tailgate programming
–Open the tailgate manually to its highest position and press and hold the closing but-ton on the tailgate's lower edge for at least 3seconds. Release the tailgate.
> Two audible signals will sound to indicate that the programmed opening angle has been erased.
NOTE
If the tailgate has been opened and closed continuously too long, the automatic functionwill be deactivated to avoid overloading theelectrical system. The automatic function canbe used again after approximately 2 minutes. If the vehicle's battery has been discharged or disconnected, or if the tailgate has been openfor more than 24 hours, the tailgate must beopened and closed once manually to resetthe system.
Pinch protectionIf the tailgate is obstructed when being opened/ closed, a pinch protection mechanism is acti-vated.
• While opening: the tailgate will stop moving and an audible signal will sound.
• While closing: the tailgate will stop andreturn to the maximum programmable open-ing position. An audible signal will sound.
WARNING
Be sure that no one is near the tailgate when it is opened or closed automatically. The tail-gate should never be obstructed in any waywhen it is operated.
14
Models equipped with the optional Passive Entry system have a button to close the tailgate and a button to close and lock the tailgate.
Page 250 of 546

||
LOCKS AND ALARM
* Option/accessory, for more information, see Introduction.
248
Related information
• Remote key's range (p. 235)
• Locking/unlocking from outside the vehicle (p. 243)
• Foot movement tailgate operation
* (p. 238)
Locking/unlocking with the detachable key blade
The detachable key blade can be used to e.g., unlock the driver's door from the outside if, forexample, the remote key's battery is weak.
Unlocking
Pull out the driver's door handle as far as possible to access the lock cylinder.
Remove the key blade from the remote key and insert it into the lock cylinder.
Turn it clockwise 45 degrees so that the key blade points straight rearward.
Turn the key blade back 45 degrees to its original position. Remove the key blade fromthe lock cylinder and release the door han-dle.
5. Pull the door handle again to open the door. > This will trigger the alarm. Lock the door in the same way, but turn the keyin step 3 counterclockwise.
Turning off the alarm
Backup key reader under the tunnel console cup hold- ers
To turn off the alarm:
1. Place the remote key in the cup holder (on
the key symbol) in the tunnel console (see the illustration).
2. Turn the start knob to START and release it.
> The start knob will return to its original position and the alarm will be turned off.
LockingIf necessary, the vehicle can be locked by insert-ing the detachable key blade into the lock cylin-der in the driver's door. Each of the other doors has a lock mechanism that must be pressed in using the key blade sothat the door cannot be opened from the outside.The doors can still be opened from the inside.
Page 251 of 546
LOCKS AND ALARM
249
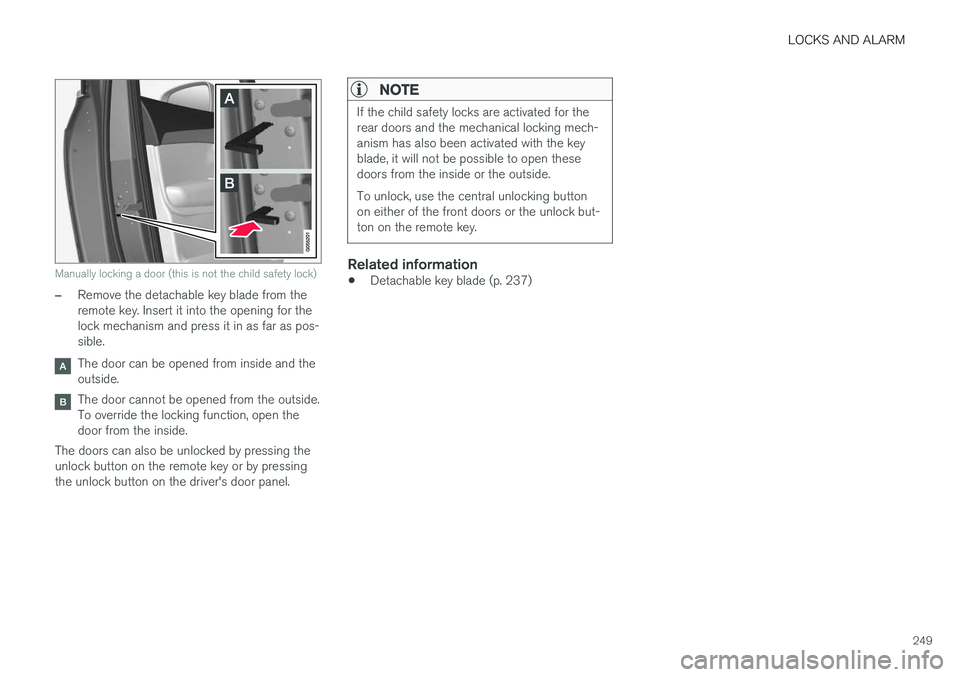
Manually locking a door (this is not the child safety lock)
–Remove the detachable key blade from the remote key. Insert it into the opening for thelock mechanism and press it in as far as pos-sible.
The door can be opened from inside and the outside.
The door cannot be opened from the outside. To override the locking function, open thedoor from the inside.
The doors can also be unlocked by pressing theunlock button on the remote key or by pressingthe unlock button on the driver's door panel.
NOTE
If the child safety locks are activated for the rear doors and the mechanical locking mech-anism has also been activated with the keyblade, it will not be possible to open thesedoors from the inside or the outside. To unlock, use the central unlocking button on either of the front doors or the unlock but-ton on the remote key.
Related information
• Detachable key blade (p. 237)
Page 264 of 546
||
DRIVER SUPPORT
* Option/accessory, for more information, see Introduction.
262
NOTE
Before CC can be activated, the vehicle's speed must be at least 20 mph (30 km/h).This is also the lowest speed that can be set.
Activating CC (putting it in active mode and setting a speed)
–With the symbol displayed (CC is in
standby mode), press the
button (2) on
the left-side steering wheel keypad.
> This puts CC in active mode and will maintain the vehicle's current speed.
Related information
• Cruise Control (CC) (p. 261)
• Switching between Cruise Control (CC) and Adaptive Cruise Control (ACC)
* (p. 265)
• Deactivating/resuming Cruise Control (CC) (p. 263)
• Turning Cruise Control off (p. 264)
Changing Cruise Control speed
Changing a set speed
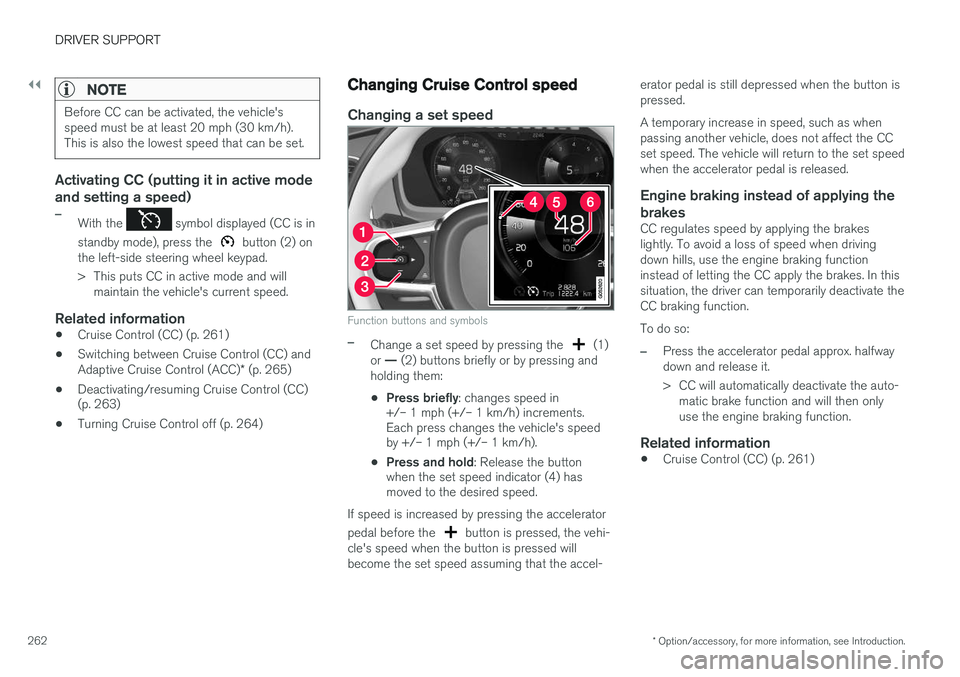
Function buttons and symbols
–Change a set speed by pressing the (1)
or — (2) buttons briefly or by pressing and
holding them:
• Press briefly
: changes speed in
+/– 1 mph (+/– 1 km/h) increments. Each press changes the vehicle's speedby +/– 1 mph (+/– 1 km/h).
• Press and hold
: Release the button
when the set speed indicator (4) hasmoved to the desired speed.
If speed is increased by pressing the accelerator pedal before the
button is pressed, the vehi-
cle's speed when the button is pressed will become the set speed assuming that the accel- erator pedal is still depressed when the button ispressed. A temporary increase in speed, such as when passing another vehicle, does not affect the CCset speed. The vehicle will return to the set speedwhen the accelerator pedal is released.
Engine braking instead of applying the
brakes
CC regulates speed by applying the brakeslightly. To avoid a loss of speed when drivingdown hills, use the engine braking functioninstead of letting the CC apply the brakes. In thissituation, the driver can temporarily deactivate theCC braking function. To do so:
–Press the accelerator pedal approx. halfway down and release it.
> CC will automatically deactivate the auto- matic brake function and will then only use the engine braking function.
Related information
• Cruise Control (CC) (p. 261)
Page 266 of 546
||
DRIVER SUPPORT
264
–Press the button (2).
> The set speed marker (4) and symbols will change colors from GRAY to WHITE. CC will then set and maintain the vehicle's current speed.
Related information
•Cruise Control (CC) (p. 261)
• Starting and activating Cruise Control (p. 261)
Turning Cruise Control off
Cruise Control (CC) can be deactivated (turned off).
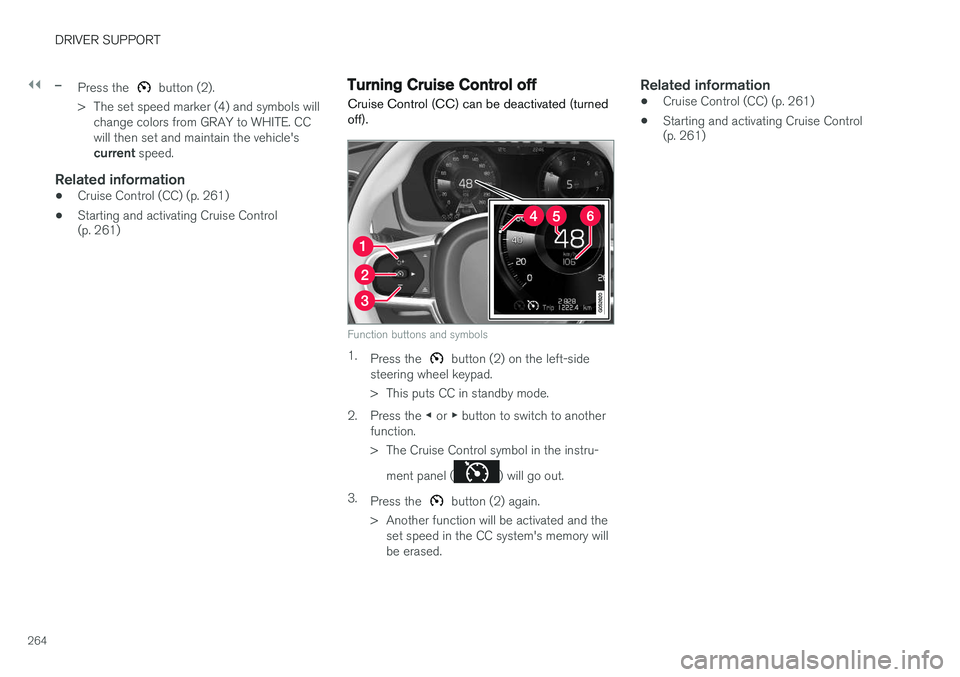
Function buttons and symbols
1. Press the button (2) on the left-side
steering wheel keypad.
> This puts CC in standby mode.
2. Press the ◀ or ▶ button to switch to another
function.
> The Cruise Control symbol in the instru-
ment panel (
) will go out.
3. Press the
button (2) again.
> Another function will be activated and the set speed in the CC system's memory will be erased.
Related information
• Cruise Control (CC) (p. 261)
• Starting and activating Cruise Control (p. 261)
Page 267 of 546
DRIVER SUPPORT
* Option/accessory, for more information, see Introduction.265
Switching between Cruise Control (CC) and Adaptive Cruise Control (ACC)*
In models equipped with the optional ACC, the driver can toggle between CC and ACC.
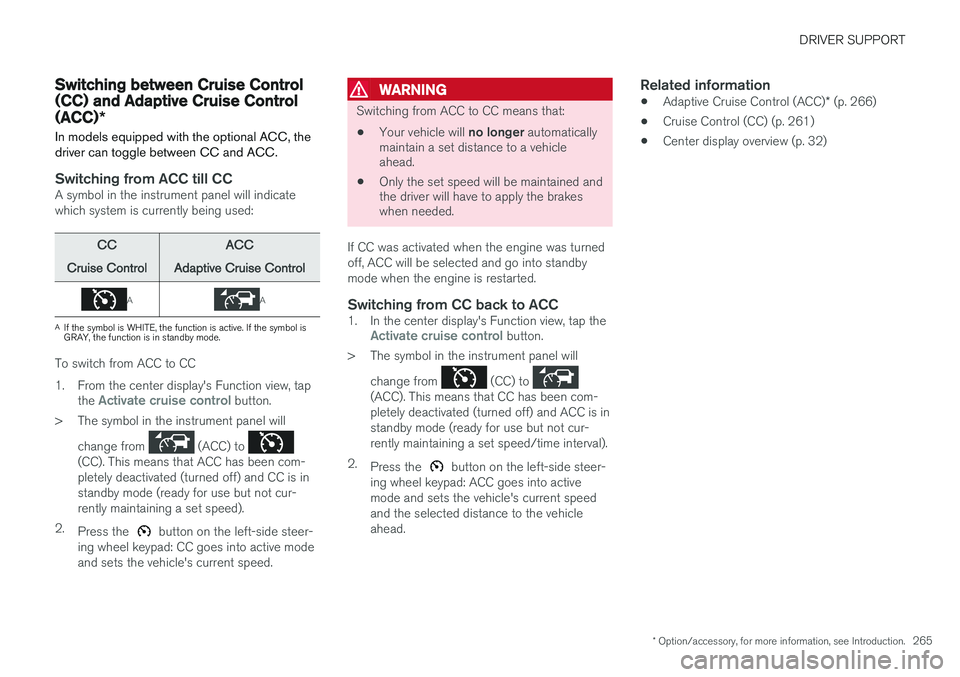
Switching from ACC till CCA symbol in the instrument panel will indicate which system is currently being used:
CC
Cruise ControlACC
Adaptive Cruise Control
AA
A If the symbol is WHITE, the function is active. If the symbol is GRAY, the function is in standby mode.
To switch from ACC to CC
1. From the center display's Function view, tap
the
Activate cruise control button.
> The symbol in the instrument panel will
change from
(ACC) to (CC). This means that ACC has been com- pletely deactivated (turned off) and CC is instandby mode (ready for use but not cur-rently maintaining a set speed).
2. Press the
button on the left-side steer-
ing wheel keypad: CC goes into active mode and sets the vehicle's current speed.
WARNING
Switching from ACC to CC means that:
• Your vehicle will
no longer automatically
maintain a set distance to a vehicle ahead.
• Only the set speed will be maintained andthe driver will have to apply the brakeswhen needed.
If CC was activated when the engine was turned off, ACC will be selected and go into standbymode when the engine is restarted.
Switching from CC back to ACC1. In the center display's Function view, tap theActivate cruise control button.
> The symbol in the instrument panel will
change from
(CC) to (ACC). This means that CC has been com- pletely deactivated (turned off) and ACC is instandby mode (ready for use but not cur-rently maintaining a set speed/time interval).
2. Press the
button on the left-side steer-
ing wheel keypad: ACC goes into active mode and sets the vehicle's current speedand the selected distance to the vehicleahead.
Related information
• Adaptive Cruise Control (ACC)
* (p. 266)
• Cruise Control (CC) (p. 261)
• Center display overview (p. 32)
Page 271 of 546
DRIVER SUPPORT
}}
* Option/accessory, for more information, see Introduction.269
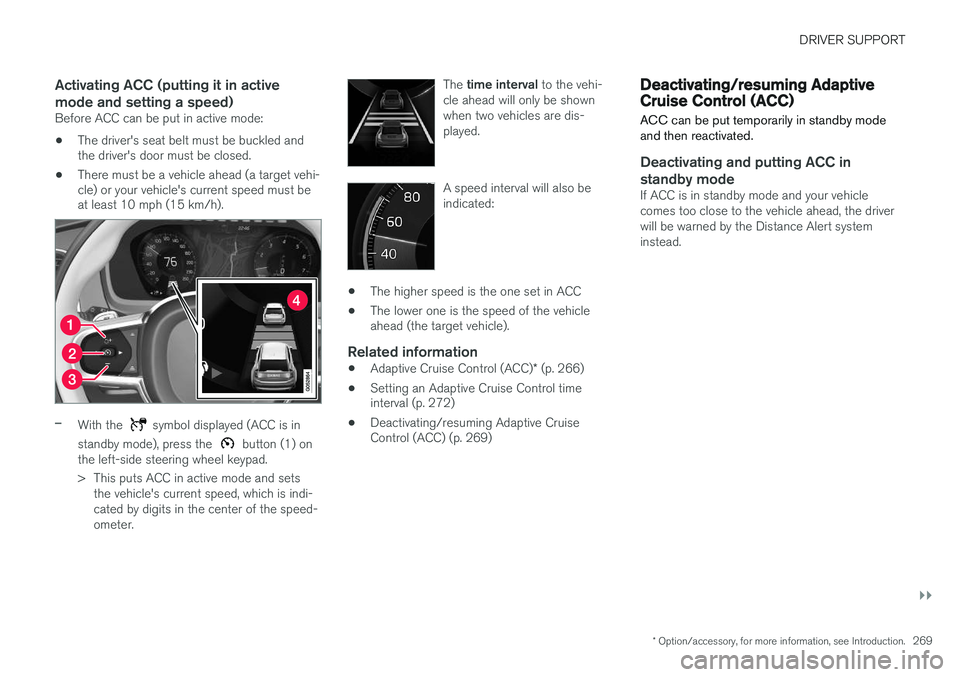
Activating ACC (putting it in active mode and setting a speed)
Before ACC can be put in active mode:
• The driver's seat belt must be buckled and the driver's door must be closed.
• There must be a vehicle ahead (a target vehi-cle) or your vehicle's current speed must beat least 10 mph (15 km/h).
–With the symbol displayed (ACC is in
standby mode), press the
button (1) on
the left-side steering wheel keypad.
> This puts ACC in active mode and sets the vehicle's current speed, which is indi- cated by digits in the center of the speed-ometer. The
time interval to the vehi-
cle ahead will only be shownwhen two vehicles are dis-played.
A speed interval will also be indicated:
• The higher speed is the one set in ACC
• The lower one is the speed of the vehicle ahead (the target vehicle).
Related information
•
Adaptive Cruise Control (ACC)
* (p. 266)
• Setting an Adaptive Cruise Control timeinterval (p. 272)
• Deactivating/resuming Adaptive CruiseControl (ACC) (p. 269)
Deactivating/resuming Adaptive Cruise Control (ACC)
ACC can be put temporarily in standby mode and then reactivated.
Deactivating and putting ACC in standby mode
If ACC is in standby mode and your vehicle comes too close to the vehicle ahead, the driverwill be warned by the Distance Alert systeminstead.
Page 276 of 546

||
DRIVER SUPPORT
274
WARNING
•Pilot Assist is designed to be a supple- mentary driving aid and cannot cover alldriving situations, traffic, weather and/orroad conditions.
• The driver should be familiar with all ofthe information in this article regardingPilot Assist, including its limitations.
• Pilot Assist is not intended to replace thedriver's attention and judgement.
• Pilot Assist must only be used wherethere are clearly visible traffic lane sidemarker lines on both sides of the currenttraffic lane. In other circumstances thereis an increased risk of collision with sur-rounding obstacles that are not detectedby the system.
• The driver is always responsible for steer-ing the vehicle and maintaining a suitablespeed and distance to the vehicle aheadand must intervene if necessary, even ifPilot Assist is being used.
Pilot Assist is designed to regulate speed smoothly but in situations calling for fast braking,the driver must apply the brakes. This applies tosituations where there are considerable differen-ces in speed or if the vehicle ahead brakes sud-denly. Due to the limitations of the camera andradar sensor, the system may apply the brakes inyour vehicle suddenly or not at all. The default speed for Pilot Assist is preset toapprox. 30 mph (50 km/h) and cannot bechanged. If the vehicle ahead increases speed toover 30 mph (50 km/h) and pulls away from yourvehicle, Pilot Assist will go into standby mode.
NOTE
•
Pilot Assist maintenance should only be carried out by a trained and qualifiedVolvo service technician.
• Pilot Assist regulates your vehicle'sspeed using the accelerator pedal andthe brakes. Please be aware that theremay be a faint sound from the brakeswhen the system is using them.
WARNING
•Pilot Assist does not react to people or animals, or small vehicles such as bicy-cles and motorcycles. It also does notreact to low trailers, slow moving, parkedor approaching vehicles, or stationaryobjects.
• Do not use Pilot Assist in demandingdriving conditions such as city driving orother heavy traffic situations, in slipperyconditions, when there is a great deal ofwater or slush on the road, during heavyrain or snow, in poor visibility, on windingroads or on highway on- or off-ramps.
Pilot Assist overview
Controls
Function buttons and symbols
[]: Press to activate Pilot Assist or put it
in standby mode
Arrow key [ < ]: change from Pilot Assist to
Adaptive Cruise Control (symbol (6) will also change)
Reduce the distance (time interval) to the vehicle ahead
Arrow key [ > ]: change from Adaptive Cruise
Control to Pilot Assist (symbol (6) will also change)
Increase the distance (time interval) to the vehicle ahead
Function symbols