2016 VOLVO XC90 T8 change wheel
[x] Cancel search: change wheelPage 453 of 546

WHEELS AND TIRES
}}
451
Snow tires and chains
The use of snow chains and/or winter tires can help improve traction in winter driving conditions.
Snow chains can be used on your Volvo with the following restrictions:
• Snow chains should be installed on front wheels only. Use only Volvo approved snowchains.
• If accessory, aftermarket or "custom" tiresand wheels are installed and are of a size dif-ferent than the original tires and wheels,chains in some cases CANNOT be used.Sufficient clearances between chains andbrakes, suspension and body componentsmust be maintained.
• Some strap-on type chains will interfere withbrake components and therefore CANNOTbe used.
• All Wheel Drive models
: Snow chains
should only be installed on the front wheels.
• Certain size tires may not allow the assemblyof snow chains/traction devices.
Consult your Volvo retailer for additional snow chain information.
CAUTION
• Snow chains should not be used on wheels larger than 19".
• Always follow the chain manufacturer'sinstallation instructions carefully. Installchains as tightly as possible andretighten periodically.
• Check local regulations regarding the useof snow chains before installing.
• Use single-sided snow chains only.
• Never exceed the chain manufacturer'sspecified maximum speed limit. (Underno circumstances should you exceed31 mph (50 km/h).
• Avoid bumps, holes or sharp turns whendriving with snow chains.
• The handling of the vehicle can beadversely affected when driving withchains. Avoid fast or sharp turns as wellas locked wheel braking.
Checking tire inflation pressure
Correct tire inflation pressure helps improve driv- ing stability, save fuel and increase the servicelife of the tires.
WARNING
• Under-inflation is the most common cause of tire failure and may result insevere tire cracking, tread separation, or"blow-out," with unexpected loss of vehi-cle control and increased risk of injury.
• Under-inflated tires reduce the load car-rying capacity of your vehicle.
Cold tiresInflation pressure should be checked when the tires are cold. The tires are considered to be cold when they have the same temperature as the sur-rounding (ambient) air. This temperature is normally reached after the vehicle has been parked for at least 3 hours. After driving a distance of approximately 1 mile (1.6 km), the tires are considered to be hot. If youhave to drive farther than this distance to pumpyour tire(s), check and record the tire pressurefirst and add the appropriate air pressure whenyou get to the pump. When weather temperature changes occur, tire inflation pressures also change. A 10-degree
Page 454 of 546

||
WHEELS AND TIRES
452temperature drop causes a corresponding drop of 1 psi (7 kPa) in inflation pressure. Check yourtire pressures frequently and adjust them to theproper pressure, which can be found on the vehi-cle's tire information placard or certification label. If checking tire pressure when the tire is hot, never "bleed" or reduce air pressure. The tiresare hot from driving and it is normal for pressuresto increase above recommended cold pressures.A hot tire at or below recommended cold inflationpressure could be significantly under-inflated.
Recommended inflation pressures
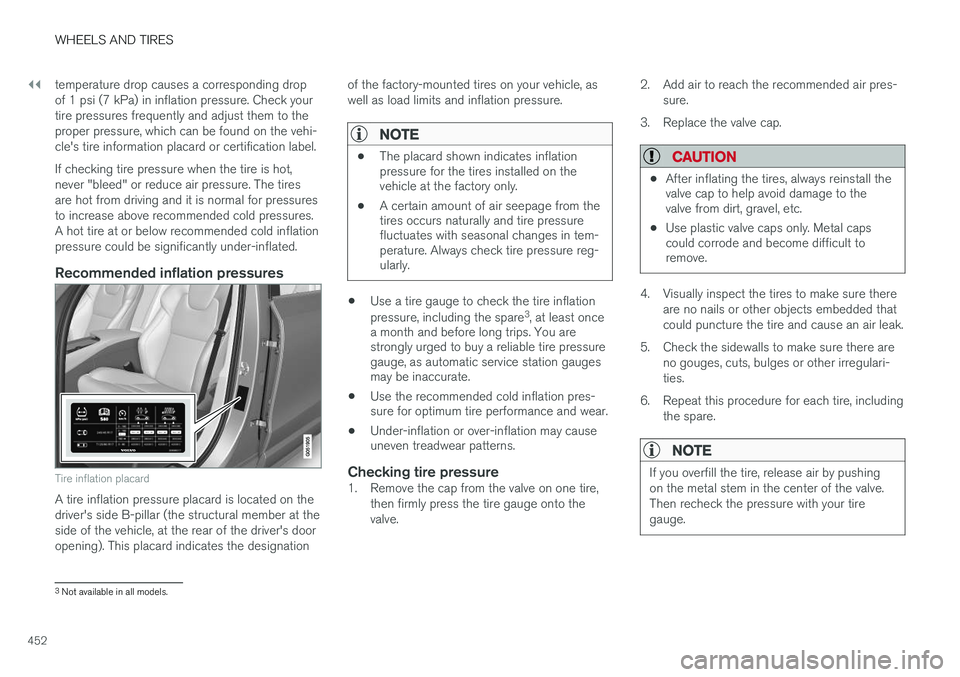
Tire inflation placard
A tire inflation pressure placard is located on the driver's side B-pillar (the structural member at theside of the vehicle, at the rear of the driver's dooropening). This placard indicates the designation
of the factory-mounted tires on your vehicle, aswell as load limits and inflation pressure.
NOTE
•
The placard shown indicates inflation pressure for the tires installed on thevehicle at the factory only.
• A certain amount of air seepage from thetires occurs naturally and tire pressurefluctuates with seasonal changes in tem-perature. Always check tire pressure reg-ularly.
•Use a tire gauge to check the tire inflation pressure, including the spare 3
, at least once
a month and before long trips. You are strongly urged to buy a reliable tire pressuregauge, as automatic service station gaugesmay be inaccurate.
• Use the recommended cold inflation pres-sure for optimum tire performance and wear.
• Under-inflation or over-inflation may causeuneven treadwear patterns.
Checking tire pressure1. Remove the cap from the valve on one tire,
then firmly press the tire gauge onto the valve. 2. Add air to reach the recommended air pres-
sure.
3. Replace the valve cap.
CAUTION
• After inflating the tires, always reinstall the valve cap to help avoid damage to thevalve from dirt, gravel, etc.
• Use plastic valve caps only. Metal capscould corrode and become difficult toremove.
4. Visually inspect the tires to make sure there
are no nails or other objects embedded that could puncture the tire and cause an air leak.
5. Check the sidewalls to make sure there are no gouges, cuts, bulges or other irregulari-ties.
6. Repeat this procedure for each tire, including the spare.
NOTE
If you overfill the tire, release air by pushing on the metal stem in the center of the valve.Then recheck the pressure with your tiregauge.
3Not available in all models.
Page 458 of 546

||
WHEELS AND TIRES
4567. When hoisting the vehicle, it is essential that
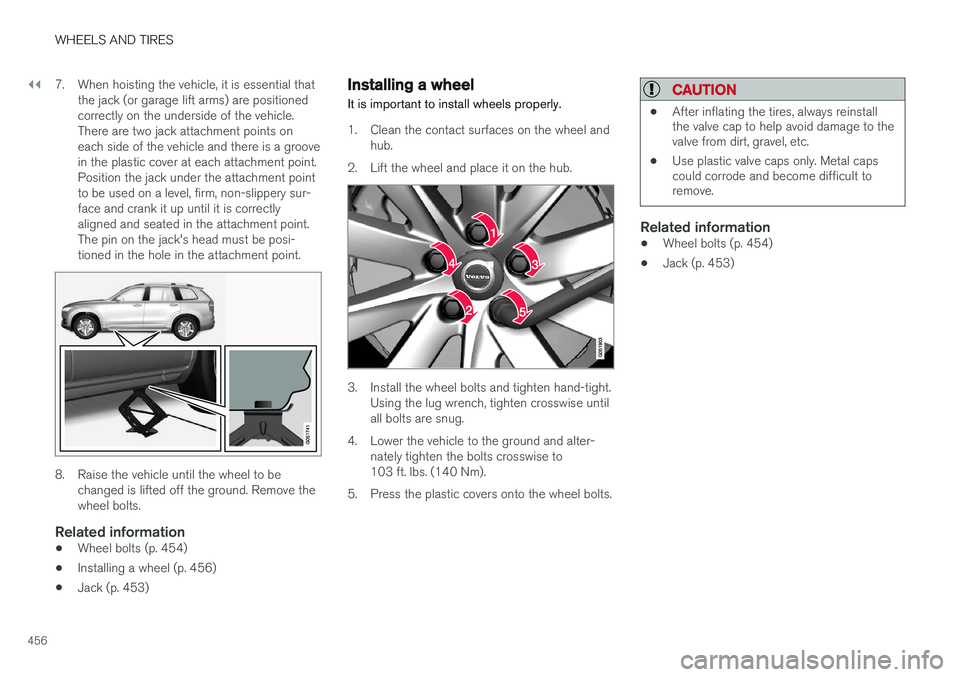
the jack (or garage lift arms) are positioned correctly on the underside of the vehicle.There are two jack attachment points oneach side of the vehicle and there is a groovein the plastic cover at each attachment point.Position the jack under the attachment pointto be used on a level, firm, non-slippery sur-face and crank it up until it is correctlyaligned and seated in the attachment point.The pin on the jack's head must be posi-tioned in the hole in the attachment point.
8. Raise the vehicle until the wheel to be changed is lifted off the ground. Remove the wheel bolts.
Related information
• Wheel bolts (p. 454)
• Installing a wheel (p. 456)
• Jack (p. 453)
Installing a wheel
It is important to install wheels properly.
1. Clean the contact surfaces on the wheel and hub.
2. Lift the wheel and place it on the hub.
3. Install the wheel bolts and tighten hand-tight. Using the lug wrench, tighten crosswise until all bolts are snug.
4. Lower the vehicle to the ground and alter- nately tighten the bolts crosswise to103 ft. lbs. (140 Nm).
5. Press the plastic covers onto the wheel bolts.
CAUTION
• After inflating the tires, always reinstall the valve cap to help avoid damage to thevalve from dirt, gravel, etc.
• Use plastic valve caps only. Metal capscould corrode and become difficult toremove.
Related information
•Wheel bolts (p. 454)
• Jack (p. 453)
Page 460 of 546

||
WHEELS AND TIRES
458If a spare wheel or other wheel without a TPMS sensor is used, a fault message will appear in theinstrument panel after driving for a few minutes. After changing wheels, always check that the new wheels have TPMS sensors to avoid a sys-tem malfunction warning. TPMS does not replace the need for regular tire inspection and maintenance.
RecommendationsTPMS sensors should be mounted on all wheelsused with the vehicle, including winter wheels.
NOTE
•
If you change to tires with a different dimension than the factory-installed ones,the TPMS system must be reconfiguredfor these tires. This must be done by atrained and qualified Volvo service techni-cian.
• If a tire is changed, or if the TPMS sensoris moved to another wheel, the rubbervalve and valve core should be replaced.
• When installing TPMS sensors, the vehi-cle must be parked for at least15 minutes with the ignition off. If thevehicle is driven within 15 minutes, aTPMS error message will be displayed.
WARNING
Incorrect inflation pressure could lead to tire failure, resulting in a loss of control of thevehicle.
Turning TPMS off 4TPMS can be turned off in the center display's Top view.
1. Park the vehicle and turn off the engine.2.
Activate ignition mode I.
3. Select
SettingsMy CarIntelliSafe
Tire Pressure Monitor in the Top view
and deselect (tap) the button.
> The function will remain off until it is reac- tivated.
Related information
• Checking inflation pressure (p. 458)
• Reinflating tires equipped with the Tire Pressure Monitoring System (TPMS)(p. 459)
• Tire Pressure Monitoring System type appro-val (p. 461)
• Ignition modes (p. 370)
Checking inflation pressure The Tire Pressure Monitoring System makes it possible to view the current inflation pressure ofall four tires.
Checking inflation pressureOpen the Car status app in
the center display's Application view. Tap
Status to see the
current inflation pressure of all four tires.
The on-screen graphic displays the inflation pres- sure.
The illustration is generic and may vary from model to model or after a software update
4 Certain markets only.
Page 461 of 546

WHEELS AND TIRES
}}
459
Color indications:
• No color indicator
: tire pressure is above
the threshold for a low inflation pressure warning.
• Yellow
: low tire pressure. Stop and check/
reinflate the tire(s) as soon as possible.
• Red
: inflation pressure is very low. Stop
immediately and check/reinflate the tire(s).
• When no tire pressure values or updated tirepressure values are shown then system hasnot learned the tire pressure values. It mightbe necessary to drive at a speed of at least20 mph (30 km/h) for several minutes.
• If the TPMS symbol (telltale) flashes forapprox. 1 minute then glows steadily, and the message
Tire pressure system Service
required is displayed: this indicates that the
system is not functioning correctly. Have it checked by a trained and qualified Volvoservice technician.
Please note that the sample tire pressures shown in the illustration are in bar. The unit ofmeasure can be changed (e.g., to pound perscare inch (psi) in the center display's Settings menu, under
SystemUnitsTire Pressure.
Tire Pressure Monitoring System settings
The unit of measure for tire inflation pressure can be changed in the center display's Top view by selecting
SettingsSystemUnitsTire
Pressure and tapping the desired unit.
Related information
• Calibrating the Tire Pressure Monitoring System (TPMS) (p. 460)
• Reinflating tires equipped with the TirePressure Monitoring System (TPMS)(p. 459)
• Tire Pressure Monitoring System (TPMS)(p. 457)
Reinflating tires equipped with the Tire Pressure Monitoring System(TPMS) When low tire pressure has been detected, a message will be displayed in the instrumentpanel and the Tire Pressure Monitoring Systemsymbol will illuminate.
SymbolExplanation
Check and reinflate the tire(s) when the TPMS symbol illuminatesand a message is displayed.
1. Use a tire pressure gauge to check the infla-
tion pressure of the under-inflated tire(s).
2. Re-inflate the tire(s) to the correct pressure (consult the tire pressure placard located on the driver's side B-pillar (the structural mem-ber at the side of the vehicle, at the rear ofthe driver's door opening).
3. In some cases, it may be necessary to drive the vehicle for several minutes at a speed ofat least 20 mph (30 km/h) to erase theTPMS telltale warning and the text message.Please be aware that the TPMS telltalewarning will not go out until the low tire pres-sure has been corrected.
Page 463 of 546

WHEELS AND TIRES
}}
461
Tire Pressure Monitoring System type approval
NOTE
USA FCC ID: MRXVHSS4 Canada IC:2546A-VHSS4 M :VHSS4This device complies with part 15 of the FCC rules and with licence exempt RSS standardsof Industry Canada. Operation is subject to the following condi- tions: (1) This device may not cause harmful inter- ference, and (2) this device must accept any interference received, including interference that maycause undesired operation.
WARNING
Changes or modifications not expressively approved by the party responsible for compli-ance could void the user's authority to oper-ate the equipment. The term “IC:” before theradio certification number only signifies thatIndustry Canada technical specifications weremet.
Tire sealing system
The vehicle is equipped with a tire sealing sys- tem that enables you to temporarily seal a hole inthe tread surface and re-inflate a flat tire, or toadjust a tire
Page 536 of 546

INDEX
534Brake system
Brake pad inspection 347
fluid 528
general information 346, 348, 350
Bulbs 500 replacing 496
specifications 501
C
Cameradriver support systems 252
limitations 254
Camera, Park Assist 311, 313, 315, 316
Capacity weight 449, 525
Cargo area, steel grid 219
Cargo area cover 221Cargo compartment fuses 493
raising/lowering the level 215
Cargo net 217
Cargo space 208
Car wash 511
Catalytic converter 364CD, USB, iPod, AUX, Bluetooth, Recents, Library, Shuffle, Similar, Change device, Pri-
mary Audio Default Language, Subtitle, Pri- mary Subtitle Default Language, Video, DivX ® VOD 424
CD player 424 Cell phone hands-free 414
Pairing 415
Cell phone voice control 122 Center display changing settings 34
cleaning 515
keyboard 35
navigating in 42
overview 32
screen in the center console 49
symbols in the status bar 47
Chains 451
Changing a wheel 453Charging cable hybrid battery 375
Child restraints recalls and registration 70
Child restraint systems 70 booster cushions 77
convertible seats 74
infant seats 72
ISOFIX/LATCH anchors 78
top tether anchors 80Child safety 68booster cushions 77
child restraint systems 70, 79
convertible seats 74
infant seats 72
Child safety locks 228 Child seats lower attachment points 79
City safety 287, 293City Safety crossing traffic 291
detecting objects 290
limitations 293
rear collision warning 292
symbols and messages 297
troubleshooting 295
City Safety, On/Off 289 Cleaning exterior 511
interior 513
Clean Zone Interior Package 186
Climate system 188 air distribution 201, 202, 204
air filter 187
air vents 202
auto mode 187
blower 191
center display controls 189