Page 460 of 546

||
WHEELS AND TIRES
458If a spare wheel or other wheel without a TPMS sensor is used, a fault message will appear in theinstrument panel after driving for a few minutes. After changing wheels, always check that the new wheels have TPMS sensors to avoid a sys-tem malfunction warning. TPMS does not replace the need for regular tire inspection and maintenance.
RecommendationsTPMS sensors should be mounted on all wheelsused with the vehicle, including winter wheels.
NOTE
•
If you change to tires with a different dimension than the factory-installed ones,the TPMS system must be reconfiguredfor these tires. This must be done by atrained and qualified Volvo service techni-cian.
• If a tire is changed, or if the TPMS sensoris moved to another wheel, the rubbervalve and valve core should be replaced.
• When installing TPMS sensors, the vehi-cle must be parked for at least15 minutes with the ignition off. If thevehicle is driven within 15 minutes, aTPMS error message will be displayed.
WARNING
Incorrect inflation pressure could lead to tire failure, resulting in a loss of control of thevehicle.
Turning TPMS off 4TPMS can be turned off in the center display's Top view.
1. Park the vehicle and turn off the engine.2.
Activate ignition mode I.
3. Select
SettingsMy CarIntelliSafe
Tire Pressure Monitor in the Top view
and deselect (tap) the button.
> The function will remain off until it is reac- tivated.
Related information
• Checking inflation pressure (p. 458)
• Reinflating tires equipped with the Tire Pressure Monitoring System (TPMS)(p. 459)
• Tire Pressure Monitoring System type appro-val (p. 461)
• Ignition modes (p. 370)
Checking inflation pressure The Tire Pressure Monitoring System makes it possible to view the current inflation pressure ofall four tires.
Checking inflation pressureOpen the Car status app in
the center display's Application view. Tap
Status to see the
current inflation pressure of all four tires.
The on-screen graphic displays the inflation pres- sure.
The illustration is generic and may vary from model to model or after a software update
4 Certain markets only.
Page 461 of 546

WHEELS AND TIRES
}}
459
Color indications:
• No color indicator
: tire pressure is above
the threshold for a low inflation pressure warning.
• Yellow
: low tire pressure. Stop and check/
reinflate the tire(s) as soon as possible.
• Red
: inflation pressure is very low. Stop
immediately and check/reinflate the tire(s).
• When no tire pressure values or updated tirepressure values are shown then system hasnot learned the tire pressure values. It mightbe necessary to drive at a speed of at least20 mph (30 km/h) for several minutes.
• If the TPMS symbol (telltale) flashes forapprox. 1 minute then glows steadily, and the message
Tire pressure system Service
required is displayed: this indicates that the
system is not functioning correctly. Have it checked by a trained and qualified Volvoservice technician.
Please note that the sample tire pressures shown in the illustration are in bar. The unit ofmeasure can be changed (e.g., to pound perscare inch (psi) in the center display's Settings menu, under
SystemUnitsTire Pressure.
Tire Pressure Monitoring System settings
The unit of measure for tire inflation pressure can be changed in the center display's Top view by selecting
SettingsSystemUnitsTire
Pressure and tapping the desired unit.
Related information
• Calibrating the Tire Pressure Monitoring System (TPMS) (p. 460)
• Reinflating tires equipped with the TirePressure Monitoring System (TPMS)(p. 459)
• Tire Pressure Monitoring System (TPMS)(p. 457)
Reinflating tires equipped with the Tire Pressure Monitoring System(TPMS) When low tire pressure has been detected, a message will be displayed in the instrumentpanel and the Tire Pressure Monitoring Systemsymbol will illuminate.
SymbolExplanation
Check and reinflate the tire(s) when the TPMS symbol illuminatesand a message is displayed.
1. Use a tire pressure gauge to check the infla-
tion pressure of the under-inflated tire(s).
2. Re-inflate the tire(s) to the correct pressure (consult the tire pressure placard located on the driver's side B-pillar (the structural mem-ber at the side of the vehicle, at the rear ofthe driver's door opening).
3. In some cases, it may be necessary to drive the vehicle for several minutes at a speed ofat least 20 mph (30 km/h) to erase theTPMS telltale warning and the text message.Please be aware that the TPMS telltalewarning will not go out until the low tire pres-sure has been corrected.
Page 462 of 546

||
WHEELS AND TIRES
460
NOTE
To help avoid incorrect tire inflation pressure, if possible only inflate the tires when they arecold. The tires are considered to be coldwhen they have the same temperature as thesurrounding (ambient) air. This temperature isnormally reached after the vehicle has beenparked for at least 3 hours. After driving a dis-tance of approximately 1 mile (1.6 km), thetires are considered to be warm.
CAUTION
When inflating tires with TPMS sensors, press the pump's mouthpiece straight onto thevalve to help avoid bending or otherwise dam-aging the valve.
CAUTION
•After inflating the tires, always reinstall the valve cap to help avoid damage to thevalve from dirt, gravel, etc.
• Use plastic valve caps only. Metal capscould corrode and become difficult toremove.
WARNING
• Incorrect inflation pressure could lead to tire failure, resulting in a loss of control ofthe vehicle.
• Tire monitoring systems cannot indicatesudden tire damage caused by externalfactors (e.g., a blowout) in advance.
Related information
•
Tire Pressure Monitoring System (TPMS)(p. 457)
• Checking inflation pressure (p. 458)
Calibrating the Tire Pressure Monitoring System (TPMS) 6
In certain situations, a text pertaining to calibra- tion requirements may appear in the center dis-play. This text is generic and does not apply
to North American models .
6
Certain markets only.
Page 463 of 546
WHEELS AND TIRES
}}
461
Tire Pressure Monitoring System type approval
NOTE
USA FCC ID: MRXVHSS4 Canada IC:2546A-VHSS4 M :VHSS4This device complies with part 15 of the FCC rules and with licence exempt RSS standardsof Industry Canada. Operation is subject to the following condi- tions: (1) This device may not cause harmful inter- ference, and (2) this device must accept any interference received, including interference that maycause undesired operation.
WARNING
Changes or modifications not expressively approved by the party responsible for compli-ance could void the user's authority to oper-ate the equipment. The term “IC:” before theradio certification number only signifies thatIndustry Canada technical specifications weremet.
Tire sealing system
The vehicle is equipped with a tire sealing sys- tem that enables you to temporarily seal a hole inthe tread surface and re-inflate a flat tire, or toadjust a tire
Page 464 of 546
||
WHEELS AND TIRES
* Option/accessory, for more information, see Introduction.
462 The 12-volt sockets are located in the front tun- nel console, on the rear side of the center con- sole in the rear seat and in the cargo area
*.
Accessing the tire sealing systemThe tire sealing system is stowed under the floor of the cargo area. To access it:
1. Lift the floor hatch in the cargo area.
2. Lift out the tire sealing system.
NOTE
• The tire sealing system is only intended to seal holes on the tire
Page 465 of 546

WHEELS AND TIRES
}}
463
WARNING
Please keep the following points in mind when using the tire sealing system:
• The sealing compound bottle (no. 8 in the illustration) contains 1) rubber latex, natu-ral and 2) ethanediol. These substancesare harmful if swallowed.
• The contents of this bottle may causeallergic skin reactions or otherwise bepotentially harmful to the respiratory tract,the skin, the central nervous system, andthe eyes.
Precautions: • Keep out of reach of children.
• Do not ingest the contents.
• Avoid prolonged or repeated contact with the skin.
• Wash thoroughly after handling.
First aid: • Skin: Wash affected areas of skin with soap and water. Get medical attention ifsymptoms occur.
• Eyes: Flush with plenty of water for least15 minutes, occasionally lifting the upperand lower eyelids. Get medical attention ifsymptoms occur.
• Inhalation: Move the exposed person tofresh air. If irritation persists, get medicalattention.
•
Ingestion: Do
NOT induce vomiting
unless directed to do so by medical per- sonnel. Get medical attention.
• Disposal: Dispose of this material and itscontainer to a hazardous or special wastecollection point.
Related information
•Inflating a tire with the tire sealing systemcompressor (p. 467)
• Using the tire sealing system (p. 463)
Using the tire sealing system
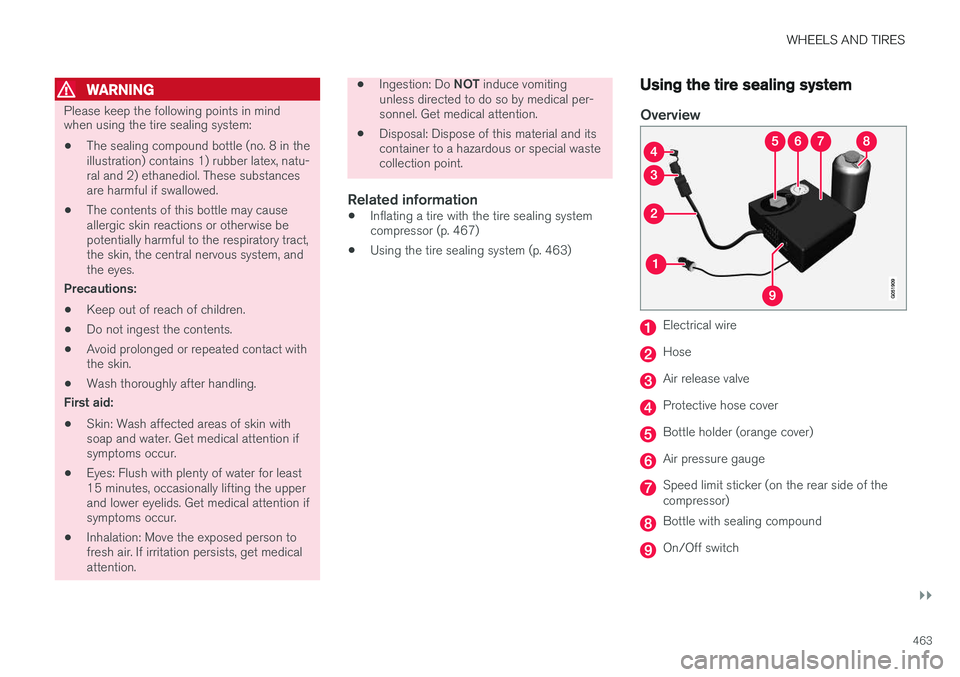
Overview
Electrical wire
Hose
Air release valve
Protective hose cover
Bottle holder (orange cover)
Air pressure gauge
Speed limit sticker (on the rear side of the compressor)
Bottle with sealing compound
On/Off switch
Page 466 of 546

||
WHEELS AND TIRES
464
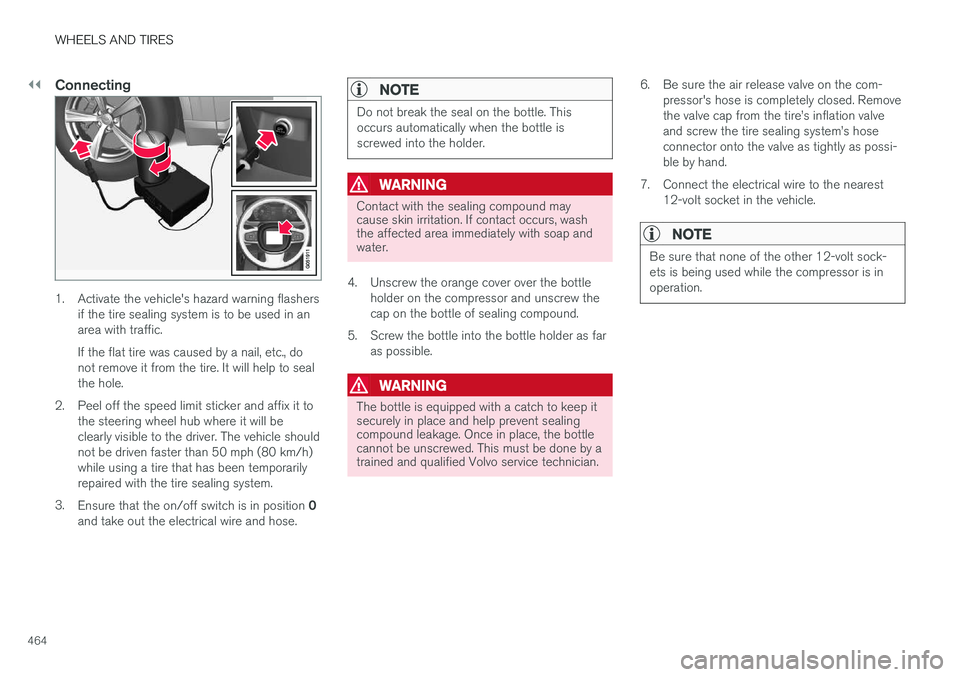
Connecting
1. Activate the vehicle's hazard warning flashersif the tire sealing system is to be used in an area with traffic. If the flat tire was caused by a nail, etc., do not remove it from the tire. It will help to sealthe hole.
2. Peel off the speed limit sticker and affix it to the steering wheel hub where it will beclearly visible to the driver. The vehicle shouldnot be driven faster than 50 mph (80 km/h)while using a tire that has been temporarilyrepaired with the tire sealing system.
3. Ensure that the on/off switch is in position 0
and take out the electrical wire and hose.
NOTE
Do not break the seal on the bottle. This occurs automatically when the bottle isscrewed into the holder.
WARNING
Contact with the sealing compound may cause skin irritation. If contact occurs, washthe affected area immediately with soap andwater.
4. Unscrew the orange cover over the bottle holder on the compressor and unscrew the cap on the bottle of sealing compound.
5. Screw the bottle into the bottle holder as far as possible.
WARNING
The bottle is equipped with a catch to keep it securely in place and help prevent sealingcompound leakage. Once in place, the bottlecannot be unscrewed. This must be done by atrained and qualified Volvo service technician. 6. Be sure the air release valve on the com-
pressor's hose is completely closed. Remove the valve cap from the tire
Page 467 of 546
WHEELS AND TIRES
}}}}
465
8. Start the tire sealing system