2016 VOLVO XC90 T8 phone
[x] Cancel search: phonePage 115 of 546

INSTRUMENTS AND CONTROLS
* Option/accessory, for more information, see Introduction.113
Sub-categories
Electric Parking Brake
Seats
Wipers
Suspension
Exterior SoundA
A
XC90 T8 Plug-in Hybrid, certain markets only.
Sound
Sub-categories
Sound Experience*
Tone
Balance
System Volumes
Navigation
Sub-categories
Map
Route
Traffic
Guidance
System
Media
Sub-categories
AM/FM RadioA
SiriusXM
Gracenote ®
Video
A
AM radio is not available in hybrid models.
Communication
Sub-categories
Phone
Text Messages
Bluetooth
Wi-Fi
Vehicle Wi-Fi Hotspot
Vehicle Modem Internet
Volvo On Call
Volvo Service Networks
ClimateThe main category Climate has no sub-catego-
ries.
System
Sub-categories
Date & Time
Language
Keyboard Layouts
Voice Control
Units
Storage
Software Updates
Factory reset
Services
Related information
• Settings view (p. 111)
• Changing system settings in Settings view (p. 114)
Page 119 of 546

INSTRUMENTS AND CONTROLS
}}
* Option/accessory, for more information, see Introduction.117
Clock The clock is displayed in the instrument panel and in the center display.
Location of the clock in the instrument panel in 12" (upper) and 8" (lower) instrument panels
Certain messages and other information in the instrument panel may temporarily obscure theclock. In the center display, the clock is located at the upper right of the status bar.
Settings for date and time
Select SettingsSystemDate & Time in
the center display's Top view to change the for- mat for displaying date or time. Set the date and time by tapping the up or down arrows on the center display.
Automatic time
The function Automatic Time is also available,
which adjusts the time zone automatically, depending on the vehicle's location. If
Automatic
Time has not been selected, set the date and
time manually by tapping the up or down arrows on the center display.
Daylight savings time
In certain countries, an automatic change to day- light savings time can be selected by activating
Auto. If the automatic change is not available,
change to daylight savings time by selecting Onor Off.
Related information
• Instrument panel (p. 127)
• Center display overview (p. 32)
• Using the center display (p. 49)
Head-up display (HUD)
*
The head-up display provides information such as speed, cruise control functions, navigation,traffic sign information, incoming phone calls,etc. at the base of the windshield in the driver'sfield of vision.
Incoming phone call
The HUD supplements the instrument panel and projects information on the lower section of thewindshield. The projected information can only beseen from the driver's seat.
CAUTION
The HUD's projection unit is located in the dashboard. Avoid scratching or placingobjects on the unit's glass surface.
Page 121 of 546
INSTRUMENTS AND CONTROLS
}}
* Option/accessory, for more information, see Introduction.119
Via settings
1.
Tap Settings in Top view.
2. Tap
My CarDisplays.
3. Select/deselect
Head-Up Display.
Selecting display alternatives1.Tap Settings in Top view.
2. Tap
My CarDisplaysHead-Up
Display Options.
Tap Go to the center display's Settings view and select
Driver Display & Head-up
Display.
3. Select :
Show Navigation In Head-Up
Display, Road Sign Information In Head-
Up Display, Show Driver Support In
Head-Up Display or Show Phone In
Head-Up Display.
Adjusting HUD brightness and height position
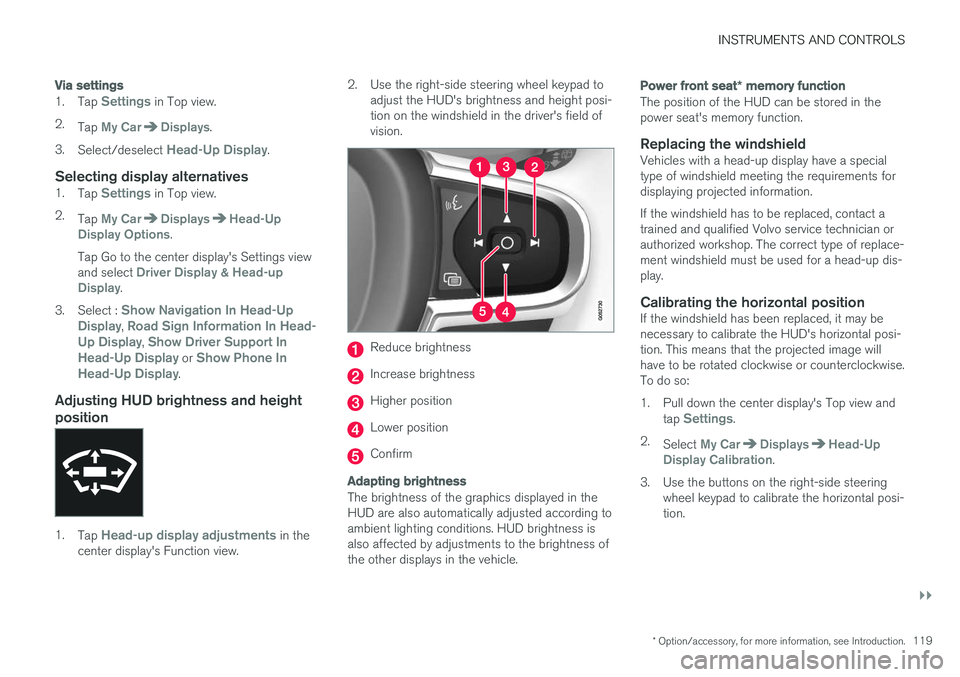
1. Tap Head-up display adjustments in the
center display's Function view. 2. Use the right-side steering wheel keypad to
adjust the HUD's brightness and height posi- tion on the windshield in the driver's field ofvision.
Reduce brightness
Increase brightness
Higher position
Lower position
Confirm
Adapting brightness
The brightness of the graphics displayed in the HUD are also automatically adjusted according toambient lighting conditions. HUD brightness isalso affected by adjustments to the brightness ofthe other displays in the vehicle.
Power front seat * memory function
The position of the HUD can be stored in the power seat's memory function.
Replacing the windshieldVehicles with a head-up display have a specialtype of windshield meeting the requirements fordisplaying projected information. If the windshield has to be replaced, contact a trained and qualified Volvo service technician orauthorized workshop. The correct type of replace-ment windshield must be used for a head-up dis-play.
Calibrating the horizontal positionIf the windshield has been replaced, it may benecessary to calibrate the HUD's horizontal posi-tion. This means that the projected image willhave to be rotated clockwise or counterclockwise.To do so:
1. Pull down the center display's Top view and
tap
Settings.
2. Select
My CarDisplaysHead-Up
Display Calibration.
3. Use the buttons on the right-side steering wheel keypad to calibrate the horizontal posi- tion.
Page 122 of 546

||
INSTRUMENTS AND CONTROLS
* Option/accessory, for more information, see Introduction.
120
Rotate counterclockwise
Rotate clockwise
Confirm
CleaningWipe the glass covering the HUD projection unit carefully with a clean and dry (or very slightlydamp if necessary) microfiber cloth. Never use strong stain removers. For difficult cleaning conditions, a special cleaning agent canbe purchased at a Volvo retailer.
Related information
• Center display overview (p. 32)
• Navigating in the center display's views (p. 42)
Voice control
Voice commands make it possible for the driver to voice-control certain functions in the mediaplayer, a Bluetooth-connected cell phone, cli- mate system and the Volvo navigation system *.
Voice control offers convenience and enables the driver to keep his/her hands on the steeringwheel and concentrate on driving and the trafficsituation around the vehicle.
WARNING
As the driver, you have full responsibility for operating the vehicle safely and adhering toall applicable traffic regulations.
Input to the system is in dialog form and compri- ses commands from the driver and a verbalresponse from the system. The voice control system uses the same micro- phone as the Bluetooth hands-free system and system responses come via the infotainment sys-tem's speakers. In certain cases, text messages are also provided in the instrument panel. The functions are controlled using the right-side steering wheel keypad and settings are madefrom the center console.
System updates
The voice control system is being constantly improved and updates should be downloaded foroptimal functionality. See the support sitesupport.volvocars.com.
Related information
•
Using voice commands (p. 121)
• Voice control settings (p. 125)
• Voice control for radio and media (p. 122)
• Voice control for cell phones (p. 122)
• System updates (p. 474)
• Navigation system voice commands (p. 124)
• Climate system voice commands (p. 123)
Page 123 of 546
INSTRUMENTS AND CONTROLS
121
Using voice commands
The following is an introduction for using voice commands.
Press the button on the right- side steering wheel keypad toactivate the system and initiatea voice command dialog.
Keep the following points in mind when using voice commands:
• When giving a command, speak at your usual speed and in a normal tone of voice
after
the tone .
• Avoid speaking while the system is respond- ing. Commands cannot be processed duringa response.
• Avoid background noises in the cabin whenusing the system by closing the vehicle's doors, windows and panoramic roof
* when
giving voice commands.
Voice command dialogs can be cancelled by:
• Saying "
Cancel".
• By pressing and holding the
button on
the right-side steering wheel keypad.
To speed up a command dialog or to skip system responses, press the
button on the right-
side steering wheel keypad when the system is responding and give your next command.
Voice command examples
Press , say " Call"-"[First-name] "-"[Last-
name] "-"[number category] " to call a contact
in your phonebook if the person has more than one phone number listed (i.e., home, mobile, work,etc.). For example, press
and say
" Call "-"Robin "-"Smith "-"mobile ".
Commands/phrasesThe following commands can always be used: •
Repeat: the system will repeat the most
recent voice instruction.
•
Cancel: cancel the dialog.
•
Help: Initiates a help dialog. The system will
provide several alternative commands that can be used in a given situation.
The commands for specific situations are descri- bed in the respective articles such as "Cell phonecommands", etc.
Numbers
Numbers can be spoken in different ways depending on the context and function beingused:
• Phone numbers and zip codes
should be
spoken individually, number by number, e.g., five five five one two three four (5551234).
• Addresses (house numbers)
can be spo-
ken individually or as a group, e.g., two two ortwenty-two (22). It is also possible to say a sequence of numbers, e.g., twenty-twotwenty-two (22 22) and "double" or "triple"can also be used, e.g., double zero (00) or tri-ple zero (000). Numbers in the range0-2300 can be used.
• Frequencies
can be spoken ninety-eight
point eight (98.8), one hundred four pointtwo (104.2) or hundred four point two(104.2).
Related information
• Voice control (p. 120)
Page 124 of 546
INSTRUMENTS AND CONTROLS
* Option/accessory, for more information, see Introduction.
122
Voice control for cell phones Voice commands can be used to control many of the most common functions in a Bluetooth ®
-
connected cell phone.
To specify a phone book contact, the voice com- mand has to include the contact's informationthat is in the phone book. For example, if a con- tact such as
John Smith has several phone
numbers, a number category such as home ormobile can be specified. To call, say: "Call John
Smith mobile".
To use the voice control system, press the
on the right-side steering wheel keypad and say one of the following commands after the tone:
• "
Call [contact]": call a contact from your
phone book.
• "
Call [phone number]": call a phone num-
ber.
• "
Recent calls": displays the list of recent
calls.
• "
Read message": reads a message aloud.
If there are several messages, select the one to be read.
Related information
• Voice control (p. 120)
• Using voice commands (p. 121)
• Voice control settings (p. 125)
Voice control for radio and media
The following voice commands can be used for the radio or an external media player.
To use the voice control system, press the on the right-side steering wheel keypad and say one of the following commands after the tone:
• "
Media": initiates a dialog and displays pos-
sible commands.
• "
Play [artist]": plays music by the selected
artist.
• "
Play [song title]": plays the selected song.
• "
Play [song title] from [album]": plays the
selected song from the selected album.
• "
Play [radio station]": starts the selected
radio station.
• "
Tune to [frequency]": tunes to the
selected frequency on the current waveband. If no waveband has been selected, FM is thedefault.
• "
Tune to [frequency] [waveband]": tunes
to the selected station on the selected wave- band.
• "
Radio": starts FM radio.
• "
Radio FM": starts FM radio.
• "
SiriusXM": starts SiriusXM radio
*
• "
CD": starts playback from a CD.
• "
USB": starts playback from a USB flash
drive. •
"
iPod": starts playback from an iPod.
• "
Bluetooth": starts playback from a Blue-
tooth-connected device.
• "
Similar music": starts playback from a
USB flash drive with music similar to the type currently playing.
Related information
• Voice control (p. 120)
• Using voice commands (p. 121)
• Voice control settings (p. 125)
Page 130 of 546

||
INSTRUMENTS AND CONTROLS
128
12" instrument panel
Left side
•Speedometer
• Trip odometer
• Odometer
• Cruise control/speed limiter information
• Road sign information
Center
•Indicator and warning symbols
• Ambient temperature sensor
• Clock
• Messages (and in certain cases also graph- ics)
• Distance to empty tank
• Distance to discharged hybrid battery (eDTE:electrical Distance to Empty) •
Door and seat belt status
• Hybrid battery charge information
• Compass
• Media player
• Navigation system map
• Cell phone
• Voice control
Right side
• Tachometer (depending on current driving mode)
• Fuel gauge
• Battery gauge
• Gear indicator
• Current driving mode (Hybrid, Off Road, Save,Pure, Power and AWD)
• ECO gauge (depending on current drivingmode)
• Current fuel consumption
• Hybrid battery's charge level
• App menu (activated using the right-sidesteering wheel keypad)
Activating the instrument panelThe instrument panel is activated as soon as a door is opened (i.e., ignition mode
0). After a
short period, the panel will go out if it is not used. To reactivate it, do one of the following: •
Press the brake pedal
• Turn the start knob to
START and release it
(without pressing the brake pedal). This acti- vates ignition mode I
• Open one of the doors
Page 132 of 546
||
INSTRUMENTS AND CONTROLS
130
AppFunctions
Trip com- puterSelect a trip odometer, make instrument panel display set-tings, etc.
Media playerSelect the active source for the media player.
PhoneCall a contact from the call list.
NavigationPause guidance, start guidance to a recently set destination, etc.
Related information
•Instrument panel (p. 127)
• Center display overview (p. 32)
• Using the instrument panel App menu (p. 156)
Hybrid-related information in the instrument panel
Different types of information will be displayed in the instrument panel, depending on the drivemode selected. These drive modes offer uniqueways of helping the driver achieve the best pos-sible driving economy. The vehicle also stores driving statistics that can be viewed in the form of a bar graph.
Hybrid-unique symbolsThe various gauges and indicators in the instru- ment panel show the relationship between theelectric motor's current power consumption andthe remaining power available.
Indicates the currently available outputfrom the electric motor. A solid symbolindicates that the electric motor isbeing used.
Indicates the currently available output from the electric motor. A hollow sym-bol means that the electric motor is not being used.
Indicates the output level when the gasoline engine starts. A solid symbolindicates that the gasoline engine isbeing used.
Indicates the output level when the gasoline engine will start. A hollowsymbol indicates that the gasoline engine is not being used.
Indicates that the hybrid battery is being charged.
Indicates the current charge level in the electric motor's battery. This indica-tor is located by the hybrid batterygauge in the lower right corner.
eDTE (Electrical Distance To Empty) indicator (distance until the hybrid bat-tery is discharged).
The hybrid gauge
Available electric motor output
This hybrid battery indicator is located between the hybrid gauge and the fuel gauge on the lowerright side of the instrument panel. It indicates thecurrent (charge level) remaining in the hybrid bat-tery, which can be used to power the electricmotor or to heat/cool the vehicle.