2016 VOLVO XC90 T8 turn signal
[x] Cancel search: turn signalPage 239 of 546

LOCKS AND ALARM
}}
237
and hold to close an open tailgate (an audi- ble warning signal will sound).
Panic alarm: Press to attract attention dur-
ing emergency situations. To activate, press
and hold this button for at least 3 seconds or press it twice within 3 seconds to activate the turn signals and horn. To deactivate,
wait approximately 5 seconds and press the button again (the panic alarm will also deac-tivate automatically after several minutes).
InterferenceMetallic objects or electromagnetic fields mayinterfere with the remote key's function. Avoidplacing the remote key within 4-6 in. (10-15 cm)of a cell phone or a metallic object. If interference persists, use the remote key's detachable key blade to unlock the vehicle andplace the remote key in the backup key reader inthe tunnel console cup holder.
Loss of a remote keyIf a remote keys is lost, a new one can beordered. The other keys should be taken with thevehicle to a Volvo retailer or authorized independ-ent locksmith. As an anti-theft measure, the codeof the lost remote key must be erased from thesystem. The number of registered keys for thevehicle can be found in the center display's Topview.
Related information
• Remote key's range (p. 235)
• Detachable key blade (p. 237)
• Changing the remote key's battery (p. 232)
Detachable key blade Your vehicle's remote key contains a detachable key blade that can be used to unlock the driver'sdoor, etc. A Volvo retailer can provide you with the key blade's unique code.
Using the detachable key bladeThe remote key's detachable key blade can be used to:
• Unlock the driver's door if the central locking system cannot be activated using the remotekey
• Lock all doors
• Activate/deactivate the mechanical childsafety locks in the rear doors
The Key Tag 7
does not have a detachable key
blade.
7 Models with the optional Passive Entry system only.
Page 242 of 546

||
LOCKS AND ALARM
* Option/accessory, for more information, see Introduction.
240
Related information
• Power tailgate
* (p. 246)
• Locking/unlocking the tailgate (p. 244)
• Remote key's range (p. 235)
Locking and unlocking confirmation
The turn signals can be used to indicate that the vehicle has been locked/unlocked with theremote key. These settings can also bechanged.
Exterior confirmation
• Locking: the turn signals flash once and the door mirrors will fold in (retract) 11
• Unlocking: the turn signals flash twice andthe door mirrors will fold out 11
When the vehicle is locked, confirmation will only be given if all doors/tailgate and the hood areclosed. If the vehicle is locked while only the driver's door is closed, all doors/tailgate will lock but confirma-tion will only be given when all doors/tailgate/hood are closed.
Interior confirmation
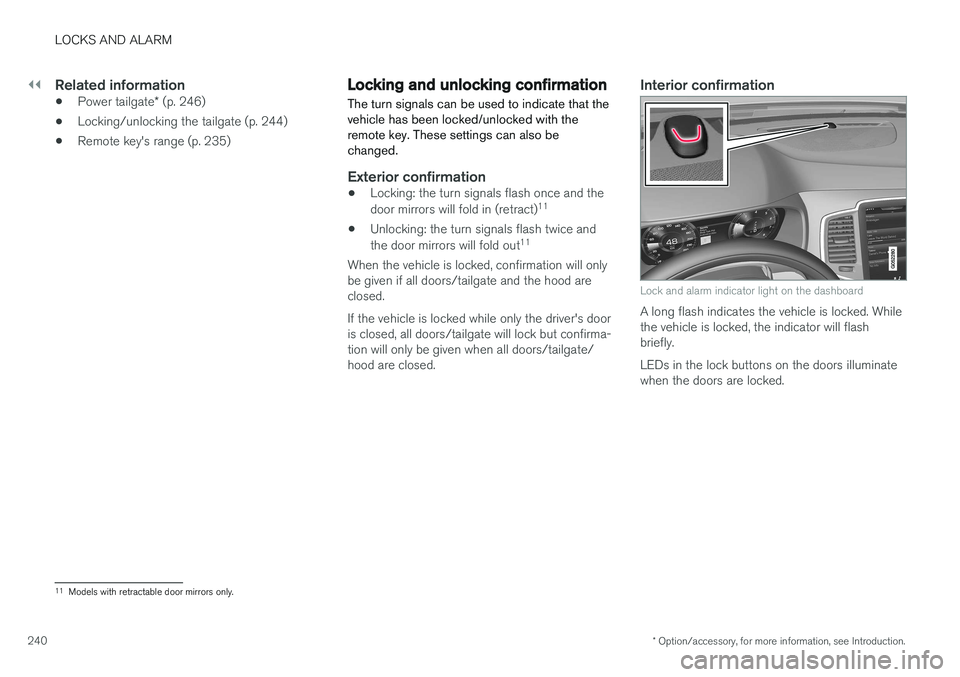
Lock and alarm indicator light on the dashboard
A long flash indicates the vehicle is locked. While the vehicle is locked, the indicator will flashbriefly. LEDs in the lock buttons on the doors illuminate when the doors are locked.
11 Models with retractable door mirrors only.
Page 249 of 546

LOCKS AND ALARM
}}
* Option/accessory, for more information, see Introduction.247
–Press the button14
on the lower edge of
the tailgate.
> The tailgate will close automatically but will not be locked .
–Press the button14
on the lower edge of
the tailgate.
> The tailgate will close automatically. The tailgate and doors will also be locked and
the alarm will be armed.
If the remote key is not close enough to the tail- gate, automatic locking/unlocking/opening/clos-ing will not be possible. Three short audible sig-nals will sound.
Interrupting opening/closing
–This can be done in five ways: • Press the button on the lighting panel
• Press the button on the remote key
• Press either of the buttons on the lower edge of the tailgate
• Press lightly on the rubber-covered buttonunder the tailgate's outside handle
• Move your foot under a sensor beneath the rear bumper
*
> The tailgate will stop moving
Programming the tailgate's maximum opening angle
The tailgate's maximum opening angle can be programmed, for example, if the tailgate has to beopened in a garage with a low ceiling. Programming the opening angle:
–Open the tailgate manually to the desired angle and press and hold the closing buttonon the tailgate's lower edge for at least 3seconds. Release the tailgate.
> Two audible signals will sound to indicate that the selected opening angle has been stored.
Erasing tailgate programming
–Open the tailgate manually to its highest position and press and hold the closing but-ton on the tailgate's lower edge for at least 3seconds. Release the tailgate.
> Two audible signals will sound to indicate that the programmed opening angle has been erased.
NOTE
If the tailgate has been opened and closed continuously too long, the automatic functionwill be deactivated to avoid overloading theelectrical system. The automatic function canbe used again after approximately 2 minutes. If the vehicle's battery has been discharged or disconnected, or if the tailgate has been openfor more than 24 hours, the tailgate must beopened and closed once manually to resetthe system.
Pinch protectionIf the tailgate is obstructed when being opened/ closed, a pinch protection mechanism is acti-vated.
• While opening: the tailgate will stop moving and an audible signal will sound.
• While closing: the tailgate will stop andreturn to the maximum programmable open-ing position. An audible signal will sound.
WARNING
Be sure that no one is near the tailgate when it is opened or closed automatically. The tail-gate should never be obstructed in any waywhen it is operated.
14
Models equipped with the optional Passive Entry system have a button to close the tailgate and a button to close and lock the tailgate.
Page 272 of 546

||
DRIVER SUPPORT
* Option/accessory, for more information, see Introduction.
270 To temporarily deactivate and put Adaptive Cruise Control in standby mode:
Function buttons and symbols
–Press the button (2).
> The
symbol in the instrument panel
will change colors from WHITE to GRAY and the set speed in the center of thespeedometer will change from BEIGE toGRAY.
Standby mode due to action by the driver
ACC is temporarily deactivated and put in standby mode if:
• the brakes are applied
• The gear selector is moved to
N
• the vehicle is driven faster than the set speed for more than 1 minute. In these cases, the driver will have to regulate the vehicle's speed. A temporary increase in speed, such as when passing another vehicle, does not affect the ACCset speed. The vehicle will return to the set speedwhen the accelerator pedal is released.
Automatic standby mode
ACC interacts with other systems, such as Electronic Stability Control. If any of these othersystems are not functioning properly, ACC willturn off automatically.
WARNING
If this happens, the driver will be alerted by an audible signal and a message in the instru-ment panel. The driver will have to adapt thevehicle's speed, apply the brakes when nec-essary and keep a safe distance to the vehicleahead.
ACC switches automatically to standby mode if: • the vehicle's speed goes below approx. 3 mph (5 km/h) and ACC cannot determineif the vehicle ahead is stationary or is anobject such as a speed bump, etc
• the vehicle's speed goes below approx.3 mph (5 km/h) and the vehicle aheadchanges lanes or turns so that ACC nolonger has a target vehicle to follow
• the driver opens the door
• the driver unbuckles the seat belt •
engine speed (rpm) is too high/low
• the wheels lose traction
• the parking brake is applied
• the stability system's
ESC Sport Mode is
activated
• the
Off Road drive mode is selected
• The radar sensor is covered by e.g., wet snow or if heavy rain interferes with radar waves
Reactivating ACC from standby modeTo reactivate ACC after it has temporarily been put in standby mode:
–Press the button (1).
> The vehicle will then return to the most
recently set speed .
WARNING
There may be a significant increase in speed after the
button has been pressed.
Related information
•Adaptive Cruise Control (ACC)
* (p. 266)
• Starting and activating Adaptive Cruise Control (ACC) (p. 268)
• Setting an Adaptive Cruise Control timeinterval (p. 272)
Page 279 of 546

DRIVER SUPPORT
}}
* Option/accessory, for more information, see Introduction.277
•the lane's side market lines are missing, badly faded or cross each other.
• the division of lanes is not clear, e.g.,when a line divides or merges withanother, at exits or if there are many roadsigns/markers.
• if there are edges or other lines on ornear the lane, e.g., curbs, cracks, repairedareas, sharp shadows, etc.
• the lane is narrow or winding.
• the weather conditions (rain, snow, fog,slush, poor visibility, backlighting, etc).
The driver should also be aware that Pilot Assist has the following limitations: • High curbs, barriers and temporary obsta- cles (cones, barriers etc) may not bedetected or could be detected incorrectlyas side marker lines, which may create arisk of collision. The driver must ensure asafe distance to these obstacles.
• The camera or radar sensor may not beable to detect objects if there are pot-holes or if there are stationary objectspartially or completely blocking the road.
• Pilot Assist does not "see" pedestrians,animals, etc.
• Pilot Assist's steering capacity is limitedand may not always be able to help thedriver keep the vehicle in the lane.Hands on the steering wheel
Pilot Assist only functions when the driver's hands are on the steering wheel
, which is con-
tinuously monitored by the system. If this is notthe case, the driver will be alerted by a text mes-sage in the instrument panel. If the driver's handsare not returned to the steering wheel, an audiblesignal will sound. If the driver does not return his/her hands to the steering wheel after the audible signal, PilotAssist will go into standby mode and must be reactivated by pressing
.
Related information
• Pilot Assist
* (p. 273)
Deactivating/resuming Pilot Assist
Putting Pilot Assist in standby mode
Function buttons and symbols
1.
Press the button (1).
> Pilot Assist will go into standby mode.
2. Press the ◀ button (2).
> Pilot Assist will be turned off and shift to ACC in standby mode.
or
–Press the ◀ button (2).
> Pilot Assist will be turned off and switch to ACC in active mode.
Page 280 of 546

||
DRIVER SUPPORT
* Option/accessory, for more information, see Introduction.
278
Standby mode due to driver action
If a turn signal is used or if the accelerator pedal is pressed, Pilot Assist will temporarily go intostandby mode. When the turn signal is switchedoff or the accelerator pedal is released, PilotAssist will reactivate automatically. Automatic reactivation from standby mode can be done within 1 minute. After 1 minute haselapsed, Pilot Assist must be reactivated man- ually by pressing the
button.
Pilot Assist will temporarily go into standby mode if: • the brakes are applied
• the gear selector is moved to the
N position.
The driver will then have to regulate speed and distance to the vehicle ahead, or reactivate Pilot Assist manually by pressing the
button on
the left-side steering wheel keypad.
Automatic standby mode
Pilot Assist interacts with other systems, such as Electronic Stability Control. If any of these othersystems are not functioning properly, Pilot Assistwill automatically be deactivated.
WARNING
If this happens, the driver will be alerted by an audible signal and a message in the instru-ment panel. The driver will have to adapt thevehicle's speed, apply the brakes when nec-essary and keep a safe distance to the vehicleahead.
Pilot Assist switches automatically to standby mode if: • the camera cannot detect the traffic lane's side marker lines
• the vehicle ahead is not within a reasonable(detectable) distance
• the driver's hands are not on the steeringwheel
• the driver unbuckles the seat belt
• engine speed (rpm) is too high/low
• the wheels lose traction
• brake temperature is too high
• The camera lens/radar sensor is covered bye.g., wet snow or if heavy rain interferes withradar waves
Reactivating Pilot Assist from standby mode
–Press the button (1).
> The most recently set speed will be used.
Related information
• Pilot Assist
* (p. 273)
Setting a Pilot Assist time interval
Different time intervals to the vehicle ahead can be selected and are shown in the instrumentpanel as 1–5 horizontal bars.
Changing the time intervalThe greater the number of bars, the longer the time interval.One bar between the vehiclesrepresents a time interval ofapproximately 1 second; 5 barsis approximately 3 seconds.
The same symbol appears if Distance Alert isactivated.
Page 286 of 546

DRIVER SUPPORT
* Option/accessory, for more information, see Introduction.
284
Radar sensor - type approval
USA & Canada:
FCC ID: L2C0054TR IC: 3432A-0054TR FCC
ID: L2C0055TR IC: 3432A-0055TR This device complies with Part 15 of the FCC Rules and with Industry Canada license-exemptRSS standard(s). Operation is subject to the fol-lowing two conditions: (1) This device may not cause harmful interfer- ence, and (2) This device must accept any interference received, including interference that may causeundesired operation.
WARNING
Changes or modifications not expressively approved by the party responsible for compli-ance could void the user's authority to oper-ate the equipment.
The term “IC:” before the radio certification num- ber only signifies that Industry Canada technicalspecifications were met.
Related information
• Radar sensor (p. 283)
Adaptive cruise control passing assistance
ACC can assist the driver when passing other vehicles.
How passing assistance worksWhen ACC is following another vehicle and the driver indicates that he/she is about to pass thatvehicle by using the left turn signal, ACC willbegin accelerating toward the vehicle aheadbefore your vehicle has moved into the passinglane. The function will then delay a speed reduction to avoid early braking as your vehicle approachesthe slower-moving vehicle. The function is active until your vehicle has passed the other vehicle.
WARNING
Be aware that this function may be activated in situations other than when passing a vehi-cle, such as if the turn signal is used to indi-cate a lane change or to indicate a turn. Thevehicle will accelerate briefly.
Using passing assistanceTo activate passing assistance:
• Your vehicle (ACC) must be following another vehicle (the target vehicle).
• Current speed must be at least approx.45 mph (70 km/h ). •
The speed set for ACC must be high enoughto safely pass the vehicle ahead.
Starting passing assistanceTo start a passing assistance sequence:
• Activate the left turn signal.
Passing assistance limitations
WARNING
The driver should be prepared for sudden changes when passing assistance is used. Incertain cases, there may be undesired accel-eration. Certain situations should be avoided, such as: • If the vehicle is approaching an exit to the left or a left turn.
• If the vehicle ahead slows down beforeyour vehicle has moved into the passinglane.
• Traffic in the passing lane slows down.
Passing assistance in these situations can be deactivated by putting ACC in standby mode.
Related information
• Adaptive Cruise Control (ACC)
* (p. 266)
Page 291 of 546

DRIVER SUPPORT
}}}}
289
When City Safety applies the brakes, the brake lights will illuminate. When City Safety is triggered and applies the brakes, a text message will be displayed in theinstrument panel.
Related information
•
City Safety
™ troubleshooting (p. 295)
• City Safety in crossing traffic (p. 291)
• City Safety limitations (p. 293)
• City Safety symbols and messages (p. 297)
• Detecting cyclists and pedestrians with City Safety (p. 290)
• Rear Collision Warning (RCW) (p. 292)
• City Safety warning level settings (p. 289)
• City Safety in crossing traffic (p. 291)
• Seat belts (p. 64)
City Safety warning level settings
City Safety is always activated but the function's warning distance can be adjusted.
NOTE
City Safety cannot be turned off and activates automatically each time the engine/electricmotor is started.
Setting a warning level (distance)
The distance set for warnings determines the system's responsiveness and sets the distance atwhich visual, audible and tangible (haptic) warn-ings will be triggered. To do so:1. Tap
Settings in the center display's Top
view.
2. Tap
My CarIntelliSafeCity Safety.
3. Choose among
Earlier, Normal or Later.
Begin by choosing
Earlier. If too many warnings
are given, change to Normal.
If the driver feels that warnings are given too often, the warning level can be lowered. Thismeans that warnings will be provided later, result-ing in fewer warnings being given. The setting
Later should only used in exceptional
circumstances, e.g., for a more dynamic driving style.
WARNING
• No automatic system can be guaranteed to function 100% correctly in all situa-tions. For that reason, never test CitySafety by driving toward a person orobject. This could result in serious injuryor death.
• Even if the setting
Earlier has been
selected, warnings may be perceived as being given late, e.g., if the difference inspeed is great or if the vehicle aheadbrakes suddenly.
• City Safety can provide a warning for apotential collision but it can never shortenthe driver's reaction time.
• To help make City Safety as effective as possible, always using the setting
Earlieris recommended.
NOTE
•Due to local traffic regulations in certain markets, RCW will
not activate the rear
turn signals. That part of the function will be deactivated.
• The use of the rear turn signals will alsobe deactivated if the City Safety warning level is set at
Later. See also the section
"Setting a warning level (distance)" in the article "City Safety settings."
• If RCW detects a vehicle approachingfrom behind, the seat belt pretensioners