2016 VOLVO XC90 T8 steering wheel
[x] Cancel search: steering wheelPage 69 of 546

SAFETY
}}
67
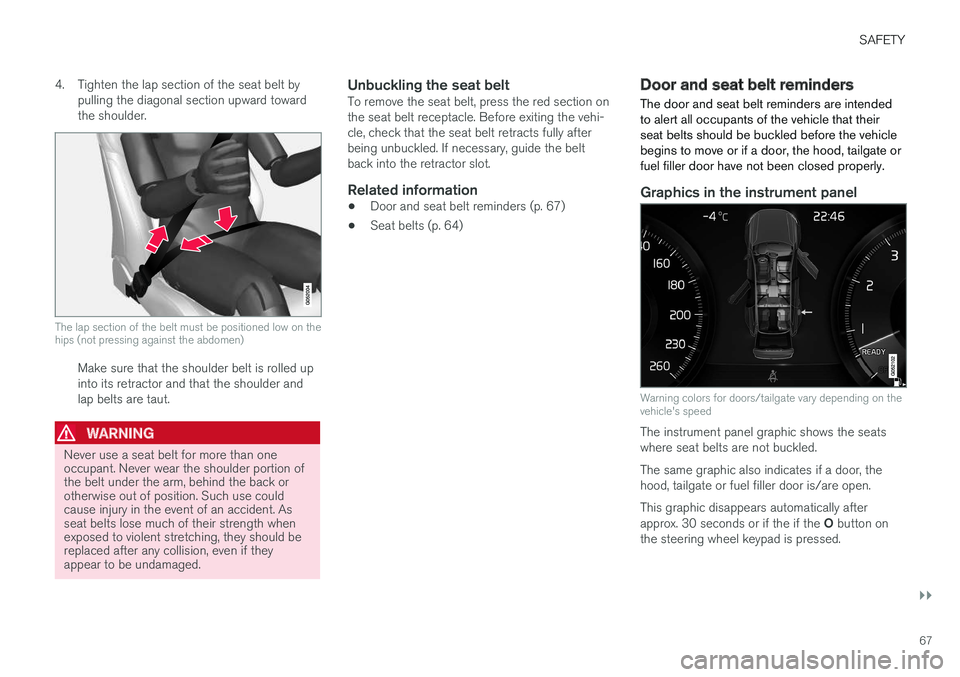
4. Tighten the lap section of the seat belt by
pulling the diagonal section upward toward the shoulder.
The lap section of the belt must be positioned low on the hips (not pressing against the abdomen)
Make sure that the shoulder belt is rolled up into its retractor and that the shoulder andlap belts are taut.
WARNING
Never use a seat belt for more than one occupant. Never wear the shoulder portion ofthe belt under the arm, behind the back orotherwise out of position. Such use couldcause injury in the event of an accident. Asseat belts lose much of their strength whenexposed to violent stretching, they should bereplaced after any collision, even if theyappear to be undamaged.
Unbuckling the seat beltTo remove the seat belt, press the red section on the seat belt receptacle. Before exiting the vehi-cle, check that the seat belt retracts fully afterbeing unbuckled. If necessary, guide the beltback into the retractor slot.
Related information
• Door and seat belt reminders (p. 67)
• Seat belts (p. 64)
Door and seat belt reminders
The door and seat belt reminders are intended to alert all occupants of the vehicle that theirseat belts should be buckled before the vehiclebegins to move or if a door, the hood, tailgate orfuel filler door have not been closed properly.
Graphics in the instrument panel
Warning colors for doors/tailgate vary depending on the vehicle's speed
The instrument panel graphic shows the seats where seat belts are not buckled. The same graphic also indicates if a door, the hood, tailgate or fuel filler door is/are open. This graphic disappears automatically after approx. 30 seconds or if the if the O button on
the steering wheel keypad is pressed.
Page 70 of 546

||
SAFETY
68
Seat belt reminder
Seat belt reminder light in ceiling console
The seat belt reminder consists of an audible signal, an indicator light nearthe rearview mirror and a symbol in theinstrument panel that alert all occu-
pants of the vehicle to buckle their seat belts.
The audible signal is speed-dependent and will sound for several seconds. If the driver's or a passenger's seat belt is not buckled, this will be indicated in the instrumentpanel. Child seats are not included in the seat belt reminder system.
Front seats
An audible signal and an indicator light will remind the driver and front seat passenger tobuckle their seat belts.
Rear seats
The rear seat belt reminder has two functions.
• It indicates which seat belts are buckled in the rear seats. This will also be displayed inan instrument panel graphic.
• It also provides audio and visual reminders ifa rear seat belt is unbuckled while the vehi-cle is in motion. The reminders will disappearwhen the seat belt has been buckled again or can be erased by pressing the
O button
on the steering wheel keypad.
Door/hood/tailgate/fuel filler door
reminder
If a door, the hood, tailgate or fuel filler door is/are not properly closed, this will be indicated ina graphic in the instrument panel. Stop the vehi-cle safely and close the source of the reminder.
If the vehicle is moving at a speedunder approx.6 mph (10 km/h), theinformation symbol will illuminate in theinstrument panel.
At speeds above approx. 6 mph (10 km/h), the warning symbol will illu-minate in the instrument panel.
Related information
•Seat belts (p. 64)
• Buckling and unbuckling seat belts (p. 65)
Child safety
Children should always be seated safely when traveling in the vehicle.
General informationVolvo recommends the proper use of restraint systems for all occupants including children.Remember that, regardless of age and size, achild should always be properly restrained in avehicle. Your vehicle is also equipped with ISOFIX/ LATCH attachments, which make it more conven-ient to install child seats. Some restraint systems for children are designed to be secured in the vehicle by lap belts or thelap portion of a lap-shoulder belt. Such childrestraint systems can help protect children invehicles in the event of an accident only if theyare used properly. However, children could beendangered in a crash if the child restraints arenot properly secured in the vehicle. Failure to fol-low the installation instructions for your childrestraint can result in your child striking the vehi-cle's interior in a sudden stop. Holding a child in your arms is NOT a suitable substitute for a child restraint system. In an acci-dent, a child held in a person's arms can becrushed between the vehicle's interior and anunrestrained person. The child could also beinjured by striking the interior, or by being ejectedfrom the vehicle during a sudden maneuver or
Page 92 of 546

||
SAFETY
90The location of the front airbags is indicated by SRS AIRBAG
embossed on the steering wheel
pad and above the glove compartment, and by decals on both sun visors and on the front andfar right side of the dash. The driver's side front airbag is folded and
located in the steering wheel hub.The knee airbag is folded on the underside of
the dashboard on the driver's side. The text AIRBAG is embossed on the panel.
The passenger's side front airbag is folded
behind a panel located above the glove compart- ment.
WARNING
• The airbags in the vehicle are designed to be a SUPPLEMENT to–not a replace-ment for–the three-point seat belts. Formaximum protection, wear seat belts at alltimes. Be aware that no system can pre-vent all possible injuries that may occur inan accident.
• Never drive with your hands on the steer-ing wheel pad/airbag housing.
• The front airbags are designed to helpprevent serious injury. Deployment occursvery quickly and with considerable force.During normal deployment and depend-ing on variables such as seating position,one may experience abrasions, bruises,swellings, or other injuries as a resultfrom deployment of one or both of theairbags.
• When installing any accessory equipment,make sure that the front airbag system isnot damaged. Any interference in the sys-tem could cause malfunction.
Front airbag deployment
•The front airbags are designed to deploy dur-ing certain frontal or front-angular collisions,impacts, or decelerations, depending on thecrash severity, angle, speed and objectimpacted. The airbags may also deploy in certain non-frontal collisions where rapiddeceleration occurs.
• The airbag system sensors, which trigger thefront airbags, are designed to react to boththe impact of the collision and the inertialforces generated by it, and to determine ifthe intensity of the collision is sufficient forthe seat belt pretensioners and/or airbags tobe deployed.
However, not all frontal collisions activate the front airbags.
• If the collision involves a nonrigid object (e.g., a snow drift or bush), or a rigid, fixed objectat a low speed, the front airbags will not nec-essarily deploy.
• Front airbags do not normally deploy in aside impact collision, in a collision from therear or in a rollover situation.
• The amount of damage to the bodyworkdoes not reliably indicate if the airbagsshould have deployed or not.
Page 94 of 546

||
SAFETY
92
Passenger's side airbag decal
WARNING
•Children must never be allowed in the front passenger's seat.
• Occupants in the front passenger's seatmust never sit on the edge of the seat, sitleaning toward the instrument panel orotherwise sit out of position.
• The occupant's back must be as uprightas comfort allows and be against the seatback with the seat belt properly fastened.
• Feet must be on the floor, e.g., not on thedash, seat or out of the window.
WARNING
•
No objects or accessory equipment, e.g. dashboard covers, may be placed on,attached to, or installed near the air baghatch (the area above the glove compart-ment) or the area affected by airbagdeployment.
• There should be no loose articles, suchas coffee cups on the floor, seat, or dash-board area.
• Never try to open the airbag cover on thesteering wheel or the passenger's sidedashboard. This should only be done by atrained and qualified Volvo service techni-cian.
• Failure to follow these instructions canresult in injury to the vehicle occupants.
Related information
• Seat belts (p. 64)
• Occupant weight sensor (p. 84)
Inflatable curtains
The inflatable curtain is designed to help protect the heads of the occupants of the front seatsand the occupant of the outboard rear seatingpositions in certain side impact collisions.
This system consists of inflatable curtains located along the sides of the roof liners, stretching fromthe center of both front side windows to the rearedge of the rear side door windows. In certain side impacts, both the Inflatable Cur-
tain (IC) and the side Impact Airbag System (SIPS airbag) will deploy. The IC and the SIPSairbag deploy simultaneously.
Page 98 of 546

INSTRUMENTS AND CONTROLS
96
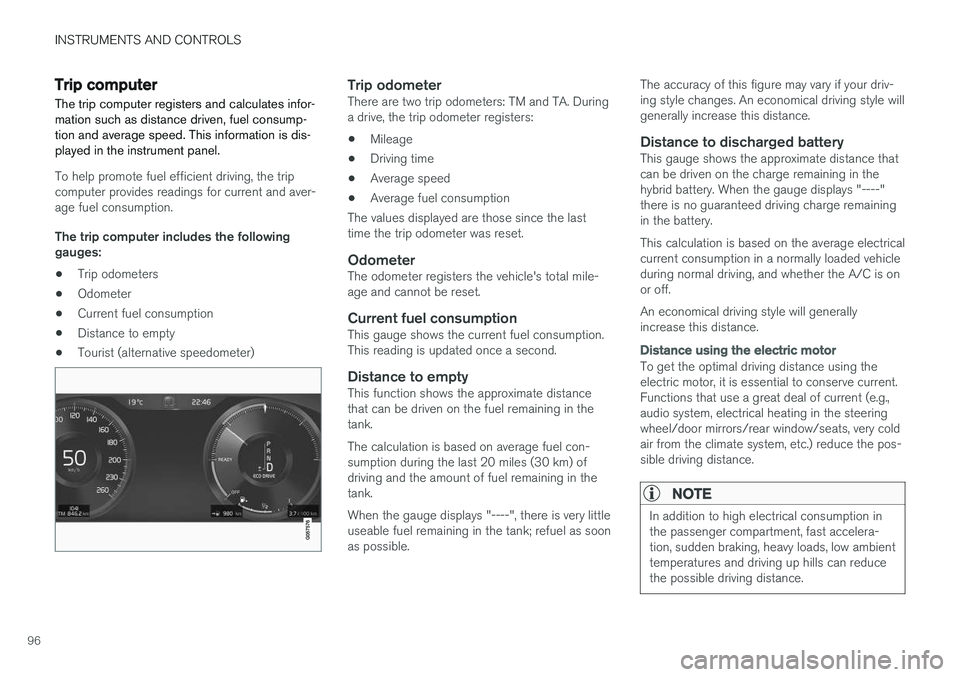
Trip computer The trip computer registers and calculates infor- mation such as distance driven, fuel consump-tion and average speed. This information is dis-played in the instrument panel.
To help promote fuel efficient driving, the trip computer provides readings for current and aver-age fuel consumption. The trip computer includes the following gauges:
• Trip odometers
• Odometer
• Current fuel consumption
• Distance to empty
• Tourist (alternative speedometer)
Trip odometerThere are two trip odometers: TM and TA. During a drive, the trip odometer registers:
• Mileage
• Driving time
• Average speed
• Average fuel consumption
The values displayed are those since the lasttime the trip odometer was reset.
OdometerThe odometer registers the vehicle's total mile-age and cannot be reset.
Current fuel consumptionThis gauge shows the current fuel consumption.This reading is updated once a second.
Distance to emptyThis function shows the approximate distancethat can be driven on the fuel remaining in thetank. The calculation is based on average fuel con- sumption during the last 20 miles (30 km) ofdriving and the amount of fuel remaining in thetank. When the gauge displays "----", there is very little useable fuel remaining in the tank; refuel as soonas possible. The accuracy of this figure may vary if your driv-ing style changes. An economical driving style willgenerally increase this distance.
Distance to discharged batteryThis gauge shows the approximate distance thatcan be driven on the charge remaining in thehybrid battery. When the gauge displays "----"there is no guaranteed driving charge remainingin the battery. This calculation is based on the average electrical current consumption in a normally loaded vehicleduring normal driving, and whether the A/C is onor off. An economical driving style will generally increase this distance.
Distance using the electric motor
To get the optimal driving distance using the electric motor, it is essential to conserve current.Functions that use a great deal of current (e.g.,audio system, electrical heating in the steeringwheel/door mirrors/rear window/seats, very coldair from the climate system, etc.) reduce the pos-sible driving distance.
NOTE
In addition to high electrical consumption in the passenger compartment, fast accelera-tion, sudden braking, heavy loads, low ambienttemperatures and driving up hills can reducethe possible driving distance.
Page 99 of 546

INSTRUMENTS AND CONTROLS
}}
97
Tourist (alternative speedometer)This is an alternative digital speedometer can be used when driving in areas in which the speedlimit is listed in a different unit of measure. If the speedometer is in mph, this gauge will show the
vehicle's speed in km/h and vice versa.
Related information
•Displaying trip computer information (p. 97)
• Displaying trip statistics (p. 98)
Displaying trip computer information
The trip computer registers and calculates infor- mation such as distance driven, fuel consump-tion and average speed. This information is dis-played in the instrument panel.
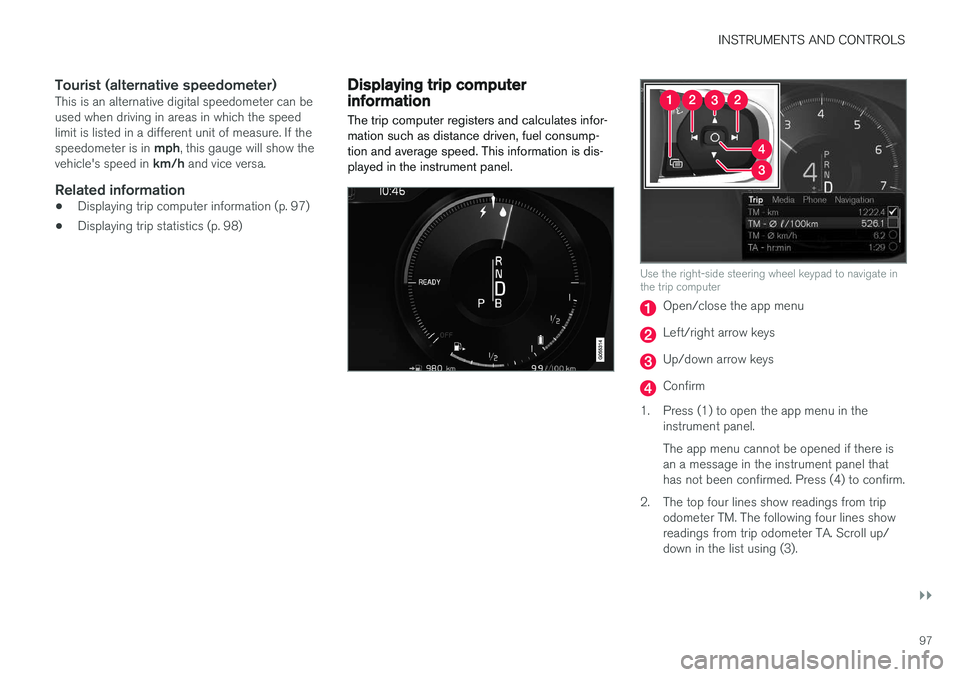
Use the right-side steering wheel keypad to navigate in the trip computer
Open/close the app menu
Left/right arrow keys
Up/down arrow keys
Confirm
1. Press (1) to open the app menu in the instrument panel. The app menu cannot be opened if there is an a message in the instrument panel thathas not been confirmed. Press (4) to confirm.
2. The top four lines show readings from trip odometer TM. The following four lines showreadings from trip odometer TA. Scroll up/down in the list using (3).
Page 100 of 546

||
INSTRUMENTS AND CONTROLS
* Option/accessory, for more information, see Introduction.
98 3. Scroll to the selection buttons in the lines
below TA and select the trip odometer to be displayed.
• Current fuel consumption
• Distance to empty
• Odometer
• Trip odometers TM, TA or none
• Tourist (alternative speedometer).
• Distance to discharged battery
Select or deselect an alternative using thecenter button (4). The change will be madeimmediately.
Resetting a trip odometer
Reset trip odometer TM by pressing and holding the RESET button the left-side steering wheel
lever. Trip odometer TA resets automatically if the ignition is switched off for more than 4 hours.
Changing the unit of measureChange the units of measure for driven distanceand fuel consumption in the center display's Top view by selecting
SettingsSystemUnitsand marking the desired unit.
NOTE
Changing these units of measure will also change the ones used in the Volvo navigation system *.
Related information
• Displaying trip statistics (p. 98)
• Trip computer (p. 96)
Displaying trip statistics Trip computer statistics can be displayed graphi- cally in the center display.
Page 114 of 546

||
INSTRUMENTS AND CONTROLS
* Option/accessory, for more information, see Introduction.
112
Changing a setting
A sub-category in Settings view with various possible settings
1. Tap the category/sub-category to navigate to
the desired setting.
2. Change the setting(s). > The changes are saved immediately.
Types of settings
Type of settingDescription
Trigger functionStarts an app or a separate view for more advanced settings. Tapthe text to e.g., connect aBluetooth device.
Radio buttonSelect one of the possible set- tings by tapping the desired radiobutton to e.g., change the systemlanguage.
Type of settingDescription
Multi- selectionbuttonSelect a level for a particular set- ting by pressing the desired partof the button e.g., to set thedesired level for City Safety.
Check boxTap to activate/deactivate a func- tion e.g., to select automatic startfor steering wheel heating.
SliderSelect a level for a function by pressing and dragging the slidercontrol e.g., to set a volume level.
Informa- tion dis-playThis is not an actual setting but displays information such as thevehicle's VIN number.
Related information
• Center display overview (p. 32)
• Navigating in the center display's views (p. 42)
• Using the center display (p. 49)
• Changing system settings in Settings view(p. 114)
• Categories in Settings view (p. 112)
Categories in Settings view
Settings view consists of a number of main cate- gories and sub-categories that contain settingsand information for many of the vehicle's fea-tures and functions.
The main categories in Settings view are: My
Car, Sound, Navigation, Media,Communication, Climate and System.
Each main category, in turn, contains several sub- categories with possible settings. The tableshows the first level of sub-categories. The possi-ble settings for a function or area are describedin greater detail in their respective articles in theowner's manual. For system settings not descri-bed in the respective articles, see "Changing sys-tem settings in Settings view."
My Car
Sub-categories
Displays
IntelliSafe
Park Assist
Drive Mode/Individual Drive Mode*
Lights
Mirrors
Locking and Unlocking Feedback