2016 VOLVO XC90 T8 clock
[x] Cancel search: clockPage 185 of 546

CLIMATE
183
3.
Tap
Add timer.
> A pop-up window will open.
NOTE
A new timer setting cannot be made if there are already 8 timers set. Delete one of theexisting timer settings in order to add a newone.
4. Tap Date to set a specific date for the timer
setting. Tap
Days to set a timer for one or more days
of the week. For
Days: activate/deactivate the repeat
function by selecting/deselecting the
Repeat weekly box.
5. For
Date: Select a date for preconditioning
by scrolling in the date list using the arrow keys. For
Days: Select days of the week for pre-
conditioning by tapping the days' buttons.
6. Set the time at which preconditioning should be completed by scrolling with the arrows in the clock.
7. Tap
Confirm to add the timer setting.
> The timer settings will be added to the list and activated.
Editing a timer setting1. Open Climate view in the center display. 2. Tap the
Parking climate tab.
3. Tap the timer setting to be changed. > A pop-up window will open.
4. Change the setting as described in the sec- tion "Adding a timer setting" above.
Deleting a timer setting
The button for editing a list/deleting a timer setting in the Climate setting's Parking climate tab
1. Open Climate view in the center display. 2.
Tap the
Parking climate tab.
3. Tap
Edit list.
4. Tap the delete icon at the right in the list. >The icon will change to the text
Delete. 5.
Tap
Delete to confirm.
> The timer setting will be deleted from the list.
Page 235 of 546

LOCKS AND ALARM
}}
233
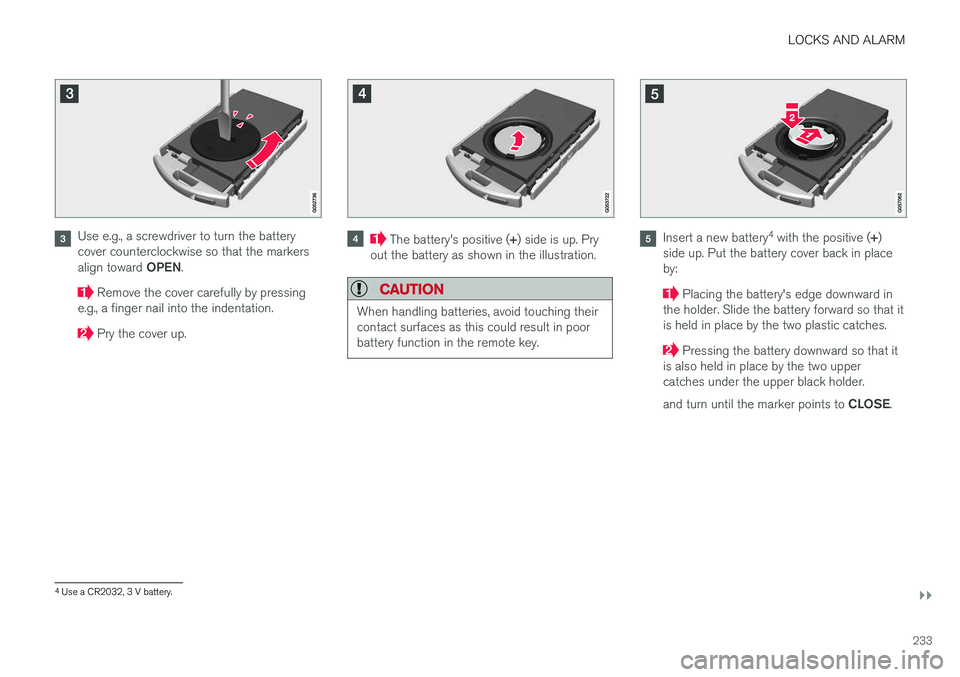
Use e.g., a screwdriver to turn the battery cover counterclockwise so that the markers align toward OPEN.
Remove the cover carefully by pressing
e.g., a finger nail into the indentation.
Pry the cover up.
The battery's positive ( +) side is up. Pry
out the battery as shown in the illustration.
CAUTION
When handling batteries, avoid touching their contact surfaces as this could result in poorbattery function in the remote key.
Insert a new battery 4
with the positive ( +)
side up. Put the battery cover back in place by:
Placing the battery's edge downward in
the holder. Slide the battery forward so that it is held in place by the two plastic catches.
Pressing the battery downward so that it
is also held in place by the two upper catches under the upper black holder. and turn until the marker points to CLOSE.
4
Use a CR2032, 3 V battery.
Page 236 of 546

||
LOCKS AND ALARM
234
NOTE
Volvo recommends that the batteries used in the remote control meet the UN Manual ofTest and Criteria, Part III, sub-section 38.3. Batteries installed in the key from the factory and batteries exchanged by an authorizedVolvo workshop fulfill the above criteria. Old batteries should be disposed of properly at a recycling center or at your Volvo retailer.
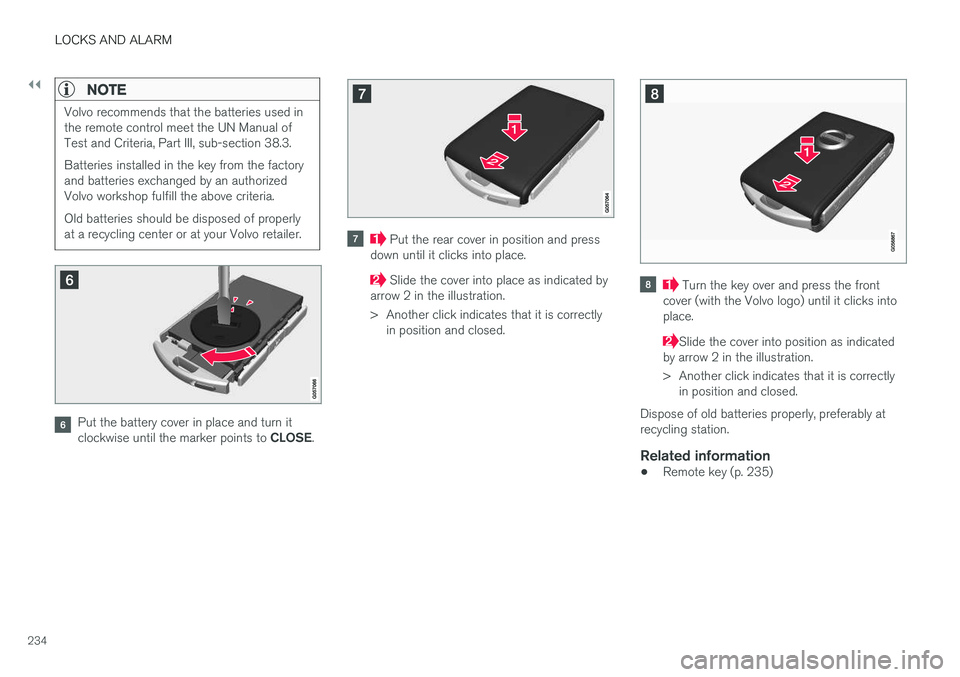
Put the battery cover in place and turn it clockwise until the marker points to CLOSE.
Put the rear cover in position and press
down until it clicks into place.
Slide the cover into place as indicated by
arrow 2 in the illustration.
> Another click indicates that it is correctly in position and closed. Turn the key over and press the front
cover (with the Volvo logo) until it clicks into place.
Slide the cover into position as indicated
by arrow 2 in the illustration.
> Another click indicates that it is correctly in position and closed.
Dispose of old batteries properly, preferably at recycling station.
Related information
• Remote key (p. 235)
Page 250 of 546

||
LOCKS AND ALARM
* Option/accessory, for more information, see Introduction.
248
Related information
• Remote key's range (p. 235)
• Locking/unlocking from outside the vehicle (p. 243)
• Foot movement tailgate operation
* (p. 238)
Locking/unlocking with the detachable key blade
The detachable key blade can be used to e.g., unlock the driver's door from the outside if, forexample, the remote key's battery is weak.
Unlocking
Pull out the driver's door handle as far as possible to access the lock cylinder.
Remove the key blade from the remote key and insert it into the lock cylinder.
Turn it clockwise 45 degrees so that the key blade points straight rearward.
Turn the key blade back 45 degrees to its original position. Remove the key blade fromthe lock cylinder and release the door han-dle.
5. Pull the door handle again to open the door. > This will trigger the alarm. Lock the door in the same way, but turn the keyin step 3 counterclockwise.
Turning off the alarm
Backup key reader under the tunnel console cup hold- ers
To turn off the alarm:
1. Place the remote key in the cup holder (on
the key symbol) in the tunnel console (see the illustration).
2. Turn the start knob to START and release it.
> The start knob will return to its original position and the alarm will be turned off.
LockingIf necessary, the vehicle can be locked by insert-ing the detachable key blade into the lock cylin-der in the driver's door. Each of the other doors has a lock mechanism that must be pressed in using the key blade sothat the door cannot be opened from the outside.The doors can still be opened from the inside.
Page 373 of 546

STARTING AND DRIVING
* Option/accessory, for more information, see Introduction.371
ModeFunctions available
0•The odometer, clock and tem- perature gauge are illuminated
• Power seats
* can be adjusted
• The power windows can be oper-ated
• The 12-volt socket in the cargocompartment can be used
• The center display is activatedand can be used
• The infotainment system can beused for a limited time
In this mode, certain functions can only be used for a limited time to helpminimize battery drain
I• The laminated panoramic roof
*,
power seats */windows,12-volt
sockets in the passenger com- partment, Bluetooth, navigation system *, climate system blower,
windshield wipers can be oper- ated
• The infotainment system will start(if it was started when the ignitionwas switched off)
Using electrical current will drain the start battery in this mode.
ModeFunctions available
II• The headlights illuminate
• Warning/indicator lights illumi- nate for 5 seconds
• A number of other functions willalso be activated. However, the heated seats
* and heated rear
window functions can only be activated when the engine is run-ning.
This mode should only be used for very short periods to help avoiddraining the battery.
Selecting an ignition mode
Start knob in the tunnel console
• Ignition mode 0
: unlock the vehicle and
keep the remote key in the passenger's com- partment.
NOTE
To access ignition modes I or II without star-
ting the engine, the brake pedal must not be
depressed when these modes are selected.
• Ignition mode I
: Turn the start knob to
START and release it. The knob will return
automatically to its original position.
• Ignition mode II
: Turn the start knob to
START and hold it there for approx.
4 seconds. Release the knob.
• Returning to ignition mode 0
: To return to
mode 0 from mode II or I, turn the start knob
to STOP and release it.
Related information
•Starting the engine (p. 372)
• Turning the engine off (p. 374)
Page 506 of 546

MAINTENANCE AND SERVICING
504
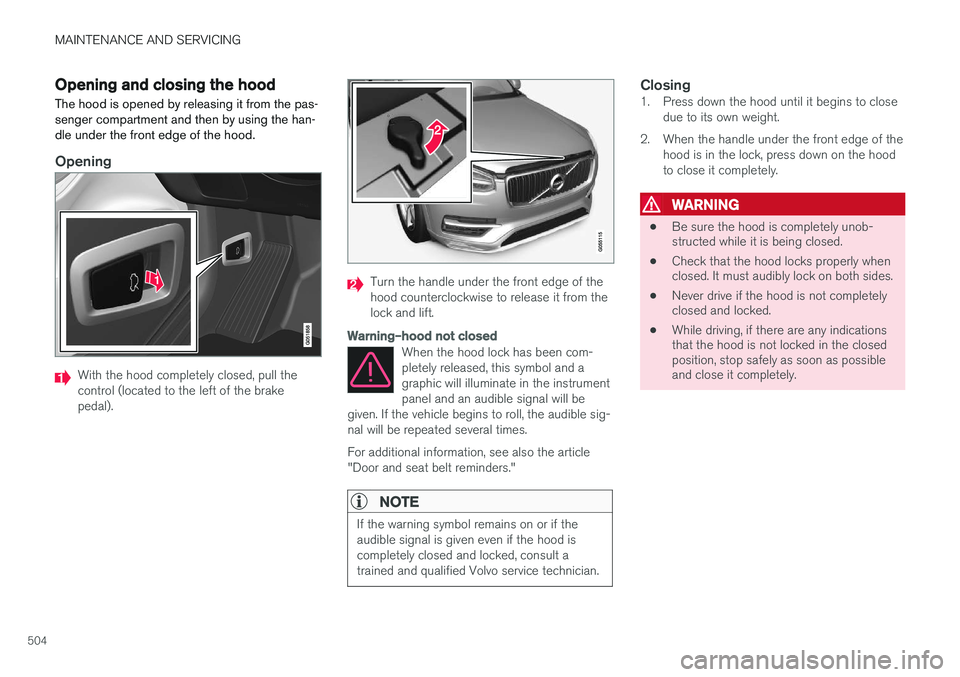
Opening and closing the hood The hood is opened by releasing it from the pas- senger compartment and then by using the han-dle under the front edge of the hood.
Opening
With the hood completely closed, pull the control (located to the left of the brakepedal).
Turn the handle under the front edge of the hood counterclockwise to release it from thelock and lift.
Warning–hood not closed
When the hood lock has been com- pletely released, this symbol and agraphic will illuminate in the instrumentpanel and an audible signal will be
given. If the vehicle begins to roll, the audible sig-nal will be repeated several times. For additional information, see also the article "Door and seat belt reminders."
NOTE
If the warning symbol remains on or if the audible signal is given even if the hood iscompletely closed and locked, consult atrained and qualified Volvo service technician.
Closing1. Press down the hood until it begins to close due to its own weight.
2. When the handle under the front edge of the hood is in the lock, press down on the hood to close it completely.
WARNING
• Be sure the hood is completely unob- structed while it is being closed.
• Check that the hood locks properly whenclosed. It must audibly lock on both sides.
• Never drive if the hood is not completelyclosed and locked.
• While driving, if there are any indicationsthat the hood is not locked in the closedposition, stop safely as soon as possibleand close it completely.
Page 537 of 546

INDEX
535
Electronic Climate Control 188
introduction 178, 188
passenger compartment filter 186
preconditioning 179, 181
rear controls 188, 190
recirculation 194
refrigerant 527
service 479
setting the temperature 192
voice commands 123
Clock 117
Cold weather driving 358
Collision warning system 288
Compass in rearview mirror 139 calibrate 139
Connected service booking 475
Convertible seats 74
Coolant 528 refilling 468
Corrosion protection 516
Courtesy lighting 148
Crash event data 30
Crash mode 87, 88
Cross Traffic Alert 333, 334, 335, 337
Cruise control 261, 262, 263, 264, 265 adaptive 266, 268, 269, 271, 272, 273 , 282 , 283 , 284 , 285 , 286
Curb weight 449, 525
D
Daytime running lights 140, 142 Defroster
rear window and mirrors 195
Detachable key blade 237, 248
Digital owner's manual 55, 56
Dimensions 523
Disconnecting the front passenger