2016 VOLVO V60 CROSS COUNTRY warning light
[x] Cancel search: warning lightPage 225 of 402

07 Driver support
07
}}
223
Lane Departure Warning (LDW) – operation
Operation and function
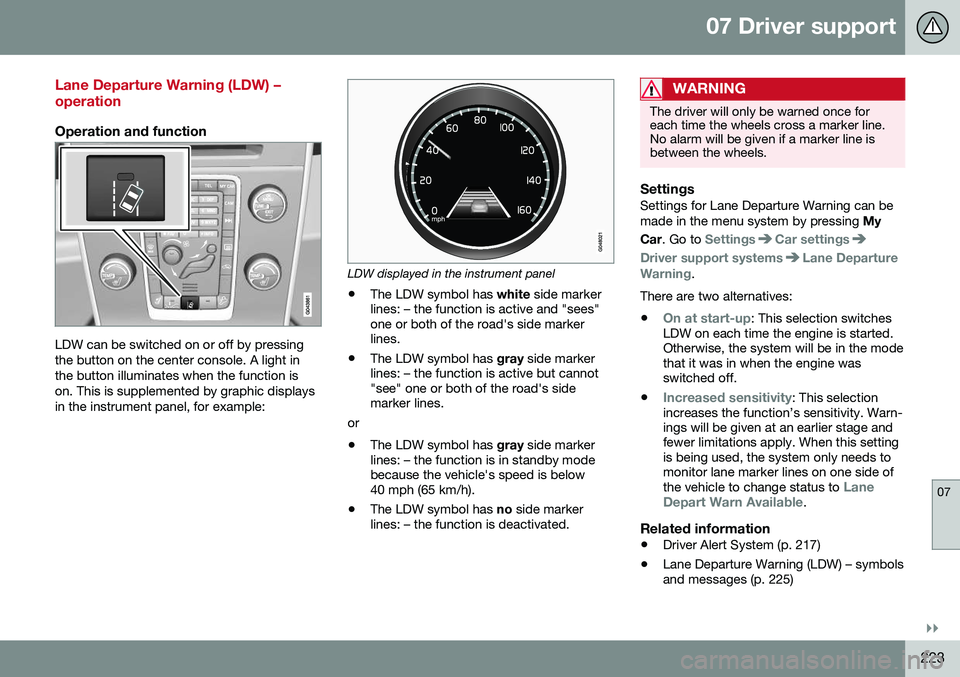
LDW can be switched on or off by pressing the button on the center console. A light inthe button illuminates when the function ison. This is supplemented by graphic displaysin the instrument panel, for example:
LDW displayed in the instrument panel
• The LDW symbol has
white side marker
lines: – the function is active and "sees" one or both of the road's side markerlines.
• The LDW symbol has
gray side marker
lines: – the function is active but cannot"see" one or both of the road's sidemarker lines.
or
• The LDW symbol has
gray side marker
lines: – the function is in standby modebecause the vehicle's speed is below40 mph (65 km/h).
• The LDW symbol has
no side marker
lines: – the function is deactivated.
WARNING
The driver will only be warned once for each time the wheels cross a marker line.No alarm will be given if a marker line isbetween the wheels.
SettingsSettings for Lane Departure Warning can be made in the menu system by pressing My
Car . Go to
SettingsCar settings
Driver support systemsLane Departure
Warning.
There are two alternatives:
•
On at start-up: This selection switches
LDW on each time the engine is started. Otherwise, the system will be in the modethat it was in when the engine wasswitched off.
•
Increased sensitivity: This selection
increases the function’s sensitivity. Warn- ings will be given at an earlier stage andfewer limitations apply. When this settingis being used, the system only needs tomonitor lane marker lines on one side of the vehicle to change status to
Lane
Depart Warn Available.
Related information
• Driver Alert System (p. 217)
• Lane Departure Warning (LDW) – symbols and messages (p. 225)
Page 230 of 402

07 Driver support
07
228
Lane Keeping Aid (LKA) – operation
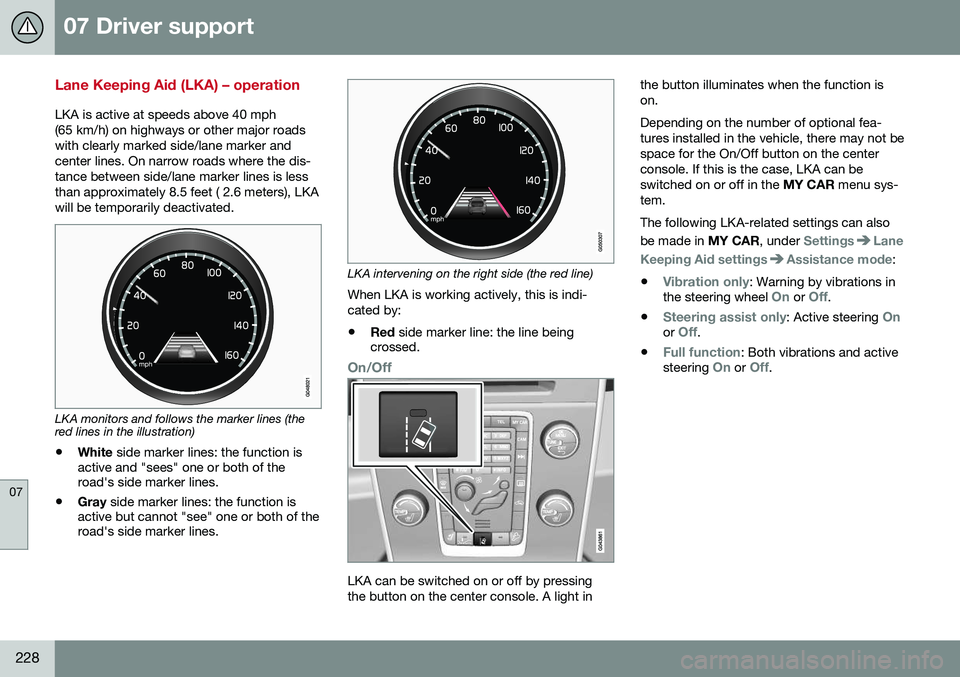
LKA is active at speeds above 40 mph (65 km/h) on highways or other major roadswith clearly marked side/lane marker andcenter lines. On narrow roads where the dis-tance between side/lane marker lines is lessthan approximately 8.5 feet ( 2.6 meters), LKAwill be temporarily deactivated.
LKA monitors and follows the marker lines (the red lines in the illustration)• White
side marker lines: the function is
active and "sees" one or both of the road's side marker lines.
• Gray
side marker lines: the function is
active but cannot "see" one or both of theroad's side marker lines.
LKA intervening on the right side (the red line)
When LKA is working actively, this is indi- cated by:
• Red
side marker line: the line being
crossed.
On/Off
LKA can be switched on or off by pressing the button on the center console. A light in the button illuminates when the function ison. Depending on the number of optional fea- tures installed in the vehicle, there may not bespace for the On/Off button on the centerconsole. If this is the case, LKA can beswitched on or off in the
MY CAR menu sys-
tem. The following LKA-related settings can also be made in MY CAR, under
SettingsLane
Keeping Aid settings
Assistance mode:
•
Vibration only: Warning by vibrations in
the steering wheel On or Off.
•
Steering assist only: Active steering Onor Off.
•
Full function: Both vibrations and active
steering On or Off.
Page 237 of 402

07 Driver support
07
235
Activating/deactivatingThe system is activated automatically when the vehicle is started.
–Press the Park assist button on the center console to temporarily deactivate the sys-tem(s).
> The indicator light in the button will goout when the system has been deacti- vated.
Park assist will be automatically reactivatedthe next time the engine is started, or if thebutton is pressed (the indicator light in thebutton will illuminate).
NOTE
Park assist is disengaged automatically when the parking brake is applied.
Related information
• Park assist – introduction (p. 232)
• Park assist – limitations (p. 235)
• Park assist – function (p. 232)
• Park assist – troubleshooting (p. 240)
• Rear Park Assist Camera (PAC) – function (p. 241)
Park assist – limitations
Cleaning the sensorsThe sensors must be cleaned regularly to ensure that they work properly. Clean themwith water and a suitable car washing deter-gent.
Location of the front sensors
Location of the rear sensors Ice and snow covering the sensors may cause incorrect warning signals.
NOTE
If the sensors are obstructed by e.g., dirt, snow, or ice, this could result in falsewarning signals from the park assist sys-tem.
Related information
•
Park assist – introduction (p. 232)
• Park assist – function (p. 232)
• Park assist – operation (p. 234)
• Park assist – troubleshooting (p. 240)
• Rear Park Assist Camera (PAC) – function (p. 241)
Page 248 of 402

||
07 Driver support
07
246* Option/accessory, for more information, see Introduction.
WARNING
• BLIS and CTA are information sys- tems, NOT warning or safety systemsand do not function in all situations.
• BLIS and CTA do not eliminate theneed for you to visually confirm theconditions around you, and the needfor you to turn your head and should-ers to make sure that you can safelychange lanes or back up.
• As the driver, you have full responsibil-ity for changing lanes/backing up in asafe manner.
Related information
•
BLIS* – function (p. 246)
• BLIS* – operation (p. 247)
• BLIS* – Cross Traffic Alert (CTA) (p. 247)
• BLIS* – limitations (p. 249)
• BLIS* – messages (p. 250)
BLIS* – function
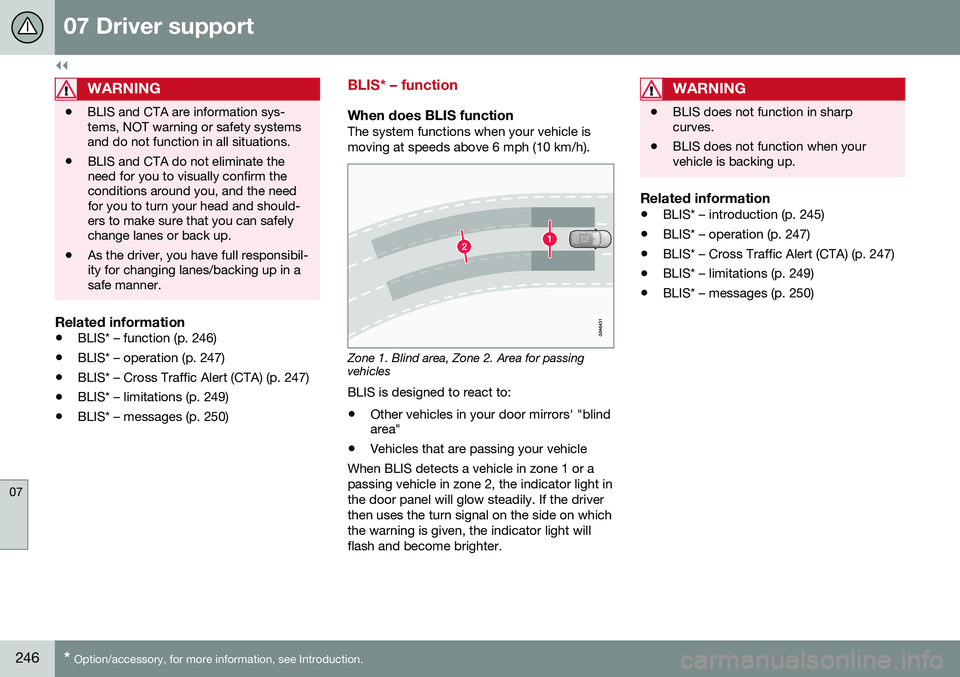
When does BLIS functionThe system functions when your vehicle is moving at speeds above 6 mph (10 km/h).
Zone 1. Blind area, Zone 2. Area for passing vehicles
BLIS is designed to react to:
• Other vehicles in your door mirrors' "blind area"
• Vehicles that are passing your vehicle
When BLIS detects a vehicle in zone 1 or a passing vehicle in zone 2, the indicator light inthe door panel will glow steadily. If the driverthen uses the turn signal on the side on whichthe warning is given, the indicator light willflash and become brighter.
WARNING
• BLIS does not function in sharp curves.
• BLIS does not function when yourvehicle is backing up.
Related information
•
BLIS* – introduction (p. 245)
• BLIS* – operation (p. 247)
• BLIS* – Cross Traffic Alert (CTA) (p. 247)
• BLIS* – limitations (p. 249)
• BLIS* – messages (p. 250)
Page 250 of 402

||
07 Driver support
07
248
WARNING
•BLIS and CTA are information sys- tems, NOT warning or safety systemsand do not function in all situations.
• BLIS and CTA do not eliminate theneed for you to visually confirm theconditions around you, and the needfor you to turn your head and should-ers to make sure that you can safelychange lanes or back up.
• As the driver, you have full responsibil-ity for changing lanes/backing up in asafe manner.
When does CTA function
How CTA works
CTA supplements BLIS by warning the driver of crossing traffic behind your vehicle, for example, when backing out of a parkingspace. It is primarily designed to detect another vehi- cle but in certain cases may also detectpedestrians or smaller objects such as bicy-cles. CTA is only activated when the vehicle is backing up and is activated automaticallywhen the gear selector is put in reverse.
• An audible signal indicates that CTA has detected something that is approachingfrom the side. The signal will come fromeither the left or right audio systemspeakers, depending on which the side ofyour vehicle the approaching vehicle/object has been detected.
• CTA also provides a warning by illuminat-ing the BLIS indicator lights.
• An icon will also illuminate in the Parkassist graphic on the center console dis-play.
LimitationsCTA has limitations in certain situations, for example, the CTA sensors cannot "see"through other parked vehicles or obstruc-tions. The following are several examples where CTA's "field of vision" may initially be limitedand approaching vehicles cannot be detecteduntil they are too close:
The vehicle is pulled far into a parking space
CTA's blind area
CTA's "field of vision"
In angled parking spaces, CTA may be "blind" on one side
15
Blind Spot Information System
Page 255 of 402

08 Starting and driving
08
253
WARNING
•Always remove the remote key from the ignition slot when leaving the vehi-cle and ensure that the ignition inmode
0 (see Ignition modes (p. 77) for
information about the ignition modes).
• On vehicles with the optional keylessdrive, never remove the remote keyfrom the vehicle while it is being drivenor towed.
• Always place the gear selector in Parkand apply the parking brake beforeleaving the vehicle. Never leave thevehicle unattended with the enginerunning.
• Always open garage doors fully beforestarting the engine inside a garage toensure adequate ventilation. Theexhaust gases contain carbon monox-ide, which is invisible and odorless butvery poisonous.
NOTE
•
After a cold start, idle speed may be noticeably higher than normal for ashort period. This is done to help bringcomponents in the emission controlsystem to their normal operating tem-perature as quickly as possible, whichenables them to control emissions andhelp reduce the vehicle's impact on the environment 3
.
CAUTION
• When starting in cold weather, the automatic transmission may shift up atslightly higher engine speeds than nor-mal until the automatic transmissionfluid reaches normal operating tem-perature.
• Do not race a cold engine immediatelyafter starting. Oil flow may not reachsome lubrication points fast enough toprevent engine damage.
• The engine should be idling when youmove the gear selector. Never acceler-ate until after you feel the transmissionengage. Accelerating immediately afterselecting a gear will cause harshengagement and premature transmis-sion wear.
• Selecting
P or N when idling at a
standstill for prolonged periods of timewill help prevent overheating of theautomatic transmission fluid.
Related information
• Switching off the engine (p. 254)
3
If the gear selector is in the D or R positions and the car is not moving, engine speed (rpm) will be lower and it will take longer for the engine to reach normal operating temperature.
Page 271 of 402

08 Starting and driving
08
}}
269
All Wheel Drive (AWD)
Your Volvo can be equipped with permanent All Wheel Drive, which means that power isdistributed automatically between the frontand rear wheels.
Under normal driving conditions, most of the engine's power is directed to the frontwheels. However, if there is any tendency forthe front wheels to spin, an electronicallycontrolled coupling distributes power to thewheels that have the best traction.
NOTE
The message AWD disabled Service
required will be appear in the information
display if an electrical fault should occur in the AWD system. A warning light will alsoilluminate in the instrument panel. If thisoccurs, have the system checked by atrained and qualified Volvo service techni-cian.
Related information
• Transmission – general information (p. 257)
Hill Descent Control (HDC) 11
–
introduction
HDC is a type of automatic engine brake and makes it possible to increase or decrease thevehicle's speed on downhill gradients usingonly the accelerator pedal, without applyingthe brakes. The brake system functions auto-matically to maintain a low and steady speed.
IntroductionNormally, when the accelerator pedal isreleased while driving down hills, the vehicle'sspeed slows as the engine runs at lower rpm(the normal engine braking effect). However, ifthe downhill gradient becomes steeper and ifthe vehicle is carrying a load, speed increasesdespite the engine braking effect. In this sit-uation, the brakes must be applied to reducethe vehicle's speed. HDC is particularly useful when driving down steep hills with rough surfaces, and where theroad may have slippery patches.
WARNING
HDC does not function in all situations, and is a supplementary braking aid. Thedriver has full responsibility for driving in asafe manner.
11 Available on the V60 Cross Country in combination with certain engines only.
Page 273 of 402

08 Starting and driving
08
}}
* Option/accessory, for more information, see Introduction.271
NOTE
Engine response to pressure on the accel- erator pedal may be slightly slower thannormal when HDC is activated.
Related information
• Hill Descent Control (HDC) – introduction (p. 269)
• Brakes – general (p. 271)
Brakes – general
The brake system is a hydraulic system con- sisting of two separate brake circuits. If aproblem should occur in one of these circuits,it is still possible to stop the vehicle with theother brake circuit. If the brake pedal must be depressed farther than normal and requires greater foot pres-sure, the stopping distance will be longer. A warning light in the instrument panel will light up to warn the driver that a fault hasoccurred. If this light comes on while driving or braking, stop immediately and check the brake fluidlevel in the reservoir.
NOTE
Press the brake pedal hard and maintain pressure on the pedal – do not pump thebrakes.
WARNING
If the fluid level is below the
MIN mark in
the reservoir or if a brake system message is shown in the information display: DO
NOT DRIVE . Have the vehicle towed to a
trained and qualified Volvo service techni-cian and have the brake system inspected.
Brake pad inspectionOn vehicles equipped with a jack*, the condi- tion of the brake pads can be checked byraising the vehicle (see Changing a wheel –removing wheel (p. 296) for informationabout using the jack and removing a wheel)and performing a visual inspection of thebrake pads.
WARNING
• If the vehicle has been driven immedi- ately prior to a brake pad inspection,the wheel hub, brake components,etc., will be very hot. Allow time forthese components to cool before car-rying out the inspection.
• Apply the parking brake and put thegear selector in the Park (
P) position.
• Block the wheels standing on theground, use rigid wooden blocks orlarge stones.