2016 VOLVO V60 CROSS COUNTRY warning light
[x] Cancel search: warning lightPage 88 of 402
||
03 Instruments and controls
03
86* Option/accessory, for more information, see Introduction.
3. Push back the lever to lock the steering
wheel in place. If the lever is difficult to push into place, press the steering wheellightly at the same time as you push thelever.
WARNING
Never adjust the steering wheel while driv- ing.
With the optional speed-dependent power steering the level of steering force can beadjusted, see Active chassis* (Four C)(p. 169).
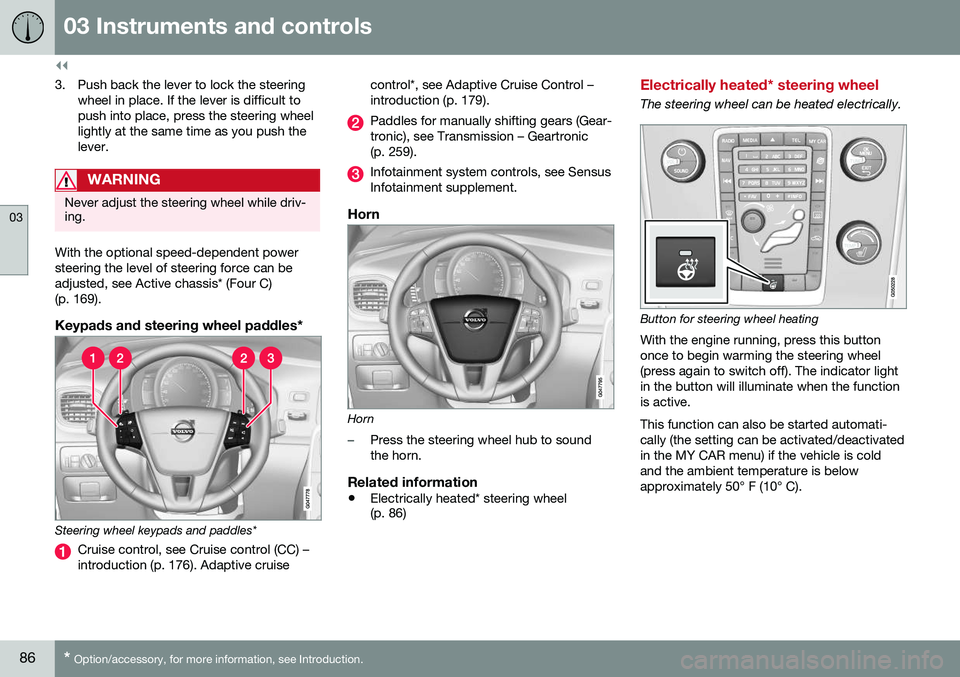
Keypads and steering wheel paddles*
Steering wheel keypads and paddles*
Cruise control, see Cruise control (CC) – introduction (p. 176). Adaptive cruise control*, see Adaptive Cruise Control –introduction (p. 179).
Paddles for manually shifting gears (Gear- tronic), see Transmission – Geartronic(p. 259).
Infotainment system controls, see Sensus Infotainment supplement.
Horn
Horn
–Press the steering wheel hub to sound the horn.
Related information
•
Electrically heated* steering wheel (p. 86)
Electrically heated* steering wheel
The steering wheel can be heated electrically.
Button for steering wheel heating
With the engine running, press this button once to begin warming the steering wheel(press again to switch off). The indicator lightin the button will illuminate when the functionis active. This function can also be started automati- cally (the setting can be activated/deactivatedin the MY CAR menu) if the vehicle is coldand the ambient temperature is belowapproximately 50° F (10° C).
Page 96 of 402

||
03 Instruments and controls
03
94* Option/accessory, for more information, see Introduction.
NOTE
• This automatic flashing sequence can be interrupted by immediately movingthe lever in the opposite direction.
• If the turn signal indicator flashesfaster than normal, check for aburned-out turn signal bulb.
Related information
•
Hazard warning flashers (p. 93)
Front interior lighting
The lighting in the front part of the passenger compartment is controlled with the buttons inthe ceiling console.
G021149
Light switches, front roof lighting
Drivers side front reading light, on/off
Passenger's side front reading light, on/off
Overhead courtesy lighting.
Switch (3) has three positions for all passen- ger compartment lighting:
• Off
: right side depressed, automatic light-
ing off.
• Neutral position
: automatic lighting is
on.
• On
– left side depressed, passenger
compartment lighting on.
Overhead courtesy lightingThe passenger compartment lighting is switched on and off automatically when but-ton (3) is in the neutral position. The lighting comes on and remains on for 30 seconds if:
• the vehicle is unlocked from the outside with the key or remote control
• the engine is switched off and the ignitionis in mode
0.
The lighting switches off when:
• the engine is started
• the vehicle is locked from the outside.
The lighting comes on and remains on for two minutes if one of the doors is open. The passenger compartment lighting can be switched on and off manually within30 minutes after the vehicle has beenunlocked. If the lighting is switched on manually and the vehicle is locked, the courtesy lighting willswitch off automatically after one minute.
Courtesy lights/door step lighting*The courtesy lights/door step lighting switch on/off automatically when one of the frontdoors is opened/closed.
Glove compartment lightingThe glove compartment lighting switches on/off automatically when the lid is opened/closed.
Page 101 of 402
03 Instruments and controls
03
}}
99
Power windows
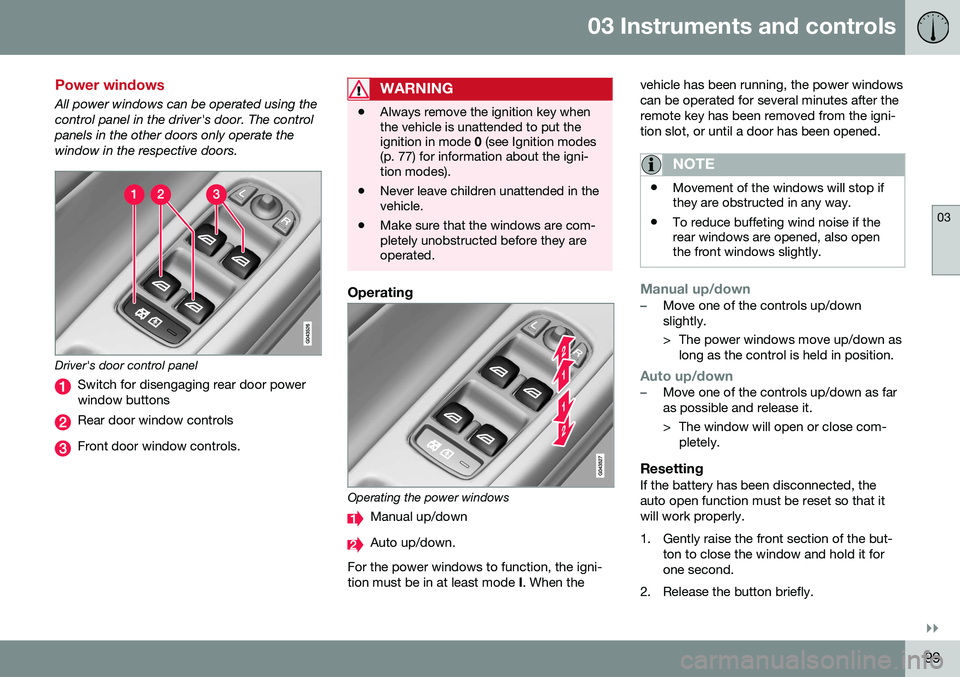
All power windows can be operated using the control panel in the driver's door. The controlpanels in the other doors only operate thewindow in the respective doors.
Driver's door control panel
Switch for disengaging rear door power window buttons
Rear door window controls
Front door window controls.
WARNING
•Always remove the ignition key when the vehicle is unattended to put theignition in mode
0 (see Ignition modes
(p. 77) for information about the igni-tion modes).
• Never leave children unattended in thevehicle.
• Make sure that the windows are com-pletely unobstructed before they areoperated.
Operating
Operating the power windows
Manual up/down
Auto up/down.
For the power windows to function, the igni- tion must be in at least mode I. When the vehicle has been running, the power windowscan be operated for several minutes after theremote key has been removed from the igni-tion slot, or until a door has been opened.
NOTE
•
Movement of the windows will stop if they are obstructed in any way.
• To reduce buffeting wind noise if therear windows are opened, also openthe front windows slightly.
Manual up/down–Move one of the controls up/down slightly.
> The power windows move up/down as
long as the control is held in position.
Auto up/down–Move one of the controls up/down as far as possible and release it.
> The window will open or close com-pletely.
ResettingIf the battery has been disconnected, the auto open function must be reset so that itwill work properly.
1. Gently raise the front section of the but- ton to close the window and hold it for one second.
2. Release the button briefly.
Page 102 of 402
03 Instruments and controls
03
100* Option/accessory, for more information, see Introduction.
3. Raise the front section of the button again
for one second.Power door mirrors
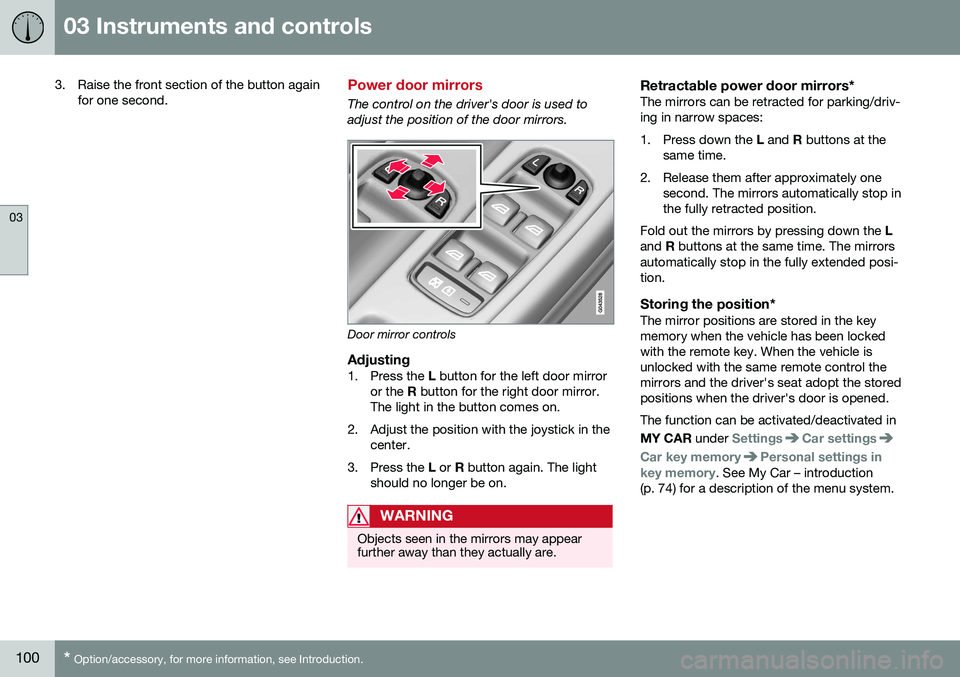
The control on the driver's door is used to adjust the position of the door mirrors.
Door mirror controls
Adjusting1. Press the L button for the left door mirror
or the R button for the right door mirror.
The light in the button comes on.
2. Adjust the position with the joystick in the center.
3. Press the L or R button again. The light
should no longer be on.
WARNING
Objects seen in the mirrors may appear further away than they actually are.
Retractable power door mirrors*The mirrors can be retracted for parking/driv- ing in narrow spaces:
1. Press down the L and R buttons at the
same time.
2. Release them after approximately one second. The mirrors automatically stop in the fully retracted position.
Fold out the mirrors by pressing down the L
and R buttons at the same time. The mirrors
automatically stop in the fully extended posi-tion.
Storing the position*The mirror positions are stored in the keymemory when the vehicle has been lockedwith the remote key. When the vehicle isunlocked with the same remote control themirrors and the driver's seat adopt the storedpositions when the driver's door is opened. The function can be activated/deactivated in MY CAR under
SettingsCar settings
Car key memoryPersonal settings in
key memory. See My Car – introduction
(p. 74) for a description of the menu system.
Page 109 of 402
03 Instruments and controls
03
}}
* Option/accessory, for more information, see Introduction.107
WARNING
•
If you use HomeLink ®
to open a
garage door or gate, be sure no one is near the gate or door while it is inmotion.
• When programming a garage dooropener, it is advised to park outside ofthe garage.
• Do not use HomeLink ®
with any
garage door opener that lacks safetystop and reverse features as requiredby U.S. federal safety standards (thisincludes any garage door openermodel manufactured before April 1,1982). A garage door that cannotdetect an object - signaling the door tostop and reverse - does not meet cur-rent U.S. federal safety standards. Formore information, contact HomeLinkat: www.homelink.com.
The HomeLink ®
22
Wireless Control System
provides a convenient way to replace up to three hand-held radio-frequency (RF) trans-mitters used to activate devices such as gateoperators, garage door openers, entry doorlocks, security systems, even home lighting.Additional information can be found on theInternet at, www.homelink.com/www.youtube.com/HomeLinkGentex or byphoning the hotline at 1–800–355–3515. Retain the original transmitter of the RFdevice you are programming for use in othervehicles as well as for future HomeLink pro-gramming. It is also suggested that upon thesale of the vehicle, the programmed Home-Link buttons be erased for security purposes.Refer to “Resetting HomeLink Buttons” in HomeLink
®
Wireless Control System* – pro-
gramming (p. 107).
Using HomeLinkTo operate, simply press and hold the pro- grammed HomeLink button until the traineddevice begins to operate (this may take sev-eral seconds). Activation will now occur forthe trained device (i.e., garage door opener,gate operator, security system, entry doorlock, home/office lighting, etc.). For conven-ience, the hand-held transmitter of the devicemay also be used at any time. In the eventthat there are still programming difficulties orquestions, contact HomeLink at:www.homelink.com/www.youtube.com/HomeLinkGentex or by phoning the hotline at1–800–355–3515.
NOTE
If the ignition is switched off, HomeLink will function for 30 minutes after the driv-er's door has been opened.
HomeLink ®
Wireless Control System*
– programming
The HomeLink Wireless Control System pro- vides a convenient way to replace up to threehand-held radio-frequency (RF) transmittersused to activate devices such as gate opera-tors, garage door openers, entry door locks,security systems, even home lighting. Addi-tional information can be found on the Inter-net atwww.homelink.com/www.youtube.com/HomeLinkGentex or by phoning the hotline at1–800–355–3515.
NOTE
Some vehicles may require the ignition to be switched on or be in the “accessories”position for programming and/or operationof HomeLink. It is also recommended thata new battery be placed in the hand-heldtransmitter of the device being pro-grammed to HomeLink for quicker trainingand accurate transmission of the radio-fre-quency signal. The HomeLink buttonsmust be reset first. When this has beencompleted, Homelink is in learning modeso that you can perform programming.
1. Position the end of your hand-held trans- mitter 1–3 inches (5–14 cm) away from the HomeLink button you wish to pro-gram while keeping the indicator light inview.
22HomeLink and the HomeLink house are registered trademarks of Gentex Corporation.
Page 115 of 402
03 Instruments and controls
03
113
Related information
•Information displays – introduction (p. 66)
• Information display – menu overview (p. 111)
• Information display – menu controls(p. 111)
Trip computer – introduction
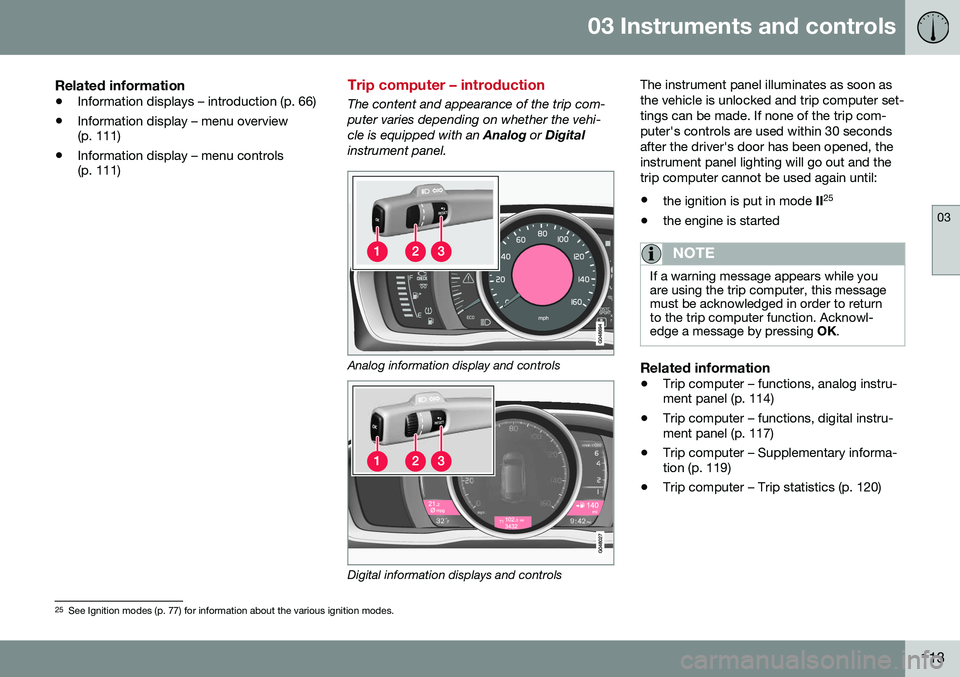
The content and appearance of the trip com- puter varies depending on whether the vehi-cle is equipped with an
Analog or Digital
instrument panel.
Analog information display and controls
Digital information displays and controls The instrument panel illuminates as soon as the vehicle is unlocked and trip computer set-tings can be made. If none of the trip com-puter's controls are used within 30 secondsafter the driver's door has been opened, theinstrument panel lighting will go out and thetrip computer cannot be used again until: •
the ignition is put in mode II25
• the engine is started
NOTE
If a warning message appears while you are using the trip computer, this messagemust be acknowledged in order to returnto the trip computer function. Acknowl-edge a message by pressing
OK.
Related information
• Trip computer – functions, analog instru- ment panel (p. 114)
• Trip computer – functions, digital instru-ment panel (p. 117)
• Trip computer – Supplementary informa-tion (p. 119)
• Trip computer – Trip statistics (p. 120)
25
See Ignition modes (p. 77) for information about the various ignition modes.
Page 139 of 402
05 Loading and storage
05
* Option/accessory, for more information, see Introduction.137
Tunnel console
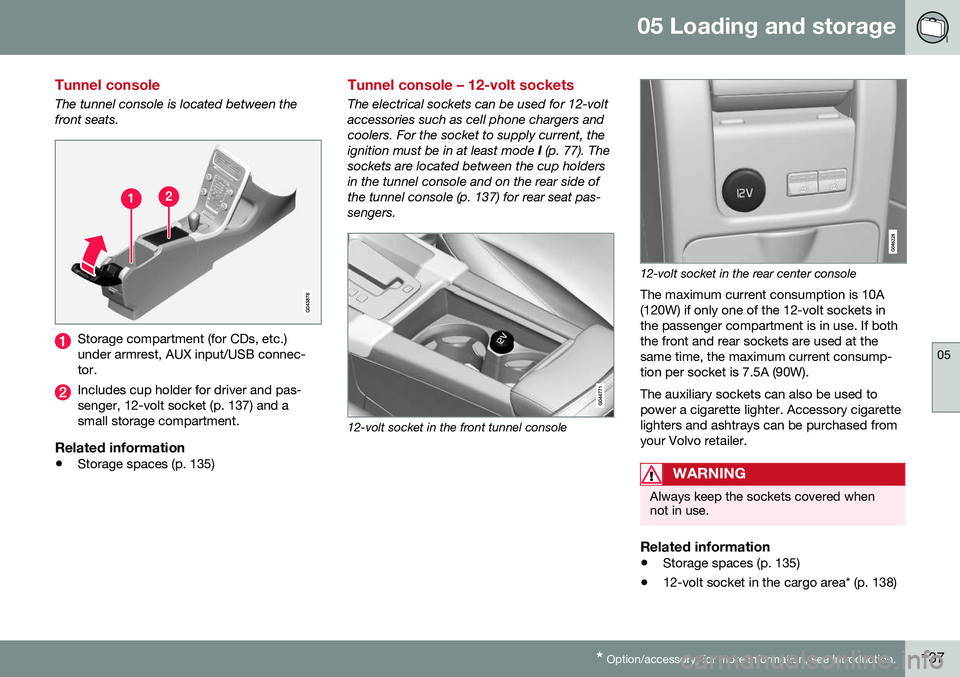
The tunnel console is located between the front seats.
Storage compartment (for CDs, etc.) under armrest, AUX input/USB connec-tor.
Includes cup holder for driver and pas- senger, 12-volt socket (p. 137) and asmall storage compartment.
Related information
• Storage spaces (p. 135)
Tunnel console – 12-volt sockets
The electrical sockets can be used for 12-volt accessories such as cell phone chargers andcoolers. For the socket to supply current, theignition must be in at least mode
I (p. 77). The
sockets are located between the cup holdersin the tunnel console and on the rear side ofthe tunnel console (p. 137) for rear seat pas-sengers.
12-volt socket in the front tunnel console
12-volt socket in the rear center console
The maximum current consumption is 10A (120W) if only one of the 12-volt sockets inthe passenger compartment is in use. If boththe front and rear sockets are used at thesame time, the maximum current consump-tion per socket is 7.5A (90W). The auxiliary sockets can also be used to power a cigarette lighter. Accessory cigarettelighters and ashtrays can be purchased fromyour Volvo retailer.
WARNING
Always keep the sockets covered when not in use.
Related information
• Storage spaces (p. 135)
• 12-volt socket in the cargo area* (p. 138)
Page 167 of 402
06 Locks and alarm
06
165
Alarm indicator
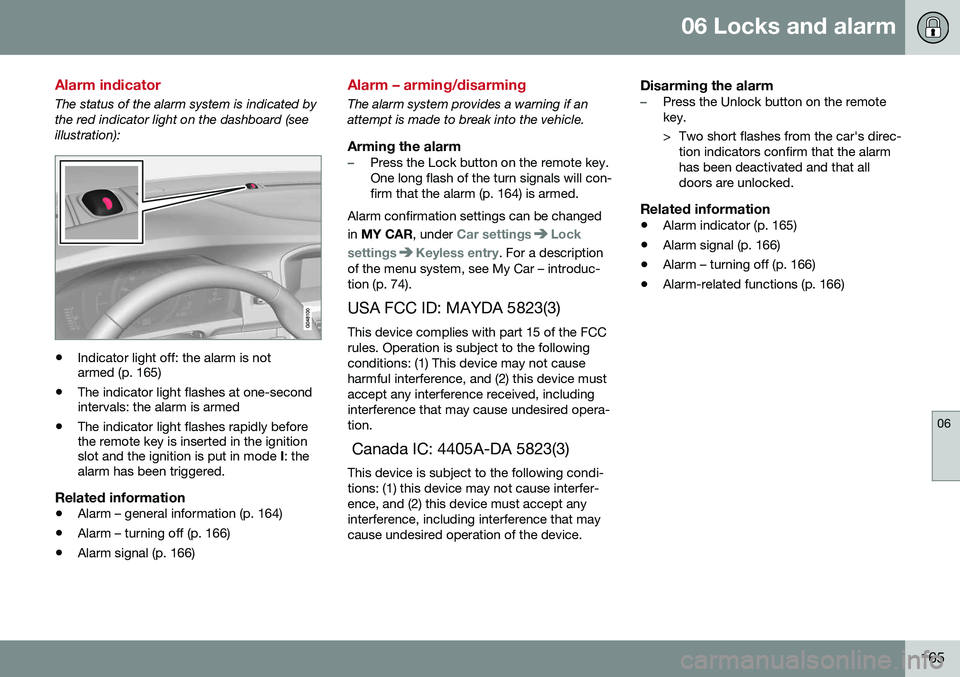
The status of the alarm system is indicated by the red indicator light on the dashboard (seeillustration):
•Indicator light off: the alarm is not armed (p. 165)
• The indicator light flashes at one-secondintervals: the alarm is armed
• The indicator light flashes rapidly beforethe remote key is inserted in the ignitionslot and the ignition is put in mode
I: the
alarm has been triggered.
Related information
• Alarm – general information (p. 164)
• Alarm – turning off (p. 166)
• Alarm signal (p. 166)
Alarm – arming/disarming
The alarm system provides a warning if an attempt is made to break into the vehicle.
Arming the alarm–Press the Lock button on the remote key. One long flash of the turn signals will con-firm that the alarm (p. 164) is armed.
Alarm confirmation settings can be changed in MY CAR , under
Car settingsLock
settings
Keyless entry. For a description
of the menu system, see My Car – introduc- tion (p. 74).
USA FCC ID: MAYDA 5823(3) This device complies with part 15 of the FCCrules. Operation is subject to the followingconditions: (1) This device may not causeharmful interference, and (2) this device mustaccept any interference received, includinginterference that may cause undesired opera-tion. Canada IC: 4405A-DA 5823(3) This device is subject to the following condi- tions: (1) this device may not cause interfer-ence, and (2) this device must accept anyinterference, including interference that maycause undesired operation of the device.
Disarming the alarm–Press the Unlock button on the remote key.
> Two short flashes from the car's direc- tion indicators confirm that the alarm has been deactivated and that alldoors are unlocked.
Related information
• Alarm indicator (p. 165)
• Alarm signal (p. 166)
• Alarm – turning off (p. 166)
• Alarm-related functions (p. 166)