Page 361 of 392

10 Maintenance and servicing
10
}}
359
CAUTION
Volvo does not recommend the use of long-life or durable paint protection coat-ings, some of which may claim to preventpitting, fading, oxidation, etc. These coat-ings have not been tested by Volvo forcompatibility with your vehicle's clear coat.Some of them may cause the clear coat tosoften, crack, or cloud. Damage caused byapplication of paint protection coatingsmay not be covered under your vehicle'spaint warranty.
Related information
•Washing the car (p. 357)
Cleaning the interior
Only use cleaning agents and car care prod- ucts recommended by Volvo. Clean regularlyand follow the instructions included with thecar care product.
Cleaning the interior
Upholstery care
FabricClean with soapy water or a detergent. For more difficult spots caused by oil, ice cream,shoe polish, grease, etc., use a clothing/fabric stain remover. Consult your Volvoretailer.
Alcantera TM
suede-like materialSuede-like upholstery can be cleaned with a soft cloth and mild soap solution.
Leather careVolvo's leather upholstery is manufactured with a protectant to repel soiling. Over time,sunlight, grease and dirt can break down theprotection. Staining, cracking, scuffing, andfading can result. Volvo offers an easy-to-use, non-greasy leather care kit formulated to clean and beau-tify your vehicle's leather, and to renew theprotective qualities of its finish. The cleanerremoves dirt and oil buildup. The light creamprotectant restores a barrier against soil andsunlight. Volvo also offers a special leather softenerthat should be applied after the cleaner andprotectant. It leaves leather soft and smooth,and reduces friction between leather andother finishes in the vehicle. Volvo recommends cleaning, protecting and conditioning your vehicle's leather two to fourtimes a year. Ask your Volvo retailer aboutLeather Care Kit 951 0251 and Leather Soft-ener 943 7429.
Cleaning leather upholstery1. Pour leather cleaner on a damp sponge
and squeeze it until the cleaner foams.
2. Apply the foam to the stain by moving the sponge with circular movements.
3. Dampen the stain thoroughly with the sponge. Let the sponge absorb the stain, do not rub.
4. Dry the stain with soft paper towels or a towel, and allow the leather to dry com-pletely.
Page 362 of 392

||
10 Maintenance and servicing
10
360
Protecting leather upholstery1. Put a small amount of protectant creamon a cloth and apply a thin coating of cream to the upholstery with light circularmovements.
2. Allow the leather to dry for 20 minutes. This will help the leather resist staining and protect against sunlight's harmful UV rays.
CAUTION
• Under no circumstances should gaso- line, naphtha or similar cleaning agentsbe used on the plastic or the leathersince these can cause damage.
• Take extra care when removing stainssuch as ink or lipstick since the color-ing can spread.
• Use solvents sparingly. Too much sol-vent can damage the seat padding.
• Start from the outside of the stain andwork toward the center.
• Sharp objects (e.g. pencils or pens in apocket) or Velcro fasteners on clothingmay damage the textile upholstery.
• Clothing that is not colorfast, such asnew jeans or suede garments, maystain the upholstery.
Cleaning a leather-covered steering wheel
•
Remove soil, dust, etc., with a damp sponge and a neutral soap solution.
• Leather should be allowed to breath.Never cover the steering wheel with aplastic protector.
• Volvo recommends cleaning, protectingand conditioning the steering wheel withVolvo's Leather Care Kit 951 0251 andLeather Softener 943 7429.
If there are stains on the steering wheel: Type 1 (ink, wine, coffee, milk, sweat or
blood)
–Use a soft cloth or sponge. Wipe the wheel with a solution with 5% ammonia.For blood stains, mix approx. 1 cup (2 dl)of water and one ounce (25g) of salt andwipe the stain.
Type 2 (fat, oil, sauces, or chocolate)
1. Same procedure as for type I stains.
2. Finish by rubbing the wheel with absorb- ent paper or a towel.
Type 3 (dry soil or dust)
1. Remove the soil/dust with a soft brush.
2. Same procedure as for type I stains.
CAUTION
Sharp objects, such as rings, could dam- age the leather on the steering wheel.
Cleaning the seat beltsClean only with lukewarm water and a mild soap solution.
Cleaning floor matsThe floor mats should be vacuumed orbrushed clean regularly, especially duringwinter when they should be taken out for dry-ing. Spots on textile mats can be removedwith a mild detergent. For best protection inwinter, Volvo recommends the use of Volvorubber floor mats. Consult your Volvo retailer.
Spots on interior plastic, metal, or wood surfaces
Cleaning interior plastic components should be done with a cleaning agent speciallydesigned for this purpose. Consult your Volvoretailer.
Page 363 of 392

10 Maintenance and servicing
10
}}
361
CAUTION
•Do not use cleaning agents with high alcohol content such as washer fluidto clean instrument panel glass.
• Never spray cleaning agents or waterdirectly onto components with electri-cal buttons or controls. Clean compo-nents of this type by applying thecleaning agent/water sparingly to acloth and wiping the components sothat no liquid penetrates into thesecomponents.
Related information
•
Washing the car (p. 357)
Touching up paintwork
Paint damage requires immediate attention to avoid rusting. Make it a habit to check the fin-ish regularly, for instance washing the vehicle.Touch-up if necessary. Paint repairs require special equipment and skill. Contact your Volvo retailer for anyextensive damage. Minor scratches can be repaired by using Volvo touch-up paint.
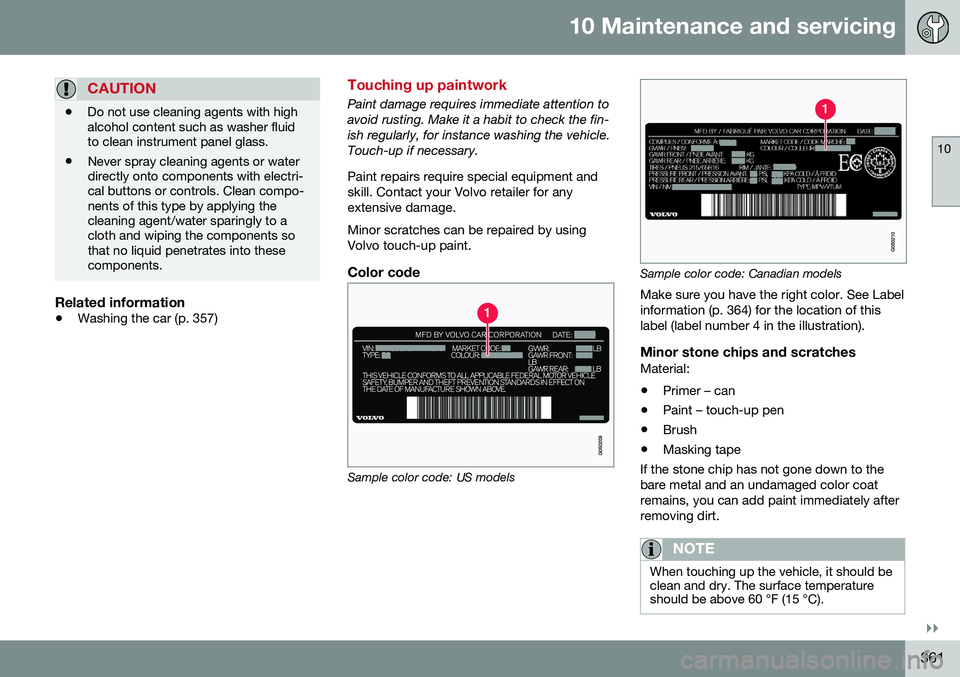
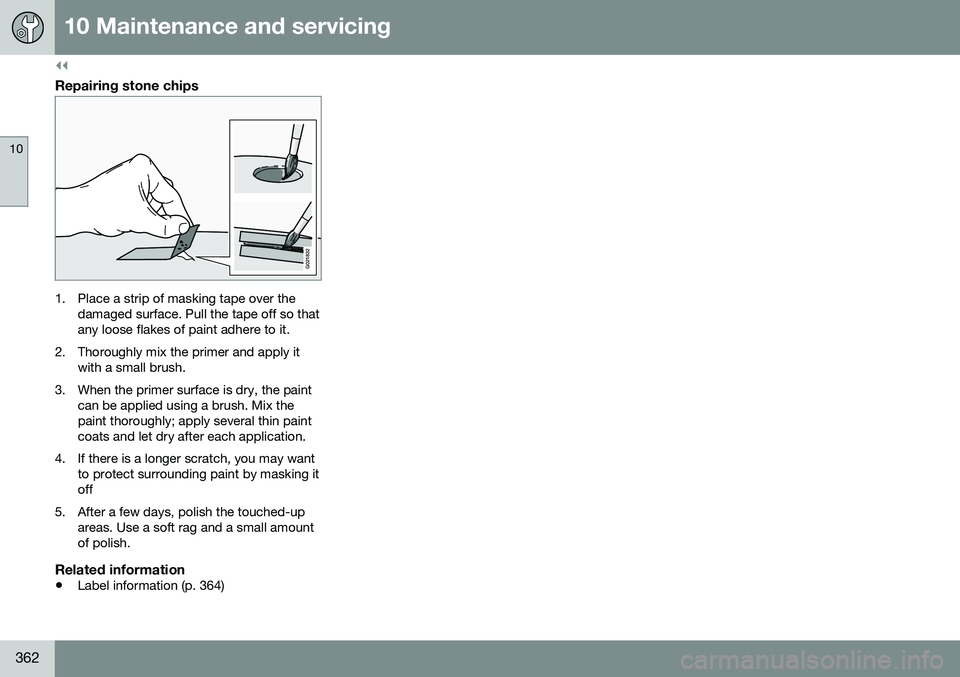
Color code
Sample color code: US models
Sample color code: Canadian models
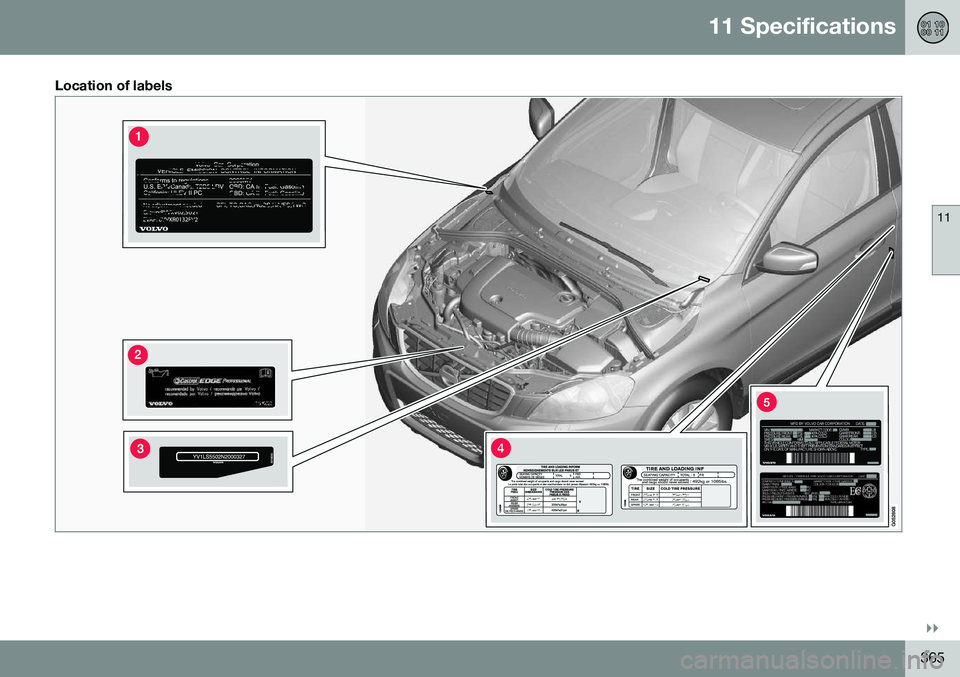
Make sure you have the right color. See Label information (p. 364) for the location of thislabel (label number 4 in the illustration).
Minor stone chips and scratchesMaterial:
• Primer – can
• Paint – touch-up pen
• Brush
• Masking tape
If the stone chip has not gone down to thebare metal and an undamaged color coatremains, you can add paint immediately afterremoving dirt.
NOTE
When touching up the vehicle, it should be clean and dry. The surface temperatureshould be above 60 °F (15 °C).
Page 364 of 392
||
10 Maintenance and servicing
10
362
Repairing stone chips
G021832
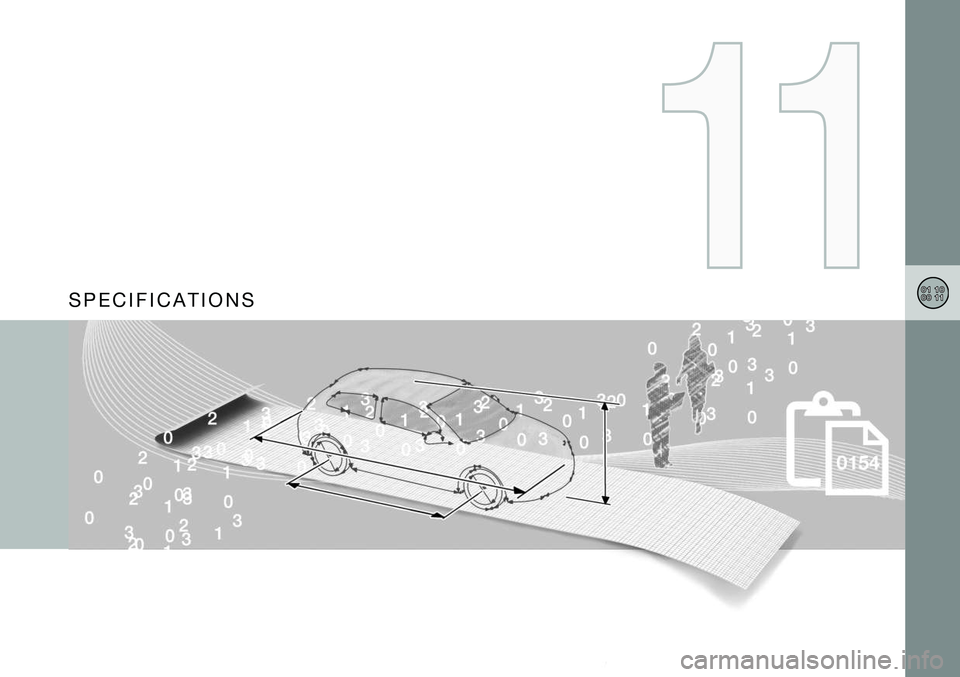
1. Place a strip of masking tape over thedamaged surface. Pull the tape off so that any loose flakes of paint adhere to it.
2. Thoroughly mix the primer and apply it with a small brush.
3. When the primer surface is dry, the paint can be applied using a brush. Mix thepaint thoroughly; apply several thin paintcoats and let dry after each application.
4. If there is a longer scratch, you may want to protect surrounding paint by masking itoff
5. After a few days, polish the touched-up areas. Use a soft rag and a small amountof polish.
Related information
• Label information (p. 364)
Page 365 of 392
S P E C I F I C A T I O N S
Page 366 of 392
11 Specifications
11
364
Label information
The labels in your vehicle provide information such as the chassis number, paint code, tireinflation pressure, etc.
Page 367 of 392
11 Specifications
11
}}
365
Location of labels
Page 368 of 392

||
11 Specifications
11
366
List of labelsVehicle Emission Control Information. Your Volvo is designed to meet all appli- cable emission standards, as evidencedby the certification label on the undersideof the hood. For further information regar-ding these regulations, please consultyour Volvo retailer.
Engine oil. This label contains the recom-
mended engine oil specifications.
Vehicle Identification Number (VIN). The VIN plate is located on the top left surface of the dashboard. The VehicleIdentification Number (VIN) should alwaysbe quoted in all correspondence concern-ing your vehicle with the retailer and whenordering parts.
Tire inflation pressures. This label indi-
cates the correct inflation pressures for the tires that were on the vehicle when itleft the factory.
Federal Motor Vehicle Safety Stand- ards (FMVSS) specifications (USA) andMinistry of Transport (CMVSS) stand- ards (Canada). Your Volvo is designed to
meet all applicable safety standards, as evidenced by the certification label on thedriver's side B-pillar (the structural mem-ber at the side of the vehicle, at the rearof the driver's door opening). This labelalso includes codes for paint color, etc.For further information regarding theseregulations, please consult your Volvoretailer. U.S. models have the upperdecal; Canadian models have the lowerone.
Related information
• Weights (p. 369)
• Engine specifications (p. 370)