Page 129 of 486

Fig. 104 Tightening the ratchet strap
r--f'n First read and observe the Introductory l.-..lr:=-ll information and safety warnings & on page 125.
Tightening the ratchet strap
• Press the slider =:>Fig. 103 ® outwards in the direction of the arrow.
• Pivot the lever CD to position@.
• Pull the belt@ from the rear through the slot in the spool@ tight.
• Pivot the lever CD back and forth alternately be-tween positions ® and @ until the belt strap has wound itself around the spool 2 -3 times ::. &.
• Press the slid er® outwards and pivot the lever CD to position @. The ratchet is now closed and locked in position.
Releasing the ratchet strap
• Before releasing the ratchet strap, make sure the load cannot fall over.
• Press the slider =:>Fig. 104 ® outwards.
• Pivot the lever CD to position @, until the slider ® engages in the slot@. The spool @) now ro-tates freely.
• Pull the ratchet strap @ out of the ratchet.
A WARNING
Ratchet straps, if used Incorrectly, may get detached in the event of a sudden braking manoeuvre or accident. This could cause ob-jects to be flung through the Interior and lead to severe or fatal injuries.
• "Wind" the strap around the spool 2-3 times.
• Never use ratchet straps to secure loads to the side panels.
Driving with an open tailgate or open wing doors
r--f'n First read and observe the Introductory l.-..lr:=-ll Information and safety warnings & on page 125.
Driving with an open tailgate or open wing doors is particularly dangerous. All objects and the open tailgate or open wing doors must be secured prop-erly. Take the appropriate measures to reduce the amount of poisonous exhaust fumes that could en-ter into the vehicle.
Make sure you observe any legal requirements when driving with an open tailgate or open wing doors.
A WARNING
Driving with an unlocked or open tailgate or unlocked/open wing doors can cause serious injuries.
• Always drive with the tailgate or wing doors closed.
• Always stow all items in the luggage com-partment securely. Loose objects can fall out of the luggage compartment and injure other road users.
• Always drive carefully and ensure that you think ahead.
• Avoid any abrupt or sudden driving and braking manoeuvres as this could cause the open tailgate or open wing doors to move un-pred lctably. .,.
Transporting items 129
Page 130 of 486

A WARNING (Continued)
• Any objects protruding from the luggage compartment must be marked to ensure that they are visible to other road users. Comply with legal regulations.
• If items protrude out of the luggage com-partment, never use the tail gate or wing doors to "hold them in position".
• If you drive with the tailgate or wing doors open, remove any racks and luggage from the tail gate or a wing door.
A WARNING
Poisonous exhaust fumes can get into the in-terior when the tailgate or wing doors are open. This can result in loss of conscious-ness, carbon monoxide poisoning, serious Injury and accidents.
Driving a loaded vehicle
1"''l1 First read and observe the introductory L--Wl information and safety warnings & on page 125.
For good vehicle handling when driving a loaded vehicle, please observe the following:
• Stow all items of luggage page 127.
• Accelerate carefully and gently.
• Avoid sudden braking and driving manoeuvres.
• Brake earlier than in normal driving.
• If applicable, heed the information about driving with a trailer 139.
• If applicable, observe the information concern-ing the roof carrier 137.
Luggage compartment
CO Introduction
This chapter contains information on the following subjects:
Luggage compartment cover . . . . . . . . . . . . . . 132
130 Before the JOUrney
A WARNING (Continued)
• Always drive with the wing doors or tail-gate closed to prevent poisonous exhaust fumes getting into the vehicle.
• If exceptional circumstances require you to drive with an open tallgate or open wing doors, do the following to reduce the amount of poisonous exhaust fumes that could enter into the vehicle:
CD
-Close all windows and the sliding/tilting roof.
-Switch off air reclrculatlon mode.
-Open all vents In the dash panel.
-Switch the blowers to the highest set-ting.
The vehicle length and height are different when the wing doors or tailgate are open.
A wARNING
Moving loads can severely impair the vehi-cle's stability and driving safety which could cause accidents and severe Injuries.
• Secure objects properly to prevent them from sliding.
• Use suitable straps when securing heavy objects.
• Engage the rear seat backrests securely In
an upright position.
Always use suitable securing straps with the fas-tening rings. Never exceed the vehicle's maximum payload. Both the payload and the distribution of the load in the vehicle will have an effect on the driving response and braking "'
Page 131 of 486

Additional information and warnings:
• Airbag system =:.page 87
• Lights =:.page 106
• Transporting =:.page 125
• Towing a trailer=> page 139
• Luggage net, California =>page 192
• Wheels and tyres =>page 367
A WARNING
When the vehicle is not in use or is not being supervised, always lock the doors and tail-gate to reduce the risk of severe or fatal inju-ries.
• Never leave children unattended, especial-ly when the tailgate is open. Children could make their way into the luggage compart-ment, close the tailgate and be unable to get out. This can cause severe or fatal injuries.
• Never let children play in or around the ve-hicle.
• Do not travel with people in the luggage compartment.
A WARNING
Objects that are not secured, or are secured Incorrectly, can cause serious injuries in the event of a sudden driving or braking manoeu-vre or accident. This applies particularly if objects are struck by the alrbag when activa-ted and then flung through the vehicle interi-or. To reduce the risk of accidents, please ob-serve the following guidelines:
• Always stow all objects In the vehicle se· curely. Always stow luggage and heavy ob-jects in the luggage compartment.
• Always use suitable straps to prevent lug-gage from being thrown through the vehicle Interior and entering the deployment zones of
A WARNING (Continued)
the curtain alrbag, the combined curtain and side airbag or the front airbag In the event of a sudden driving or braking manoeuvre.
• Always keep stowage compartments closed while the vehicle is In motion.
• Do not stow any hard, heavy or sharp ob· jects loose in any of the vehicle's open stow-age areas, on the luggage compartment cov-er or on the dash panel.
• Remove any hard, heavy or sharp objects from items of clothing and bags Inside the vehicle and stow them securely.
A WARNING
Transporting heavy objects changes the vehi-cle's handling and increases the braking dis-tance. Heavy loads that are not properly stowed or secured in the vehicle can lead to a loss of vehicle control and can cause serious injury.
• Transporting heavy objects changes the vehicle's handling and the centre of gravity.
• The payload should be distributed as evenly as possible in the vehicle.
• Always secure heavy objects In the lug-gage compartment as far in front of the rear axle as possible.
CD
Hard objects on the shelf can chafe against the wires of the heating element in the rear window and cause damage.
m Always ensure that the venlilalion openings L!J between the rear window and the stowage area are uncovered to allow stale air to escape from the vehicle.
Transporting items 131
Page 132 of 486

Luggage compartment cover
Fig. 105 In the luggage compartment: luggage compartment cover.
f"'l1 First read and observe the Introductory L-Jc.l.l Information and safety warnings & on page 130.
The luggage compartment cover is attached to the 3-seat bench backrest.
Opening the luggage compartment cover
• Make sure the backrest of the 3-seat bench has engaged securely in the upright position.
• Using the handle, pull the luggage compart-ment cover evenly to the rear.
• Hook the luggage compartment cover in at the sides.
Retracting the luggage compartment cover
• Using the handle, pull the luggage compart-ment cover slightly to the rear.
• Hold the luggage compartment cover and lift it up out of the side retainers to remove it.
• Guide the luggage compartment cover forwards by hand. Do not let it snap back.
Removing the luggage compartment cover
• Roll up the luggage compartment cover, if nec-essary.
• Press one side of the luggage compartment cover against the spring pressure inwards and piv-ot it slightly to the back.
• Pull out the luggage compartment cover on the other side to the inside of the vehicle.
Fitting the luggage compartment cover
• Insert the hook on the luggage compartment cover into the retainer on one side.
• Press the other side of the luggage compart-ment cover against the spring pressure inwards 106 G) and hold it in this position.
132 I Before the journey
Fig. 106 In the luggage compartment: retainer for the luggage compartment cover
• Press the luggage compartment cover hook in-to the appropriate retainer@.
• Loosen the luggage compartment cover and press the hook to the outside, aided by spring pressure, into the retainer@.
• Check that the luggage compartment cover is fitted properly.
A WARNING
Objects that are not secured or are secured incorrectly, or animals on the luggage com-partment cover, could cause serious injuries in any sudden driving or braking manoeuvre or accident.
• Do not stow any hard, heavy or sharp items either loose or In bags on the luggage compartment cover.
• Never transport pets on the luggage com-partment cover.
To prevent damage to the luggage compart-ment cover, do not load it to such a height that the luggage compartment cover will press against the load when the rear lld is closed.
Page 133 of 486

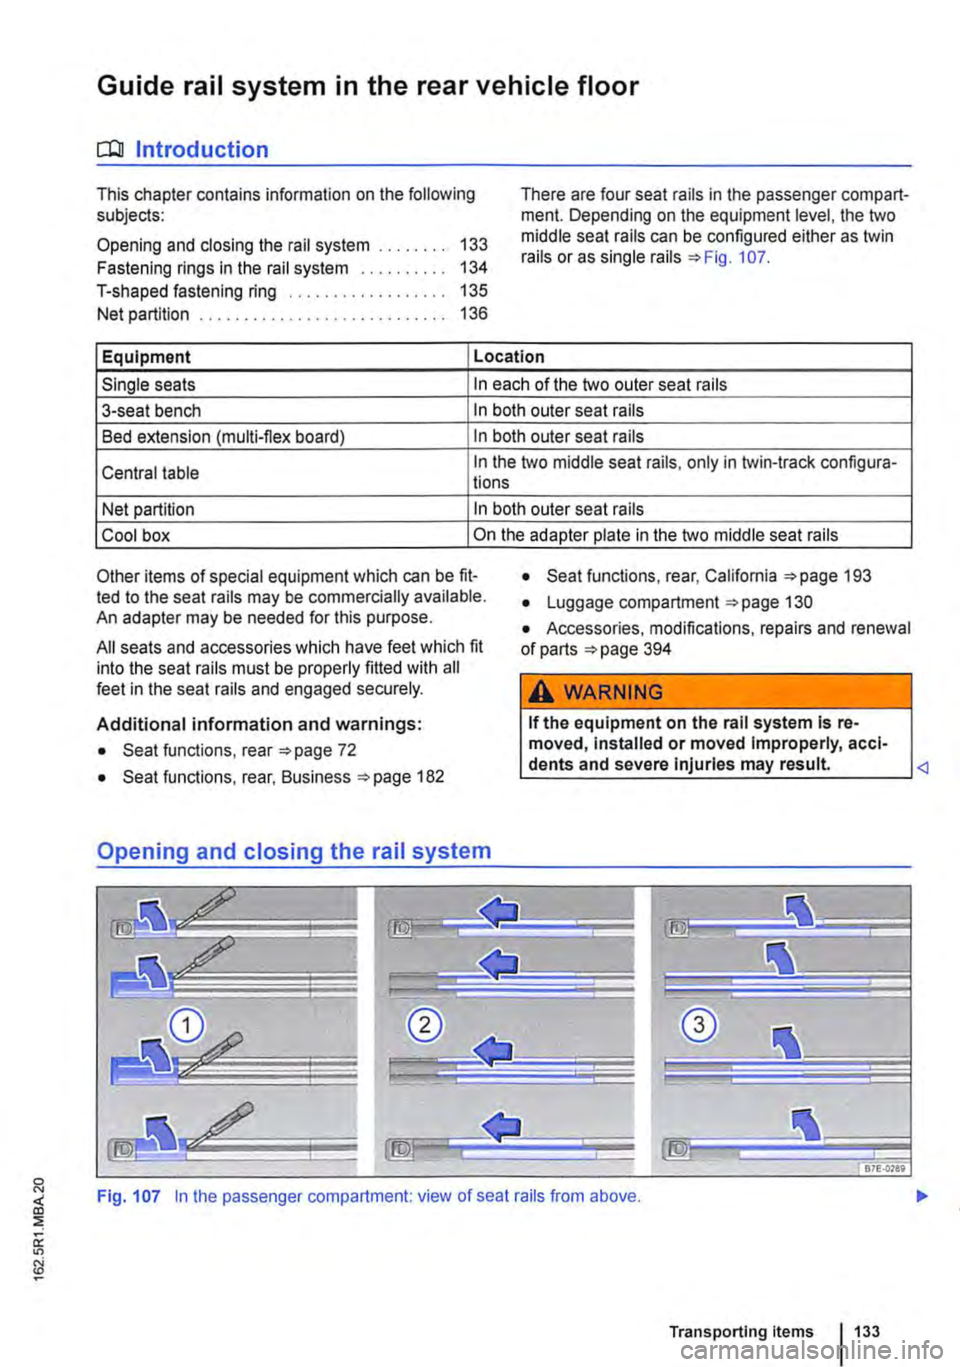
Guide rail system in the rear vehicle floor
CQJ Introduction
This chapter contains information on the following subjects:
Opening and closing the rail system 133
Fastening rings in the rail system . . . . 134
T-shaped fastening ring . . . . . . . . . 135
Net partition . . . . . . . . . . . . . . . . . . . . . . 136
There are four seat rails in the passenger compart-ment. Depending on the equipment level, the two middle seat rails can be configured either as twin rails or as single rails =>Fig. 107.
Equipment Location
Single seats In each of the two outer seat rails
3-seat bench In both outer seat rails
Bed extension (multi-flex board) In both outer seat rails
Central table In the two middle seat rails, only in twin-track configura-lions
Net partition In both outer seat rails
Cool box On the adapter plate in the two middle seat rails
Other items of special equipment which can be fit-ted to the seat rails may be commercially available. An adapter may be needed for this purpose.
All seats and accessories which have feet which fit into the seat rails must be properly fitted with all feet in the seat rails and engaged securely.
Additional information and warnings:
• Seat functions, rear =>page 72
• Seat functions, rear, Business =>page 182
• Seat functions, rear, California =>page 193
• Luggage compartment =>page 130
• Accessories, modifications, repairs and renewal of parts =>page 394
A WARNING
If the equipment on the rail system Is re-moved, Installed or moved Improperly, acci-dents and severe Injuries may result
Fig. 107 In the passenger compartment: view of seat rails from above.
Transporting items 133
Page 134 of 486

t"""""fl1 First read and observe the introductory l..--bll information and safety warnings & on page 133.
Removing plastic covers
The plastic covers=:. Fig. 107 must be removed from the seat rails, if seats or the central table are to be installed or removed.
• Take the screwdriver from the vehicle tootkit.
• Insert the flat blade of the screwdriver into the seat rail at an angle in front of the plastic cover you wish to remove G).
• Press the cover lug approx. 3 mm to the front and, at the same time, lever it out.
Removing split cover rail
• Grasp with both hands into the rubber lip of the shorter part (approx. 30 cm) of the aluminium cov-er rail ®. and push it towards the front until both clips are released.
• Remove cover rail@ upwards in a straight line.
• Now, also move the opposite part of the alumi-nium cover rail towards the front, and remove it up-wards in a straight line.
• Repeat this procedure for all seat rails.
Installing split cover rail
• Fit the aluminium cover rail so that it is flush with the longer part of the cover rail.
• Push the aluminium cover rail from above into the clips of the seat rail until it engages.
• Repeat this procedure for all seat rails.
Fastening rings in the rail system
Fig. 108 Fastening ring in the seat rail.
1> daN: Deka Newton. Unit for load carrying capacity.
134 Before the JOUrney
Installing plastic covers
• Insert the plastic cover CD with the recess at the front into the seat rail and press down at the back until the cover engages securely. The cover must be flush with the seat rails.
• Ensure that the plastic covers for the double seat rails are not confused with each other as the covers will otherwise not engage securely.
A WARNING
If the equipment In the seat rails Is removed, Installed or moved Improperly, accidents and severe Injuries may result.
• Proceed with care when removing and In-stalling the aluminium cover rails: risk of In-jury caused by corners and edges.
• The aluminium cover rails and plastic cov-ers must always be Installed when the vehicle Is In motion.
• Never remove the seat rails completely. Such jobs should only be carried out by a qualified workshop.
• If your seat rails are damaged, have them checked, and If necessary replaced, by a qualified workshop.
CD
If seats are moved when the seat rails are soiled, the seat rails and the seat feet could be damaged.
t"""""T'n First read and observe the introductory l..--bll information and safety warnings & on page 133.
The fastening rings in the seat rails ::.Fig. 108 may be loaded with a maximum load rating of 250 daN1l ::.&.
A wARNING
Incorrect use of fastening rings can cause se-vere or fatal accidents.
• Always use suitable and undamaged se-curing straps. ..,.
Page 135 of 486

A WARNING (Continued)
• Attach securing straps securely to the fas-tening rings.
• Loose objects in the vehicle can suddenly slide and change the way the vehicle han-dles.
• Never exceed the maximum load rating of the fastening rings when securing objects.
• Small and light objects should also be se-cured.
• Never secure a child seat to the fastening rings.
• Rotating single seats must always be turned in the direction of travel if a load is se-cured behind this seat using fastening rings.
T-shaped fastening ring
Fig. 109 Load secured correctly using 2 securing straps
il11 First read and observe the introductory L-J,.:.U information and safety warnings & on page 133.
Depending on the vehicle equipment level, the scope of delivery includes two T-shaped fastening rings which can be fitted in the seat rails.
The T-shaped fastening rings are used to secure loads in addition to the fitted fastening rings.
A WARNING (Continued)
• Never use elastic straps or nets to tie down loads.
• Distribute the load on the fastening rings evenly.
• Ensure that the load retains its form and position once it has been secured. Use stable packaging and anti-slip floor surfacing for your load.
Fig. 110 T-shaped fastening ring fitted correctly in the seat rail
Conditions for installation of the T-shaped fastening ring
• AT-shaped fastening ring 109 ®may only be used together with one single fastening ring® that is fitted in the vehicle.
• To secure the load use only buckle straps or ratchet straps with a maximum load rating of SrF < or= 300 daN. Follow the instructions provi-ded by the belt manufacturer.
• T-shaped fastening rings may only be fitted be-hind vehicle occupants.
• Turn the single seats so that they face the di-rection of travel.
• The seat backrests of single seats or of the 3-seat bench must be in an upright position. .,.
Transporting Items 135
Page 136 of 486

Fitting the T-shaped fastening ring
• Fit the T-shaped fastening ring parallel to the seat rail in the seat rail.
• Turn the fastening ring through go• so that it is positioned across the seat rails =:>Fig. 110 @.
• Pull the tensioning strap Q) through the fasten-ing ring, and tension it.
Removing the T-shaped fastening ring
• Loosen the tensioning strap.
• Turn the fastening ring through go• so that it is positioned parallel to the seat rail.
• Remove the fastening ring from the seat rail.
A WARNING
Incorrect use ofT-shaped fastening rings can cause severe or fatal accidents.
• Use the T-shaped fastening ring only to-gether with a tensionlng strap and remove it from the seat rail after use. The T-shaped fas-tening ring is secure only when it Is ten-sloned together with a tenslonlng strap.
Net partition
Fig. 111 Folding out the net partition
A WARNING (Continued)
• The T-shaped fastening rings should nev-er be Inserted In the seat rails near the re-movable covers.
• Always secure the load with two securing straps to a total of four fastening rings =:>Fig. 109. Use each tensloning strap with a maximum of one T-shaped fastening ring. The second fastening ring must always be a fastening ring that Is fitted permanently In the vehicle.
• Fit T-shaped fastening rings only behind the vehicle occupants. Otherwise, In the event of an accident or sudden braking ma-noeuvre, vehicle occupants could hit the se-cured load with their heads or other body parts.
• No more than one T-shaped fastening ring may be In a seat rail at any one time.
• Never exceed the maximum load rating.
Fig. 112 Correctly fitted net partition in the headliner and in the seat rail ...
1361 Before the journey