Page 137 of 209

Driving and operating135system. Refer to Infotainment
system manual for further
information.
Deactivation
Deactivate the system by pressing
r on the instrument panel with the
ignition on. LED illuminates in the
button when deactivated. When
reverse gear is selected, no acoustic
signal will sound.
Notice
In versions with Info-Display
indication, the function can be
deactivated via the Infotainment
system. Refer to Infotainment
system manual for further
information.
The function is reactivated by
pressing r again or the next time
the ignition is switched on.
Fault
If the system detects an operating fault, when selecting reverse gear a
continuous acoustic alarm will sound
for approx. 5 seconds, a
corresponding message appears in
the Driver Information Centre (DIC)
3 89 and F illuminates in the
instrument cluster 3 85. Consult a
workshop to have the cause of the
fault remedied.Caution
When reversing, the area should
be free from obstacles which could impact on the underside of the
vehicle.
Impact to the rear axle, which may
not be visible, could lead to
uncharacteristic changes in the
vehicle handling. In the event of
such an impact, consult a
workshop.
Vehicle messages 3 90.
Basic notes on parking assist system
9 Warning
Under certain circumstances,
various reflective surfaces on
objects or clothing as well as
external noise sources may cause the system to fail to detect
obstacles.
Caution
Performance of the sensors can
be reduced when sensors are
covered, e.g. by ice or snow.
Performance of the parking assist
systems can be reduced due to
heavy loading.
Page 138 of 209

136Driving and operatingSpecial conditions apply if there
are taller vehicles involved (e.g.
off-road vehicles, mini vans,
vans). Object identification in the
upper part of these vehicles
cannot be guaranteed.
Objects with a very small reflection
cross-section, e.g. objects of
narrow size or soft materials, may
not be detected by the system.
The parking assist system will not
avoid a collision with objects which are out of the detection range of
the sensors.
Rear view camera
The rear view camera assists the
driver when reversing by displaying a view of the area behind the vehicle in
the interior mirror or in the Info-
Display.
9 Warning
The rear view camera does not
replace driver vision. Note that
objects that are outside the
camera's field of view, e.g. below
the bumper or underneath the
vehicle, are not displayed.
Do not reverse the vehicle by only looking at the display and checkthe surrounding area behind and
around the vehicle before
reversing.
Activation
Rear view camera is automatically
activated when reverse gear is
engaged. An audible signal confirms
activation.
Functionality
The camera is mounted above the
rear doors/tailgate.
The area displayed by the camera is
limited. The distance of the image that
appears on the display differs from
the actual distance.
Page 139 of 209

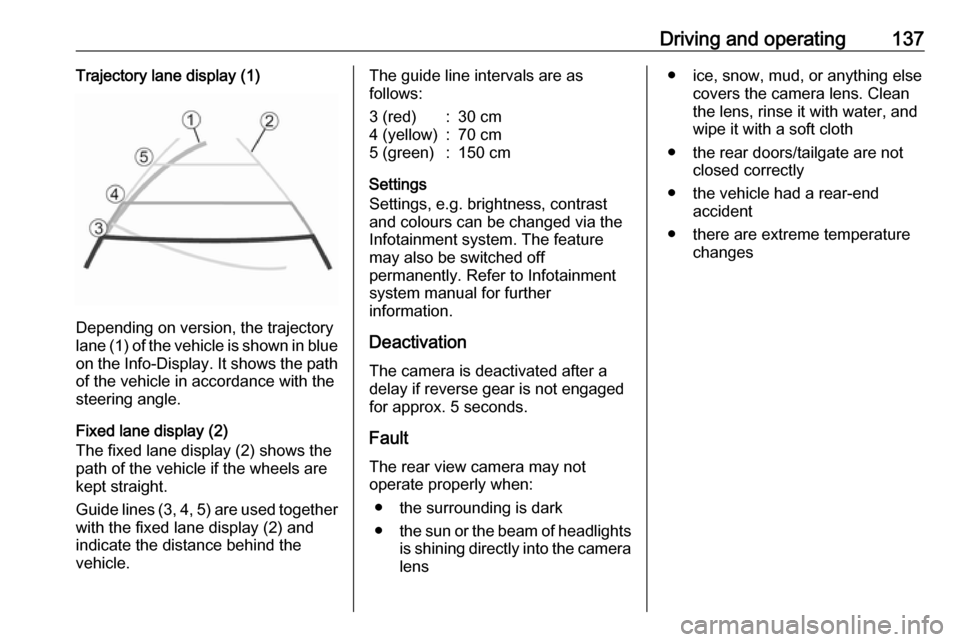
Driving and operating137Trajectory lane display (1)
Depending on version, the trajectory
lane (1) of the vehicle is shown in blue
on the Info-Display. It shows the path of the vehicle in accordance with the
steering angle.
Fixed lane display (2)
The fixed lane display (2) shows the
path of the vehicle if the wheels are
kept straight.
Guide lines (3, 4, 5) are used together
with the fixed lane display (2) and
indicate the distance behind the
vehicle.
The guide line intervals are as
follows:3 (red):30 cm4 (yellow):70 cm5 (green):150 cm
Settings
Settings, e.g. brightness, contrast
and colours can be changed via the
Infotainment system. The feature
may also be switched off
permanently. Refer to Infotainment
system manual for further
information.
Deactivation
The camera is deactivated after a
delay if reverse gear is not engaged
for approx. 5 seconds.
Fault
The rear view camera may not
operate properly when:
● the surrounding is dark
● the sun or the beam of headlights
is shining directly into the camera
lens
● ice, snow, mud, or anything else covers the camera lens. Clean
the lens, rinse it with water, and
wipe it with a soft cloth
● the rear doors/tailgate are not closed correctly
● the vehicle had a rear-end accident
● there are extreme temperature changes
Page 140 of 209

138Driving and operatingFuel
Fuel for diesel engines Only use diesel fuel that complies
with EN 590. The fuel must have low
sulphur content (max. 10 ppm).
Equivalent standardised fuels with a
biodiesel (= FAME according to
EN14214) content of max. 7% by
volume (like DIN 51628 or equivalent
standards) may be used.
In countries outside the European
Union, use Euro-Diesel fuel with a
sulphur concentration below 50 ppm.Caution
Use of fuel that does not comply to EN 590 or similar can lead to
engine powerloss, increased wear
or engine damage and loss of
warranty.
Do not use marine diesel oils, heating
oils, Aquazole and similar diesel-
water emulsions. Diesel fuels must
not be diluted with fuels for petrol
engines.
The flow and filterability of diesel fuels are temperature-dependent. When
temperatures are low, refuel with
diesel fuel with guaranteed winter
properties.
Diesel fuel filter 3 150, diesel fuel
system bleeding 3 151.
Refuelling9 Danger
Before refuelling, switch off engine
and any external heaters with
combustion chambers.
Vehicles with stop-start system:
The engine must be switched off
and the ignition key removed, to avoid risk of engine being
restarted automatically by the
system.
Switch off any mobile phones.
Follow the operating and safety
instructions of the filling station
when refuelling.
9 Danger
Fuel is flammable and explosive.
No smoking. No naked flames or
sparks.
If you can smell fuel in your
vehicle, have the cause of this
remedied immediately by a
workshop.
Caution
In case of misfuelling, do not
switch on ignition.
Notice
To ensure the fuel level is displayed
correctly, the ignition must be
switched off before refuelling. Avoid
minor fuel top-ups (e.g. less than
5 litres) to ensure accurate readings.
The fuel filler flap is located on the left-
hand side of the vehicle.
The fuel filler flap can only be opened
if the vehicle is unlocked and the left-
hand door is opened.
Pull flap to open.
Page 141 of 209

Driving and operating139
To open the fuel filler cap (1), turn
anticlockwise.
The fuel filler cap can be retained in
the bracket on the fuel filler flap.
For refuelling, fully insert the pump
nozzle and switch it on.
After automatic cut-off, it can be
topped up with max. two doses of fuel.
Caution
Wipe off any overflowing fuel
immediately.
When refuelling is complete, replace
the fuel filler cap and turn clockwise
as far as it will go.
Close the fuel filler flap.
Fuel filler cap Only use genuine fuel filler caps.Diesel-engined vehicles have special
fuel filler caps.
Fuel consumption - CO 2-
Emissions
The values for fuel consumption
(combined) of the model Vauxhall
Vivaro is within a range of 38 to
50 mpg.
The CO 2 emission (combined) is
within a range of 195 to 149 g/km.
For the values specific to your
vehicle, refer to the EEC Certificate of
Conformity provided with your vehicle or other national registration
documents.
General information
The official fuel consumption and
specific CO 2 emission figures quoted
relate to the EU base model with
standard equipment.Fuel consumption data and CO 2
emission data are determined
according to regulation
R (EC) No. 715/2007 (in the latest
applicable version), taking into
consideration the vehicle weight in
running order, as specified by the
regulation.
The figures are provided only for the
purpose of comparison between
different vehicle variants and must
not be taken as a guarantee for the
actual fuel consumption of a
particular vehicle.
Additional equipment may result in
slightly higher results than the stated fuel consumption and CO 2 figures.
Furthermore, fuel consumption is dependent on personal driving style
as well as road and traffic conditions.
Page 142 of 209

140Driving and operatingTrailer hitch
General information
Entrust retrofitting of towing
equipment to a workshop. It may be
necessary to make changes that
affect the cooling system, heat
shields or other equipment. Only use
towing equipment that has been
approved for your vehicle.
Driving characteristics and towing tips
In the case of trailers with brakes,
attach the breakaway stopping cable.
Before attaching a trailer, lubricate
the coupling ball. However, do not do so if a stabiliser, which acts on thecoupling ball, is being used to reduce
snaking movements. For trailers with
low driving stability the use of a
stabiliser is recommended.
A maximum speed of 50 mph must
not be exceeded, even in countries
where higher speeds are permitted.If the trailer starts snaking, drive more slowly, do not attempt to correct the
steering and brake sharply if
necessary.
When driving downhill, drive in the
same gear as if driving uphill and
drive at a similar speed.
Adjust tyre pressure to the value
specified for full load 3 196.
Trailer towing
Trailer loads The permissible trailer loads are
vehicle and engine-dependent
maximum values which must not be
exceeded. The actual trailer load is the difference between the actual
gross weight of the trailer and the
actual coupling socket load with the
trailer coupled.
The permissible trailer loads are
specified in the vehicle documents. In
general, they are valid for gradients
up to max. 12%.
The permitted trailer load applies up
to the specified incline and up to an
altitude of 1000 metres above sealevel. Since engine power decreases
as altitude increases due to the air
becoming thinner, therefore reducing
climbing ability, the permissible gross
train weight also decreases by 10% for every 1000 metres of additional
altitude. The gross train weight does
not have to be reduced when driving
on roads with slight inclines (less than 8%, e.g. motorways).
The permissible gross train weight
must not be exceeded. This weight is
specified on the identification plate
3 184.
Vertical coupling load
The vertical coupling load is the load
exerted by the trailer on the coupling
ball. It can be varied by changing the
weight distribution when loading the
trailer.
The maximum permissible vertical
coupling load is specified on the
towing equipment identification plate
and in the vehicle documents. Always aim for the maximum load, especially in the case of heavy trailers. The
vertical coupling load should never
fall below 25 kg.
Page 143 of 209
Driving and operating141In the case of trailer loads of
1200 kg or more, the vertical coupling
load should not be less than 50 kg.
Rear axle loadWhen the trailer is coupled and the
towing vehicle fully loaded (including all occupants), the permissible rear
axle load (see identification plate or
vehicle documents) must not be
exceeded.
Trailer stability assist
If the system detects snaking
movements, engine power is reduced
and the vehicle/trailer combination is
selectively braked until the snaking ceases. While the system is working,keep steering wheel as still as
possible.
Trailer stability assist (TSA) is a
function of the Electronic Stability
Program (ESP® Plus
) 3 129.
Page 144 of 209

142Vehicle careVehicle careGeneral Information...................143
Accessories and vehicle modifications .......................... 143
Vehicle storage ........................143
End-of-life vehicle recovery .....144
Vehicle checks ........................... 144
Performing work ......................144
Bonnet ..................................... 144
Engine oil ................................. 145
Engine air filter ........................ 146
Engine coolant ......................... 147
Power steering fluid .................147
Washer fluid ............................ 148
Brakes ..................................... 148
Brake fluid ............................... 148
Vehicle battery ......................... 149
Diesel fuel filter ........................150
Diesel fuel system bleeding .....151
Wiper blade replacement ........152
Bulb replacement .......................152
Headlights ............................... 152
Fog lights ................................. 153
Front turn signal lights .............154
Tail lights ................................. 154
Side turn signal lights ..............155Centre high-mounted brake
light ......................................... 155
Reversing light ......................... 155
Number plate light ...................156
Fog tail light ............................. 156
Interior lights ............................ 156
Instrument panel illumination ...157
Electrical system ........................157
Fuses ....................................... 157
Instrument panel fuse box .......159
Vehicle tools .............................. 162
Tools ........................................ 162
Wheels and tyres .......................163
Tyres ....................................... 163
Winter tyres ............................. 163
Tyre designations ....................163
Tyre pressure .......................... 163
Tyre pressure monitoring system .................................... 164
Tread depth ............................. 167
Changing tyre and wheel size . 167
Wheel covers ........................... 167
Tyre chains .............................. 168
Tyre repair kit .......................... 168
Wheel changing .......................171
Spare wheel ............................ 172
Jump starting ............................. 174Towing....................................... 175
Towing the vehicle ...................175
Towing another vehicle ...........176
Appearance care .......................177
Exterior care ............................ 177
Interior care ............................. 178