Page 134 of 233

132Driving and operatingwarning may sound as a signal to
depress the brake pedal or apply the
parking brake.
Switch off engine if stopping for a
lengthy period, e.g. in traffic jams.
When the vehicle is parked and the
driver's door is opened, a warning
chime will sound if neutral is not
selected or the brake pedal has not
been depressed.
Engine braking
Automatic mode
When driving downhill, the manual
transmission automated does not
shift into higher gears until a fairly
high engine speed has been reached. It shifts down in good time when
braking.
Manual mode
To utilise the engine braking effect,
select a lower gear in good time when
driving downhill.Rocking the vehicle
Rocking the vehicle is only
permissible if the vehicle is stuck in
sand, mud, snow or a hole. Move the
selector lever between R and A/M (or
between + and -) in a repeat pattern,
while applying light pressure to the
accelerator pedal. Do not race the
engine and avoid sudden
acceleration.
Parking
Apply the parking brake. The most
recently engaged gear (see
transmission display) remains
engaged. With N, no gear is engaged.
When the ignition is switched off, the
transmission no longer responds to
movement of the selector lever.
If the ignition is not switched off, or the
parking brake has not been applied, a
warning chime will sound upon
opening the driver's door.
Manual mode If a higher gear is selected when the
engine speed is too low, or a lower
gear when the speed is too high, theshift is not executed. This prevents
the engine from running at too low or too high an engine speed.
If engine speed is too low, the
transmission automatically shifts to a
lower gear.
If engine speed is too high, the
transmission only switches to a higher gear via kickdown.
Electronic driving programmes
Winter mode V
Page 158 of 233

156Vehicle care
Pull the safety catch, located slightly
left of centre, and open the bonnet.
Pull up the support rod from its holder,
then secure it in the right side hook on the underside of the bonnet.
If the bonnet is opened during an Autostop, the engine will be restarted
automatically for safety reasons.
Closing Before closing the bonnet, press the
support into the holder.
Lower the bonnet and allow it to drop into the catch from a low height
(20-25 cm). Check that the bonnet is
engaged.
Engine oil Check the engine oil level manuallyon a regular basis to prevent damage
to the engine.
Ensure that the correct specification
of oil is used. Recommended fluids
and lubricants 3 196.
Check with the vehicle on a level
surface. The engine must be at
operating temperature and switched
off for at least 10 minutes.Pull out the dipstick, wipe it clean, insert it to the stop on the handle, pull
out and read the engine oil level.Caution
It is the owner's responsibility to
maintain the proper level of an
appropriate quality oil in the
engine.
When the engine oil level has
dropped to the MIN mark, top-up
engine oil.
Page 159 of 233

Vehicle care157Caution
Do not allow the engine oil level todrop below the minimum level!
We recommend the use of the same
type of engine oil that was used at the
last change.
The engine oil level must not exceed the maximum mark MAX on the
dipstick.
Caution
Overfilled engine oil must be
drained or suctioned out.
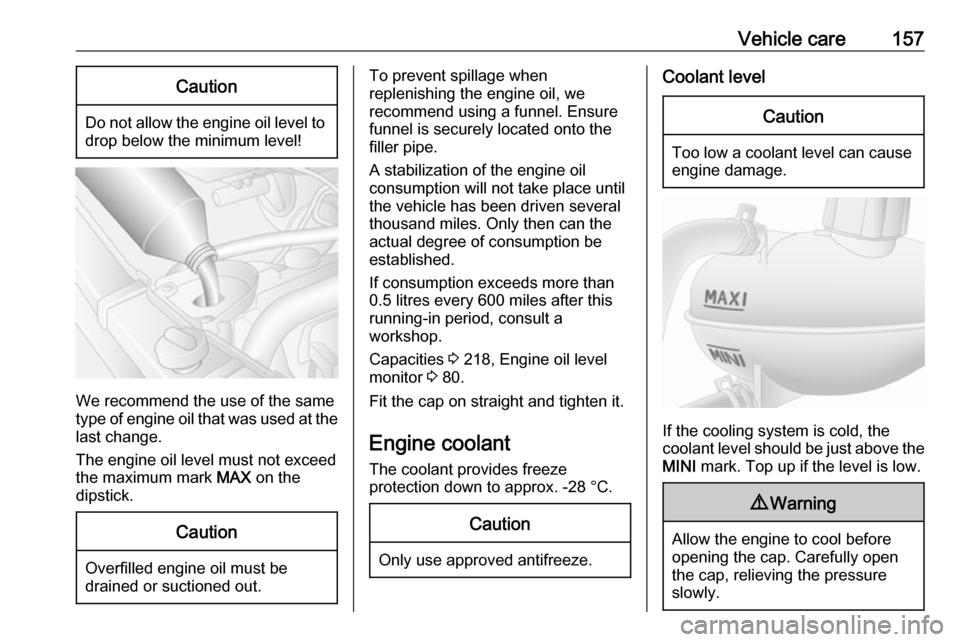
To prevent spillage when
replenishing the engine oil, we
recommend using a funnel. Ensure funnel is securely located onto the
filler pipe.
A stabilization of the engine oil
consumption will not take place until
the vehicle has been driven several
thousand miles. Only then can the
actual degree of consumption be
established.
If consumption exceeds more than
0.5 litres every 600 miles after this
running-in period, consult a
workshop.
Capacities 3 218, Engine oil level
monitor 3 80.
Fit the cap on straight and tighten it.
Engine coolant The coolant provides freeze
protection down to approx. -28 °C.Caution
Only use approved antifreeze.
Coolant levelCaution
Too low a coolant level can cause engine damage.
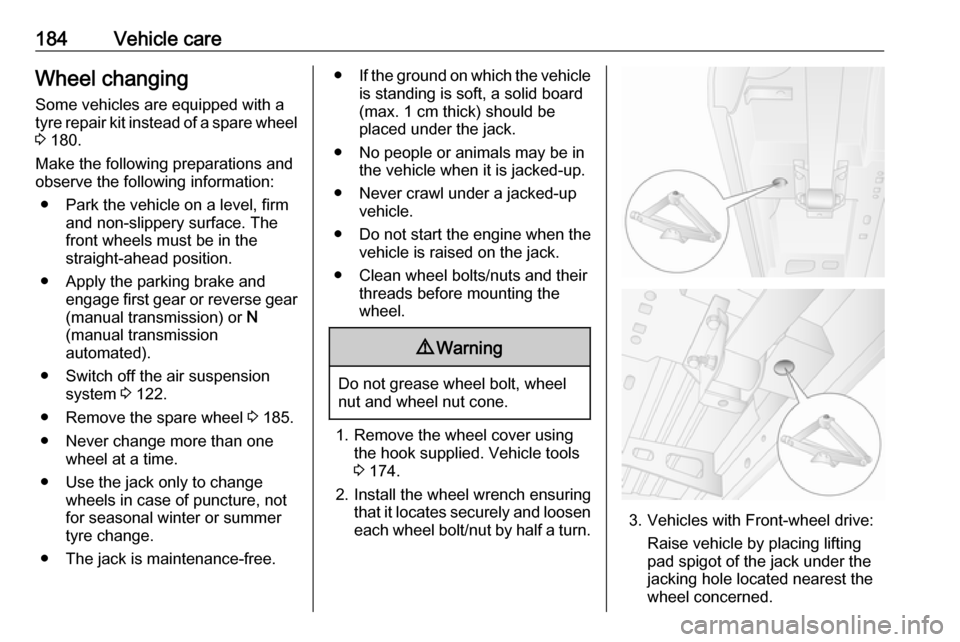
If the cooling system is cold, the
coolant level should be just above the
MINI mark. Top up if the level is low.
9Warning
Allow the engine to cool before
opening the cap. Carefully open
the cap, relieving the pressure
slowly.
Page 165 of 233
Vehicle care163
3. Release spring clip.
4. Withdraw bulb from reflector housing.
5. Renew bulb and secure with spring clip.
6. Reattach wiring connector to bulb.
7. Replace headlamp protective cover.
Low beam
1. Remove headlamp protective cover.
2. Detach wiring connector from bulb.
3. Rotate bulb holder anti-clockwise to disengage.
4. Withdraw bulb holder from reflector housing.
5. Detach bulb from bulb holder andrenew the bulb.
6. Insert the bulb holder, engaging the two lugs in the reflectorhousing and rotate clockwise to
secure.
7. Reattach wiring connector to bulb.
8. Replace headlamp protective cover.
Page 166 of 233
164Vehicle careSidelights
1. Remove protective cover.
2. Detach wiring connector from bulb.
3. Rotate bulb holder anti-clockwise to disengage.
4. Withdraw bulb holder from reflector housing.
5. Detach bulb from bulb holder andrenew the bulb.
6. Insert the bulb holder, engaging the two lugs in the reflectorhousing and rotate clockwise to
secure.
7. Reattach wiring connector to bulb.
8. Replace protective cover.
Adaptive forward lighting
Cornering light
Headlights have separate systems for high beam 1 and low beam 2. The
cornering light 3 is located between
the headlights.
1. Remove protective cover.
2. Detach wiring connector from bulb.
3. Rotate bulb holder anti-clockwise to disengage.
4. Withdraw bulb holder from reflector housing.
Page 167 of 233
Vehicle care165
5. Detach bulb from bulb holder andrenew the bulb.
6. Insert the bulb holder, engaging the two lugs in the reflectorhousing and rotate clockwise to
secure.
7. Reattach wiring connector to bulb.
8. Replace protective cover.
Fog lights
Have the front fog light bulbs replaced
by a workshop.
Front turn signal lights
1. Remove protective cover.
2. Detach wiring connector from bulb.
3. Rotate bulb holder anti-clockwise to disengage.
4. Withdraw bulb holder from reflector housing.
5. Detach bulb from bulb holder andrenew the bulb.
6. Insert the bulb holder, engaging the two lugs in the reflectorhousing and rotate clockwise to
secure.
7. Reattach wiring connector to bulb.
8. Replace protective cover.
Page 169 of 233
Vehicle care167Side turn signal lights1. Push the lamp assembly to the right and pull at the left-hand side
of the lamp assembly to release
from the aperture.
2. Detach wiring connector from lamp assembly.
3. Remove bulb holder from lamp assembly by rotating 90° and
renew bulb.
4. Install bulb holder in lamp assembly.
5. Reattach wiring connector.
6. Install lamp assembly into aperture and push to the left to
secure.
Mirror turn signal lights 1. Move the lower mirror assembly from the front to access the screw.
2. Remove the screw using a torx screwdriver.
3. Remove bulb holder from the rear
of the lower mirror assembly.
4. Renew bulb.
5. Replace bulb holder.
6. Replace the screw.
Centre high-mounted brake
light
1. Remove cover from the inside of the rear door.
2. Unscrew the nut from the locating
pin at the rear of the lamp
assembly.
Page 186 of 233

184Vehicle careWheel changingSome vehicles are equipped with a
tyre repair kit instead of a spare wheel
3 180.
Make the following preparations and
observe the following information:
● Park the vehicle on a level, firm and non-slippery surface. The
front wheels must be in the
straight-ahead position.
● Apply the parking brake and engage first gear or reverse gear
(manual transmission) or N
(manual transmission
automated).
● Switch off the air suspension system 3 122.
● Remove the spare wheel 3 185.
● Never change more than one wheel at a time.
● Use the jack only to change wheels in case of puncture, not
for seasonal winter or summer
tyre change.
● The jack is maintenance-free.● If the ground on which the vehicle
is standing is soft, a solid board
(max. 1 cm thick) should be
placed under the jack.
● No people or animals may be in the vehicle when it is jacked-up.
● Never crawl under a jacked-up vehicle.
● Do not start the engine when the vehicle is raised on the jack.
● Clean wheel bolts/nuts and their threads before mounting thewheel.9 Warning
Do not grease wheel bolt, wheel
nut and wheel nut cone.
1. Remove the wheel cover using the hook supplied. Vehicle tools
3 174.
2. Install the wheel wrench ensuring that it locates securely and loosen
each wheel bolt/nut by half a turn.
3. Vehicles with Front-wheel drive:
Raise vehicle by placing lifting
pad spigot of the jack under the
jacking hole located nearest the
wheel concerned.