Page 212 of 620

212
PRIUS v_OM_OM47B12U_(U)
4-5. Using the driving support systems
■Cruise control can be set when
●The shift position is in D.
●Vehicle speed is above approximately 25 mph (40 km/h).
■Accelerating after setting the vehicle speed
●The vehicle can be accelerated normally. After acceleration, the set speed
resumes.
●Even without canceling the cruise control, the set speed can be increased
by first accelerating the vehicle to the desired speed and then pushing the
lever down to set the new speed.
■Automatic cruise control cancelation
Cruise control will stop maintaining the vehicle speed in any of the following
situations.
●Actual vehicle speed falls more than approximately 10 mph (16 km/h) below
the preset vehicle speed.
At this time, the memorized set speed is not retained.
●Actual vehicle speed is below approximately 25 mph (40km/h).
●Enhanced VSC is activated.
■If the cruise control indicator light comes on in yellow (vehicles without
multi-information display)
Press the “ON-OFF” button once to deactivate the system, and then press
the button again to reactivate the system.
If the cruise control speed cannot be set or if the cruise control cancels imme-
diately after being activated, there may be a malfunction in the cruise control
system. Have the vehicle inspected by your Toyota dealer.
■If the warning message for the cruise control is shown (vehicles with
multi-information display)
Press the “ON-OFF” button once to deactivate the system, and then press
the button again to reactivate the system.
If the cruise control speed cannot be set or if the cruise control cancels imme-
diately after being activated, there may be a malfunction in the cruise control
system. Have the vehicle inspected by your Toyota dealer.
Page 279 of 620
279
PRIUS v_OM_OM47B12U_(U)
5-2. Setup
5
Audio system
Audio settings
Press the “SETUP” button.
Select “Audio” on the “Setup” screen.
Number of Radio Presets
Select the number of radio
preset stations.
Select input video sound.
Select video signal.
Display Cover Art on/off.
Automatic Sound Levelizer.
(P. 280)
Select “iPod Video Sound Input” on the “Audio Settings” screen.
Select a screen button for the
desired setting.
Settings are available for adjusting the radio operation, cover
art, etc.
Screen for audio settings
1
2
1
2
3
4
5
iPod Video Sound Input
1
2
Page 290 of 620
290
PRIUS v_OM_OM47B12U_(U)
5-4. Using the radio
Radio operation
Pressing the “AUDIO” button displays the audio control screen from
any screens of the selected source.
Audio source selection screen
appears
Preset stations
Scanning for receivable station
Select to display a list of receiv-
able stations
Setting the sound (P. 288)
Tune in to the desired station using one of the following methods.
■Seek tuning
Press the “” or “” button on “SEEK/TRACK”.
The radio will begin seeking up or down for a station of the nearest
frequency and will stop when a station is found.
■Manual tuning
Turn the “TUNE SCROLL” knob.
■Preset stations
Select the desired preset station.
Select “AM” or “FM” on the audio source selection screen to
begin listening to the radio.
Audio control screen
1
2
3
4
5
Selecting a station
Page 291 of 620
PRIUS v_OM_OM47B12U_(U)
2915-4. Using the radio
5
Audio system
Search for desired stations by turning the “TUNE SCROLL” knob or
pressing the “” or “” button on “SEEK/TRACK”.
Select “(add new)”.
To change the preset station to a different one, select and hold the preset
station.
Select “Yes”.
Select “OK” after setting the new preset station.
■Refreshing the station list
Select “Refresh” on the “Station List” screen.
To cancel the refresh, select “Cancel Refresh”.
■Reception sensitivity
●Maintaining perfect radio reception at all times is difficult due to the continu-
ally changing position of the antenna, differences in signal strength and sur-
rounding objects, such as trains, transmitters, etc.
●The radio antenna is mounted on the roof. The antenna can be removed
from the base by turning it.
Setting station presets
1
2
3
4
Page 301 of 620

PRIUS v_OM_OM47B12U_(U)
3015-6. Using an external device
5
Audio system
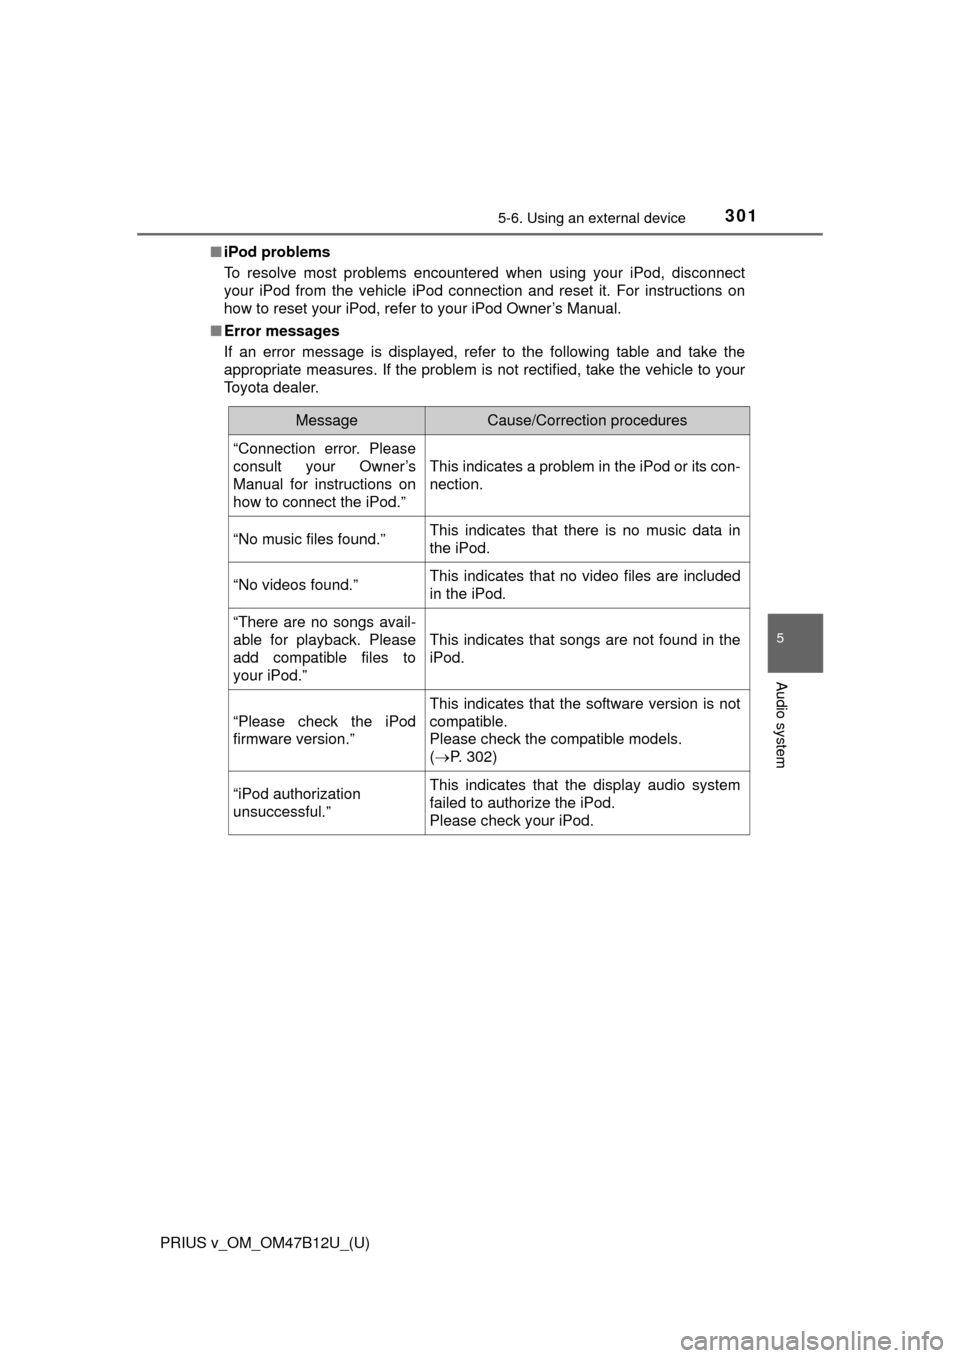
■iPod problems
To resolve most problems encountered when using your iPod, disconnect
your iPod from the vehicle iPod connection and reset it. For instructions on
how to reset your iPod, refer to your iPod Owner’s Manual.
■Error messages
If an error message is displayed, refer to the following table and take the
appropriate measures. If the problem is not rectified, take the vehicle to your
Toyota dealer.
MessageCause/Correction procedures
“Connection error. Please
consult your Owner’s
Manual for instructions on
how to connect the iPod.”
This indicates a problem in the iPod or its con-
nection.
“No music files found.”This indicates that there is no music data in
the iPod.
“No videos found.”This indicates that no video files are included
in the iPod.
“There are no songs avail-
able for playback. Please
add compatible files to
your iPod.”
This indicates that songs are not found in the
iPod.
“Please check the iPod
firmware version.”
This indicates that the software version is not
compatible.
Please check the compatible models.
(P. 302)
“iPod authorization
unsuccessful.”This indicates that the display audio system
failed to authorize the iPod.
Please check your iPod.
Page 339 of 620

339
PRIUS v_OM_OM47B12U_(U)
5-9. Bluetooth® phone
5
Audio system
Contact/Call Histor y Settings
The contact can be transferred from a Bluetooth® phone to the sys-
tem. The contact also can be added, edited and deleted.
The call history can be deleted and contact and favorites can be
changed.
Display the “Phone/Message Settings” screen. (P. 338)
Select “Contact/Call History Settings”.
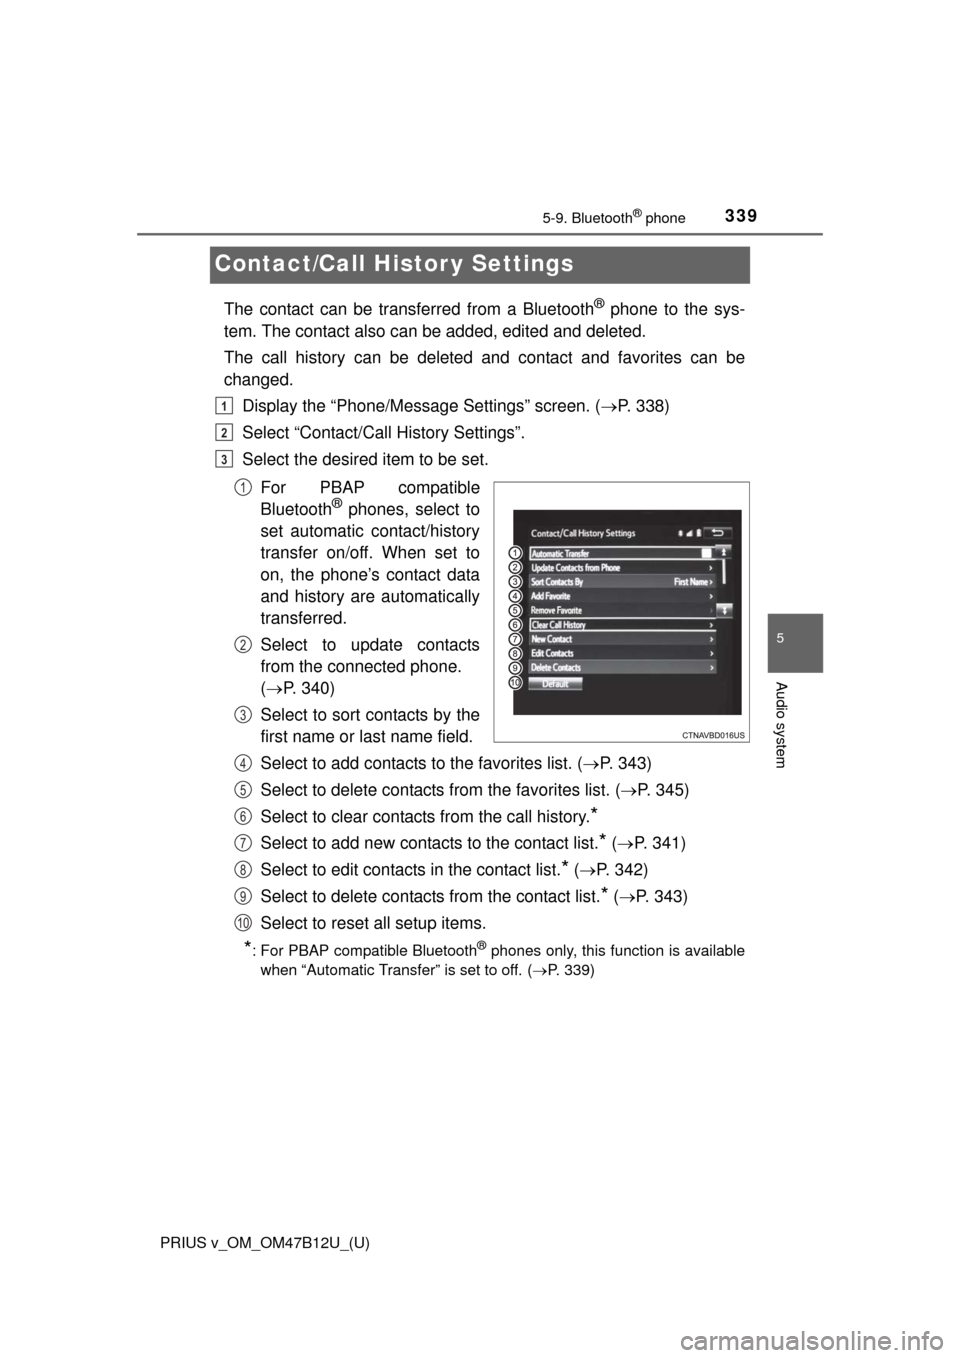
Select the desired item to be set.
For PBAP compatible
Bluetooth
® phones, select to
set automatic contact/history
transfer on/off. When set to
on, the phone’s contact data
and history are automatically
transferred.
Select to update contacts
from the connected phone.
(P. 340)
Select to sort contacts by the
first name or last name field.
Select to add contacts to the favorites list. (P. 343)
Select to delete contacts from the favorites list. (P. 345)
Select to clear contacts from the call history.
*
Select to add new contacts to the contact list.* (P. 341)
Select to edit contacts in the contact list.
* (P. 342)
Select to delete contacts from the contact list.
* (P. 343)
Select to reset all setup items.
*: For PBAP compatible Bluetooth® phones only, this function is available
when “Automatic Transfer” is set to off.
(P. 339)
1
2
3
1
2
3
4
5
6
7
8
9
10
Page 414 of 620

414
PRIUS v_OM_OM47B12U_(U)
7-2. Maintenance
■Repair and replacement
It is recommended that genuine Toyota parts be used for repairs to ensure
performance of each system. If non-Toyota parts are used in replacement or if
a repair shop other than a Toyota dealer performs repairs, confirm the war-
ranty coverage.
■Resetting the maintenance required reminder light/message indicating
maintenance is required (U.S.A. only)
After the required maintenance is preformed according to the maintenance
schedule, please reset the reminder light/message.
To reset the reminder light/message, follow the procedures described below:
Switch the display to the trip meter “A” (P. 91) when the hybrid system is
operating.
Turn the power switch off.
While pressing the MPH or km/h button (P. 93), turn the power switch to
ON mode (do not start the hybrid system because otherwise the reset
mode will be canceled). Continue to press and hold the button until the trip
meter displays “000000” and the indicator stops flashing to indicate that the
reset is complete.
■Allow inspection and repairs to be performed by a Toyota dealer
●Toyota technicians are well-trained specialists and are kept up to date with
the latest service information. They are well informed about the operation of
all systems on your vehicle.
●Keep a copy of the repair order. It proves that the maintenance that has
been performed is under warranty coverage. If any problem should arise
while your vehicle is under warranty, your Toyota dealer will promptly take
care of it.
WARNING
■If your vehicle is not properly maintained
Improper maintenance could result in serious damage to the vehicle and
possible serious injury or death.
■Handling of the 12-volt battery
●Engine exhaust, some of its constituents, and a wide variety of automobile
components contain or emit chemicals known to the State of California to
cause cancer and birth defects and other reproductive harm. Work in a
well ventilated area.
●Oils, fuels and fluids contained in vehicles as well as waste produced by
component wear contain or emit chemicals known to the State of Califor-
nia to cause cancer and birth defects or other reproductive harm. Avoid
exposure and wash any affected area immediately.
●12-volt battery posts, terminals and related accessories contain lead and
lead compounds which are known to cause brain damage. Wash your
hands after handling. (P. 439)
1
2
3
Page 445 of 620

PRIUS v_OM_OM47B12U_(U)
4457-3. Do-it-yourself maintenance
7
Maintenance and care
■How to initialize the tire pressure warning system
Park the vehicle in a safe place and turn the power switch off.
Initialization cannot be performed while the vehicle is moving.
Adjust the tire inflation pressure to the specified cold tire inflation
pressure level. (P. 559)
Make sure to adjust the tire pressure to the specified cold tire inflation
pressure level. The tire pressure warning system will operate based on
this pressure level.
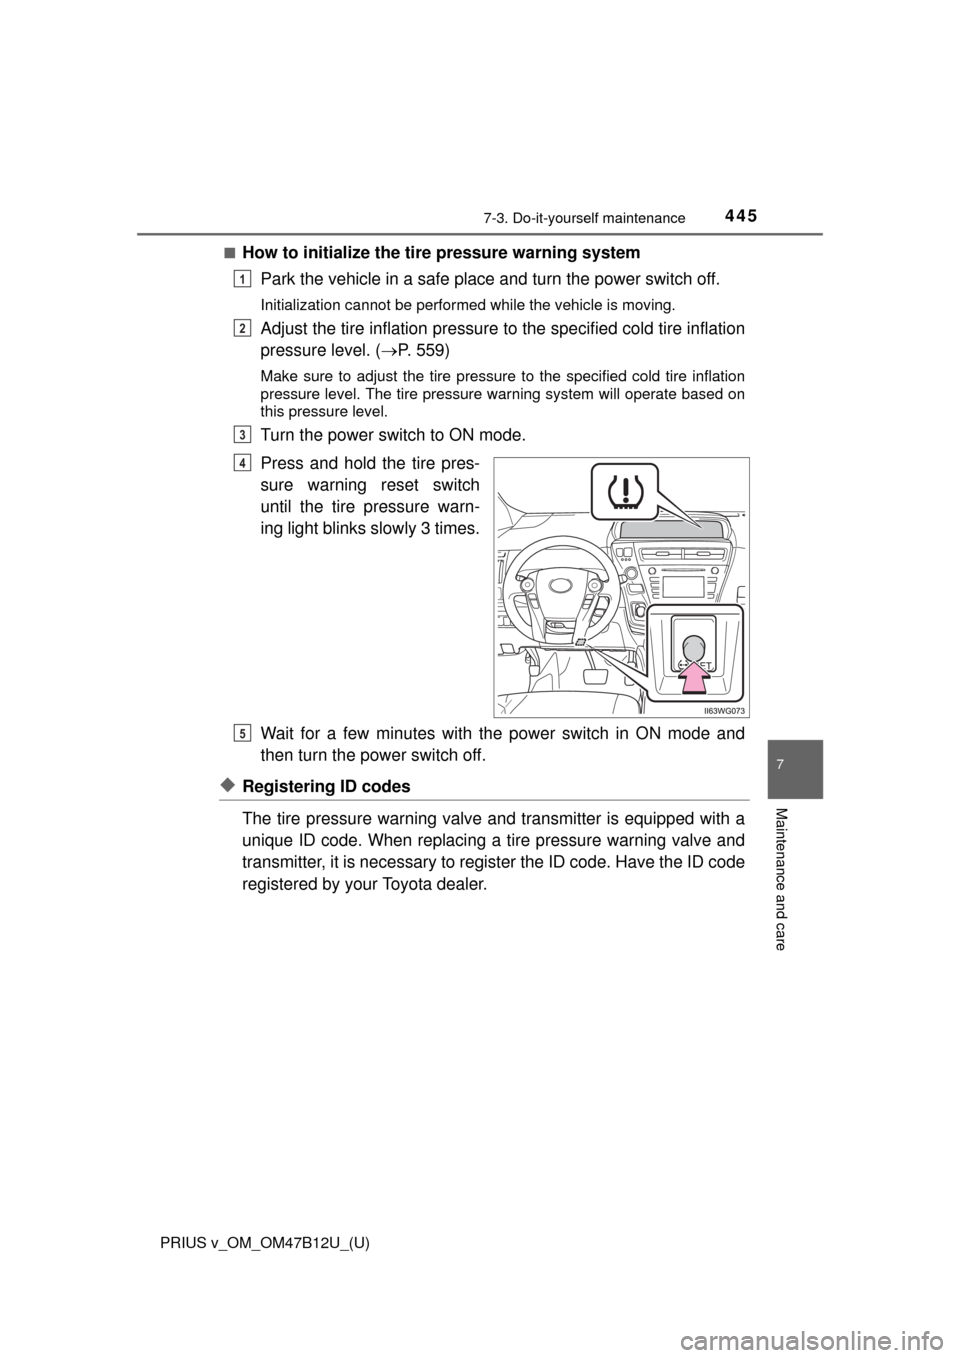
Turn the power switch to ON mode.
Press and hold the tire pres-
sure warning reset switch
until the tire pressure warn-
ing light blinks slowly 3 times.
Wait for a few minutes with the power switch in ON mode and
then turn the power switch off.
◆Registering ID codes
The tire pressure warning valve and transmitter is equipped with a
unique ID code. When replacing a tire pressure warning valve and
transmitter, it is necessary to register the ID code. Have the ID code
registered by your Toyota dealer.
1
2
3
4
5