Page 229 of 620
PRIUS v_OM_OM47B12U_(U)
2294-5. Using the driving support systems
4
Driving
When the following conditions are satisfied, the function operates.
When the lane departure alert function operates, lane lines is dis-
played on the multi-information display. (P. 230)
●When the LDA is on. (P. 228)
●When the vehicle speed is approximately 32 mph (50 km/h) or
more.
●When the system recognizes white (yellow) lane markers.
●When the lane width is more than approximately 8.2 ft. (2.5 m).
●When turn signal lever is not operating.
●When driving on a straight road or through a curve with a radius of
more than approximately 328 ft. (100 m)
●When a system abnormality is not detected. (P. 231)
In any of the following cases, the lane departure alert function will be
temporarily canceled. When the conditions, in which the cancelation
occurred improves, the function will resume operations.
●The vehicle speed deviates from the operating ranges of the func-
tion
●The turn signal lever is operated
●When the lane markers cannot be recognized while driving
●Immediately after the lane departure alert operates
The lane departure alert function will not operate again for a several
seconds after it has been activated, even if the vehicle leaves the
lane again.
Operating conditions for the function
Temporary cancelation of the function
Page 236 of 620
236
PRIUS v_OM_OM47B12U_(U)
4-5. Using the driving support systems
■Screen description
The rear view monitor system screen will be displayed if the shift
lever is shifted to R while the power switch is in ON mode.
Vehicle width extension guide line
Displays a guide path when the vehicle is being backed straight up.
The displayed width is wider than the actual vehicle width.
Vehicle center guide line
This lines indicate the estimated vehicle center on the ground.
Distance guide line
Displays a point approximately 0.5 m (1.5 ft.) (red) from the edge of the
bumper.
Distance guide line
Displays a point approximately 1 m (3 ft.) (blue) from the edge of the
bumper.
Using the rear view monitor system
1
2
3
4
Page 238 of 620
238
PRIUS v_OM_OM47B12U_(U)
4-5. Using the driving support systems
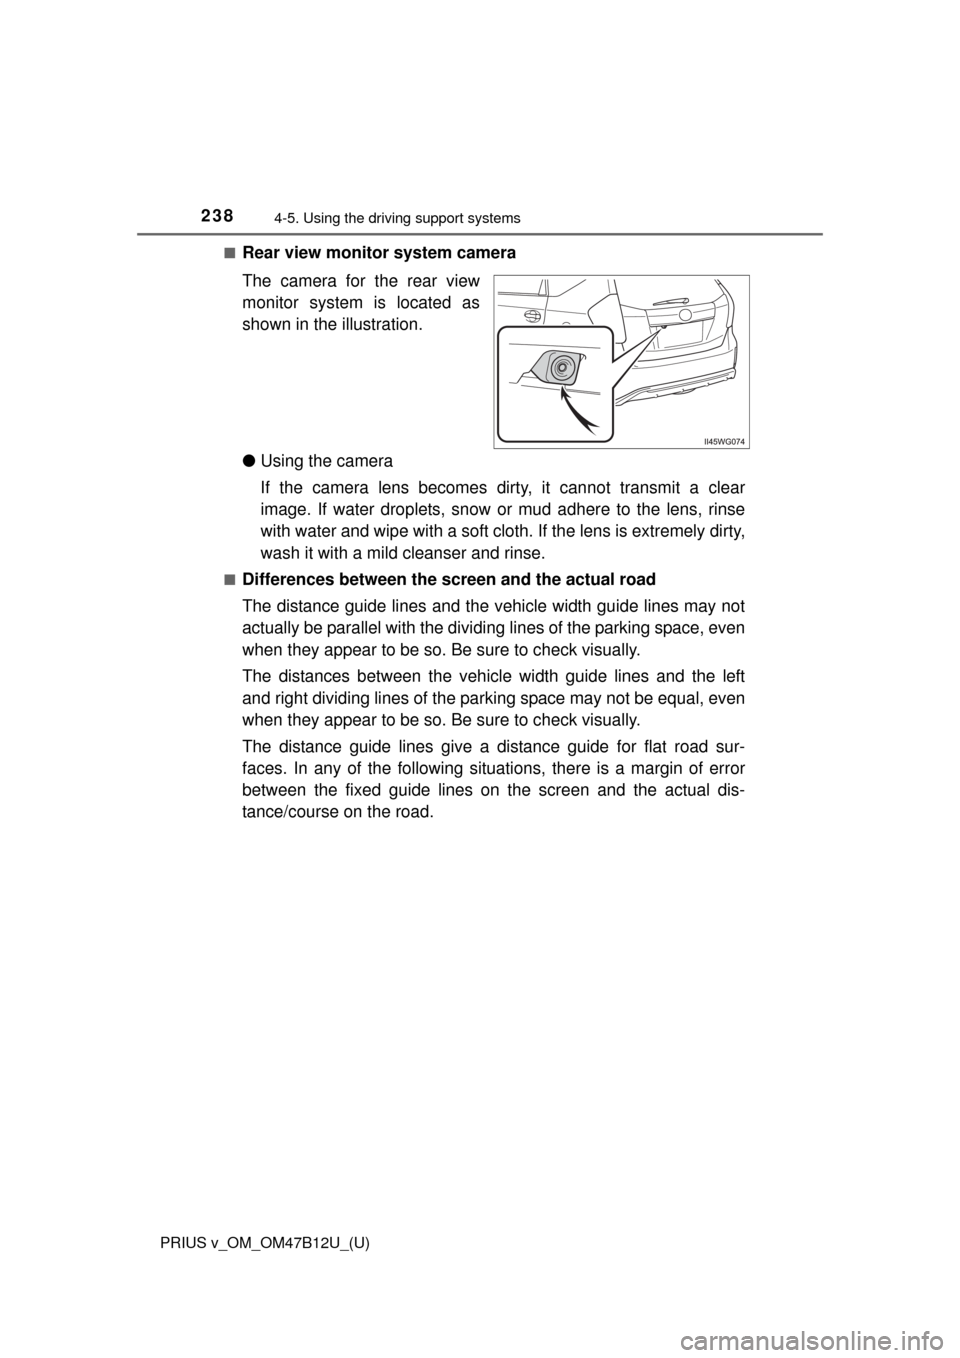
■Rear view monitor system camera
The camera for the rear view
monitor system is located as
shown in the illustration.
●Using the camera
If the camera lens becomes dirty, it cannot transmit a clear
image. If water droplets, snow or mud adhere to the lens, rinse
with water and wipe with a soft cloth. If the lens is extremely dirty,
wash it with a mild cleanser and rinse.
■Differences between the screen and the actual road
The distance guide lines and the vehicle width guide lines may not
actually be parallel with the dividing lines of the parking space, even
when they appear to be so. Be sure to check visually.
The distances between the vehicle width guide lines and the left
and right dividing lines of the parking space may not be equal, even
when they appear to be so. Be sure to check visually.
The distance guide lines give a distance guide for flat road sur-
faces. In any of the following situations, there is a margin of error
between the fixed guide lines on the screen and the actual dis-
tance/course on the road.
Page 240 of 620
240
PRIUS v_OM_OM47B12U_(U)
4-5. Using the driving support systems
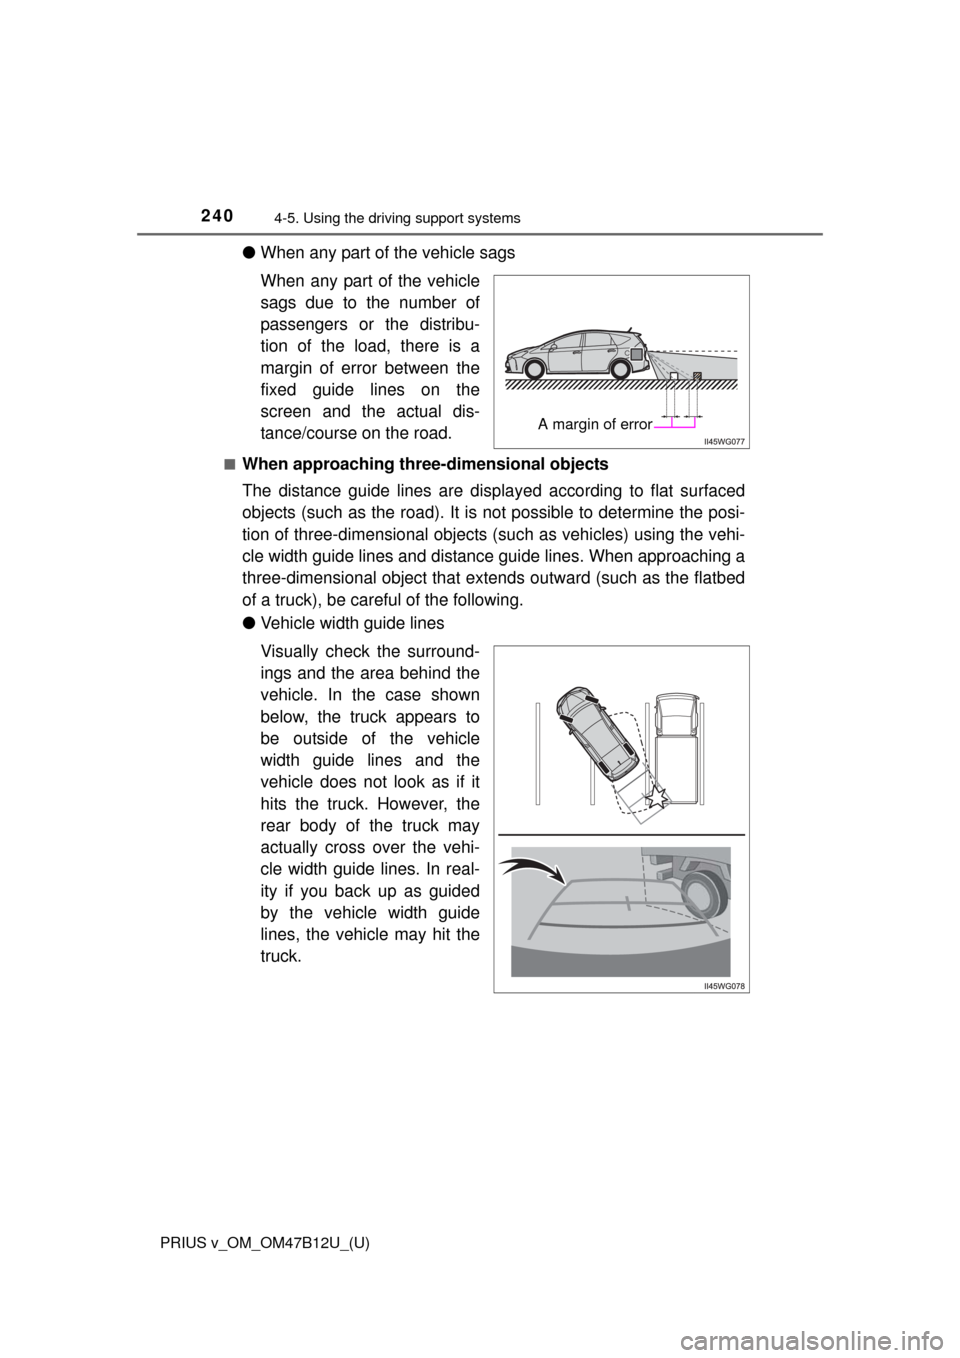
●When any part of the vehicle sags
When any part of the vehicle
sags due to the number of
passengers or the distribu-
tion of the load, there is a
margin of error between the
fixed guide lines on the
screen and the actual dis-
tance/course on the road.
■When approaching three-dimensional objects
The distance guide lines are displayed according to flat surfaced
objects (such as the road). It is not possible to determine the posi-
tion of three-dimensional objects (such as vehicles) using the vehi-
cle width guide lines and distance guide lines. When approaching a
three-dimensional object that extends outward (such as the flatbed
of a truck), be careful of the following.
●Vehicle width guide lines
Visually check the surround-
ings and the area behind the
vehicle. In the case shown
below, the truck appears to
be outside of the vehicle
width guide lines and the
vehicle does not look as if it
hits the truck. However, the
rear body of the truck may
actually cross over the vehi-
cle width guide lines. In real-
ity if you back up as guided
by the vehicle width guide
lines, the vehicle may hit the
truck.
A margin of error
Page 455 of 620
455
PRIUS v_OM_OM47B12U_(U)
7-3. Do-it-yourself maintenance
7
Maintenance and care
Wheels
When replacing wheels, care should be taken to ensure that they are
equivalent to those removed in load capacity, diameter, rim width and
inset
*.
Replacement wheels are available at your Toyota dealer.
*: Conventionally referred to as “offset”.
Toyota does not recommend using the following:
●Wheels of different sizes or types
●Used wheels
●Bent wheels that have been straightened
●Use only Toyota wheel nuts and wrenches designed for use with
your aluminum wheels.
●When rotating, repairing or changing your tires, check that the
wheel nuts are still tight after driving 1000 miles (1600 km).
●Be careful not to damage the aluminum wheels when using tire
chains.
●Use only Toyota genuine balance weights or equivalent and a plas-
tic or rubber hammer when balancing your wheels.
■When replacing wheels
The wheels of your vehicle are equipped with tire pressure warning
valves and transmitters that allow the tire pressure warning system to
provide advance warning in the event of a loss in tire inflation pressure.
Whenever wheels are replaced, tire pressure warning valves and trans-
mitters must be installed. (P. 444)
If a wheel is bent, cracked or heavily corroded, it should be
replaced. Otherwise, the tire may separate from the wheel or
cause a loss of handling control.
Wheel selection
Aluminum wheel precautions
Page 552 of 620
552
PRIUS v_OM_OM47B12U_(U)
9-1. Specifications
Maintenance data (fuel, oil level, etc.)
*1: Grade 2 only
*2: Unladen vehicle
*3: Vehicles without panoramic roof
*4: Vehicles with panoramic roof
*5: Vehicles with 16-inch tires
*6: Vehicles with 17-inch tires
Dimensions and weight
Overall length182.9 in. (4645 mm)
182.3 in. (4630 mm)
*1
Overall width69.9 in. (1775 mm)
Overall height*262.0 in. (1575 mm)*3
63.0 in. (1600 mm)*4
Wheelbase109.4 in. (2780 mm)
Tread
Front60.6 in. (1540 mm)*5
60.2 in. (1530 mm)*6
Rear60.8 in. (1545 mm)*5
60.4 in. (1535 mm)*6
Vehicle capacity weight
(Occupants + luggage)885 lb. (400 kg)
Page 566 of 620
566
PRIUS v_OM_OM47B12U_(U)
9-1. Specifications
DOT symbol*
Tire Identification Number (TIN)
Tire manufacturer’s identifica-
tion mark
Tire size code
Manufacturer’s optional tire
type code (3 or 4 letters)
Manufacturing week
Manufacturing year
*: The DOT symbol certifies that the tire conforms to applicable Federal
Motor Vehicle Safety Standards.
■
Typical tire size information
The illustration indicates typical
tire size.
Tire use
(P = Passenger car,
T = Temporary use)
Section width (millimeters)
Aspect ratio
(tire height to section width)
Tire construction code (R = Radial, D = Diagonal)
Wheel diameter (inches)
Load index (2 digits or 3 digits)
Speed symbol (alphabet with one letter)
Typical DOT and Tire Identification Number (TIN)
1
2
3
4
5
6
Tire size
7
1
2
3
4
5
6
7
Page 567 of 620
PRIUS v_OM_OM47B12U_(U)
5679-1. Specifications
9
Vehicle specifications
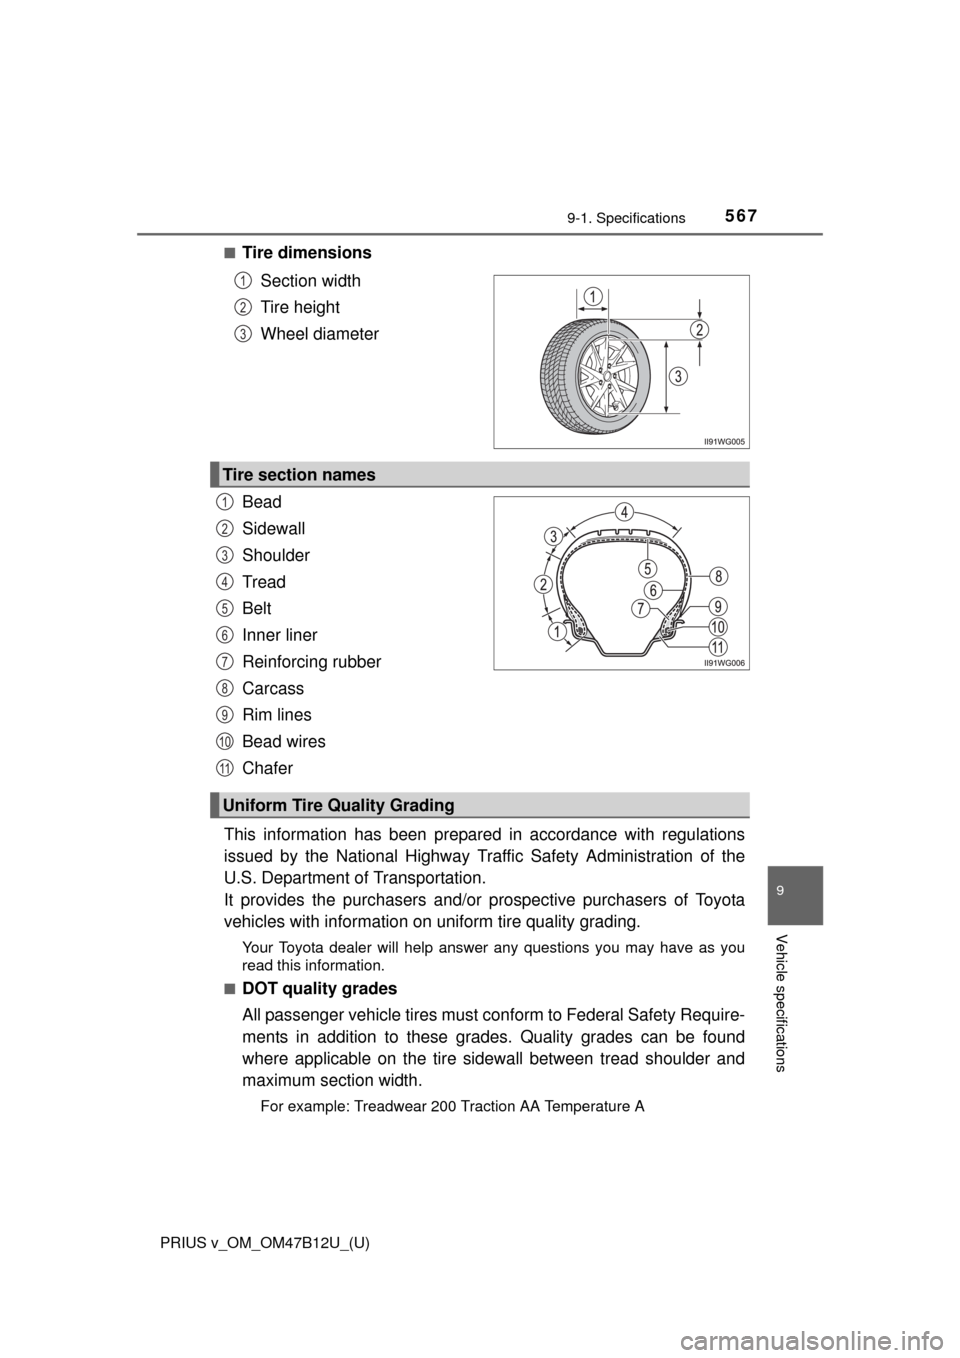
■Tire dimensions
Section width
Tire height
Wheel diameter
Bead
Sidewall
Shoulder
Tread
Belt
Inner liner
Reinforcing rubber
Carcass
Rim lines
Bead wires
Chafer
This information has been prepared in accordance with regulations
issued by the National Highway Traffic Safety Administration of the
U.S. Department of Transportation.
It provides the purchasers and/or prospective purchasers of Toyota
vehicles with information on uniform tire quality grading.
Your Toyota dealer will help answer any questions you may have as you
read this information.
■
DOT quality grades
All passenger vehicle tires must conform to Federal Safety Require-
ments in addition to these grades. Quality grades can be found
where applicable on the tire sidewall between tread shoulder and
maximum section width.
For example: Treadwear 200 Traction AA Temperature A
1
2
3
Tire section names
1
2
3
4
5
6
7
Uniform Tire Quality Grading
8
9
10
11