Page 183 of 276

183
1. BASIC OPERATION
NAVIGATION SYSTEM
8
2. MAP SCREEN OPERATION
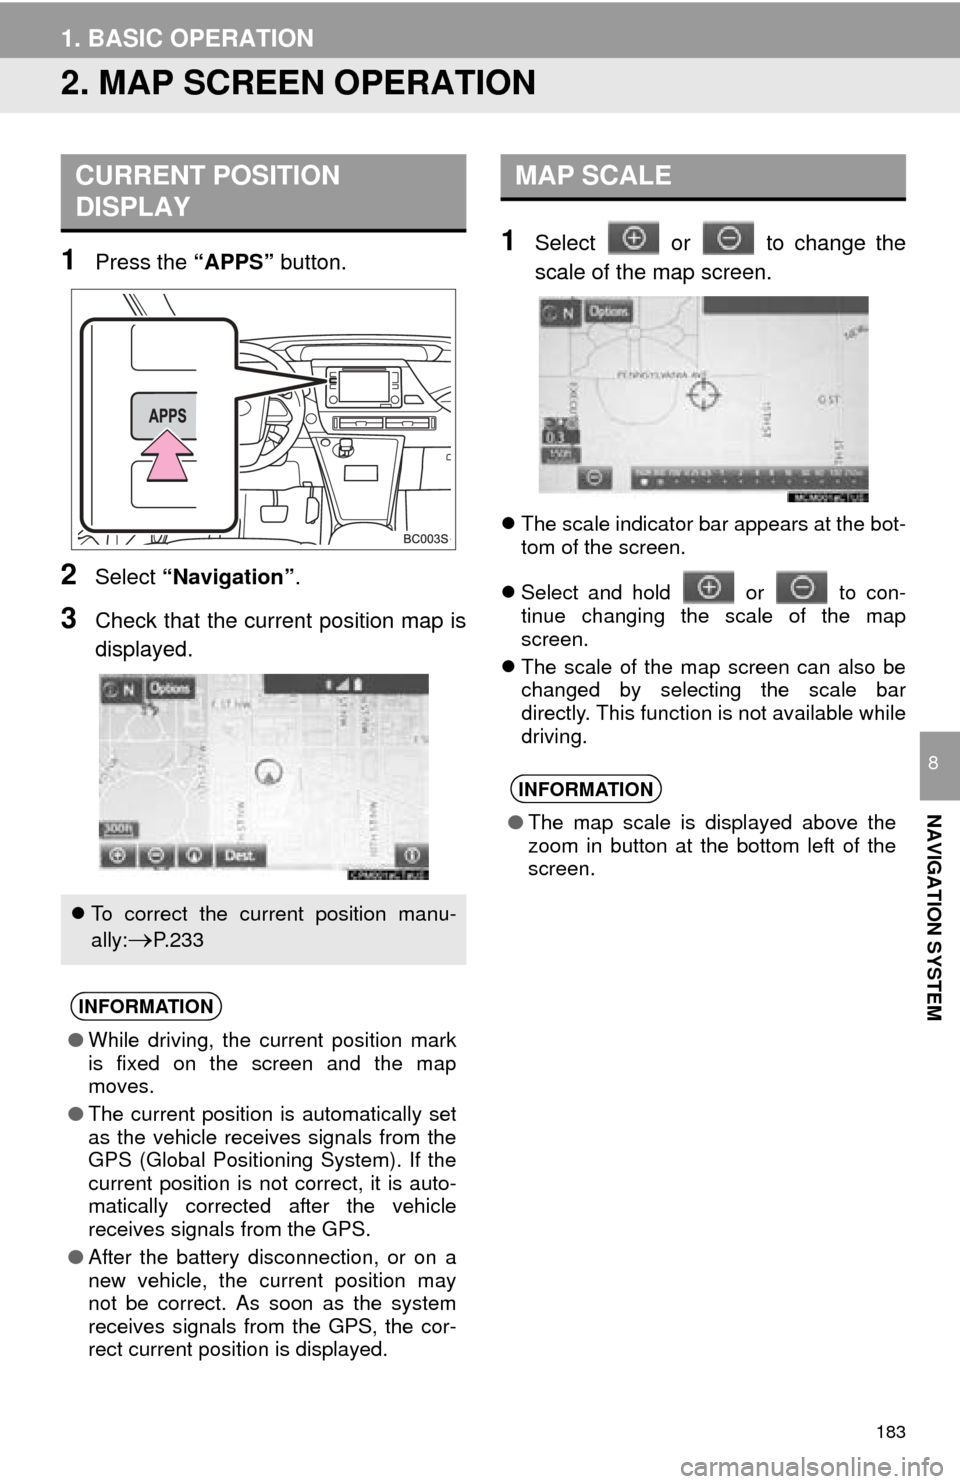
1Press the “APPS” button.
2Select “Navigation” .
3Check that the current position map is
displayed.
1Select or to change the
scale of the map screen.
The scale indicator bar appears at the bot -
tom of the screen.
Sel
ect and hold or to con-
tinue changing the scale of the map
screen.
The sc
ale of the map screen can also be
changed by selecting the scale bar
directly. This function is not available while
driving.
CURRENT POSITION
DISPLAY
To correct the current position manu-
ally:
P. 2 3 3
INFORMATION
● While driving, the current position mark
is fixed on the screen and the map
moves.
● The current position is automatically set
as the vehicle receives signals from the
GPS (Global Positioning System). If the
current position is not correct, it is auto-
matically corrected after the vehicle
receives signals from the GPS.
● After the battery disconnection, or on a
new vehicle, the current position may
not be correct. As soon as the system
receives signals from the GPS, the cor-
rect current position is displayed.
MAP SCALE
INFORMATION
●The map scale is displayed above the
zoom in button at the bottom left of the
screen.
Page 185 of 276
185
1. BASIC OPERATION
NAVIGATION SYSTEM
8
Depending on the conditions, certain
screen configuration buttons cannot be
selected.
■MAP ONLY
■DUAL MAP
The map on the left is the main map.
Editing right map
1Select any point on the right side map.
2Select the desired item.
When set to on, the indicator will illumi -nate.
Select to display the inter-
section guidance screen or
the guidance screen on the
freeway.
215
Select to display the turn-
by-turn arrow screen.216
No.FunctionPage
The right side map can be edited.
No.FunctionPage
Select to change the orien-
tation of the map.184
Select to display POI icons.188
Select to show traffic infor-
mation. 192
Select to change the map
scale.183
Page 186 of 276

186
1. BASIC OPERATION
■COMPASS
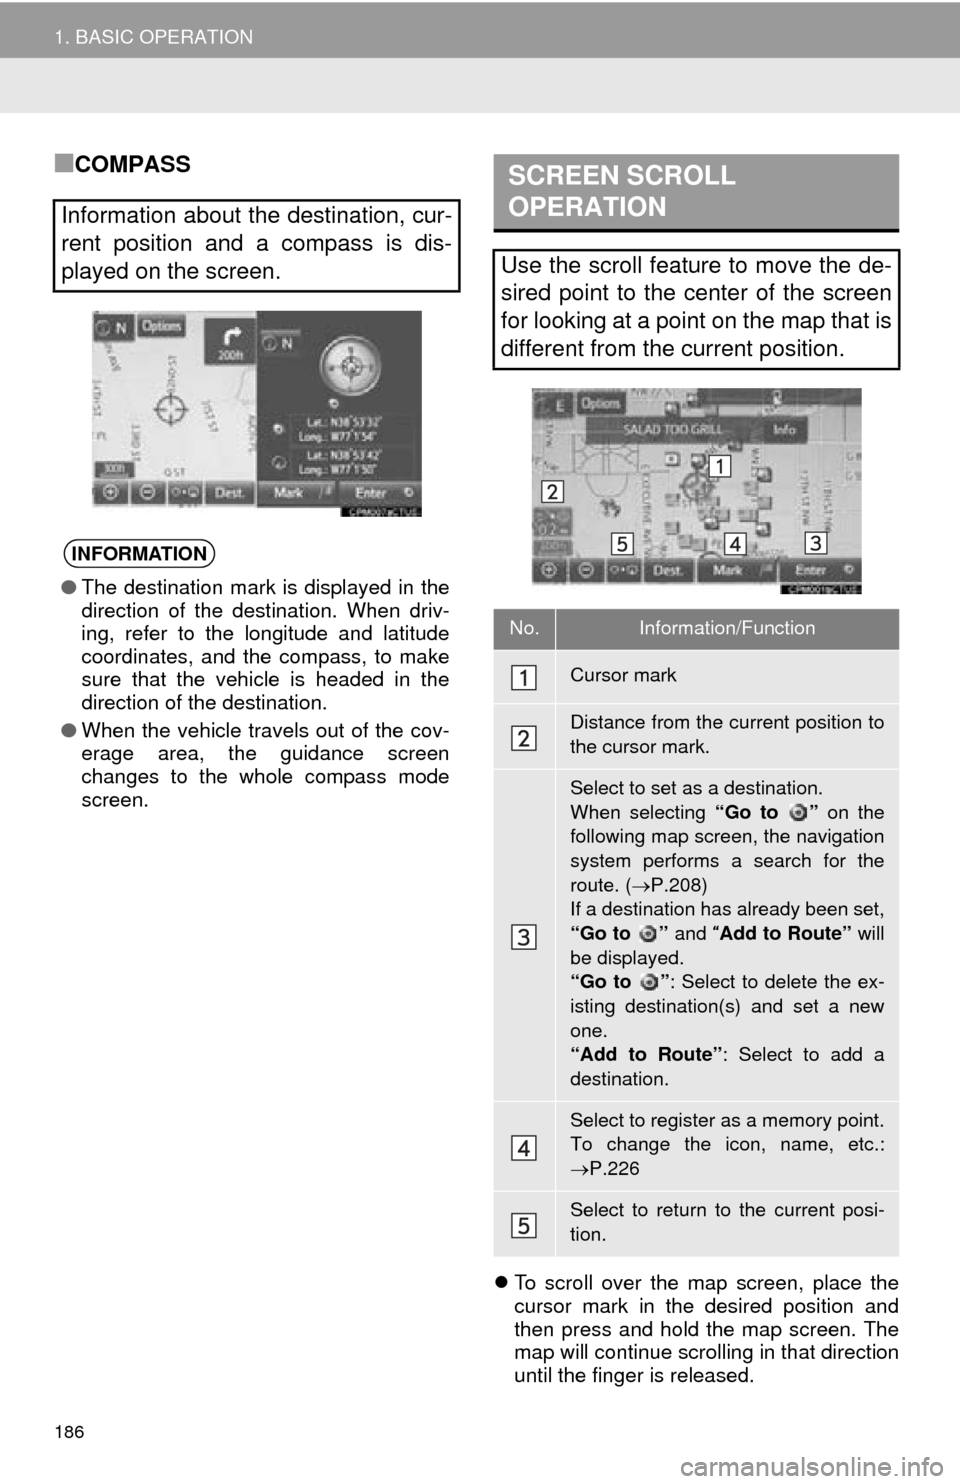
To scroll over the map screen, place the
cursor mark in the desired position and
then press and hold the map screen. The
map will continue scrolling in that direction
until the finger is released.
Information about the destination, cur-
rent position and a compass is dis-
played on the screen.
INFORMATION
●The destination mark is displayed in the
direction of the destination. When driv-
ing, refer to the longitude and latitude
coordinates, and the compass, to make
sure that the vehicle is headed in the
direction of the destination.
● When the vehicle travels out of the cov-
erage area, the guidance screen
changes to the whole compass mode
screen.
SCREEN SCROLL
OPERATION
Use the scroll feature to move the de-
sired point to the center of the screen
for looking at a point on the map that is
different from the current position.
No.Information/Function
Cursor mark
Distance from the current position to
the cursor mark.
Select to set as a destination.
When selecting “Go to ” on the
following map screen, the navigation
system performs a search for the
route. ( P.208)
If a destination has already been set,
“Go to ” and “Add to Route” will
be displayed.
“Go to ” : Select to delete the ex-
isting destination(s) and set a new
one.
“Add to Route” : Select to add a
destination.
Select to register as a memory point.
To change the icon, name, etc.:
P.226
Select to return to the current posi-
tion.
Page 187 of 276
187
1. BASIC OPERATION
NAVIGATION SYSTEM
8
1Select one of the 8 directional arrows
to move the cursor to the desired point
and then select “OK”.
ADJUSTING LOCATION IN
SMALL INCREMENTS
The cursor location can be adjusted in
small increments when “Adjust Loca-
tion” is selected on the setting map
screen.
Also, when changing the location of
memory points on the editing screen
( P.230) and adjusting the current po-
sition mark manually on the “Calibra-
tion” screen ( P.233), 8 directional
arrows may appear for this purpose.
Page 189 of 276
189
1. BASIC OPERATION
NAVIGATION SYSTEM
8
■SELECTING OTHER POI ICONS TO
BE DISPLAYED
1Select “Other POIs” .
2Select the desired POI categories and
select “OK”.
“List All Categories” : Sele
ct to display all
POI categories. To add more POI catego-
ries, select “More”.
■DISPLAYING THE LOCAL POI LIST
1Select “Find Local POI” .
2Select the desired POI.
“Near...” : Selec
t to search for POIs near
the current position or along the route.
3Check that the selected POI is dis -
played on the map screen. ( P.186)
W
hen “Near...” is selected
1Select the desired item.
“Near Here” : Select
to search for POIs
near the current position.
“Along My Route” : Select to search for
POIs along the route.
POIs that are within 20 miles (32 km) of
the current position will be listed from
among the selected categories.
Page 191 of 276
191
1. BASIC OPERATION
NAVIGATION SYSTEM
8
Destination information
No.Function
Select to register as a memory point.
To change the icon, name, etc.:
P.226
Select to set as a destination.
Select to call the registered number.
Select to delete destination or mem-
ory point.
Select to display the edit memory
point screen.
INFORMATION
● Even when traffic information is not cur-
rently being received, traffic information
and “Info” will be displayed for a while
after traffic information has been
received.
STANDARD MAP ICONS
IconName
Island
Park
Industry
Business facility
Airport
Military
University
Hospital
Stadium
Shopping mall
Golf
Page 193 of 276

193
1. BASIC OPERATION
NAVIGATION SYSTEM
8
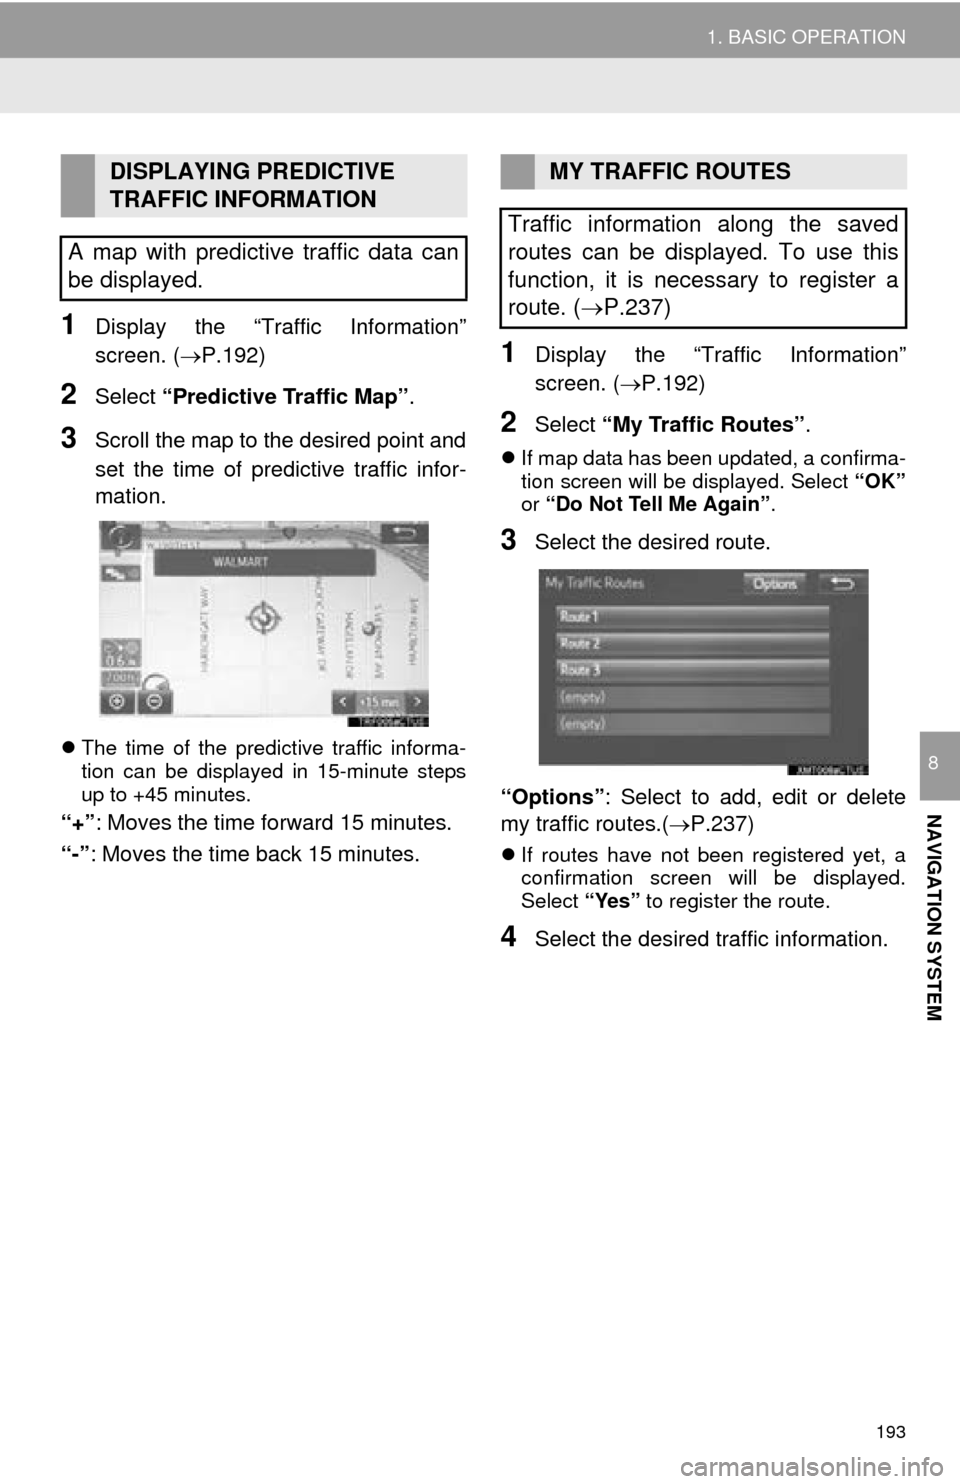
1Display the “Traffic Information”
screen. (P.192)
2Select “Predictive Traffic Map” .
3Scroll the map to the desired point and
set the time of predictive traffic infor-
mation.
The time of the predictive traffic informa -
tion can be displayed in 15-minute steps
u
p to +45 minutes.
“+” : Moves the time forward 15 minutes.
“-”: Moves the time back 15 minutes.
1Display the “Traffic Information”
screen. ( P.192)
2Select “My Traffic Routes” .
If map data has been updated, a confirma-
tion screen will be displayed. Select “OK”
or “Do
Not Tell Me Again” .
3Select the desired route.
“Options” : Sel
ect to add, edit or delete
my traffic routes.( P.237)
If routes have not been registered yet, a
confirmation screen will be displayed.
Select “Yes” to register the route.
4Select the desired traffic information.
DISPLAYING PREDICTIVE
TRAFFIC INFORMATION
A map with predictive traffic data can
be displayed.MY TRAFFIC ROUTES
Traffic information along the saved
routes can be displayed. To use this
function, it is necessary to register a
route. ( P.237)
Page 195 of 276
195
NAVIGATION SYSTEM
8
2. DESTINATION SEARCH
1. DESTINATION SEARCH SCREEN
The “Destination” screen enables to search for a destination. To display the “Des-
tination” screen, select “Dest.” on the map screen.
No.FunctionPage
Select to search for a destination by address. 199
Select to search for a destination by point of interest. 200
Select to search for a destination from previously set destinations.204
Select to search for a destination from a registered entry in “Address
Book”.204
Select to search for a destination by online database. 255
Select to search for a destination from emergency service points.205
Select to search for a destination by intersection or freeway entrance/
exit.205
Select to search for a destination by the last displayed map.207
Select to search for a destination by coordinates.207
Select to set a destination by home.198