Page 286 of 608

286
LC200_OM_OM60M88U_(U)
4-5. Using the driving support systems
Crawl Control
Press the ON/OFF switch while Crawl Control is operating. If the
switch is turned off, the slip indicator and the Turn Assist indicator will
go off (if the Turn Assist function is in use), the Crawl Control indicator
will flash until the system has turned off completely, and a message
stating that Crawl Cont rol has been turned off will be displayed on the
multi-information display for several seconds.
When turning off Crawl Control while driving, stop the vehicle before
the Crawl Control indicator turns off, or drive extremely carefully.
Turn Assist function
Press the Turn Assist switch while the Turn Assist function is operat-
ing. When the switch is pressed, the Turn Assist indicator will go off,
and a message stating that the Turn Assist function has been turned
off will be displayed on the multi-in formation display for several sec-
onds.
■ The Crawl Control and Turn Assist function can be operated when
Crawl Control
● The engine is running.
● The shift lever is in any gear other than P or N.
● The four-wheel drive control switch is in L4.
● The driver’s door is closed.
Turn Assist function
● Crawl Control is operating.
● The center differential is not locked.
● The accelerator and brake are not being operated.
● The shift lever is in any gear other than P, R or N.
● The steering wheel is turned very far.
When the system is turned off
Page 302 of 608

302
LC200_OM_OM60M88U_(U)
4-5. Using the driving support systems
■Multi-terrain Monitor screen display
The amount of time that the Multi-terrain Monitor screen is displayed changes
as follows according to the vehicle speed at the time the VIEW switch was
pressed.
The Multi-terrain Monitor screen is displayed if the vehicle speed is approxi-
mately 7 mph (12 km/h) or less when the VIEW switch is pressed.
If the vehicle speed exceeds approximately 7 mph (12 km/h), the Multi-terrain
Monitor display is canceled.
The various screens of the Multi-terrain Monitor display information to
support several different driving situations, such as when checking for
obstacles when moving forward or in reverse, or when judging road
surface conditions during off-road driving.
■Front view & dual side view
Front view & dual side view can be used to check the area around
the front of the vehicle.
• In addition to an image of the front of the vehicle, guide lines are
displayed in a composite view to provide reference for when
deciding a direction to move forward in.
• If the VIEW switch is pressed wh ile the screen is displayed, the
screen switches from normal to magnified display. (Pressing the
switch again returns the screen to the normal display)
• If the steering wheel is turned 270 or more, guide lines and
other features to support turning are automatically displayed.
Screen display and functions
Page 310 of 608

310
LC200_OM_OM60M88U_(U)
4-5. Using the driving support systems
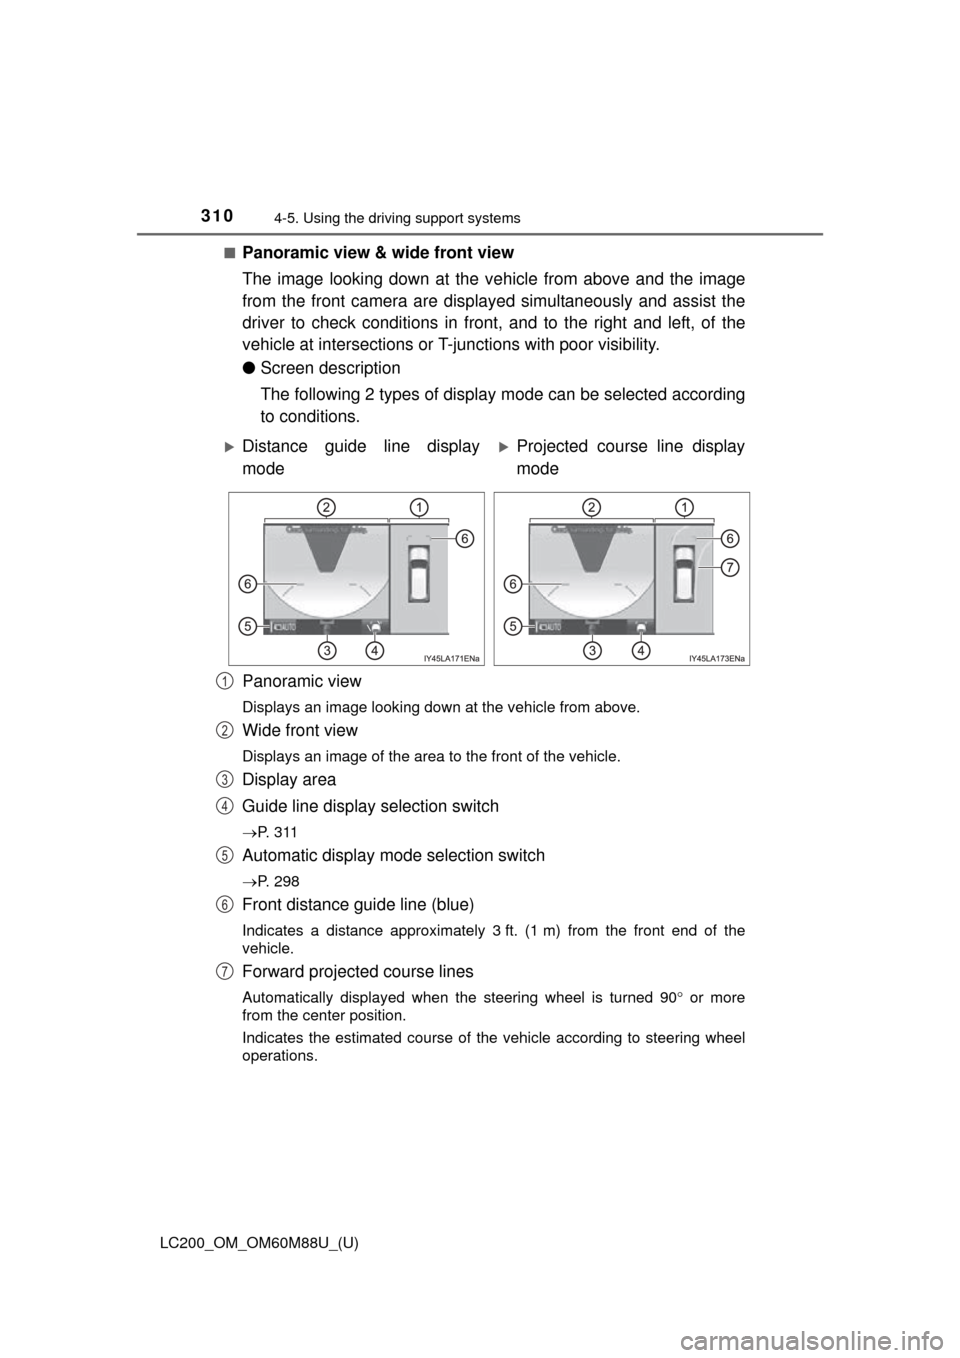
■Panoramic view & wide front view
The image looking down at the ve hicle from above and the image
from the front camera are displayed simultaneously and assist the
driver to check conditions in front, and to the right and left, of the
vehicle at intersections or T- junctions with poor visibility.
● Screen description
The following 2 types of display mode can be selected according
to conditions.
Panoramic view
Displays an image looking down at the vehicle from above.
Wide front view
Displays an image of the area to the front of the vehicle.
Display area
Guide line display selection switch
P. 3 1 1
Automatic display mode selection switch
P. 298
Front distance guide line (blue)
Indicates a distance approximately 3 ft. (1 m) from the front end of the
vehicle.
Forward projected course lines
Automatically displayed when the steering wheel is turned 90 or more
from the center position.
Indicates the estimated course of the vehicle according to steering wheel
operations.
Distance guide line display
modeProjected course line display
mode
1
2
3
4
5
6
7
Page 313 of 608
LC200_OM_OM60M88U_(U)
3134-5. Using the driving support systems
4
Driving
●Using the vehicle width lines
The relative distance of obstacles from the vehicle width lines
can be confirmed.
Example 1: When there is an obstacle in front of the vehicle
Operate the steering wheel so that the vehicle width
line and the obstacle do not overlap.
Example 2: When parking on the shoulder Approach the shoulder, but do not allow the vehicle
width line to overlap the curb or other obstacles.
After confirming the distance to the shoulder of the
road, maneuvering the vehi cle so that the vehicle
width line and the curb or other obstacle are parallel
allows the vehicle to be parked evenly.
Page 316 of 608
316
LC200_OM_OM60M88U_(U)
4-5. Using the driving support systems
●Switching modes
The display mode switches and the icon display changes each
time the guide line display selection switch is selected.
• Projected course line display mode: Projected course lines that change according to steering
wheel operations are displayed.
• Parking assist guide line display mode: Inverted steering wheel operations (parking assist guide line)
are displayed. Use this mode if you are used to how the vehi-
cle handles (if you can park wi thout needing the course line
display).
• Distance guide line display mode: Only distance guide lines are displayed. Use this mode when
guide lines are not needed.
● Guide lines
The panoramic view & rear view screen is explained here as an
example.
Selected modeProjected course
line display modeParking assist
guide line display modeDistance guide
line display mode
Icon display
Projected course line display
modeParking assist guide line dis-
play mode
Page 317 of 608

LC200_OM_OM60M88U_(U)
3174-5. Using the driving support systems
4
Driving
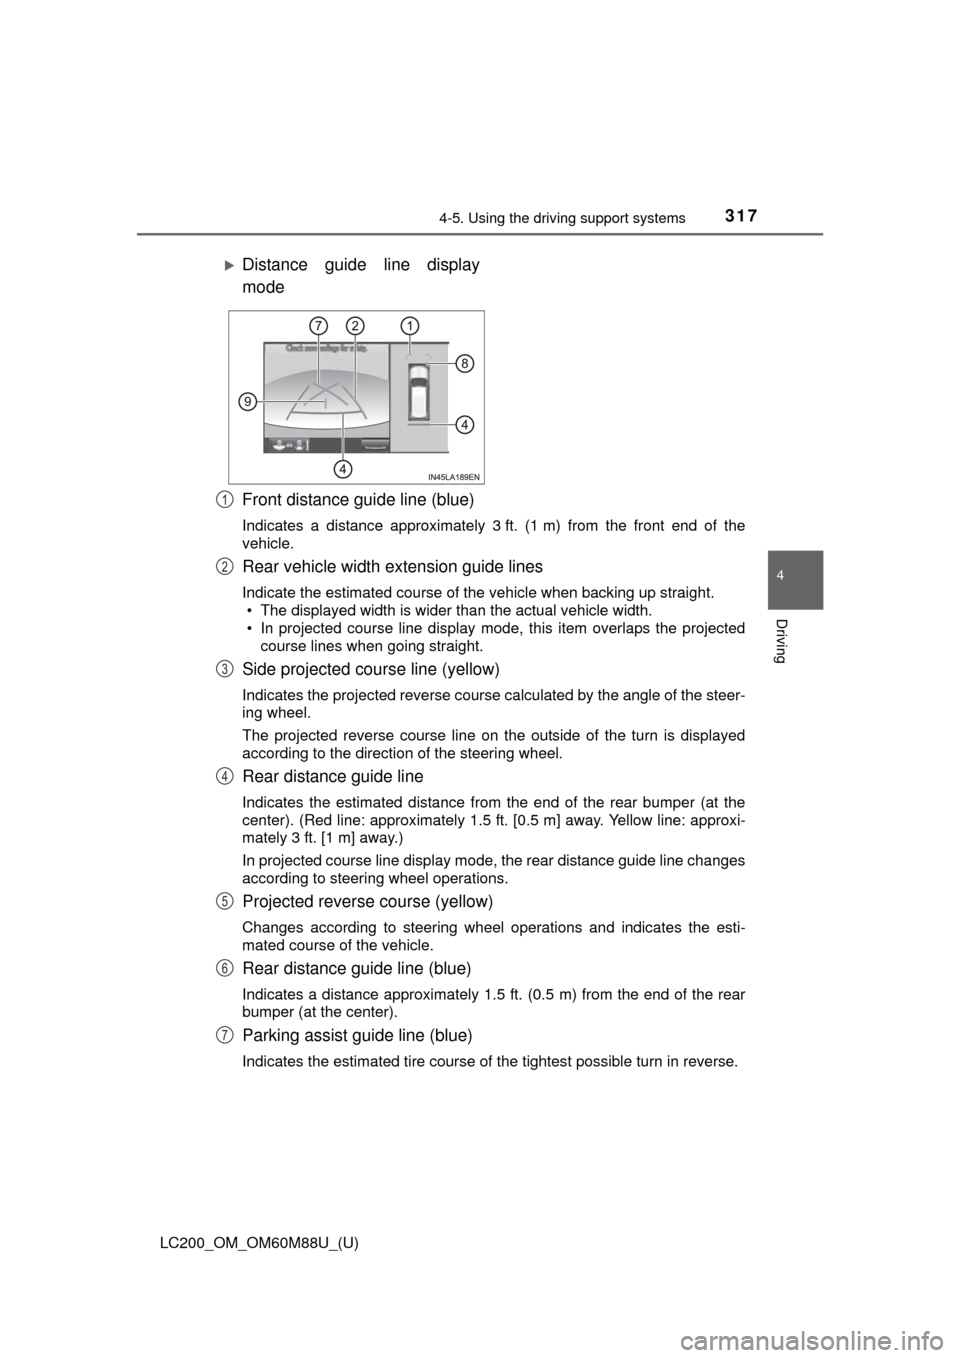
Front distance guide line (blue)
Indicates a distance approximately 3 ft. (1 m) from the front end of the
vehicle.
Rear vehicle width extension guide lines
Indicate the estimated course of the vehicle when backing up straight.
• The displayed width is wider than the actual vehicle width.
• In projected course line display mode, this item overlaps the projected
course lines when going straight.
Side projected course line (yellow)
Indicates the projected reverse course calculated by the angle of the steer-
ing wheel.
The projected reverse course line on the outside of the turn is displayed
according to the direction of the steering wheel.
Rear distance guide line
Indicates the estimated distance from the end of the rear bumper (at the
center). (Red line: approximately 1.5 ft. [0.5 m] away. Yellow line: approxi-
mately 3 ft. [1 m] away.)
In projected course line display mode, the rear distance guide line changes
according to steering wheel operations.
Projected reverse course (yellow)
Changes according to steering wheel operations and indicates the esti-
mated course of the vehicle.
Rear distance guide line (blue)
Indicates a distance approximately 1.5 ft. (0.5 m) from the end of the rear
bumper (at the center).
Parking assist guide line (blue)
Indicates the estimated tire course of the tightest possible turn in rev\
erse.
Distance guide line display
mode
1
2
3
4
5
6
7
Page 318 of 608
318
LC200_OM_OM60M88U_(U)
4-5. Using the driving support systems
Intuitive parking assist
When the intuitive parking assist is on, an icon will be displayed when an
obstacle is detected. (Refer to P. 272 for information about the intuitive
parking assist.)
Vehicle center line (blue)
Indicates the estimated vehicle center on the ground.
●Parking (using the es timated course line)
When parking in a space which is in the reverse direction to the
space described in the procedure below, the steering directions will
be reversed.
Shift the shift lever to the R position.
Turn the steering wheel so that
the estimated course lines are
within the parking space, and
back up slowly. Parking space
Estimated course lines
8
9
1
2
1
2
Page 319 of 608
LC200_OM_OM60M88U_(U)
3194-5. Using the driving support systems
4
Driving
When the rear position of the
vehicle has entered the parking
space, turn the steering wheel
so that the vehicle width exten-
sion guide lines are within the
left and right dividing lines of
the parking space.
Vehicle width extension
guide line
Once the vehicle width extension guide lines and the parking space
lines are parallel, straighten th e steering wheel and back up slowly
until the vehicle has completely entered the parking space.
Stop the vehicle in an appropri ate place, and finish parking.
● Parking (using the es timated course line)
Shift the shift lever to the R position.
Back up until the parking assist
guide line meets the edge of
the left-hand dividing line of the
parking space. Parking assist guide line
Parking space dividing line3
3
4
5
1
2
1
2