Page 504 of 620

5048-2. Steps to take in an emergency
COROLLA_TMMMS_TMMC_U (OM12J84U)
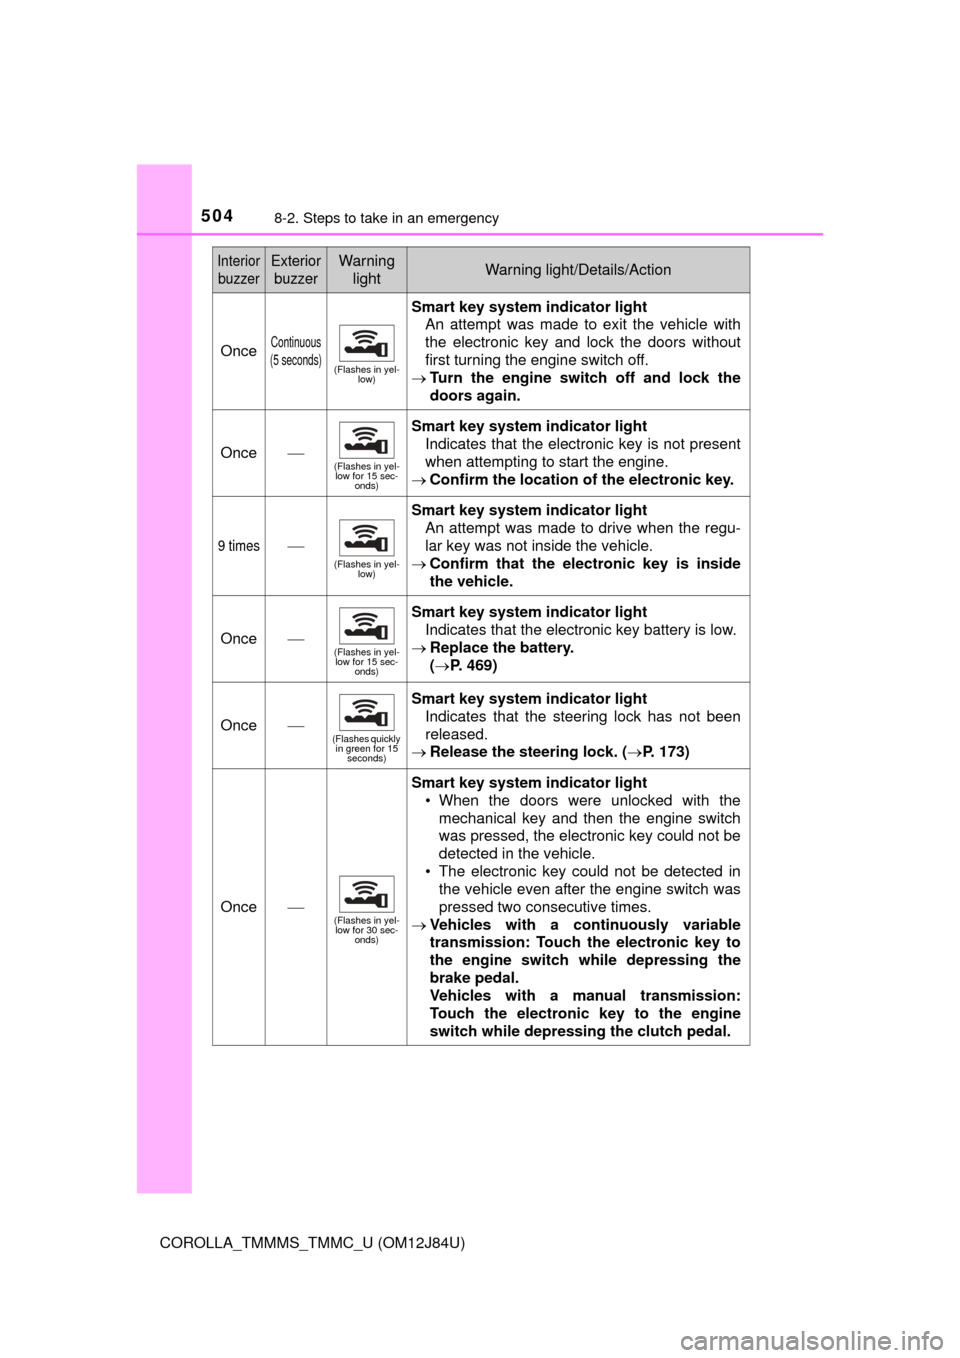
OnceContinuous
(5 seconds)
(Flashes in yel- low)
Smart key system indicator light
An attempt was made to exit the vehicle with
the electronic key and lock the doors without
first turning the engine switch off.
Turn the engine switch off and lock the
doors again.
Once
(Flashes in yel-
low for 15 sec- onds)
Smart key system indicator light
Indicates that the electronic key is not present
when attempting to start the engine.
Confirm the location of the electronic key.
9 times
(Flashes in yel-
low)
Smart key system indicator light
An attempt was made to drive when the regu-
lar key was not inside the vehicle.
Confirm that the el ectronic key is inside
the vehicle.
Once(Flashes in yel- low for 15 sec-
onds)
Smart key system indicator light
Indicates that the electronic key battery is low.
Replace the battery.
( P. 469)
Once(Flashes quickly
in green for 15 seconds)
Smart key system indicator light
Indicates that the steering lock has not been
released.
Release the steering lock. ( P. 173)
Once(Flashes in yel-
low for 30 sec- onds)
Smart key system indicator light
• When the doors were unlocked with themechanical key and then the engine switch
was pressed, the electronic key could not be
detected in the vehicle.
• The electronic key could not be detected in the vehicle even after the engine switch was
pressed two consecutive times.
Vehicles with a continuously variable
transmission: Touch the electronic key to
the engine switch while depressing the
brake pedal.
Vehicles with a manual transmission:
Touch the electronic key to the engine
switch while depressing the clutch pedal.
Interior
buzzerExterior buzzerWarning lightWarning light/Details/Action
Page 505 of 620

5058-2. Steps to take in an emergency
8
When trouble arises
COROLLA_TMMMS_TMMC_U (OM12J84U)
nSRS warning light
This warning light system monitors the airbag sensor assembly, front impact
sensors, side impact sensors (front door), side impact sensors (front), side
impact sensors (rear), driver’s seat belt buckle switch, front passenger occu-
pant classification system, “AIR BAG ON” indicator light, “AIR BAG OFF” indi-
cator light, front passenger’s seat belt buckle switch, seat belt pretensioners
(front), airbags, interconnecting wiring and power sources. ( P. 3 5 )
n Front passenger detection sensor, seat belt reminder and warning
buzzer
If luggage is placed on the front passenger seat, the front passenger detec-
tion sensor may cause the warning light to flash and the warning buzzer to
sound even if a passenger is not sitting in the seat.
n If the malfunction indicator la mp comes on while driving
First check the following:
l Is the fuel tank empty?
If it is, fill the fuel tank immediately.
l Is the fuel tank cap loose?
If it is, tighten it securely.
The light will go off after several driving trips.
If the light does not go off even after several trips, contact your Toyota dealer
as soon as possible.
n
When the tire pressure warning light comes on (vehicles with a tire
pressure warning system)
Check the tire inflation pressure and adjust to the appropriate level. Push-
ing the tire pressure warning reset switch will not turn off the tire pressure
warning light.
nThe tire pressure warning light may come on due to natural causes
(vehicles with a tire pressure warning system)
The tire pressure warning light may come on due to natural causes such
as natural air leaks and tire inflation pressure changes caused by temper-
ature. In this case, adjusting the ti re inflation pressure will turn off the
warning light (after a few minutes).
Page 517 of 620

5178-2. Steps to take in an emergency
8
When trouble arises
COROLLA_TMMMS_TMMC_U (OM12J84U)
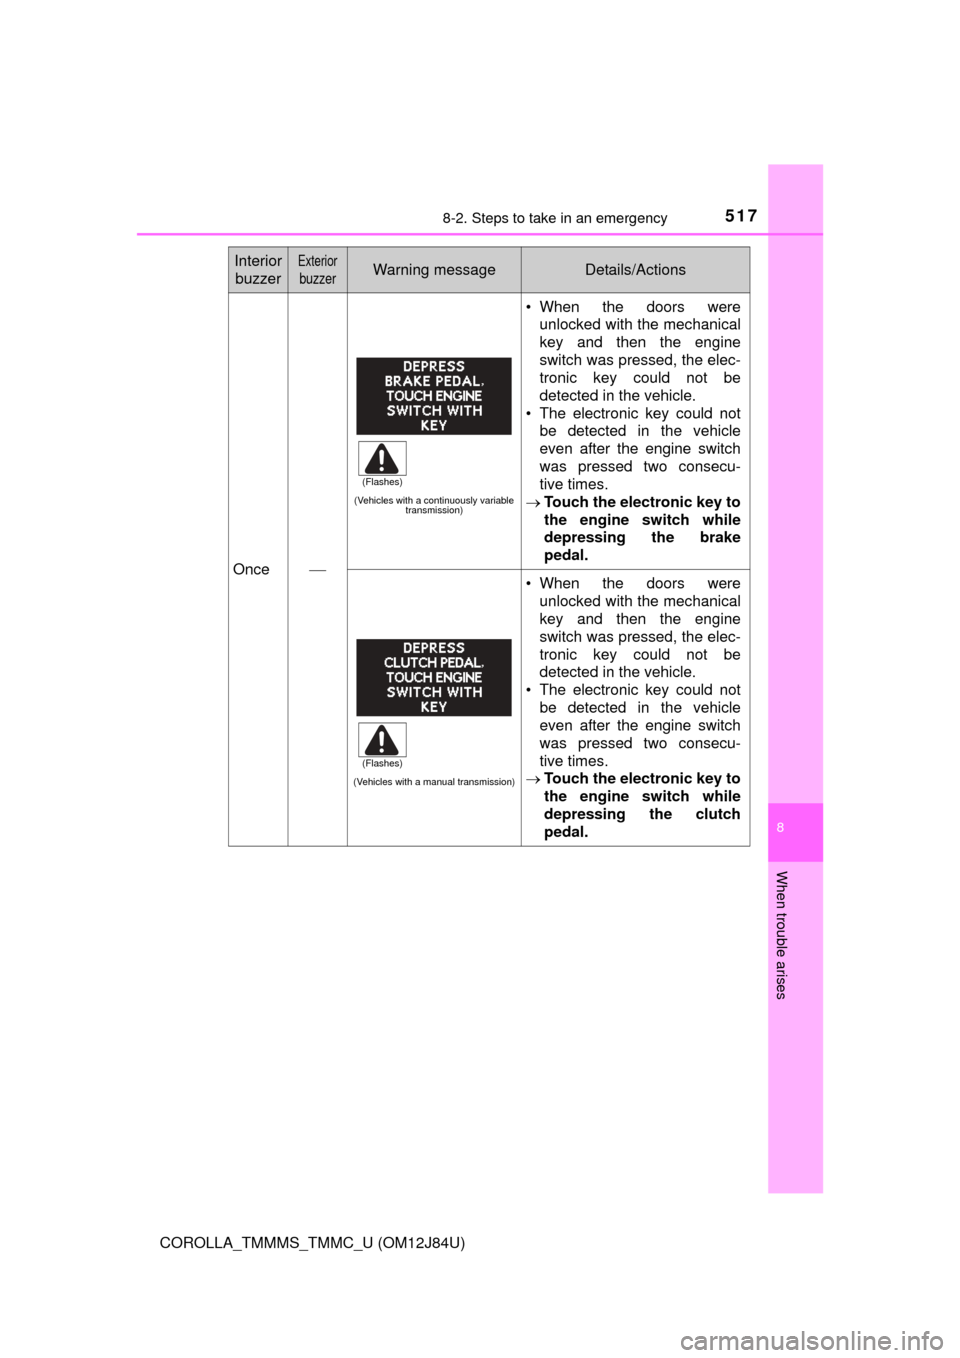
Once
(Vehicles with a continuously variable transmission)
• When the doors were
unlocked with the mechanical
key and then the engine
switch was pressed, the elec-
tronic key could not be
detected in the vehicle.
• The electronic key could not be detected in the vehicle
even after the engine switch
was pressed two consecu-
tive times.
Touch the electronic key to
the engine switch while
depressing the brake
pedal.
(Vehicles with a manual transmission)
• When the doors were
unlocked with the mechanical
key and then the engine
switch was pressed, the elec-
tronic key could not be
detected in the vehicle.
• The electronic key could not
be detected in the vehicle
even after the engine switch
was pressed two consecu-
tive times.
Touch the electronic key to
the engine switch while
depressing the clutch
pedal.
Interior
buzzerExterior
buzzerWarning messageDetails/Actions
(Flashes)
(Flashes)
Page 523 of 620
5238-2. Steps to take in an emergency
8
When trouble arises
COROLLA_TMMMS_TMMC_U (OM12J84U)
Take out the jack.For tightening
For loosening
Remove the luggage floor cover. ( P. 522)
Remove the tool tray.
Loosen the center fastener that
secures the spare tire.2
1
2
Taking out the spare tire
1
2
3
CAUTION
nWhen storing the spare tire
Be careful not to catch fingers or other body parts between the spare
tire and the body of the vehicle.
Page 530 of 620

5308-2. Steps to take in an emergency
COROLLA_TMMMS_TMMC_U (OM12J84U)
CAUTION
nWhen using the compact spare tire
lRemember that the compact spare tire provided is specifically
designed for use with your vehicle. Do not use your compact spare tire
on another vehicle.
lDo not use more than one compact spare tires simultaneously.
lReplace the compact spare tire with a standard tire as soon as possi-
ble.
lAvoid sudden acceleration, abrupt steering, sudden braking and shift-
ing operations that cause sudden engine braking.
nWhen the compact spare tire is attached
The vehicle speed may not be correctly detected, and the following sys-
tems may not operate correctly:
nSpeed limit when using the compact spare tire
Do not drive at speeds in excess of 50 mph (80 km/h) when a compact
spare tire is installed on the vehicle.
The compact spare tire is not designed for driving at high speeds. Fail-
ure to observe this precaution may lead to an accident causing death or
serious injury.
nAfter using the tools and jack
Before driving, make sure all the tools and jack are securely in place in
their storage location to reduce the po ssibility of personal injury during a
collision or sudden braking.
• ABS & Brake assist
• VSC
•TRAC
• Cruise control (if equipped) • EPS
• Rear view monitor system (if
equipped)
• Navigation system (if equipped)
Page 574 of 620

5749-1. Specifications
COROLLA_TMMMS_TMMC_U (OM12J84U)
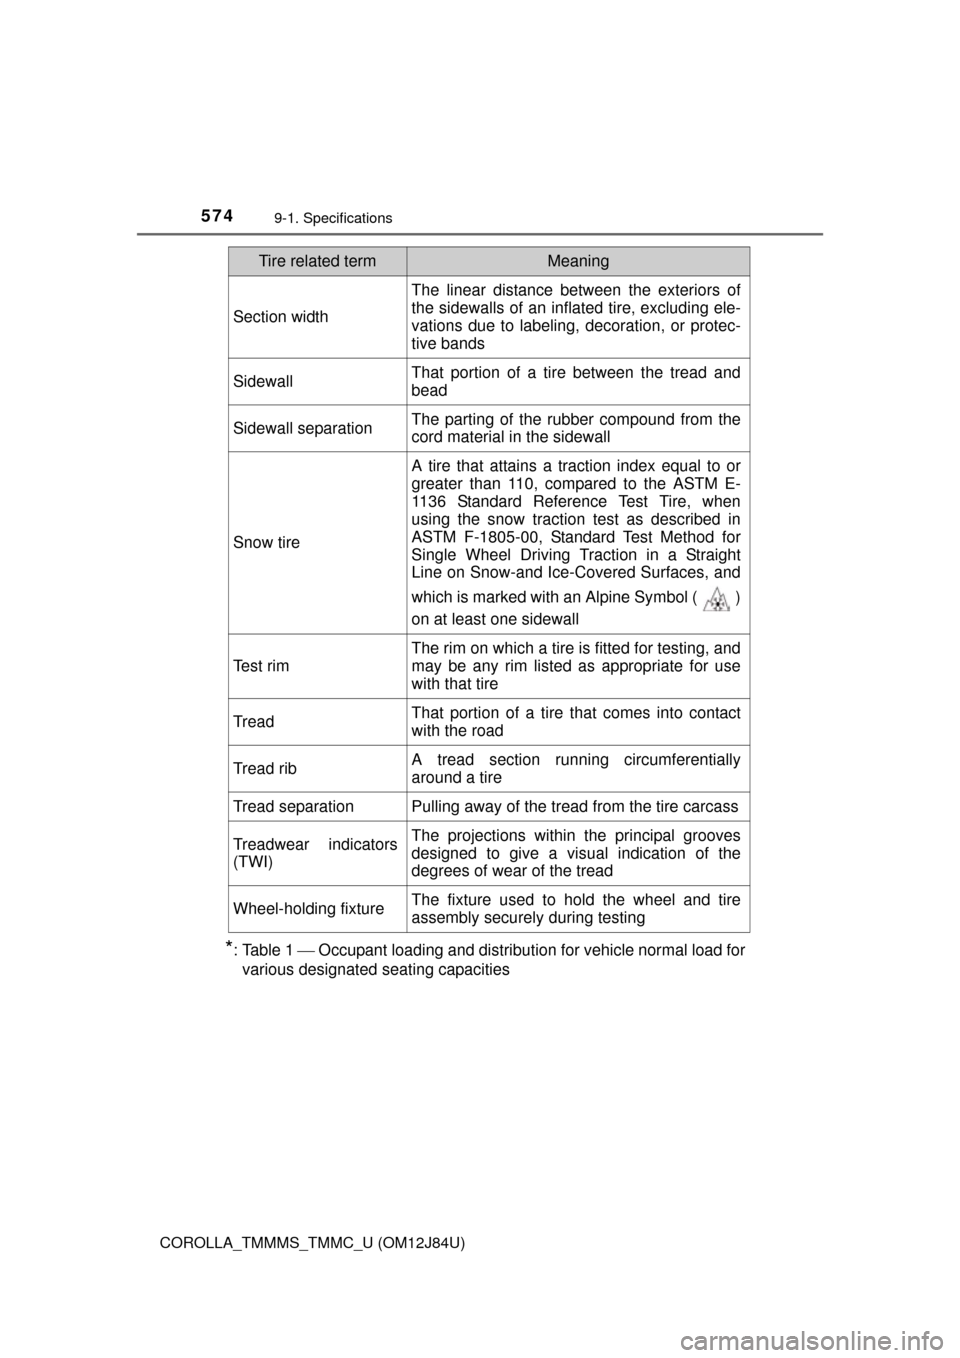
*: Table 1 Occupant loading and distribution for vehicle normal load for
various designated seating capacities
Section width
The linear distance between the exteriors of
the sidewalls of an inflated tire, excluding ele-
vations due to labeling, decoration, or protec-
tive bands
SidewallThat portion of a tire between the tread and
bead
Sidewall separationThe parting of the rubber compound from the
cord material in the sidewall
Snow tire
A tire that attains a traction index equal to or
greater than 110, compared to the ASTM E-
1136 Standard Reference Test Tire, when
using the snow traction test as described in
ASTM F-1805-00, Standard Test Method for
Single Wheel Driving Traction in a Straight
Line on Snow-and Ice-Covered Surfaces, and
which is marked with an Alpine Symbol ( )
on at least one sidewall
Test rim
The rim on which a tire is fitted for testing, and
may be any rim listed as appropriate for use
with that tire
TreadThat portion of a tire that comes into contact
with the road
Tread ribA tread section running circumferentially
around a tire
Tread separationPulling away of the tread from the tire carcass
Treadwear indicators
(TWI)The projections within the principal grooves
designed to give a visual indication of the
degrees of wear of the tread
Wheel-holding fixtureThe fixture used to hold the wheel and tire
assembly securely during testing
Tire related termMeaning
Page 587 of 620
587
10
For owners
COROLLA_TMMMS_TMMC_U (OM12J84U)
lDéroulez la sangle diagonale
de telle sorte qu’elle passe
entièrement sur l’épaule, sans
pour autant être en contact
avec le cou ou glisser de
l’épaule.
l Placez la sangle abdominale
aussi bas que possible sur les
hanches.
l Réglez la position du dossier de siège. Asseyez-vous le dos le plus
droit possible et calez-vous bien dans le siège.
l Ne vrillez pas la ceinture de sécurité.
nCeintures de sécurité
Nettoyez avec un chiffon ou une éponge humectée d’eau savon-
neuse tiède. Vérifiez régulièrem ent que les ceintures ne sont pas
effilochées, entaillées ou exagérément usées.
Seat belt instructions for Canadian owners
(in French)
The following is a French explan ation of seat belt instructions
extracted from the seat be lt section in this manual.
See the seat belt section for more detailed seat belt instructions in
English.
Utilisation correcte des ceintures de sécurité
Entretien et soin
Page 588 of 620
588
COROLLA_TMMMS_TMMC_U (OM12J84U)
AT T E N T I O N
nDommage et usure de la ceinture de sécurité
Inspectez la ceinture de sécurité périodiquement. Vérifiez si elles ne sont
pas entaillées, effilochées et que leurs ancrages ne sont pas desserrés.
N’utilisez pas une ceinture de sécurité défectueuse avant qu’elle ne soit
remplacée. Une ceinture de sécurité défectueuse n’apporte aucune garan-
tie de protection de l’occupant en cas de blessures graves, voire mortelles.