Page 440 of 620
4407-3. Do-it-yourself maintenance
COROLLA_TMMMS_TMMC_U (OM12J84U)
Set the jack attachment on the
floor jack and position the jack.
Before raising the vehicle,
make sure that the floor jack is
positioned so that the protru-
sion on the jack attachment fits
securely into the hole of the
jack point.2
3
CAUTION
Make sure to set the protrusion on the
jack attachment properly into the hole of
the jack point.
Raising the vehicle with an improperly
positioned floor jack will damage the
vehicle and may cause the vehicle to fall
off the floor jack.
Page 459 of 620

4597-3. Do-it-yourself maintenance
7
Maintenance and care
COROLLA_TMMMS_TMMC_U (OM12J84U)n
If you press the tire pressure warning reset switch accidentally (vehi-
cles with a tire pressure warning system)
If initialization is perform
ed, adjust the tire inflation pressure to the speci-
fied level and initialize the tire pressure warning system again.
nWhen initialization of the tire pressure warning system has failed
(vehicles with a tire pressure warning system)
Initialization can be completed in a few minutes. However, in the following
cases, the settings have not been recorded and the system will not oper-
ate properly. If repeated attempts to record tire inflation pressure settings
are unsuccessful, have the vehicle inspected by your Toyota dealer.
lWhen operating the tire pressure wa rning reset switch, the tire pressure
warning light does not blink 3 times.
lAfter driving for a certain period of time since the initialization has been
completed, the warning light comes on after blinking for 1 minute.
nTire pressure warning system certification
For the U.S.A.
FCC ID: HYQ23AAK FCC ID: PAXPMVC010
NOTE:
This device complies with part 15 of the FCC Rules. Operation is subject
to the following two conditions: (1) This device may not cause harmful
interference, and (2) this device must accept any interference received,
including interference that may cause undesired operation.
FCC WARNING:
Changes or modifications not expressly approved by the party responsi-
ble for compliance could void the user ’s authority to operate the equip-
ment.
For Canada
NOTE:
Operation is subject to the following two conditions: (1) this device may
not cause interference, and (2) this device must accept any interference,
including interference that may cause undesired operation of the device.
L’utilisation de ce dispositif est au torisée seulement aux deux conditions
suivantes : (1) il ne doit pas produire de brouillage, et (2) l’utilisateur du
dispositif doit être pr êt à accepter tout brouillage radioé lectrique reçu,
même si ce brouillage est susceptible de comp romettre le fonctionne-
ment du dispositif.
Page 477 of 620
4777-3. Do-it-yourself maintenance
7
Maintenance and care
COROLLA_TMMMS_TMMC_U (OM12J84U)
Replace the light bulb, and
install the bulb base.
Align the 3 tabs on the light bulb
with the mounting and insert.
Turn and secure the bulb
base.
Shake the bulb base gently to
check that it is not loose, turn
the headlights on once and visu-
ally confirm that no light is leak-
ing through the mounting.
3
4
Page 479 of 620
4797-3. Do-it-yourself maintenance
7
Maintenance and care
COROLLA_TMMMS_TMMC_U (OM12J84U)
Turn the bulb base counter-
clockwise.
Install a new light bulb.
Align the 3 tabs on the light bulb
with the mounting and insert.
Turn clockwise and secure the
bulb base.
Install the connector.
Shake the connector gently to
check that it is not loose, turn
the front fog lights on once and
visually confirm that no light is
leaking through the mounting.
When installing the fender liner, install by conducting and
with the directions reversed.
Make sure that the fender liner is attached to the inside of the bumper.
4
5
6
721
Page 485 of 620

4857-3. Do-it-yourself maintenance
7
Maintenance and care
COROLLA_TMMMS_TMMC_U (OM12J84U)n
Replacing the following bulbs
If any of the lights listed below
has burnt out, have it replaced by
your Toyota dealer.
l Headlight low beams/daytime running lights
l High mounted stoplights
l Side turn signal lights (if equipped)
nLED light bulbs
The high mounted stoplights and headlight low beams/daytime running lights
consist of a number of LEDs. If any of the LEDs burns out, take your vehicle
to your Toyota dealer to have the light replaced.
n Condensation build-up on the inside of the lens
Temporary condensation build-up on the inside of the headlight lens does not
indicate a malfunction.
Contact your Toyota dealer for more information in the following situations:
lLarge drops of water have built up on the inside of the lens.
l Water has built up inside the headlight.
CAUTION
n Replacing light bulbs
lTurn off the lights. Do not attempt to replace the bulb immediately after
turning off the lights.
The bulbs become very hot and may cause burns.
l Do not touch the glass portion of the light bulb with bare hands. When it is
unavoidable to hold the glass portion, use and hold with a clean dry cloth
to avoid getting moisture and oils on the bulb.
Also, if the bulb is scratched or dropped, it may blow out or crack.
l Fully install light bulbs and any parts used to secure them. Failure to do so
may result in heat damage, fire, or water entering the headlight unit. This
may damage the headlights or cause condensation to build up on the lens.
n To prevent damage or fire
Make sure bulbs are fully seated and locked.
Page 489 of 620

4898-1. Essential information
8
When trouble arises
COROLLA_TMMMS_TMMC_U (OM12J84U)
Steadily step on the brake pedal with both feet and firmly depress it.
Do not pump the brake pedal repeatedly as this will increase the effort
required to slow the vehicle.
Shift the shift lever to N.
If the shift lever is shifted to N
After slowing down, stop the vehicle in a safe place by the road.
Stop the engine.
If the shift lever cannot be shifted to N
Keep depressing the brake pedal with both feet to reduce vehicle
speed as much as possible.
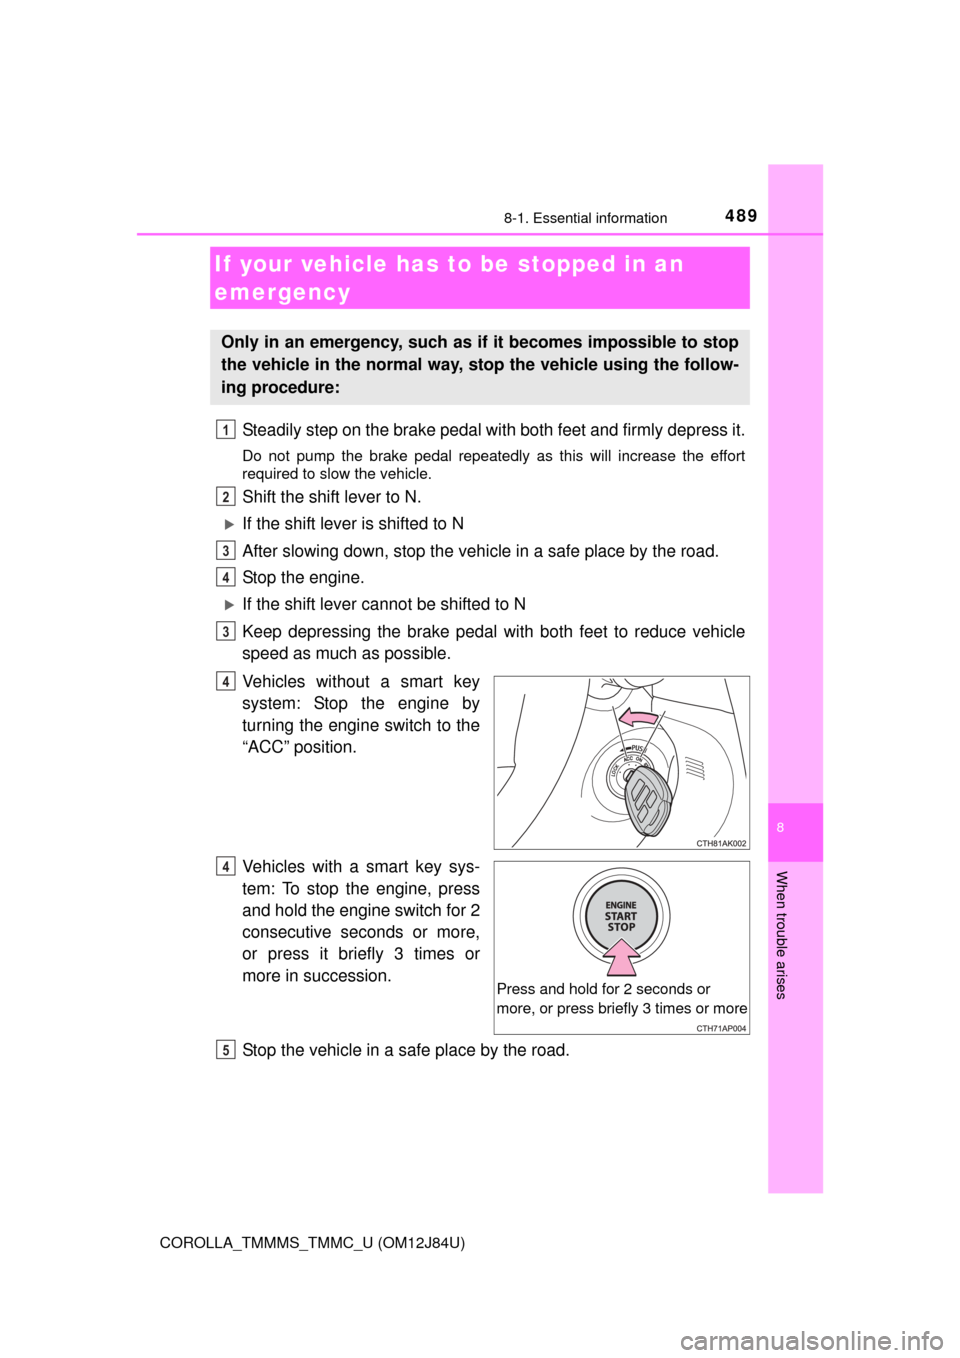
Vehicles without a smart key
system: Stop the engine by
turning the engine switch to the
“ACC” position.
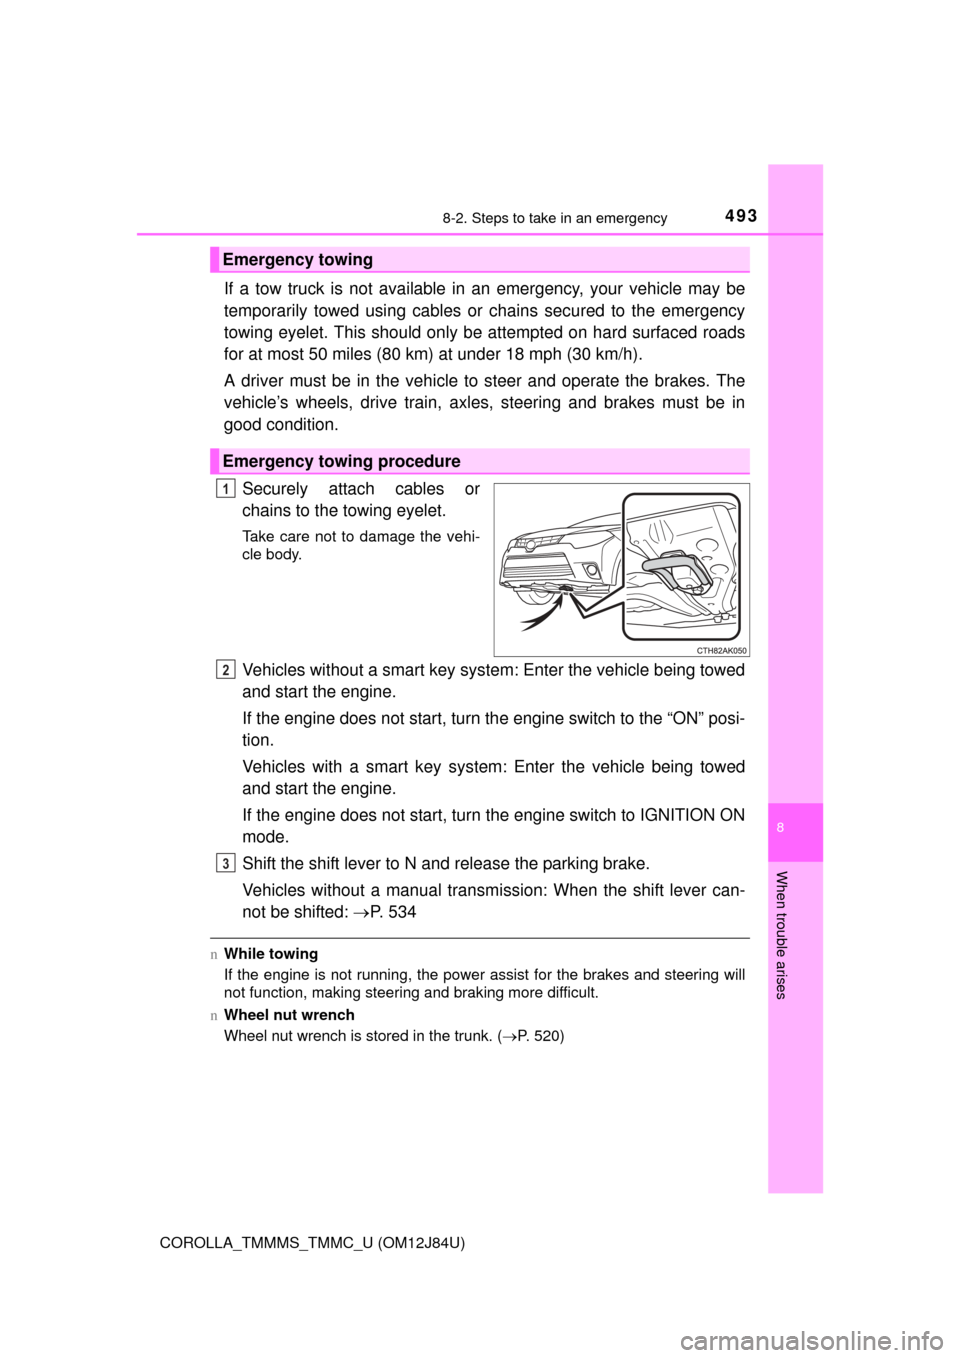
Vehicles with a smart key sys-
tem: To stop the engine, press
and hold the engine switch for 2
consecutive seconds or more,
or press it briefly 3 times or
more in succession.
Stop the vehicle in a safe place by the road.
If your vehicle has to be stopped in an
emergency
Only in an emergency, such as if it becomes impossible to stop
the vehicle in the normal way, st op the vehicle using the follow-
ing procedure:
1
2
3
4
3
4
Press and hold for 2 seconds or
more, or press briefly 3 times or more
4
5
Page 493 of 620

4938-2. Steps to take in an emergency
8
When trouble arises
COROLLA_TMMMS_TMMC_U (OM12J84U)
If a tow truck is not available in an emergency, your vehicle may be
temporarily towed using cables or chains secured to the emergency
towing eyelet. This should only be attempted on hard surfaced roads
for at most 50 miles (80 km) at under 18 mph (30 km/h).
A driver must be in the vehicle to steer and operate the brakes. The
vehicle’s wheels, drive train, axles, steering and brakes must be in
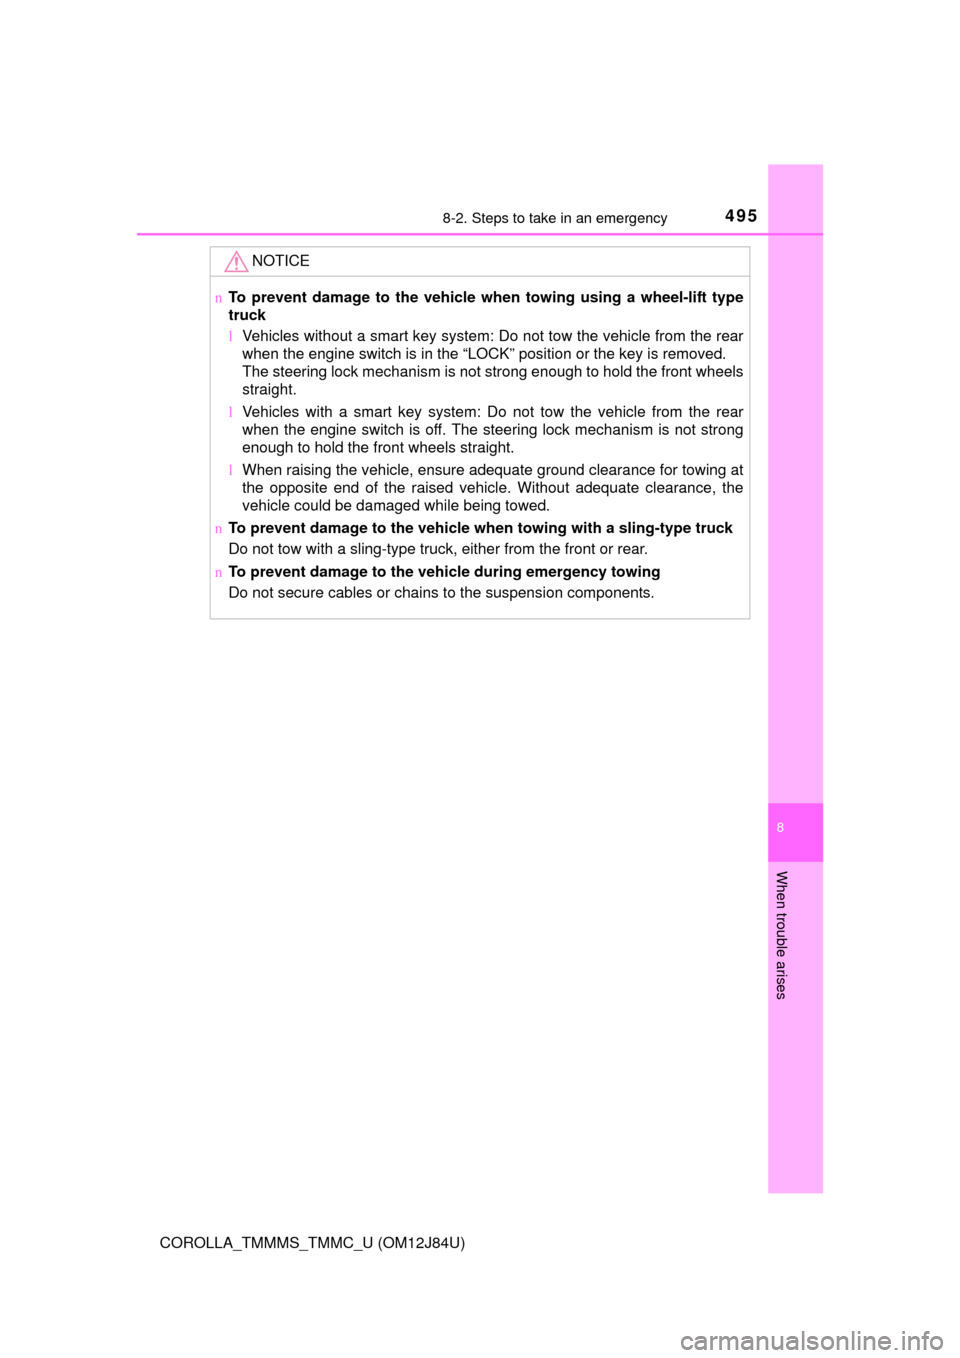
good condition.Securely attach cables or
chains to the towing eyelet.
Take care not to damage the vehi-
cle body.
Vehicles without a smart key system: Enter the vehicle being towed
and start the engine.
If the engine does not start, turn th e engine switch to the “ON” posi-
tion.
Vehicles with a smart key system : Enter the vehicle being towed
and start the engine.
If the engine does not start, turn the engine switch to IGNITION ON
mode.
Shift the shift lever to N and release the parking brake.
Vehicles without a manual transm ission: When the shift lever can-
not be shifted: P. 534
nWhile towing
If the engine is not running, the power assist for the brakes and steering will
not function, making steering and braking more difficult.
n Wheel nut wrench
Wheel nut wrench is stored in the trunk. ( P. 520)
Emergency towing
Emergency towing procedure
1
2
3
Page 495 of 620

4958-2. Steps to take in an emergency
8
When trouble arises
COROLLA_TMMMS_TMMC_U (OM12J84U)
NOTICE
nTo prevent damage to the vehicle when towing using a wheel-lift type
truck
lVehicles without a smart key system: Do not tow the vehicle from the rear
when the engine switch is in the “LOCK” position or the key is removed.
The steering lock mechanism is not strong enough to hold the front wheels
straight.
l Vehicles with a smart key system: Do not tow the vehicle from the rear
when the engine switch is off. The steering lock mechanism is not strong
enough to hold the front wheels straight.
l When raising the vehicle, ensure adequate ground clearance for towing at
the opposite end of the raised vehicle. Without adequate clearance, the
vehicle could be damaged while being towed.
n To prevent damage to the vehicle wh en towing with a sling-type truck
Do not tow with a sling-type truck, either from the front or rear.
n To prevent damage to the vehic le during emergency towing
Do not secure cables or chains to the suspension components.