Page 308 of 620
3085-14. Using the radio (Multimedia system)
COROLLA_TMMMS_TMMC_U (OM12J84U)
Search for desired stations by turning the “TUNE/SCROLL” knob or
pressing the “ ” or “ ” button on “SEEK/TRACK”.
Select “(add new)”.
To change the preset station to a different one, select and hold the preset
station.
Select “Yes”.
Select “OK” after setting the new preset station.
nRefreshing the station list Select “Refresh” on the “Station List” screen.
To cancel the refresh, select “Cancel Refresh”.
nReception sensitivity
lMaintaining perfect radio reception at all times is difficult due to the continu-
ally changing position of the antenna, differences in signal strength and sur-
rounding objects, such as trains, transmitters, etc.
l The radio antenna is mounted inside the rear window. To maintain clear
radio reception, do not attach metallic window tinting or other metallic
objects to the antenna wire mounted inside the rear window.
Setting station presets
1
2
3
4
1
Page 318 of 620
3185-16. Using an external device (Multimedia system)
COROLLA_TMMMS_TMMC_U (OM12J84U)n
iPod problems
To resolve most problems encountered when using your iPod, disconnect
your iPod from the vehicle iPod connection and reset it. For instructions on
how to reset your iPod, refer to your iPod Owner's Manual.
n Error messages
MessageCause/Correction procedures
“Connection error. Please
consult your Owner’s Man-
ual for instructions on how
to connect the iPod.”
This indicates a problem in the iPod or its con-
nection.
“No music files found.”This indicates that there is no music data in
the iPod.
“No videos found.”This indicates that no video files are included
in the iPod.
“There are no songs avail-
able for playback. Please
add compatible files to
your iPod.”
This indicates that songs are not found in a
selected playlist.
“iPod authorization unsuc-
cessful.”This indicates that the display multimedia sys-
tem failed to authorize the iPod.
Please check your iPod.
Page 362 of 620

3625-19. Bluetooth® phone (Multimedia system)
COROLLA_TMMMS_TMMC_U (OM12J84U)
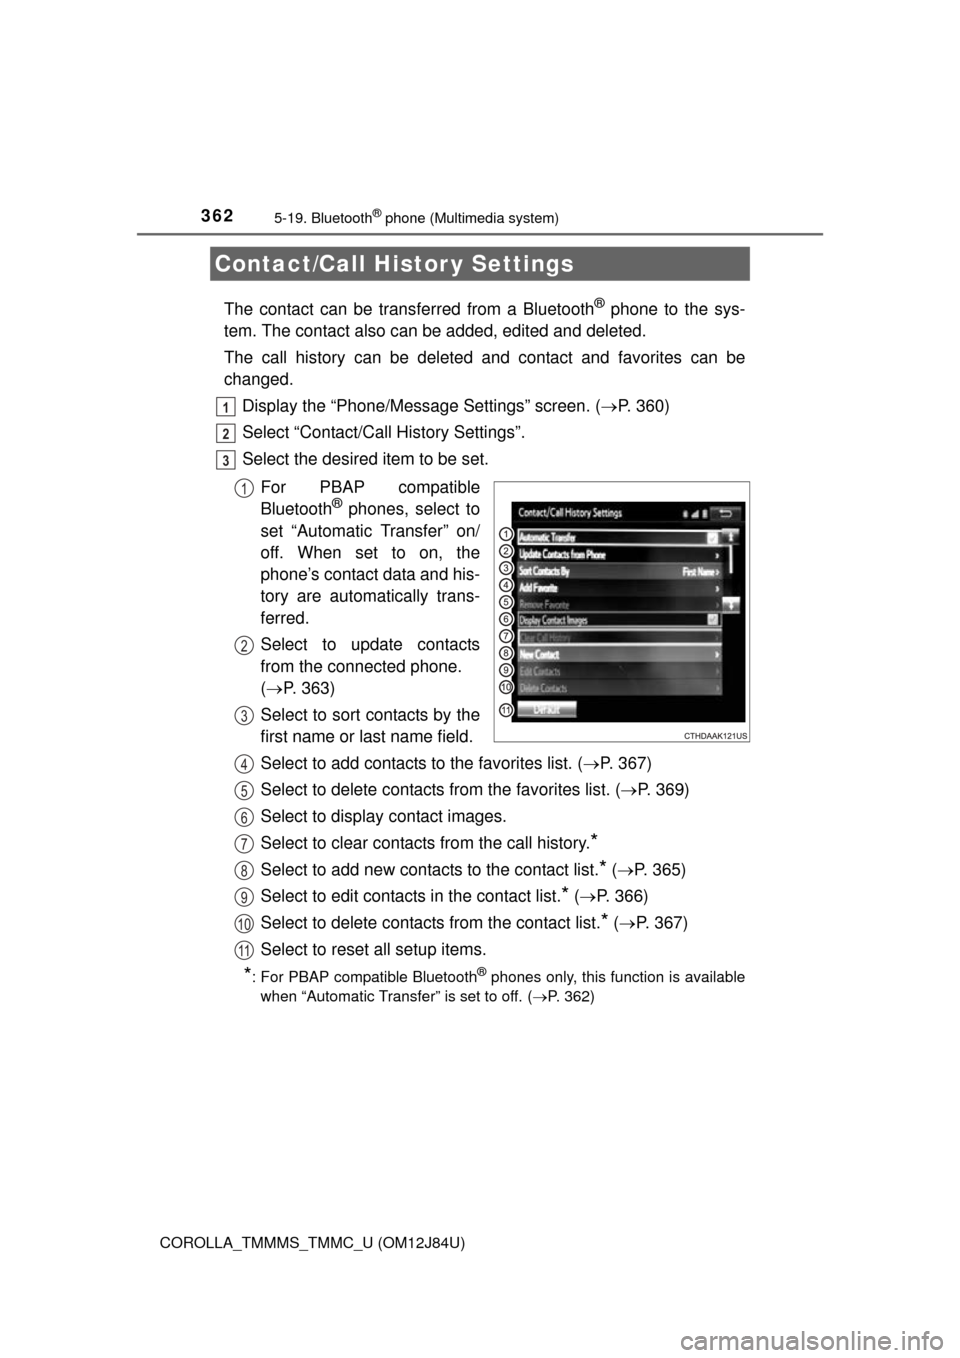
The contact can be transferred from a Bluetooth® phone to the sys-
tem. The contact also c an be added, edited and deleted.
The call history can be deleted and contact and favorites can be
changed. Display the “Phone/Message Settings” screen. ( P. 360)
Select “Contact/Call History Settings”.
Select the desired item to be set.
For PBAP compatible
Bluetooth
® phones, select to
set “Automatic Transfer” on/
off. When set to on, the
phone’s contact data and his-
tory are automatically trans-
ferred.
Select to update contacts
from the connected phone.
( P. 363)
Select to sort contacts by the
first name or last name field.
Select to add contacts to the favorites list. ( P. 367)
Select to delete contacts from the favorites list. ( P. 369)
Select to display contact images.
Select to clear contacts from the call history.
*
Select to add new contacts to the contact list.* ( P. 365)
Select to edit contacts in the contact list.
* ( P. 366)
Select to delete contacts from the contact list.
* ( P. 367)
Select to reset all setup items.
*: For PBAP compatible Bluetooth® phones only, this function is available
when “Automatic Transfer” is set to off.
( P. 362)
Contact/Call Histor y Settings
1
2
3
1
2
3
4
5
6
7
8
9
10
11
Page 427 of 620

4277-2. Maintenance
7
Maintenance and care
COROLLA_TMMMS_TMMC_U (OM12J84U)
nRepair and replacement
It is recommended that genuine Toyota parts be used for repairs to ensure
performance of each system. If non-Toyota parts are used in replacement or if
a repair shop other than a Toyota dealer performs repairs, confirm the war-
ranty coverage.
n Resetting the reminder light (vehicl es with a drive monitor display) or
the message (vehicles with a multi-in formation display) indicating main-
tenance is required (U.S.A. only)
After the required maintenance is performed according to the maintenance
schedule, please reset the reminder light (vehicles with a drive monitor dis-
play) or the message (vehicles with a multi-information display).
To reset the reminder light (vehicles with a drive monitor display) or the mes-
sage (vehicles with a multi-information display), follow the procedure
described below:
Vehicles without a smart key system: Turn the engine switch to the “LOCK”
position with the trip meter A reading shown. ( P. 77, 82)
Vehicles with a smart key system: Turn the engine switch off with the trip
meter A reading shown. ( P. 77, 82)
Vehicles without a smart key system:
While pressing the “DISP” switch
*1 ( P. 77) or display change button*2
(P. 82), turn the engine switch to the “ON” position (do not start the
engine because reset mode will be canceled).
Vehicles with a smart key system:
While pressing the “DISP” switch
*1 ( P. 77) or display change button*2
(P. 82), turn the engine switch to the IGNITION ON mode (do not start the
engine because otherwise the reset mode will be canceled).
*1: Vehicles with a drive monitor display
*2: Vehicles with a multi-information display
Continue to press and hold the button until the trip meter displays “000000”.
n Allow inspection and repairs to be performed by a Toyota dealer
lToyota technicians are well-trained specialists and are kept up to date with
the latest service information. They are well informed about the operations
of all systems on your vehicle.
l Keep a copy of the repair order. It proves that the maintenance that has
been performed is under warranty cove rage. If any problem should arise
while your vehicle is under warranty, your Toyota dealer will promptly take
care of it.
1
2
3
Page 456 of 620

4567-3. Do-it-yourself maintenance
COROLLA_TMMMS_TMMC_U (OM12J84U)n
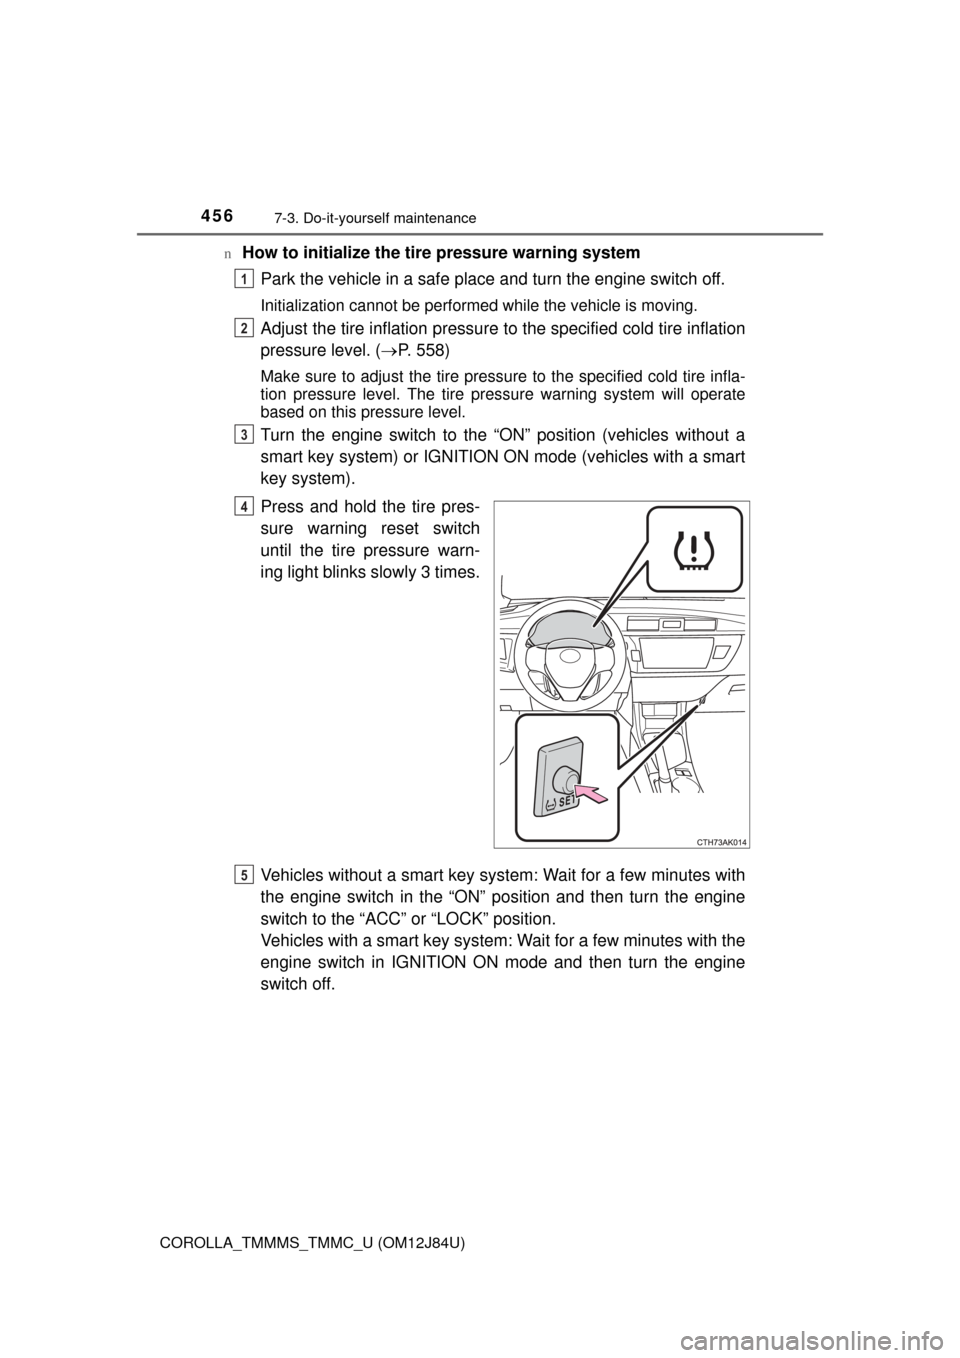
How to initialize the tire pressure warning system
Park the vehicle in a safe place and turn the engine switch off.
Initialization cannot be performed while the vehicle is moving.
Adjust the tire inflation pressure to the specified cold tire inflation
pressure level. ( P. 558)
Make sure to adjust the tire pressu re to the specified cold tire infla-
tion pressure level. The tire pressure warning system will operate
based on this pressure level.
Turn the engine switch to the “ON” position (vehicles without a
smart key system) or IGNITION ON mode (vehicles with a smart
key system).
Press and hold the tire pres-
sure warning reset switch
until the tire pressure warn-
ing light blinks slowly 3 times.
Vehicles without a smart key syst em: Wait for a few minutes with
the engine switch in the “ON” position and then turn the engine
switch to the “ACC” or “LOCK” position.
Vehicles with a smart key system: Wait for a few minutes with the
engine switch in IGNITION ON mode and then turn the engine
switch off.
1
2
3
4
5
Page 459 of 620

4597-3. Do-it-yourself maintenance
7
Maintenance and care
COROLLA_TMMMS_TMMC_U (OM12J84U)n
If you press the tire pressure warning reset switch accidentally (vehi-
cles with a tire pressure warning system)
If initialization is perform
ed, adjust the tire inflation pressure to the speci-
fied level and initialize the tire pressure warning system again.
nWhen initialization of the tire pressure warning system has failed
(vehicles with a tire pressure warning system)
Initialization can be completed in a few minutes. However, in the following
cases, the settings have not been recorded and the system will not oper-
ate properly. If repeated attempts to record tire inflation pressure settings
are unsuccessful, have the vehicle inspected by your Toyota dealer.
lWhen operating the tire pressure wa rning reset switch, the tire pressure
warning light does not blink 3 times.
lAfter driving for a certain period of time since the initialization has been
completed, the warning light comes on after blinking for 1 minute.
nTire pressure warning system certification
For the U.S.A.
FCC ID: HYQ23AAK FCC ID: PAXPMVC010
NOTE:
This device complies with part 15 of the FCC Rules. Operation is subject
to the following two conditions: (1) This device may not cause harmful
interference, and (2) this device must accept any interference received,
including interference that may cause undesired operation.
FCC WARNING:
Changes or modifications not expressly approved by the party responsi-
ble for compliance could void the user ’s authority to operate the equip-
ment.
For Canada
NOTE:
Operation is subject to the following two conditions: (1) this device may
not cause interference, and (2) this device must accept any interference,
including interference that may cause undesired operation of the device.
L’utilisation de ce dispositif est au torisée seulement aux deux conditions
suivantes : (1) il ne doit pas produire de brouillage, et (2) l’utilisateur du
dispositif doit être pr êt à accepter tout brouillage radioé lectrique reçu,
même si ce brouillage est susceptible de comp romettre le fonctionne-
ment du dispositif.
Page 460 of 620

4607-3. Do-it-yourself maintenance
COROLLA_TMMMS_TMMC_U (OM12J84U)
CAUTION
nWhen inspecting or replacing tires
Observe the following precautions to prevent accidents.
Failure to do so may cause damage to parts of the drive train as well as
dangerous handling characteristics, which may lead to an accident
resulting in death or serious injury.
lDo not mix tires of different makes, models or tread patterns.
Also, do not mix tires of remarkably different treadwear.
lDo not use tire sizes other than those recommended by Toyota.
lDo not mix differently constructed ti res (radial, bias-belted or bias-ply
tires).
lDo not mix summer, all season and snow tires.
lDo not use tires that have been used on another vehicle.
Do not use tires if you do not know how they were used previously.
nWhen initializing the tire pressure warning system (vehicles with a
tire pressure warning system)
Do not operate the tire pressure warning reset switch without first
adjusting the tire inflation pressure to the specified level. Otherwise, the
tire pressure warning light may not come on even if the tire inflation
pressure is low, or it may come on when the tire inflation pressure is
actually normal.
Page 501 of 620
5018-2. Steps to take in an emergency
8
When trouble arises
COROLLA_TMMMS_TMMC_U (OM12J84U)
*1: Parking brake engaged warning buzzer: P. 510
*2: Open door warning buzzer:P. 510
*3: Vehicles with a drive monitor display
*4: Vehicles with a multi-information display
(U.S.A.)
Maintenance required reminder light*3
Indicates that maintenance is required according to the
driven distance on the maintenance schedule.
*7
Illuminates for about 3 seconds and then flashes for about
15 seconds approximately 4500 miles (7200 km) after the
reminder light has been reset.
If necessary, perform maintenance.
Comes on and remains on if the distance driven exceeds
5000 miles (8000 km) after the reminder light has been
reset.
(The indicator will not work properly unless the reminder
light has been reset.)
Perform the necessary maintenance.
Please reset the reminder light after the maintenance
is performed.
(P. 427)
Warning lightWarning light/Details/Actions