Page 17 of 48
OVERVIEW
FEATURES/OPERATIONS
SAFETY AND EMERGENCY FEATURES
15
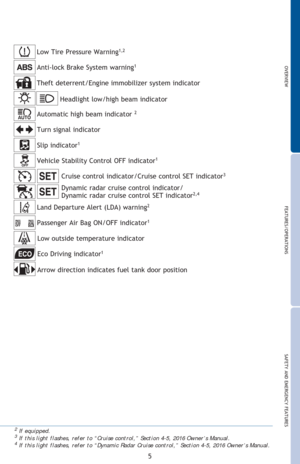
Lights & turn signals
Turn signals
Headlights
High beam
-Daytime Running Light system (DRL) Automatically turns on the headlights at a
reduced intensity.
-Automatic light cut off system Automatically turns lights off after 30-second
delay, or lock switch on remote may be pushed after locking.
Right turn
Lane change
1
Lane change2
Left turn
High beam
flasher
Headlights
Parking lights
DRL OFF
Low beam
1 The right hand signals will flash three times.2 The left hand signals will flash three times.
Page 18 of 48
16
FEATURES/OPERATIONS
Garage door opener (HomeLink®)*
(if equipped)
Garage door openers manufactured under license from HomeLink®* can be
programmed to operate garage doors, estate gates, security lighting, etc.
Refer to “Garage door opener,” Section 6-4 in the Owner’s Manual for more
details.
For programming assistance, contact HomeLink
® at 1-800-355-3515, or visit
http://www.homelink.com.
* HomeLink® is a registered trademark of Gentex Corporation.
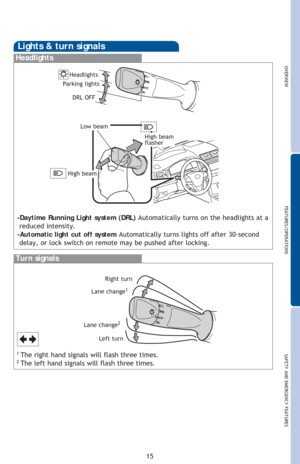
Cruise control (if equipped)
1 The set speed may also be cancelled by depressing the brake pedal.2 The set speed may be resumed once vehicle speed reaches 25 mph.
Turning system ON/OFFFunctions
System ON/OFF
Resume2/Increase speed
Set/Decrease speed
Cancel1
Indicator
Page 19 of 48

OVERVIEW
FEATURES/OPERATIONS
SAFETY AND EMERGENCY FEATURES
17
Distance control mode
To set, cancel and resume a speed Refer to “Summary of Functions” in the
Cruise Control section, and your Owner’s Manual for more details.
NOTE: Once vehicle speed is set, pushing lever up toward “+ RES” will increase
speed to the nearest 5 mph, and then in 5 mph increments. Pushing lever down
toward “- SET” will reduce speed in the same way. The distance control mode will cruise at a set speed, decelerate to maintain a
selected distance from a slower vehicle traveling in front of you, and accelerate
back up to the selected speed if the vehicle in front changes lanes or speeds up.
To change the vehicle-to-vehicle distance
Push the distance button to cycle through the settings, which will change
progressively from LONG to MIDDLE to SHORT. To set, cancel and resume a speed Refer to “Summary of Functions” in the
Cruise Control section, and to the Owner’s Manual for more details.
Switch to fixed speed mode
(1) Push
System ON/OFF
Refer to the Owner’s Manual for more details and complete safety precautions
before attempting to use “Dynamic radar cruise control.”
Dynamic radar cruise control
(if equipped)
Push
System ON/OFF
Indicator
Indicator(2) Push and hold
Push
LONGMIDDLE SHORT
Page 20 of 48

18
FEATURES/OPERATIONS
Rear view monitor system
The rear view monitor system displays an image of the view from the bumper
of the rear area of the vehicle. The camera for the rear view monitor system is
located above the license plate.
To adjust the image on the rear view monitor screen, press the “SETUP” button
and select “Display” on the “Setup” screen. Select “Camera” to adjust the
screen contrast and brightness.
Refer to the Owner‘s Manual for more details on this system.
Blind Spot Monitor (BSM)(if equipped)
The Blind Spot Monitor is a system that has two functions:
• The Blind Spot Monitor function (assists the driver in decision-making when
changing lanes)
• The Rear Cross Traffic Alert function (assists the driver when backing up)
The Blind Spot Monitor function uses radar sensors to detect vehicles that are
traveling in an adjacent lane in the area that is not reflected in the outside rear
view mirror (the blind spot), and advises the driver of the vehicles existence via
the outside rear view mirror indicator.
Refer to the Owner‘s Manual for more details on this system before attempting
to use it.
System ON/OFFRear Cross Traffic Alert buzzer
Page 21 of 48

OVERVIEW
FEATURES/OPERATIONS
SAFETY AND EMERGENCY FEATURES
19
Clock
To find your system, refer to page 22 of this guide,
For Entune™ Audio
Push “SETUP” button next to the screen
then select “General” in the touch screen to access clock setting.
For Entune™ Audio Plus and Entune™ Premium Audio
Push “APPS” button next to the screen
then select “General” in the touch screen to access clock setting.
Automatic Air Conditioning*
Automatic climate control ON
Adjusting the temperature setting will cause the airflow vents, air intake and
fan to adjust automatically.
Temperature selector (driver side)
Temperature selector (passenger side)
“SYNC” button
Indicator ON: Synchronized temperature settings for driver and passengers.
Indicator OFF: Separate temperature settings for driver and passengers.
Air Conditioning ON/OFF
Recirculate cabin air (outside air when OFF)
Airflow vent mode
In “
” or “” mode, use outside air (“” indicator OFF) to reduce
window fogging.
Fan speed
Outside rearview mirror/Rear defogger
Windshield airflow/defogger
Climate control OFF
Air Conditioning/Heating
*if equipped
Page 22 of 48
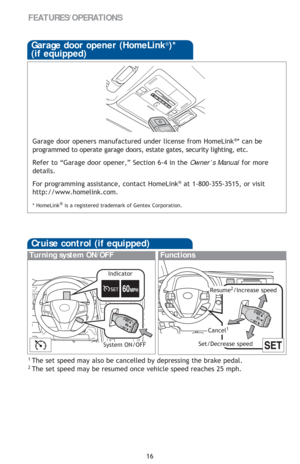
Fan speed
Recirculate cabin air (outside air when OFF)
Windshield airflow/defogger
Outside rearview mirror defoggers/Rear defogger
Air Conditioning ON/OFF
Use outside air to quickly cool interior, then change to recirculate for cooler air.
Select for maximum cooling. Air intake will automatically be set to recirculate.
It is not possible to change intake to outside, or to turn A/C OFF in this mode.
Temperature selector
Airflow vent
In “ ” mode, use outside air (“
” indicator OFF) to reduce window
fogging. “
” mode uses outside air only.
20
FEATURES/OPERATIONS
Manual Air Conditioning*
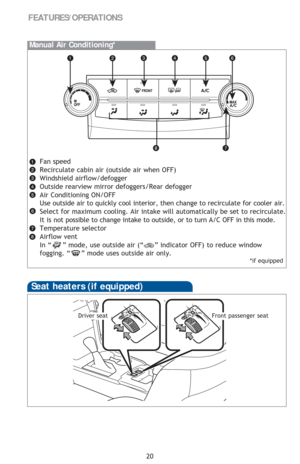
Seat heaters (if equipped)
Driver seatFront passenger seat
*if equipped
Page 23 of 48
OVERVIEW
FEATURES/OPERATIONS
SAFETY AND EMERGENCY FEATURES
21
“ ” Use to search within the selected audio medium
(radio, CD, etc.).
“MODE” Push to turn audio ON and select an audio mode. Push and hold to
turn the audio OFF.>
>
Bluetooth® technology allows dialing or receipt of calls without taking hands from
the steering wheel or using a cable to connect the compatible telephone and the
system.
Refer to “Bluetooth
® audio/phone,” Section 5-7,8 in the Owner’s Manual, for more
information about phone connections and compatibility.
Refer to “Bluetooth
® device pairing section” at the end of this booklet, to connect
your smart phone to the Entune
™ touch screen system.
Microphone
Steering wheel switches
and telephone controls (Bluetooth®)
Volume
Start call
End call
Page 24 of 48

22
FEATURES/OPERATIONS
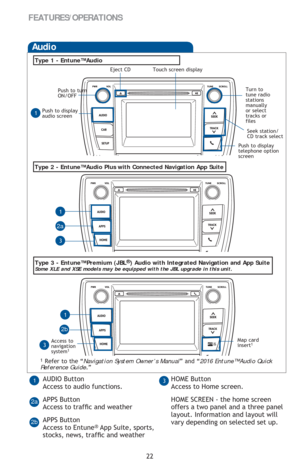
Push to display
audio screen
Seek station/
CD track select
Audio
Eject CD
Push to turn
ON/OFF
Turn to
tune radio
stations
manually
or select
tracks or
files
Access to
navigation
system
1
Type 2 - Entune™ Audio Plus with Connected Navigation App Suite
Type 1 - Entune™ Audio
1 Refer to the “Navigation System Owner’s Manual” and “2016 Entune™ Audio Quick
Reference Guide.”
Map card
insert1
1
1
1
3
3
2a
2b
Push to display
telephone option
screen
AUDIO Button
Access to audio functions.
APPS Button
Access to traf�Àc and weather
APPS Button
Access to Entune
® App Suite, sports,
stocks, news, traf�Àc and weather
13HOME Button
Access to Home screen.
HOME SCREEN - the home screen
offers a two panel and a three panel
layout. Information and layout will
vary depending on selected set up.
2a
2b
Type 3 - Entune™ Premium (JBL®) Audio with Integrated Navigation and App SuiteSome XLE and XSE models may be equipped with the JBL upgrade in this unit.
Touch screen display


 Automatically turns on the headlights at a
re")
*
(if equipped)
Garage door openers manufactured under license from HomeLink®* can be
programmed to operate garage doors, estate gates, security")

Windshield airflow/defogger
Outside rearview mirror defoggers/Rear defogger
Air Conditioning ON/OFF
Use outside air to quickly cool interior, the")
.
“MODE” Push to turn audio ON and select an audio mode")