2016 TOYOTA CAMRY HYBRID indicator
[x] Cancel search: indicatorPage 335 of 572
3356-1. Using the air conditioning system and defogger
6
Interior features
CAMRY_HV_U (OM33C35U)n
Change the airflow mode
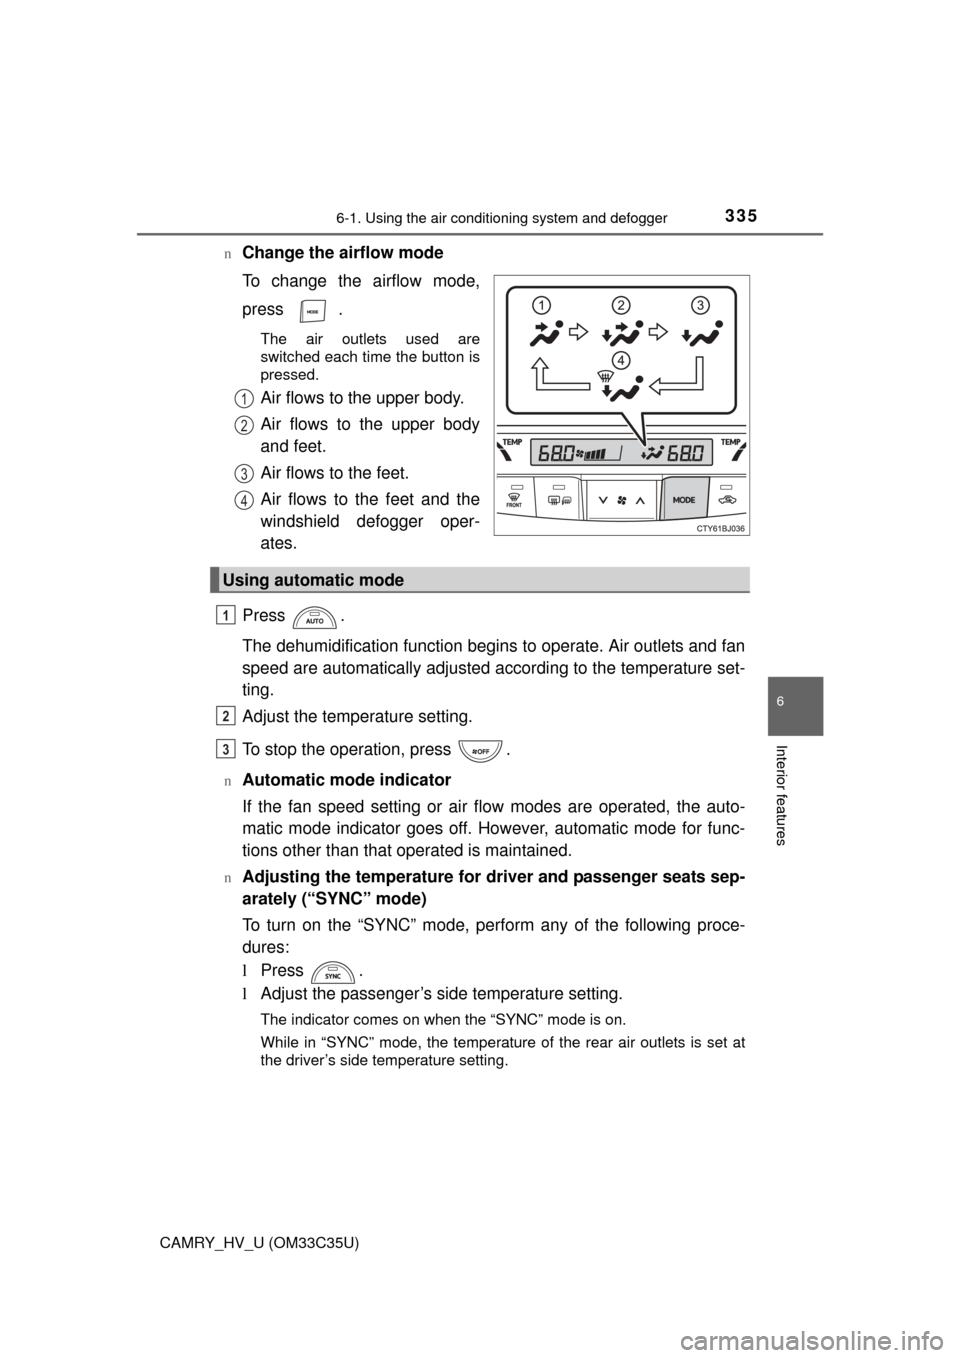
To change the airflow mode,
press .
The air outlets used are
switched each time the button is
pressed.
Air flows to the upper body.
Air flows to the upper body
and feet.
Air flows to the feet.
Air flows to the feet and the
windshield defogger oper-
ates.
Press .
The dehumidification function begins to operate. Air outlets and fan
speed are automatically adjusted according to the temperature set-
ting.
Adjust the temperature setting.
To stop the operation, press .
nAutomatic mode indicator
If the fan speed setting or air fl ow modes are operated, the auto-
matic mode indicator goes off. However, automatic mode for func-
tions other than that operated is maintained.
nAdjusting the temperature for driver and passenger seats sep-
arately (“SYNC” mode)
To turn on the “SYNC” mode, perform any of the following proce-
dures:
l Press .
l Adjust the passenger’s side temperature setting.
The indicator comes on when the “SYNC” mode is on.
While in “SYNC” mode, the temperature of the rear air outlets is set at
the driver’s side temperature setting.
1
2
3
4
Using automatic mode
1
2
3
Page 336 of 572
3366-1. Using the air conditioning system and defogger
CAMRY_HV_U (OM33C35U)n
Switching between outside air and recirculated air modes
Press .
The mode switches between outside air mode (indicator off) and recir-
culated air mode (indicator on) each time is pressed.
n
Defogging the windshield
Defoggers are used to defog the windshield and front side win-
dows.
Press .
The dehumidification function operates and fan speed increases.
Set the outside/recirculated air mode button to the outside air mode if
the recirculated air mode is used. (It may switch automatically.)
To defog the windshield and the side windows early, turn the air flow and
temperature up.
To return to the previous mode, press again when the windshield
is defogged.
n
Defogging the rear window and outside rear view mirrors
Defoggers are used to defog the rear window, and to remove rain-
drops, dew and frost from the outside rear view mirrors.
Press .
The defoggers will automatically turn off after a period of time.
Other functions
Page 341 of 572
3416-1. Using the air conditioning system and defogger
6
Interior features
CAMRY_HV_U (OM33C35U)
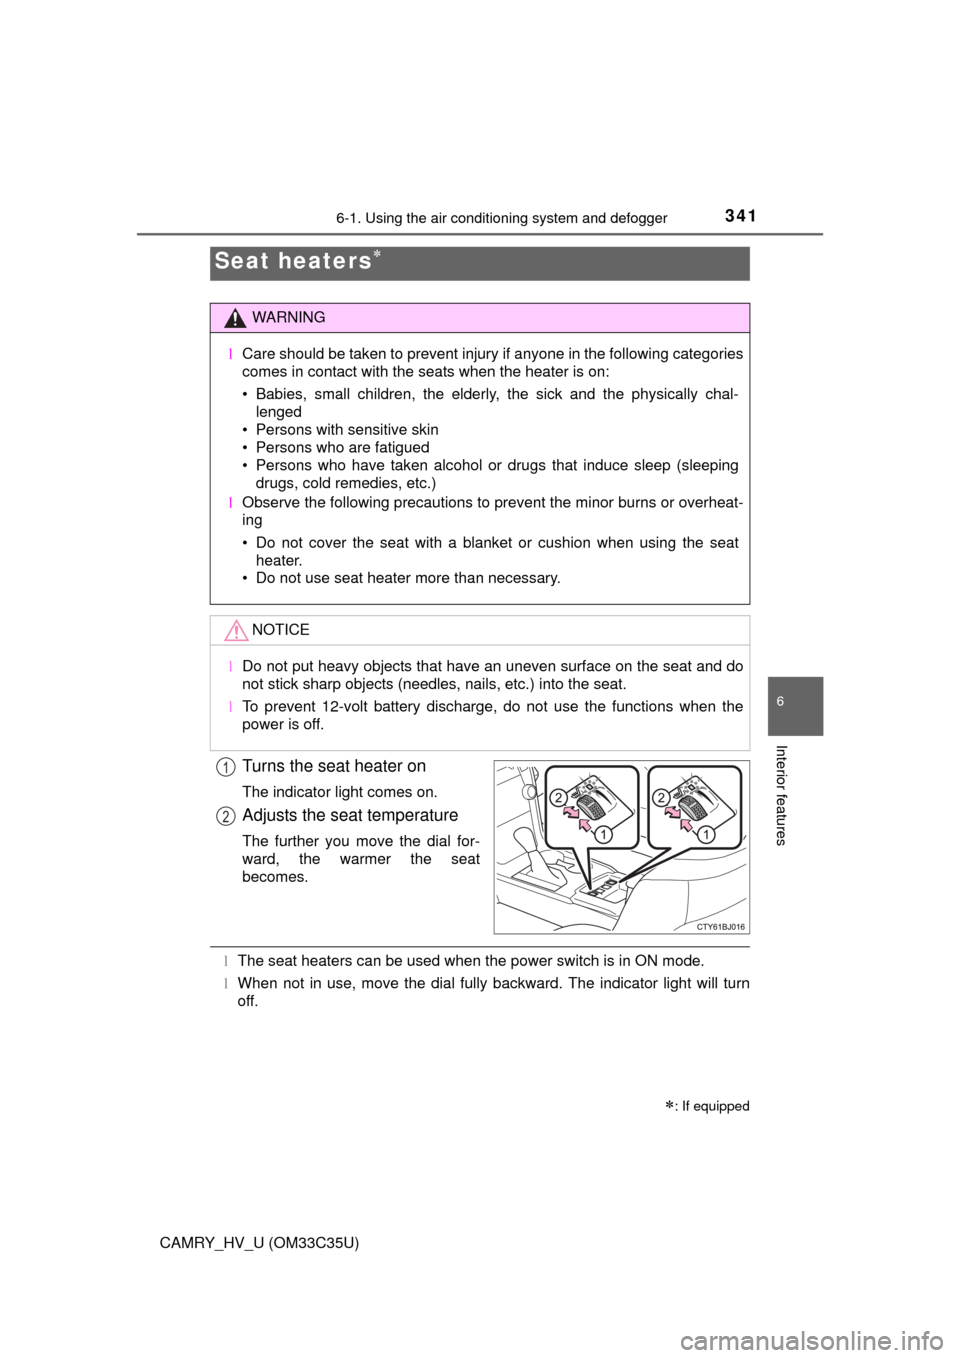
Turns the seat heater on
The indicator light comes on.
Adjusts the seat temperature
The further you move the dial for-
ward, the warmer the seat
becomes.
lThe seat heaters can be used when the power switch is in ON mode.
l When not in use, move the dial fully backward. The indicator light will turn
off.
Seat heaters
: If equipped
WARNING
l Care should be taken to prevent injury if anyone in the following categories
comes in contact with the seats when the heater is on:
• Babies, small children, the elderly, the sick and the physically chal-
lenged
• Persons with sensitive skin
• Persons who are fatigued
• Persons who have taken alcohol or drugs that induce sleep (sleeping drugs, cold remedies, etc.)
l Observe the following precautions to prevent the minor burns or overheat-
ing
• Do not cover the seat with a blanket or cushion when using the seat
heater.
• Do not use seat heater more than necessary.
NOTICE
l Do not put heavy objects that have an uneven surface on the seat and do
not stick sharp objects (needles, nails, etc.) into the seat.
l To prevent 12-volt battery discharge, do not use the functions when the
power is off.
1
2
Page 350 of 572
3506-3. Using the storage features
CAMRY_HV_U (OM33C35U)n
When using wireless charger (if equipped)
A mobile device can be charged wirelessly on the tray.
Charging can only be performed with the power switch in ACCESSORY or
ON mode and only on mobile devices with the “ ” logo.
When placing the mobile device on the wireless charging surface of the
tray, make sure that there are no objects in-between the mobile device
and the tray. They may interfere with charging.
n If the wireless charger LED indicators flash
If the wireless charging surface of the tray becomes too hot, the LED indica-
tors will flash and charging is canceled. The LED indicators will be illuminated
if the surface of the tray cools down.
If the LED indicators flash even though the surface of the tray is not hot, the
wireless charger may be malfunctioning. Consult your Toyota dealer.
n When charging of the wirel ess charger stops temporarily
If any of the following operations ar e performed with the electronic key
present, charging may stop temporarily . Charging will start again after a
while.
l Locking/unlocking the doors by touching the door handle
l Opening/closing the doors
l Opening/closing the trunk lid
l Starting the hybrid system
l Locking the doors by pressing the lock button on the electronic key
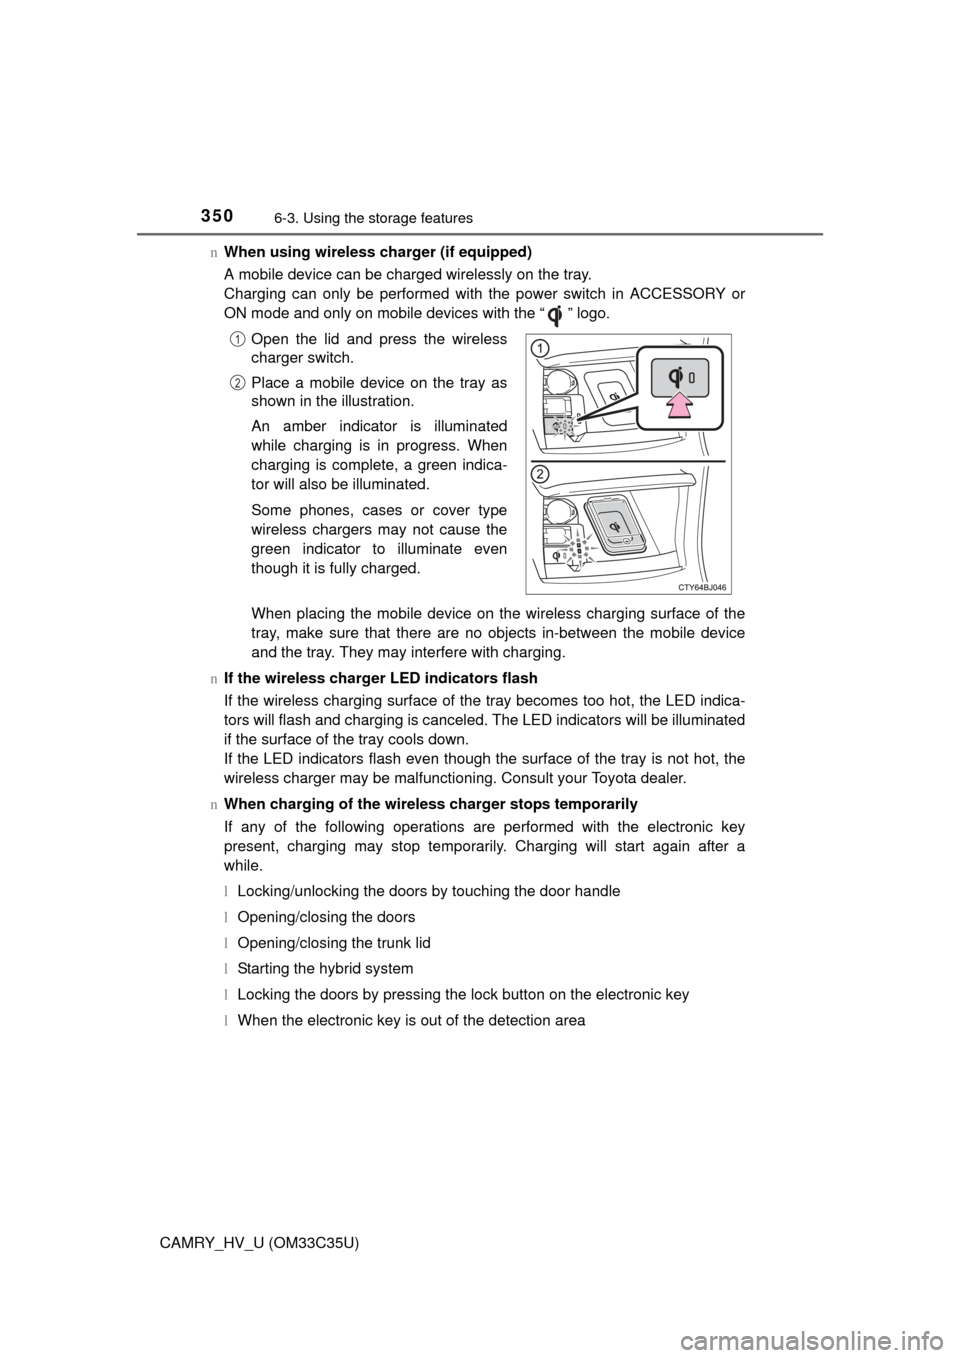
l When the electronic key is out of the detection area Open the lid and press the wireless
charger switch.
Place a mobile device on the tray as
shown in the illustration.
An amber indicator is illuminated
while charging is in progress. When
charging is complete, a green indica-
tor will also be illuminated.
Some phones, cases or cover type
wireless chargers may not cause the
green indicator to illuminate even
though it is fully charged.
1
2
Page 353 of 572
3536-3. Using the storage features
6
Interior features
CAMRY_HV_U (OM33C35U)
NOTICE
nConditions in which the wireless ch arger may not operate correctly
(vehicles with a wireless charger)
In the following situations, the wireless charger may not operate correctly:
l When a portable device is fully charged
l When there is a foreign object between the charging area and portable
device
l When a portable device becomes hot while charging
l When a portable device is placed on the wireless area with its charging
surface facing up
l When a portable device is not centered on the charging area
l When the vehicle is near a TV tower, electric power plant, gas station,
radio station, large display, airport or other facility that generates strong
radio waves or electrical noise
l When the portable device is in contact with, or is covered by any of the fol-
lowing metallic objects
• Cards to which aluminum foil is attached
• Cigarette boxes that have aluminum foil inside
• Metallic wallets or bags
• Coins
• Metal hand warmers
• Media such as CDs and DVDs
l When wireless keys (that emit radio waves) other than those of your vehi-
cle are being used nearby.
If in situations other than above the wireless charger does not operate prop-
erly or the operation indicator light is blinking, the wireless charger may be
malfunctioning. Contact your Toyota dealer.
n To prevent failure or damage to da ta (vehicles with a wireless charger)
l Do not bring magnetic cards, such as a credit card, or magnetic recording
media, close to the wireless charger. Otherwise, data may be erased due
to the influence of magnetism.
Additionally, do not bring precision instruments such as wrist watches,
close to the wireless charger, as such objects may malfunction.
l Do not leave portable devices in the cabin. The temperature inside the
cabin may become high when parked in the sun, and cause damage to the
device.
n To prevent 12-volt battery discharge (vehicles with a wireless charger)
Do not use the wireless charger for a long period of time with the hybrid sys-
tem is stopped.
Page 362 of 572
3626-4. Other interior features
CAMRY_HV_U (OM33C35U)
The garage door opener (HomeLink Universal Transceiver) is manu-
factured under license from HomeLink.
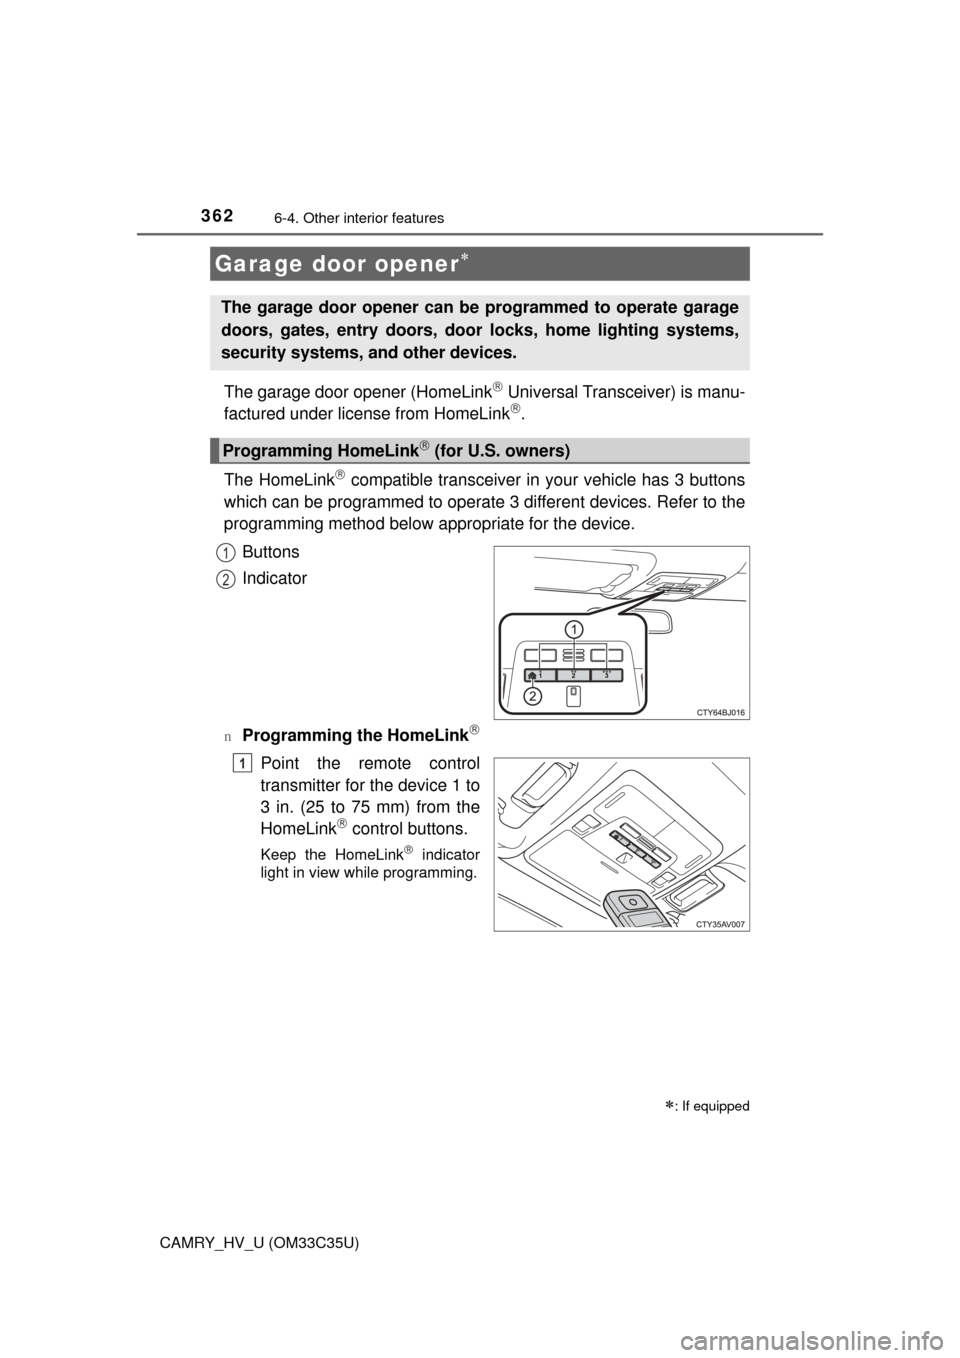
The HomeLink
compatible transceiver in your vehicle has 3 buttons
which can be programmed to operate 3 different devices. Refer to the
programming method below appropriate for the device.
Buttons
Indicator
nProgramming the HomeLink
Point the remote control
transmitter for the device 1 to
3 in. (25 to 75 mm) from the
HomeLink
control buttons.
Keep the HomeLink indicator
light in view while programming.
Garage door opener
: If equipped
The garage door opener can be programmed to operate garage
doors, gates, entry doors, door locks, home lighting systems,
security systems, and other devices.
Programming HomeLink (for U.S. owners)
1
2
1
Page 363 of 572
3636-4. Other interior features
6
Interior features
CAMRY_HV_U (OM33C35U)
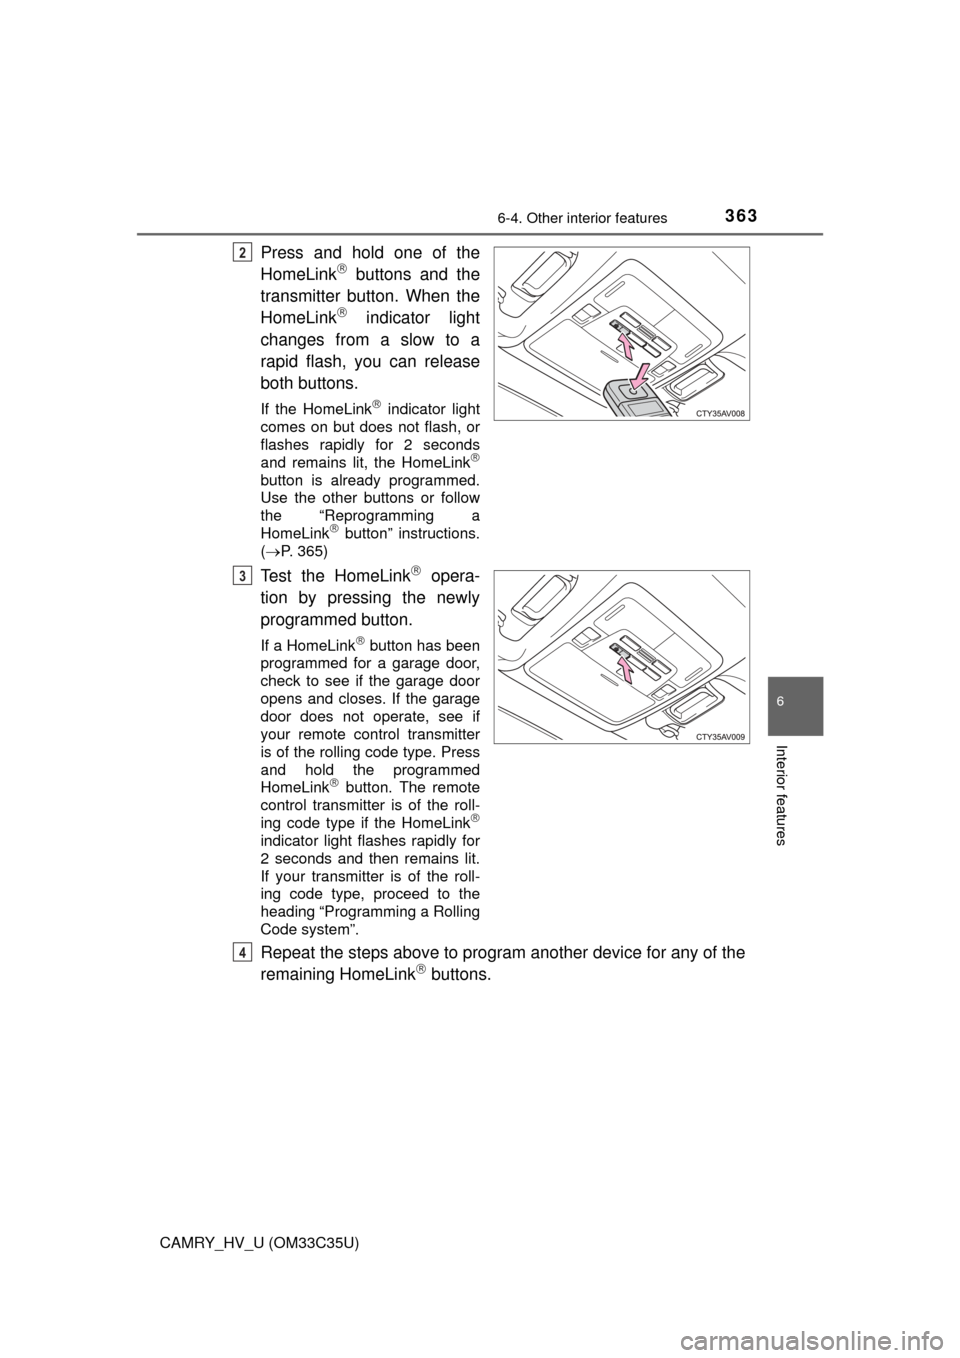
Press and hold one of the
HomeLink buttons and the
transmitter button. When the
HomeLink
indicator light
changes from a slow to a
rapid flash, you can release
both buttons.
If the HomeLink indicator light
comes on but does not flash, or
flashes rapidly for 2 seconds
and remains lit, the HomeLink
button is already programmed.
Use the other buttons or follow
the “Reprogramming a
HomeLink
button” instructions.
( P. 365)
Test the HomeLink opera-
tion by pressing the newly
programmed button.
If a HomeLink button has been
programmed for a garage door,
check to see if the garage door
opens and closes. If the garage
door does not operate, see if
your remote control transmitter
is of the rolling code type. Press
and hold the programmed
HomeLink
button. The remote
control transmitter is of the roll-
ing code type if the HomeLink
indicator light flashes rapidly for
2 seconds and then remains lit.
If your transmitter is of the roll-
ing code type, proceed to the
heading “Programming a Rolling
Code system”.
Repeat the steps above to program another device for any of the
remaining HomeLink buttons.
2
3
4
Page 364 of 572

3646-4. Other interior features
CAMRY_HV_U (OM33C35U)n
Programming a Rolling Code system (for U.S. owners)
If your device is Rolling Code equipped, follow the steps under the heading
“Programming HomeLink” before proceeding with the steps listed below.
Locate the learn button on the ceiling mounted garage door
opener motor. The exact location and color of the button may
vary by brand of garage door opener motor.
Refer to the operation manual supplied with the garage door opener
motor for the location of the learn button.
Press the learn button.
Following this step, you have 30 seconds in which to initiate step 3
below.
Press and hold the vehicle’s programmed HomeLink button for
2 seconds and then release it. R epeat this step once again. The
garage door may open.
If the garage door opens, the programming process is complete. If the
door does not open, press and release the button a third time. This third
press and release will complete the programming process by opening
the garage door.
The ceiling mounted garage door opener motor should now recognize
the HomeLink
signal and operate the garage door.
Repeat the steps above to program another rolling code system
for any of the remaining HomeLink buttons.
nProgramming an entry gate (for U.S. owners)/Programming a
device in the Canadian market
Place the remote control transmitter 1 to 3 in. (25 to 75 mm)
away from the HomeLink
buttons.
Keep the HomeLink indicator light in view while programming.
Press and hold the selected HomeLink button.
Repeatedly press and release (cyc le) the remote control trans-
mitter for 2 seconds each until step 4 is completed.
When the HomeLink
indicator light starts to flash rapidly,
release the buttons.
Test the HomeLink
operation by pressing the newly pro-
grammed button. Check to see if the gate/device operates cor-
rectly.
Repeat the steps above to program another device for any of the
remaining HomeLink
buttons.
1
2
3
4
1
2
3
4
5
6