Page 316 of 528
3165-4. Other interior features
4RUNNER (U)_(OM35B23U)
Please use as a power supply for electronic goods that use less than
12 VDC / 10 A (power consumption of 120 W).
When using electronic goods, make sure that the power consumption
of all the connected power outlets is less than 120 W.
NOTICE
■If any electrical appliances are to be used while driving
Securely fasten both the appliances and their cables to prevent them from
falling or getting caught in any of the power train components.
■If the power outlet is loose when an electrical appliance plug is con-
nected
Replace the outlet. Contact your Toyota dealer for any necessary replace-
ments.
■If the power outlet gets dirty
Turn the main switch off and use a soft, clean cloth to wipe it gently. Do not
use any cleansing materials, such as organic solvents, wax, or compound
cleaners, as these may damage the power outlet or cause it to malfunction.
Power outlets
Center panelConsole box (outside)
Open the lid.
Page 320 of 528

3205-4. Other interior features
4RUNNER (U)_(OM35B23U)
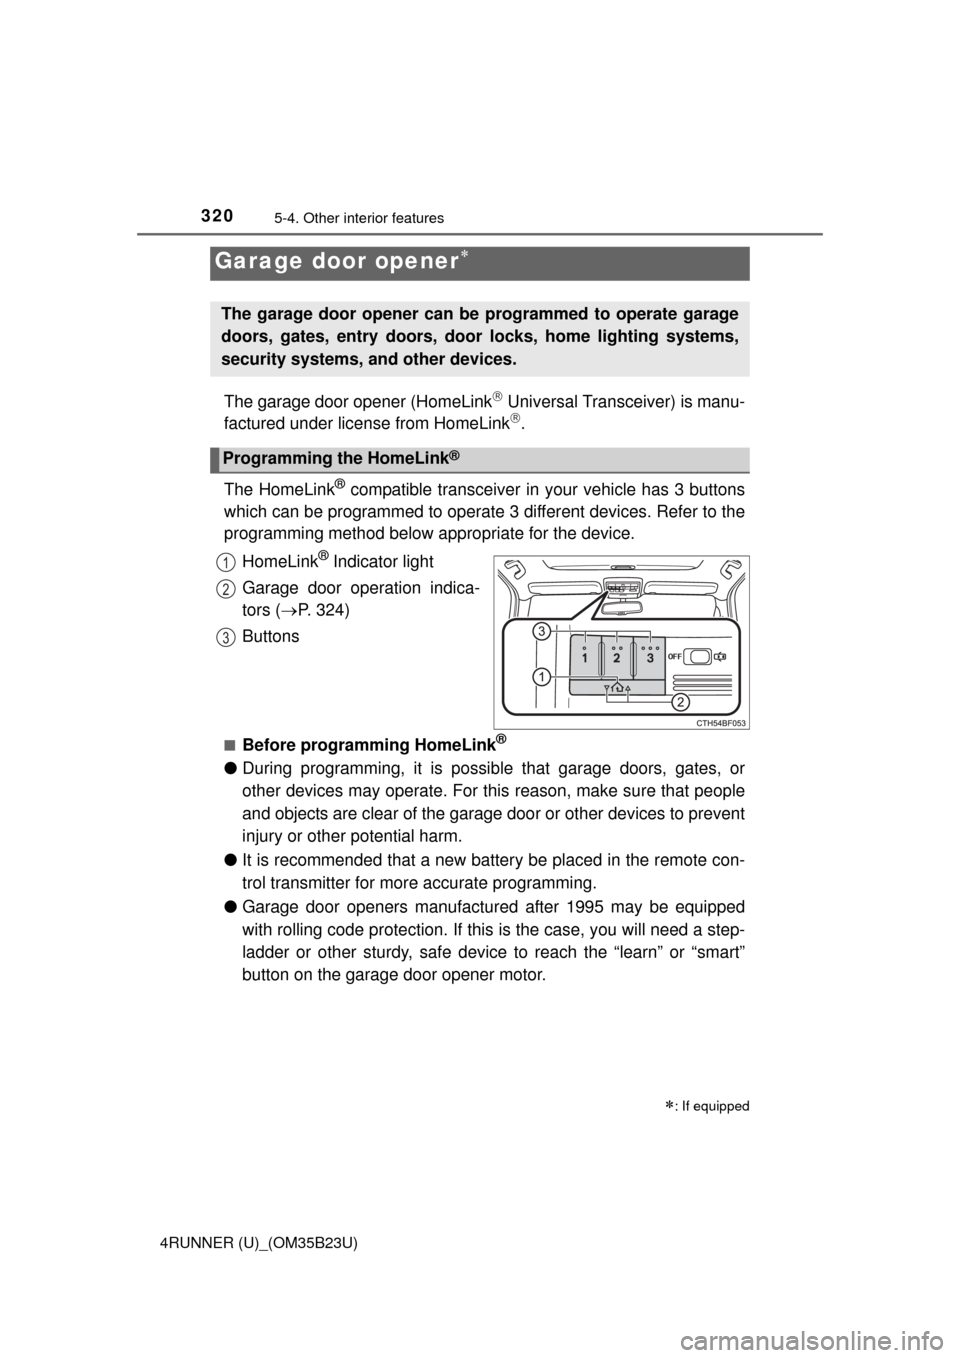
The garage door opener (HomeLink Universal Transceiver) is manu-
factured under license from HomeLink.
The HomeLink
® compatible transceiver in your vehicle has 3 buttons
which can be programmed to operate 3 different devices. Refer to the
programming method below appropriate for the device.
HomeLink
® Indicator light
Garage door operation indica-
tors (P. 324)
Buttons
■Before programming HomeLink®
●During programming, it is possible that garage doors, gates, or
other devices may operate. For this reason, make sure that people
and objects are clear of the garage door or other devices to prevent
injury or other potential harm.
●It is recommended that a new battery be placed in the remote con-
trol transmitter for more accurate programming.
●Garage door openers manufactured after 1995 may be equipped
with rolling code protection. If this is the case, you will need a step-
ladder or other sturdy, safe device to reach the “learn” or “smart”
button on the garage door opener motor.
Garage door opener
: If equipped
The garage door opener can be programmed to operate garage
doors, gates, entry doors, door locks, home lighting systems,
security systems, and other devices.
Programming the HomeLink®
1
2
3
Page 327 of 528
3275-4. Other interior features
5
Interior features
4RUNNER (U)_(OM35B23U)■
System components
Microphone
“SOS” button
LED light indicators
Safety Connect
: If equipped
Safety Connect is a subscription-based telematics service that
uses Global Positioning System (GPS) data and embedded cel-
lular technology to provide safety and security features to sub-
scribers. Safety Connect is supported by Toyota’s designated
response center, which operates 24 hours per day, 7 days per
week.
Safety Connect service is available by subscription on select,
telematics hardware-equipped vehicles.
By using the Safety Connect service, you are agreeing to be
bound by the Telematics Subscription Service Agreement and
its Terms and Conditions, as in effect and amended from time to
time, a current copy of which is available at Toyota.com. All use
of the Safety Connect service is subject to such then-applicable
Terms and Conditions.
1
2
3
Page 343 of 528

3436-2. Maintenance
6
Maintenance and care
4RUNNER (U)_(OM35B23U)
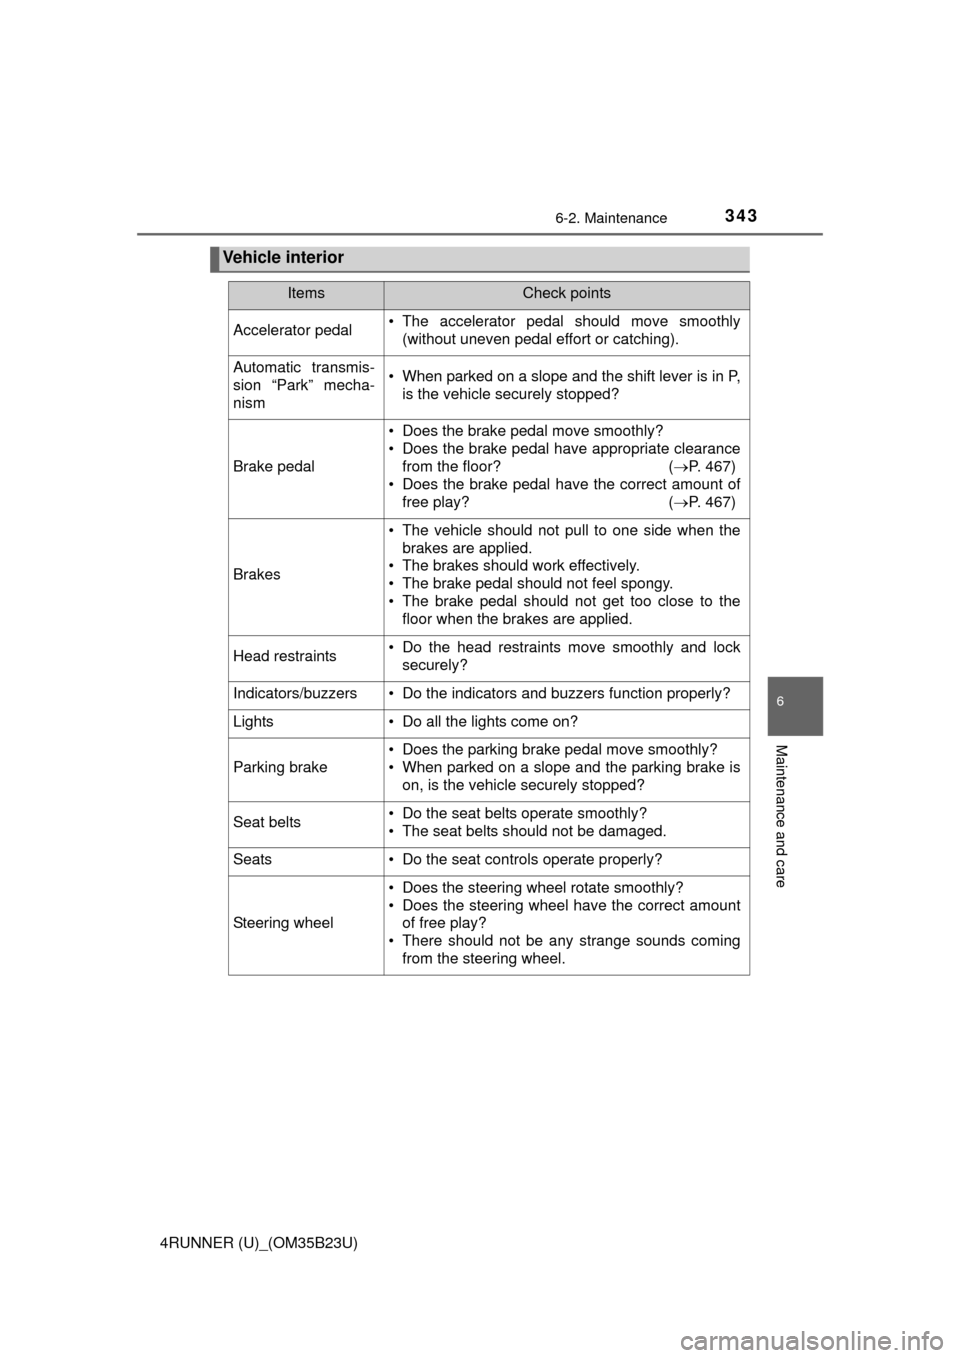
Vehicle interior
ItemsCheck points
Accelerator pedal• The accelerator pedal should move smoothly
(without uneven pedal effort or catching).
Automatic transmis-
sion “Park” mecha-
nism• When parked on a slope and the shift lever is in P,
is the vehicle securely stopped?
Brake pedal
• Does the brake pedal move smoothly?
• Does the brake pedal have appropriate clearance
from the floor? (P. 467)
• Does the brake pedal have the correct amount of
free play? (P. 467)
Brakes
• The vehicle should not pull to one side when the
brakes are applied.
• The brakes should work effectively.
• The brake pedal should not feel spongy.
• The brake pedal should not get too close to the
floor when the brakes are applied.
Head restraints• Do the head restraints move smoothly and lock
securely?
Indicators/buzzers• Do the indicators and buzzers function properly?
Lights • Do all the lights come on?
Parking brake
• Does the parking brake pedal move smoothly?
• When parked on a slope and the parking brake is
on, is the vehicle securely stopped?
Seat belts• Do the seat belts operate smoothly?
• The seat belts should not be damaged.
Seats• Do the seat controls operate properly?
Steering wheel
• Does the steering wheel rotate smoothly?
• Does the steering wheel have the correct amount
of free play?
• There should not be any strange sounds coming
from the steering wheel.
Page 351 of 528
3516-3. Do-it-yourself maintenance
6
Maintenance and care
4RUNNER (U)_(OM35B23U)■
Removing the engine compartment cover
■Installing the clips
Push up center portion
Insert
Press
Engine compartment cover
1
2
3
NOTICE
■After installing an engine compartment cover
Make sure that the cover is securely installed in its original position.
Page 388 of 528
3886-3. Do-it-yourself maintenance
4RUNNER (U)_(OM35B23U)
Replace the light bulb, and
install the bulb base.
Align the 3 tabs on the light bulb
with the mounting and insert.
Turn and secure the bulb
base.
Shake the bulb base gently to
check that it is not loose, turn
the headlights on once and visu-
ally confirm that no light is leak-
ing through the mounting.
Install the cover.
4
5
6
Page 389 of 528
3896-3. Do-it-yourself maintenance
6
Maintenance and care
4RUNNER (U)_(OM35B23U)■
Headlight high beam/daytime running lights
Turn the bulb base counter-
clockwise.
Pull the bulb out while press-
ing the lock release of the
connector.
Replace the light bulb, and
install the bulb base.
Align the 3 tabs on the light bulb
with the mounting and insert.
Turn and secure the bulb
base.
Shake the bulb base gently to
check that it is not loose, turn
the headlights on once and visu-
ally confirm that no light is leak-
ing through the mounting.
1
2
3
4
Page 395 of 528
3956-3. Do-it-yourself maintenance
6
Maintenance and care
4RUNNER (U)_(OM35B23U)
Turn the bulb base counter-
clockwise.
Install a new light bulb.
Align the 3 tabs on the light bulb
with the mounting and insert.
Turn clockwise and secure
the bulb base.
Install the connector.
Shake the connector gently to
check that it is not loose, turn
the front fog lights on once and
visually confirm that no light is
leaking through the mounting.
When installing the fender liner, install by conducting and with the
directions reversed.
5
6
7
8
9