Page 161 of 179
Understanding Tire MarkingsLaws require tire manufacturers to place standardized information on the sidewall of all tires. This
information
identifies and describes the fundamental characteristics of the tire.Wheels and Tires
Specifications161
Page 162 of 179

1Tire category. P indicates that the tire is for passenger vehicles.2Tire width. This 3-digit number is the width (in millimeters) of the tire from sidewall
edge to sidewall edge.3Aspect ratio. This 2-digit number is the sidewall height as a percentage of the tread
width. So, if the tread width is 205 mm, and the aspect ratio is 50, the sidewall height is 102 mm.4Tire construction. R indicates that the tire is of Radial ply construction.5Wheel diameter. This 2-digit number is the diameter of the wheel rim in inches.6Load index. This 2 or 3-digit number is the weight each tire can support. This number is
not always shown.7Speed rating. When stated, indicates the maximum speed (in mph) at which the tire can be used for extended periods. Q=99 mph (160 km/h), R=106 mph (170 km/h), S=112 mph (180 km/h), T=118 mph (190 km/h), U=124 mph (200 km/h), H=130 mph(210 km/h), V=149 mph (240 km/h), W=168 mph (270 km/h), Y=186 mph (300 km/h).8Tire composition and materials. The number of plies in both the tread area and thesidewall area indicates how many layers of rubber coated material make up the structure of the tire. Information is also provided on the type of materials used.9Maximum tire load. The maximum load which can be carried by the tire.10Maximum permissible inflation pressure. This pressure should not be used for normal
driving.11U.S. DOT Tire Identification Number (TIN). Begins with the letters DOT and indicates
that the tire meets all federal standards. The next 2 digits/letters represent the plant
code where it was manufactured, and the last 4 digits represent the week and year of
manufacture. For example, the number 1712 is used to represent the 17th week of 2012. The other numbers are marketing codes used at the manufacturer
Page 163 of 179
Tesla Roadside Assistance is available to you, 24 hours a day, 365 days a year, for the duration of
your warranty period.
To contact Roadside Assistance, call:
0120 975 214
Advise the representative of the vehicle
identification number (VIN), license plate number,
mileage, your location, and the nature of the problem. The VIN is on the upper dashboard on the
driver
Page 164 of 179

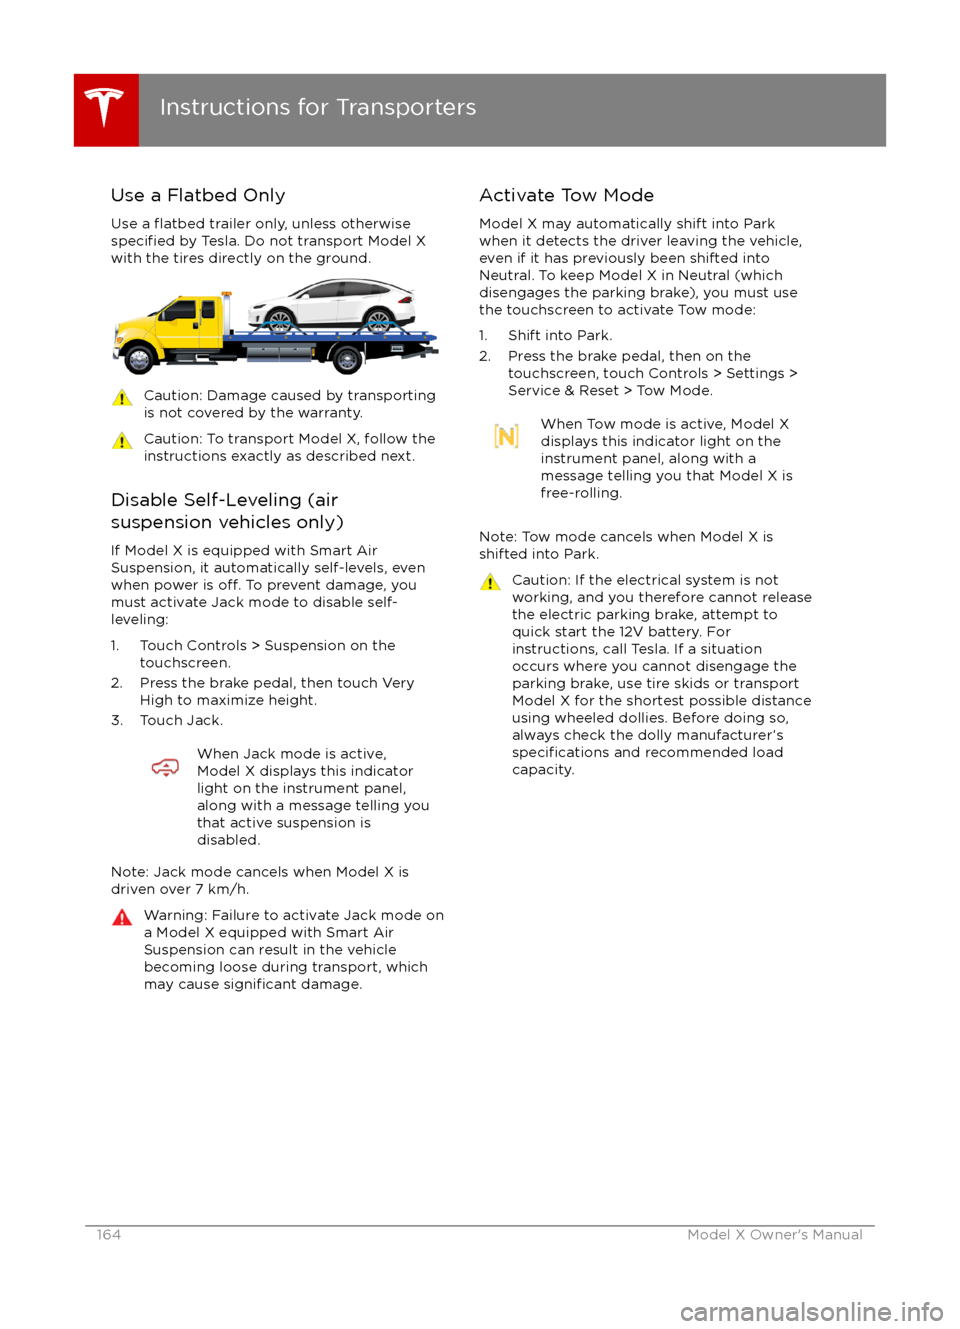
Use a Flatbed OnlyUse a
flatbed trailer only, unless otherwisespecified by Tesla. Do not transport Model X
with the tires directly on the ground.
Caution: Damage caused by transporting is not covered by the warranty.Caution: To transport Model X, follow the
instructions exactly as described next.
Disable Self-Leveling (air
suspension vehicles only)
If Model X is equipped with Smart Air
Suspension, it automatically self-levels, even
when power is
off. To prevent damage, you
must activate Jack mode to disable self-
leveling:
1. Touch Controls > Suspension on the touchscreen.
2. Press the brake pedal, then touch Very High to maximize height.
3. Touch Jack.
When Jack mode is active,
Model X displays this indicator
light on the instrument panel,
along with a message telling you
that active suspension is
disabled.
Note: Jack mode cancels when Model X is
driven over 7 km/h.
Warning: Failure to activate Jack mode on
a Model X equipped with Smart Air
Suspension can result in the vehicle
becoming loose during transport, which
may cause
significant damage.
Activate Tow Mode
Model X may automatically shift into Park
when it detects the driver leaving the vehicle,
even if it has previously been shifted into Neutral. To keep Model X in Neutral (which
disengages the parking brake), you must use
the touchscreen to activate Tow mode:
1. Shift into Park.
2. Press the brake pedal, then on the touchscreen, touch Controls > Settings >
Service & Reset > Tow Mode.When Tow mode is active, Model X
displays this indicator light on the
instrument panel, along with a
message telling you that Model X is
free-rolling.
Note: Tow mode cancels when Model X is
shifted into Park.
Caution: If the electrical system is not
working, and you therefore cannot release
the electric parking brake, attempt to
quick start the 12V battery. For
instructions, call Tesla. If a situation
occurs where you cannot disengage the
parking brake, use tire skids or transport Model X for the shortest possible distance
using wheeled dollies. Before doing so,
always check the dolly manufacturer
Page 165 of 179
Connect the Towing Eye1. Locate the towing eye in the front trunk.
2. Remove the tow hook cover. To do so, insert a small
flat screwdriver into the slot
located along the top of the cover, then
pry gently to release the cover from the
top snap.
3. Insert the towing eye.
Fully insert the towing eye into the
opening on the right side, then turn it
counter-clockwise until securely fastened.
4. Attach the winch cable to the towing eye.
Caution: Before pulling, make sure the
towing eye is securely tightened.Pull Onto the Trailer and Secure the
Wheels
Secure wheels using the eight-point tie-downmethod with basket straps or tie-down straps:
Page 166 of 179

IllustrationsIllustrations are provided for demonstration
purposes only. Depending on vehicle options, software version, region of purchase, and
specific vehicle settings, your Model X may
appear slightly different.
Although the owner information is applicable
to both right-hand drive and left-hand drive
vehicles, many illustrations show only left-
hand drive vehicles. However, the essential
information that the illustrations are providing
is correct.
Errors or Inaccuracies All
specifications and descriptions are known
to be accurate at time of publishing. However,
because continuous improvement is a goal at
Tesla, we reserve the right to make product
modifications at any time. To communicate
any inaccuracies or omissions, or to provide
general feedback or suggestions regarding the quality of this owner information, send anemail to:
[email protected]
Location of ComponentsThe owner information may specify thelocation of a component as being on the left
or right side of the vehicle. As shown here, left
(1) and right (2) represent the side of the
vehicle when sitting inside Model X in a front-
facing seat.
Document Applicability
Owner information is updated on a regular
basis to
reflect updates to your Model X.
However, in some cases, recently released
features may not be described. To display information about recently released features,
view the Release Notes on the Model X
touchscreen. Release Notes are displayed on
the touchscreen after a software update, and can be displayed at any time by touching the
Tesla "T" at the top center of the touchscreen,
then touching the Release Notes link. If
information related to how to use the Model X
touchscreen
conflicts with information in the
Release Notes, the Release Notes take
precedence.
About this Owner Information
166Model X Owner
Page 167 of 179
Copyrights and TrademarksAll information in this document and all
Model X
Page 168 of 179
Vehicle Telematics/Data Recorders
This vehicle is equipped with electronic
modules that monitor and record data from
various vehicle systems, including the motor,
Battery, braking and electrical systems. The
electronic modules record information about
various driving and vehicle conditions,
including braking, acceleration, trip and other
related information regarding your vehicle.
These modules also record information about
the vehicle