2016 TESLA MODEL S warning
[x] Cancel search: warningPage 93 of 190

3. Main viewing areaThe main viewing area changes depending on the app you have chosen (in the example, the
Nav and Media apps are displayed). For some apps (such as Nav and Web), you can zoom in and out using standard touchscreen
finger gestures.
4. Maximize/minimize app
Touch the small rectangle to expand the associated app to
fill the entire main viewing area
(some apps are not expandable). Touch again to display two apps in half-screen view.
5. Controls
Touch to access all Model S controls and settings (doors, locks, lights, etc).
6. Climate controls (see Climate Controls on page 104).
7. Volume control
Touch the up and down arrows to increase or decrease the volume of the speakers. You can
also adjust the volume using the scroll wheel on the left side of the steering wheel.
8. Reverse the position of the two currently displayed apps.
Warning: Paying attention to road and traffic conditions must always be the driver
Page 113 of 190

USB Hub Connections
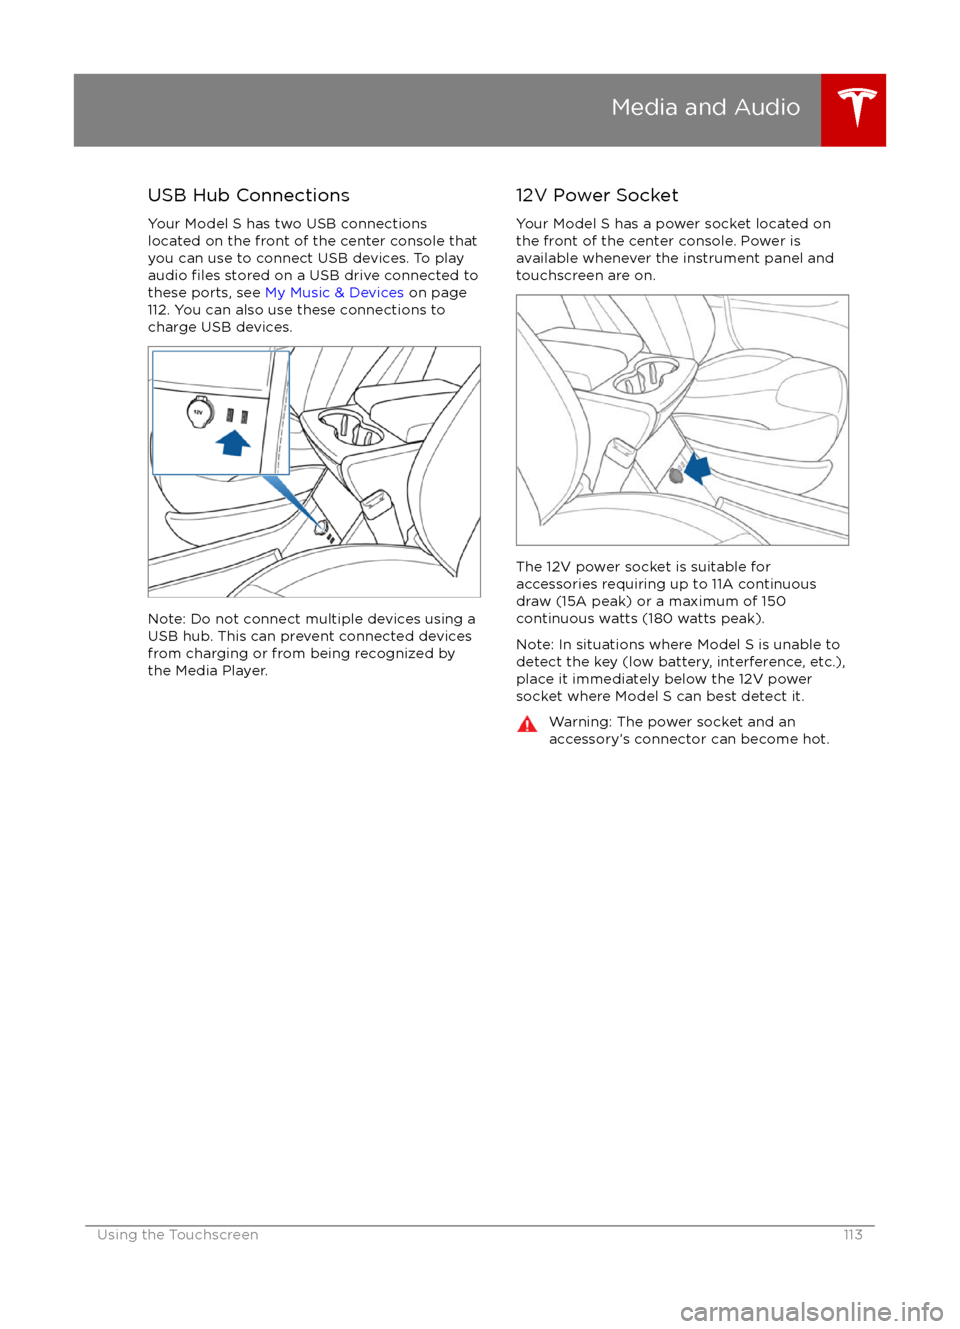
Your Model S has two USB connections
located on the front of the center console that
you can use to connect USB devices. To play
audio
files stored on a USB drive connected to
these ports, see My Music & Devices on page
112. You can also use these connections to charge USB devices.
Note: Do not connect multiple devices using a
USB hub. This can prevent connected devices
from charging or from being recognized by
the Media Player.
12V Power Socket
Your Model S has a power socket located on
the front of the center console. Power is
available whenever the instrument panel and
touchscreen are on.
The 12V power socket is suitable for
accessories requiring up to 11A continuous
draw (15A peak) or a maximum of 150
continuous watts (180 watts peak).
Note: In situations where Model S is unable to detect the key (low battery, interference, etc.),
place it immediately below the 12V power
socket where Model S can best detect it.
Warning: The power socket and an
accessory
Page 128 of 190

Warning: The high voltage system has no user serviceable parts. Do not disassemble, removeor replace high voltage components, cables or connectors. High voltage cables are coloredorange for easy
identification.
Warning: Read and follow all instructions provided on the labels that are attached to Model S.
These labels are there for your safety.Warning: In the unlikely event that a fire occurs, immediately contact your local fireemergency responders.Charging Equipment
Charging equipment designed
specifically to
charge your Model S is available from Tesla. A
Tesla Wall Connector, which installs in your
garage, is the fastest way to charge Model S at home.
In several market regions, Model S is equipped
with a Mobile Connector and the adapter(s)
you need to plug into commonly used power
outlets. When using the Mobile Connector,
first plug the Mobile Connector into the power
outlet, then plug in Model S. For more
information about your Mobile Connector, see
the Mobile Connector Owner
Page 136 of 190

Inspecting and Maintaining TiresRegularly inspect the tread and side walls for
any sign of distortion (bulges), cuts or wear.Warning: Do not drive Model S if a tire is
damaged, excessively worn, or inflated to
an incorrect pressure. Check tires
regularly for wear, and ensure there are
no cuts, bulges or exposure of the ply/
cord structure.
Tire Wear
Adequate tread depth is important for proper
tire performance. Tires with a tread depth less
than 4/32” (3 mm) are more likely to
hydroplane in wet conditions and should not
be used. Tires with a tread depth less than
5/32” (4 mm) do not perform well in snow and
slush and should not be used when driving in
winter conditions.
Model S is originally
fitted with tires that have
wear indicators molded into the tread pattern. When the tread has been worn down to 4/32”(3 mm), the indicators start to appear at thesurface of the tread pattern, producing the
effect of a continuous band of rubber across
the width of the tire. For optimal performance and safety, Tesla recommends replacing tires
before the wear indicators are visible.
Tire Rotation, Balance, and Wheel Alignment
Tesla recommends rotating the tires every
5000 miles (8000 km).
Unbalanced wheels (sometimes noticeable as
vibration through the steering wheel)
affectvehicle handling and tire life. Even with regular
use, wheels can get out of balance. Therefore,
they should be balanced as required.
If tire wear is uneven (on one side of the tire
only) or becomes abnormally excessive, check
the alignment of wheels.
Note: When replacing only two tires, always
install the new tires on the rear.
Punctured Tires
A puncture eventually causes the tire to lose pressure, which is why it is important to check
tire pressures frequently. Permanently repair
or replace punctured or damaged tires as
soon as possible.
Your tubeless tires may not leak when
penetrated, provided the object remains in the tire. If, however, you feel a sudden vibration or
ride disturbance while driving, or you suspect a tire is damaged, immediately reduce yourspeed. Drive slowly, while avoiding heavy
braking or sharp steering and, when safe to do so, stop the vehicle. Arrange to have Model S
transported to a Tesla, or to a nearby tire
repair center.
Note: In some cases, you can temporarily
repair small tire punctures (under 1/4” (6
mm)) using an optional tire repair kit available
from Tesla. This allows you to slowly drive
Model S to Tesla or to a nearby tire repair
facility.Warning: Do not drive with a punctured
tire, even if the puncture has not causedthe tire to
deflate. A punctured tire candeflate suddenly at any time.
Flat Spots
If Model S is stationary for a long period in
high temperatures, tires can form
flat spots.
When Model S is driven, these flat spots cause
a vibration which gradually disappears as the
tires warm up and regain their original shape.
To minimize
flat spots during storage, inflatetires to the maximum pressure indicated on the tire wall. Then, before driving, release airto adjust tire pressure to the recommended
levels.
Improving Tire Mileage
To improve the mileage you get from your
tires, maintain tires at the recommended tire
pressures, observe speed limits and advisory
speeds, and avoid:
Page 137 of 190

Replacing Tires and Wheels
Tires degrade over time due to the
effects of
ultraviolet light, extreme temperatures, high
loads, and environmental conditions. It is
recommended that tires are replaced every six
years, or sooner if required.
Wheel rims and tires are matched to suit the
handling characteristics of the vehicle.
Replacement tires must comply with the
original
specification. If tires other than thosespecified are used, ensure that the load and
speed ratings marked on the tire equal or
exceed those of the original
specification.
Ideally, you should replace all four tires at the same time. If this is not possible, replace the
tires in pairs (both front or both rear). When
replacing tires, always re-balance and check
the alignment of wheels.
If you replace a wheel, the TPMS (Tire Pressure
Monitoring System) sensors need to be reset to ensure they provide accurate warnings
when tires are under- or
over-inflated (see
Resetting the TPMS Sensors on page 139).
Warning: For your safety, use only tires
and wheels that match the original
specification (see Wheels and Tires on
page 169). Tires that do not match the
original
specification can affect the
operation of the Tire Pressure Monitoring System (TPMS).
Warning: Never exceed the speed rating
of your vehicle
Page 140 of 190

Tire Repair Kit
Your Model S has no spare tire. Depending on
the legislations that apply to the region in
which you purchased Model S, a tire repair kit
may or may not be included. If a tire repair kit
was not provided in Model S upon delivery,
you can purchase one from Tesla.
Note: Although Model S does not have a spare
tire, in the event of a
flat tire, Roadside
Assistance provides towing coverage for up to 50 miles.
The tire repair kit consists of a compressor
and a canister of tire sealant (enough to repair
one tire). When injected into a tire, the sealant
can penetrate a small puncture up to 1/4" (6 mm) to form a temporary repair.
Note: For punctures larger than 1/4” (6 mm),
severe tread damage, a damaged sidewall,
ripped tires or tires that have come
off the rim,
call Roadside Assistance.
Warning: The tire repair kit is a temporary
repair only. You must repair or replace a
damaged tire as soon as possible.Warning: Do not exceed 30 mph
(48 km/h) when driving with a tire that
has been temporarily repaired with sealant.Warning: Follow all directions and
warnings on the tire repair kit before
starting a repair.Caution: Do not drive on a deflated tire as
this can cause serious damage.Tire Sealant Canister
The tire sealant provided in the Tesla tire
repair kit is approved for use with Model S and is designed not to damage the TPMS (Tire
Pressure Monitoring System) sensors.
Therefore, you must replace it only with one of
the same type and capacity (see Replacing
the Sealant Canister on page 143). Tire
sealant canisters can be purchased from Tesla.
The tire sealant has an expiration date printed
on the outside of the canister. If the expiration
date has passed, the sealant might not work
as expected. Always replace an expired tire
sealant canister.Warning: Do not use any tire sealant
other than the one available from Tesla.
Doing so could cause tire pressure
sensors to malfunction.Warning: Always read and follow the
safety and handling instructions printed on the sealant canister.Warning: Keep tire sealant out of the
reach of children.Warning: Tire sealant can be harmful if it
contacts the eyes or if swallowed or
inhaled. If the sealant comes into contact with your eyes, immediately
flush with
water and seek medical attention if
irritation persists. If swallowed, do not
induce vomiting and seek medical assistance immediately. If inhaled, breathe
fresh air. Inhalation can cause drowsiness
and dizziness. If breathing is
affected,seek medical assistance immediately.
Temporary Tire Repair
140Model S Owner
Page 141 of 190

Inflating with Sealant and Air
If you have a Tesla tire repair kit, follow these
steps to temporarily repair a small tire
puncture (less than 1/4”/6 mm)).
1. Stop Model S in a safe place away from
traffic and ask passengers to wait in a safe
area.
2. Turn on the hazard warning
flashers to
alert other road users.
3. If possible, position the wheel with the puncture at the bottom.
4. Detach the power supply connector from the back of the compressor and plug it
into the 12V power socket located on the
front of center console.
5. Release the clear plastic hose from the tire
compressor.
6. Remove the red cap and screw the end of the hose onto the tire
Page 145 of 190

Cleaning the Interior
Frequently inspect and clean the interior to maintain its appearance and to prevent
premature wear. If possible, immediately wipe up spills and remove marks. For general
cleaning, wipe interior surfaces using a soft
cloth (such as micro
fiber) dampened with a
mixture of warm water and mild non-
detergent cleaner (test all cleaners on a
concealed area before use). To avoid streaks,
dry immediately with a soft lint-free cloth.
Interior Glass
Do not scrape, or use any abrasive cleaning
fluid on glass or mirrored surfaces. This can
damage the reflective surface of the mirror
and the heating elements in the rear window.
Airbags
Do not allow any substance to enter an airbag
cover. This could
affect correct operation.
Dashboard and Plastic Surfaces
Do not polish the upper surfaces of the
dashboard. Polished surfaces are
reflectiveand could interfere with your driving view.
Leather Seats
Leather is prone to dye-transfer which can
cause discoloration, particularly on light colored leather. White and tan leather iscoated with an anti-soiling treatment. Wipespills as soon as possible using a soft cloth
moistened with warm water and non-
detergent soap. Wipe gently in a circular
motion. Then wipe dry using a soft, lint-free
cloth. Using detergents or commercially
available leather cleaners and conditioners is
not recommended because they can discolor or dry out the leather.
Polyurethane Seats
Wipe spills as soon as possible using a soft
cloth moistened with warm water and non-
detergent soap. Wipe gently in a circular
motion. After cleaning, allow the seats to air
dry.
Cloth Seats
Wipe spills as soon as possible using a soft
cloth moistened with warm water and non-
detergent soap. Wipe gently in a circular
motion. Then wipe dry using a soft, lint-free
cloth. Vacuum the seats as needed to remove
any loose dirt.
Carpets
Avoid over-wetting carpets. For heavily soiled
areas, use a diluted upholstery cleaner.
Seat Belts
Extend the belts to wipe. Do not use any type
of detergent or chemical cleaning agent.
Allow the belts to dry naturally while
extended, preferably away from direct
sunlight.
Tesla Built-In Rear Facing Child Seats
Vacuum the seats to remove any loose dirt. Wipe the seats with a soft cloth dampened
with warm water. You can also use an upholstery cleaner designed for automotive
use. Extend the belts to wipe. Allow the belts
to dry naturally, preferably away from direct
sunlight.
Touchscreen and Instrument Panel
Clean the touchscreen and instrument panel
using a soft lint-free cloth
specificallydesigned to clean monitors and displays. Do not use cleaners (such as a glass cleaner) and
do not use a wet wipe or a dry statically- charged cloth (such as a recently washed
microfiber). To wipe the touchscreen without
activating buttons and changing settings, you
can enable clean mode. Touch Controls > Displays > Clean Mode. The display darkens to
make it easy to see dust and smudges.
Chrome and Metal Surfaces
Polish, abrasive cleaners or hard cloths can
damage the
finish on chrome and metal
surfaces.
Cautions for Interior Cleaning
Warning: If you notice any damage on an
airbag or seat belt, contact Tesla
immediately.Warning: Do not allow any water,
cleaners, or fabric to enter a seat belt
mechanism.Caution: Using solvents (including alcohol), bleach, citrus, naphtha, orsilicone-based products or additives on
interior components can cause damage.
Cleaning
Maintenance145