Page 105 of 190

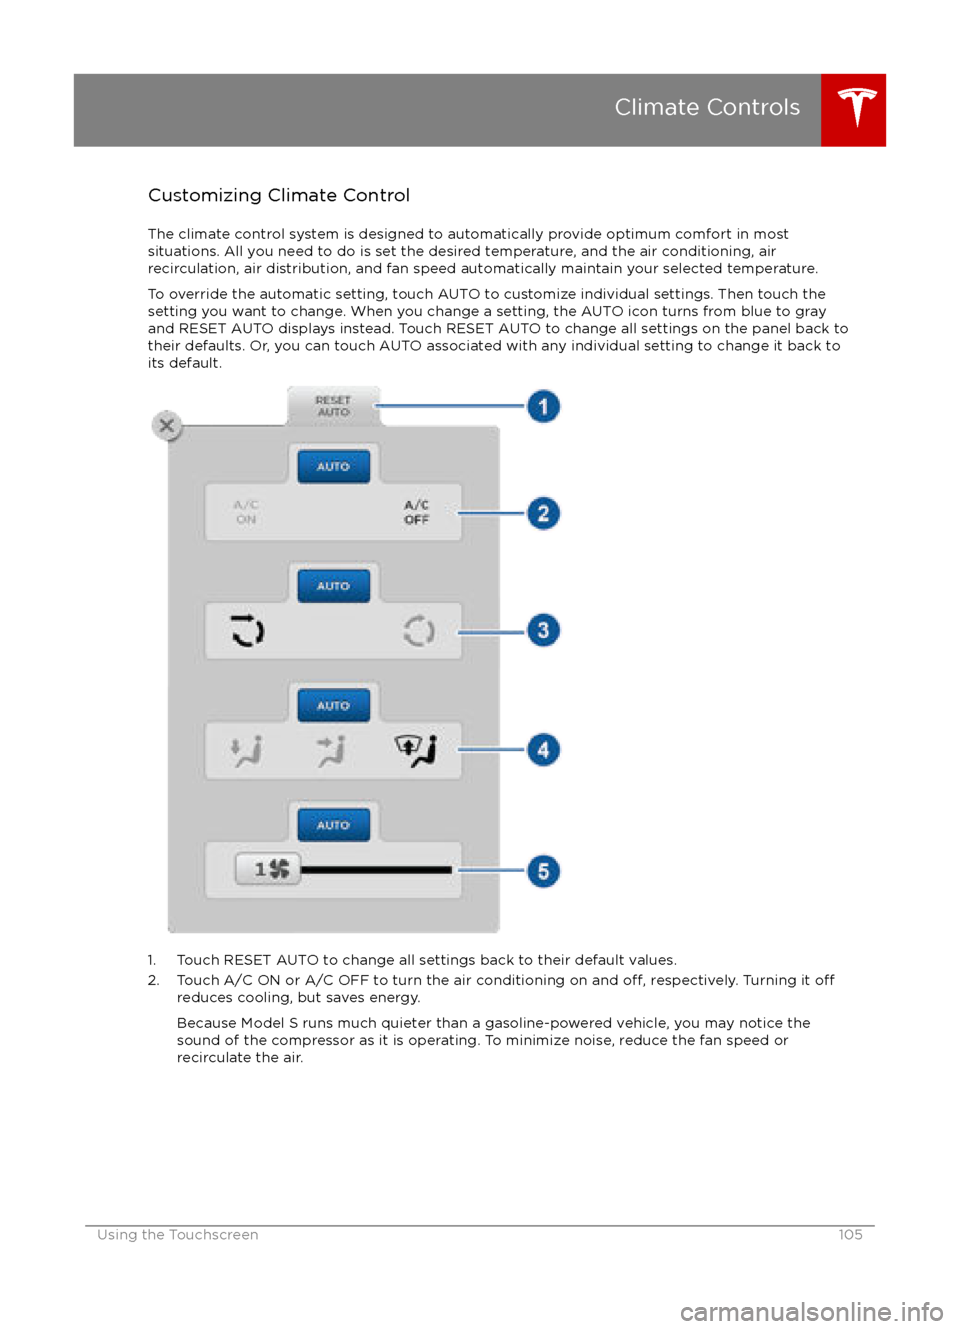
Customizing Climate ControlThe climate control system is designed to automatically provide optimum comfort in most
situations. All you need to do is set the desired temperature, and the air conditioning, air
recirculation, air distribution, and fan speed automatically maintain your selected temperature.
To override the automatic setting, touch AUTO to customize individual settings. Then touch the
setting you want to change. When you change a setting, the AUTO icon turns from blue to gray
and RESET AUTO displays instead. Touch RESET AUTO to change all settings on the panel back to
their defaults. Or, you can touch AUTO associated with any individual setting to change it back to its default.
1. Touch RESET AUTO to change all settings back to their default values.
2. Touch A/C ON or A/C OFF to turn the air conditioning on and off, respectively. Turning it offreduces cooling, but saves energy.
Because Model S runs much quieter than a gasoline-powered vehicle, you may notice the
sound of the compressor as it is operating. To minimize noise, reduce the fan speed or
recirculate the air.
Climate Controls
Using the Touchscreen105
Page 106 of 190

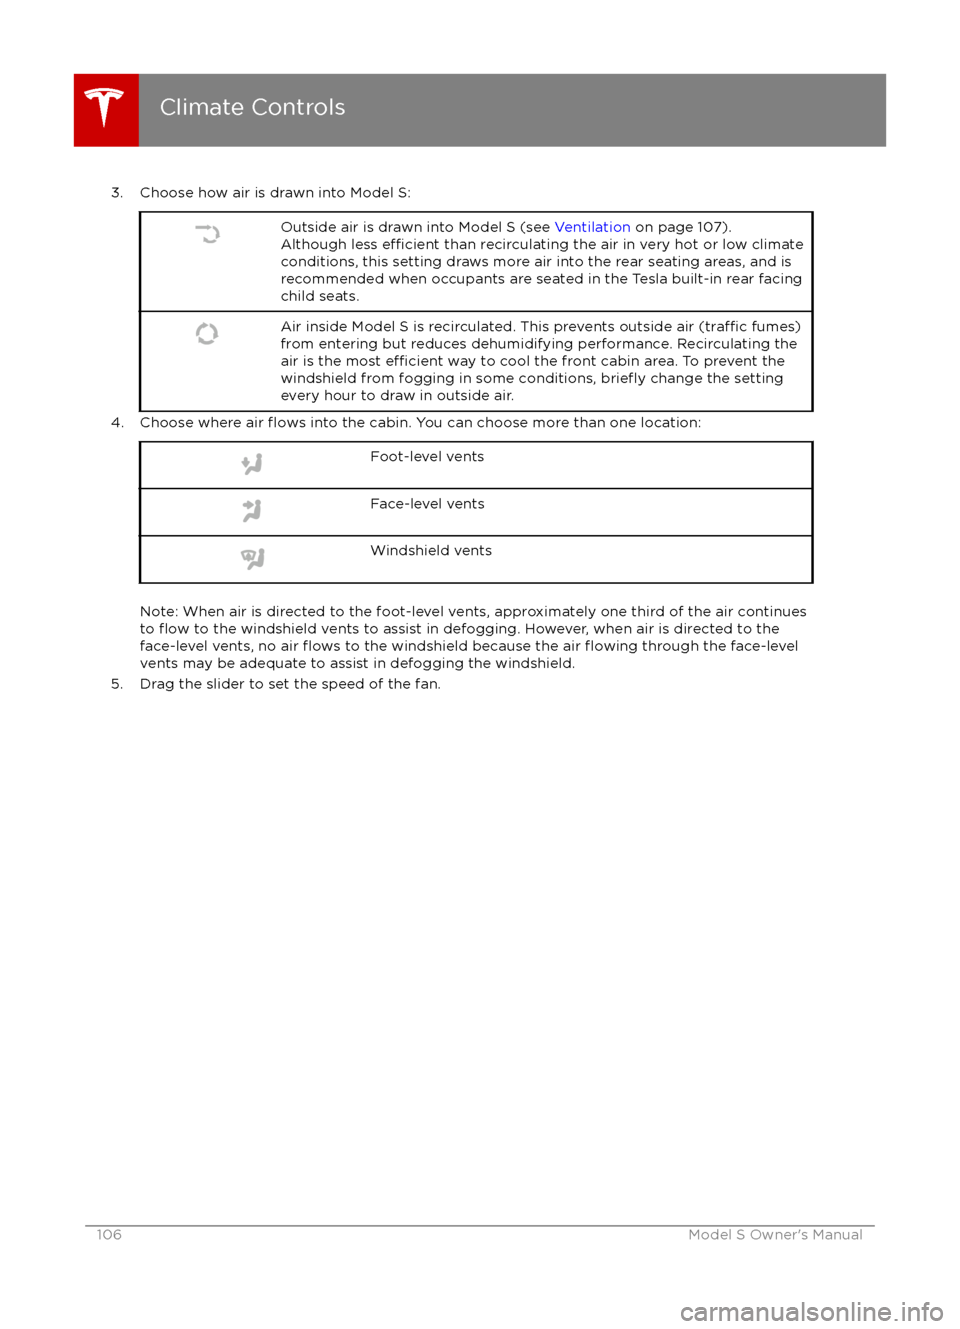
3. Choose how air is drawn into Model S:Outside air is drawn into Model S (see Ventilation on page 107).
Although less efficient than recirculating the air in very hot or low climate
conditions, this setting draws more air into the rear seating areas, and is
recommended when occupants are seated in the Tesla built-in rear facing
child seats.Air inside Model S is recirculated. This prevents outside air (traffic fumes)
from entering but reduces dehumidifying performance. Recirculating the
air is the most
efficient way to cool the front cabin area. To prevent the
windshield from fogging in some conditions, briefly change the setting
every hour to draw in outside air.
4. Choose where air flows into the cabin. You can choose more than one location:
Foot-level ventsFace-level ventsWindshield vents
Note: When air is directed to the foot-level vents, approximately one third of the air continues
to flow to the windshield vents to assist in defogging. However, when air is directed to the
face-level vents, no air flows to the windshield because the air flowing through the face-level
vents may be adequate to assist in defogging the windshield.
5. Drag the slider to set the speed of the fan.
Climate Controls
106Model S Owner
Page 107 of 190
VentilationOutside air is drawn into Model S through the
grill in front of the windshield. Keep the grill
clear of obstructions such as leaves and snow.
To direct the
flow of air inside Model S, move
the interior vents up, down, or from side to
side.
Note: You can direct the outer face level vents
toward the side windows to help defrost or
defog them.
Cabin Air Filter
Model S has an air
filter that prevents pollen,
industrial fallout, road dust and other particles
from entering through the vents. Tesla
replaces the air
filter at the regularly
scheduled maintenance intervals of every
12 months, or every 12,500 miles (20,000 km).
Climate Control Operating Tips
Page 108 of 190
Note: If Model S is equipped with Smart Air
Suspension, you may hear the sound of the
compressor when Model S starts, as the system
Page 109 of 190

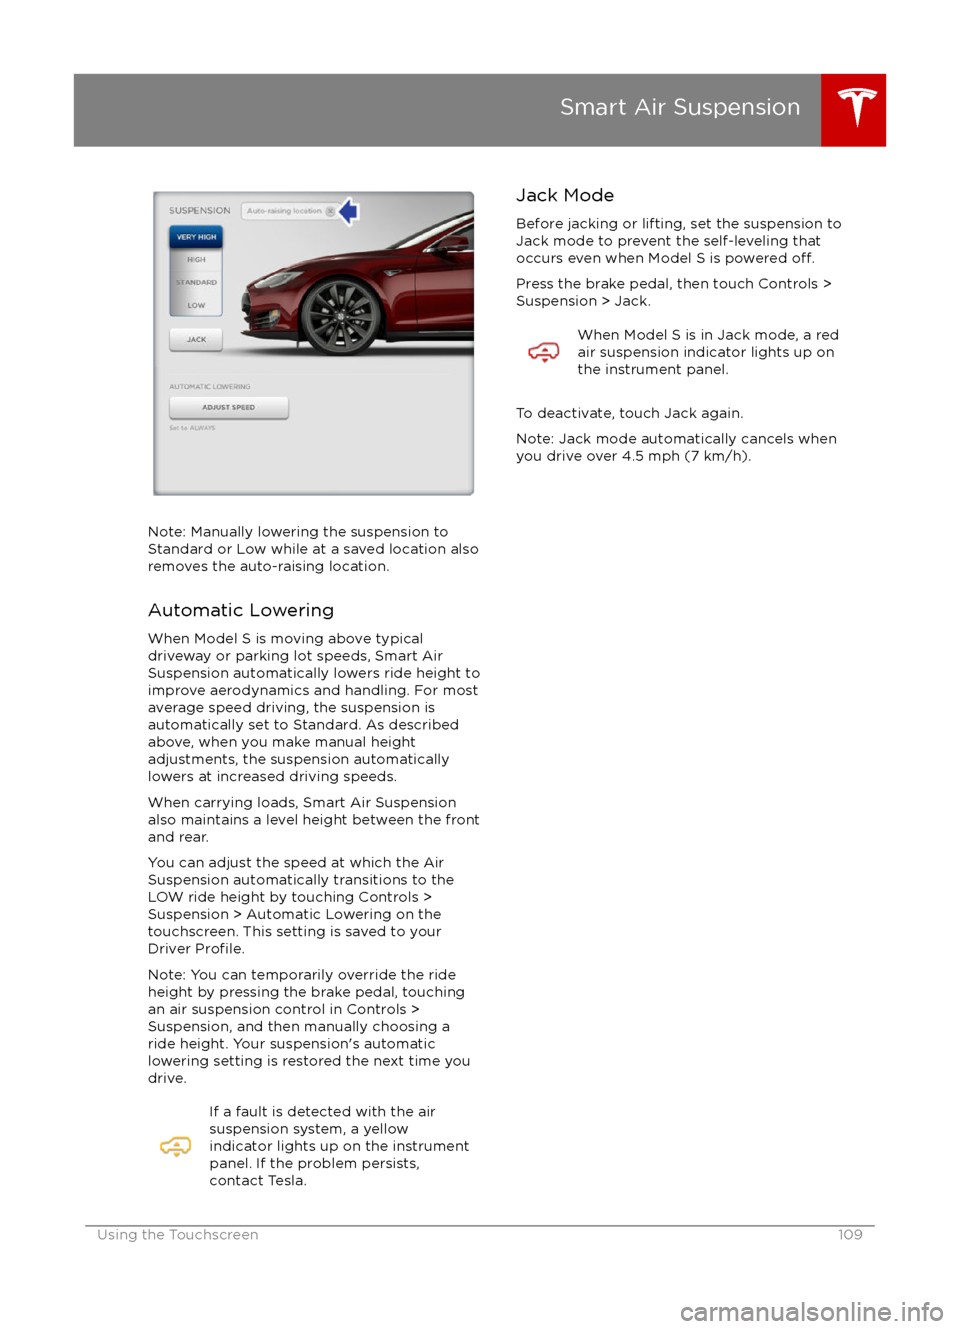
Note: Manually lowering the suspension toStandard or Low while at a saved location alsoremoves the auto-raising location.
Automatic Lowering
When Model S is moving above typical
driveway or parking lot speeds, Smart Air
Suspension automatically lowers ride height to improve aerodynamics and handling. For most
average speed driving, the suspension is
automatically set to Standard. As described
above, when you make manual height adjustments, the suspension automatically
lowers at increased driving speeds.
When carrying loads, Smart Air Suspension
also maintains a level height between the front
and rear.
You can adjust the speed at which the Air
Suspension automatically transitions to the LOW ride height by touching Controls >Suspension > Automatic Lowering on the
touchscreen. This setting is saved to your
Driver
Profile.
Note: You can temporarily override the ride
height by pressing the brake pedal, touching
an air suspension control in Controls >
Suspension, and then manually choosing a
ride height. Your suspension
Page 110 of 190

Overview
Touch the Media icon to listen to the radio or
play audio
files. The touchscreen displays the
Media Player. Media Player has two tabs. Use the Browse tab to select what you want to
play and use the Now Playing tab to view and
control what is currently playing. You can play
AM and FM radio (including HD), and XM
satellite radio (if Model S is equipped with the optional sound package). You can also play
Internet radio (such as TuneIn), and audio
filesfrom a Bluetooth-connected device or a USB-
connected flash drive.
Volume Control To adjust the media volume, roll the scroll
wheel on the left side of the steering wheel up
or down. To mute the volume, tap the scroll
wheel.
Note: The scroll wheel adjusts the volume for
media, navigation instructions and phone calls
based on what is currently in use. As you
adjust volume, the instrument panel displays
the volume level and whether you are
adjusting volume for media, navigation or phone.
Note: Muting the volume during a phone call
also mutes the microphone.
AM and FM Radio Model S provides AM and FM radio services.
These can be selected from the Browse tab or using the Source Picker, located in the upper
right corner of the Media Player window.
You can manually tune the radio to any
frequency by touching and dragging the
channel selector bar on the Now Playing
screen. The channel selector bar allows you to
move from one available radio station to the next.
XM Radio If Model S is equipped with the optional sound
studio package, you can listen to XM radio, a
subscription-based satellite radio service. To
receive XM radio channels, you must provide
the radio service provider with the radio ID for
your touchscreen.
To view the radio ID:
1. Select the XM radio source.
2. Tune it to channel 0.
3. The Radio ID displays in the station information area.
To select an XM radio channel, you can either
manually scroll through the channel numbers, or you can browse the channels by category.
To browse by category, touch Browse >
Radio > XM Satellite Radio.
Note: On some vehicles, XM radio is available
only if Model S is equipped with both the
optional sound studio package and the panoramic roof. To optimize aerodynamics,
Model S does not have an external antenna. The internal antenna is compatible only with
the transparent panoramic roof.
Media and Audio
110Model S Owner
Page 111 of 190

Internet Radio
Internet radio services are accessed over a
data connection. To use Internet radio, touch
Media > Browse > Internet.
Choose your desired Internet radio service (for
example, TuneIn), then browse through the
available categories and/or stations. When
you select a
specific station or episode, Media
Player starts playing it and displays the Now
Playing screen.
To play the next (and in some cases previous)
available station, episode, or track being
provided by the Internet radio service, touch
the arrows on the Now Playing screen, or use
the buttons on the left side of the steering wheel (see Using Left Steering Wheel Buttons
on page 37). The exact function of these controls vary depending on the
specificInternet service you are listening to.
You can also use voice commands to play a
specific song, artist, or album from an Internet
radio service (see Using Voice Commands on
page 39).
Internet Radio Account Registration
Model S provides you with one or more
Internet radio services. To enter your log in
information, touch Controls > Settings >
Apps > Media Player. Enter the email and
password associated with the Internet radio account(s) you want to use, then touch Log In.
Slacker
Model S automatically provides you with a complimentary 12-month Slacker Plus account.
Tesla has set up this account for you and there
is no need to log in. To use your own Slacker
Plus or Premium account, log in as described
above.
Note: To
shu
Page 112 of 190

Media SettingsTo adjust settings for your radio stations, and
to log into your Internet radio account(s),
touch Controls > Settings > Apps > Media
Player.
FavoritesTo add a currently playing radio
station or audio file to your Favorites
list, touch the Favorites icon on the
Now Playing screen. The icon turns
blue to show that it is a favorite. To
remove a favorite, touch the icon
again.
Note: Adding a radio station to your Favorites
list also assigns it to one of the six presets, if
an empty preset is available.
Note: To select a favorite radio station or
audio
file, you can browse your list of
Favorites by touching Browse > Favorites. As
shown below, the Favorites are grouped and
sorted by their source (FM, etc.).
To play the previous or next song or station in
your Favorites list, touch the previous or next
icon on the Now Playing screen, or use the buttons on the left side of the steering wheel
(see Using Left Steering Wheel Buttons on
page 37).
To remove a favorite from the list, touch the associated X.
Note: If you remove a favorite radio station or
channel that is assigned to a preset, it is also
removed from the preset.
My Music & Devices
To play audio
files from a USB-connected flashdrive or a Bluetooth-connected device, touch Media > Browse > My Music & Devices. The
name of the device will be displayed. Touch
the song, album, or playlist you want to play
and Media Player starts playing and displays
the Now Playing screen.
To play the next song in the selected playlist or album, touch the previous or next arrows
on the Now Playing tab, or use the buttons on
the left side of the steering wheel (see Using
Left Steering Wheel Buttons on page 37). You
can also
shu