2016 SUBARU WRX ECU
[x] Cancel search: ECUPage 413 of 594

Starting and operating/Continuously variable transmission
by inertia with the select lever set
in a forward position or move the
vehicle forward by inertia with
the select lever set in the reverse
position. Doing so may result in
an unexpected accident or mal-
function.
. Do not shift from the “ D ” position
into the “ R ” position or vice
versa until the vehicle has com-
pletely stopped. Such shifting
may cause damage to the trans-
mission.
. When parking the vehicle, first
securely apply the parking brake
and then place the select lever in
the “ P ” position. Do not park for
a long time with the select lever
in any other position as doing so
could result in a dead battery.
NOTE . When the engine coolant tempera-
ture is still low, the transmission will
upshift to higher engine speeds than
when the coolant temperature is suffi-
ciently high in order to shorten the
warm-up time and improve driveability.
The gearshift timing will automatically
shift to the normal timing after the
engine has warmed up. . Immediately after transmission fluid
is replaced, you may feel that the
transmission operation is somewhat
unusual. This results from invalidation
of data which the on-board computer
has collected and stored in memory to
allow the transmission to shift at the
most appropriate times for the current
condition of your vehicle. Optimized
shifting will be restored as the vehicle
continues to be driven for a while.
. When driving a CVT model under
continuous heavy load conditions such
as when climbing a long, steep hill, the
engine speed or the vehicle speed may
automatically be reduced. This is not a
malfunction. This phenomenon results
from the engine control function main-
taining the cooling performance of the
vehicle. The engine and vehicle speed
will return to a normal speed when the
engine is able to maintain the optimum
cooling performance after the heavy
load decreases. Driving under a heavy
load must be performed with extreme
care.
. The continuously variable transmis-
sion is a chain type system that
provides superior transmission effi-
ciency for maximum fuel economy. At
times, depending on varying driving
conditions, a chain operating noise
may be heard that is characteristic of this type of system.
& Select lever
1) Select lever button7-24
Page 464 of 594

possible.
. Stow cargo and luggage in the
trunk whenever possible.
. To prevent cargo and luggage
from sliding forward during brak-
ing, do not stack anything in the
enlarged trunk. Keep cargo and
luggage low, as close to the floor
as possible.
. When you carry something inside
the vehicle, secure it whenever
you can to prevent it from being
thrown around inside the vehicle
during sudden stops, sharp turns
or in an accident.
. Do not pile heavy loads on the
roof. These loads raise the vehi-
cle ’ s center of gravity and make it
more prone to tip over.
. Secure lengthy items properly to
prevent them from shooting for-
ward and causing serious injury
during a sudden stop.
. Never exceed the maximum load
limit. If you do, some parts on
your vehicle can break, or it can
change the way your vehicle
handles. This could result in loss
of control and cause personal
injury. Also, overloading can
shorten the life of your vehicle. . Do not place cargo or luggage in
or on the following locations as
the item may get under the
clutch, brake, or accelerator ped-
al and prevent the pedals from
being depressed properly, block
the driver ’ s vision, or hit the
driver or passengers, causing
an accident:
– At the feet of the driver
– On the front passenger or rear
seats (when stacking items)
– On the rear shelf
– On the instrument panel
– On the dashboard
CAUTION
Do not carry spray cans, containers
with flammable or corrosive liquids
or any other dangerous items inside
the vehicle.
NOTE For better fuel economy, do not carry
unneeded cargo. & Vehicle capacity weight
Vehicle placard
The load capacity of your vehicle is
determined by weight, not by available
cargo space. The maximum load you can
carry in your vehicle is shown on the
vehicle placard attached to the driver ’ s
side door pillar. It includes the total weight
of the driver and all passengers and their
belongings, any optional equipment such
as a roof rack or bike carrier, etc. Driving tips/Loading your vehicle
– CONTINUED –8-11
Page 470 of 594

. Always turn off the engine before
raising the flat tire off the ground
using the jack. Never swing or
push the vehicle supported with
the jack. The jack can come out
of the jacking point due to a jolt
and this can result in a severe
accident.
1. Park on a hard, level surface, when-
ever possible, then stop the engine.
2. Set the parking brake securely and
shift the shift lever in reverse (MT models)
or the select lever to the “ P ” (Park)
position (CVT models).
3. Turn on the hazard warning flasher
and have everyone get out of the vehicle.
4. Put wheel blocks at the front and rear
of the tire diagonally opposite the flat tire. 5. Take out the jack, jack handle and
wheel nut wrench.
The tools and the spare tire are stored
under the floor of the trunk. Refer to
“ Maintenance tools ” F 9-3.
NOTE Make sure that the jack is well lubri-
cated before using it.
6. Take out the tool bucket and turn the
attaching bolt counterclockwise, then take
the spare tire out.
NOTE If the spare tire provided in your vehicle
is a temporary spare tire, carefully read
“ Temporary spare tire ” F 9-2 and
strictly follow the instructions. 7. Loosen the wheel nuts using the wheel
nut wrench but do not remove the nuts.
Jack-up points
8. Place the jack under the side sill at the
front or rear jack-up point closest to the flat
tire. In case of emergency/Flat tires
– CONTINUED –9-5
Page 472 of 594

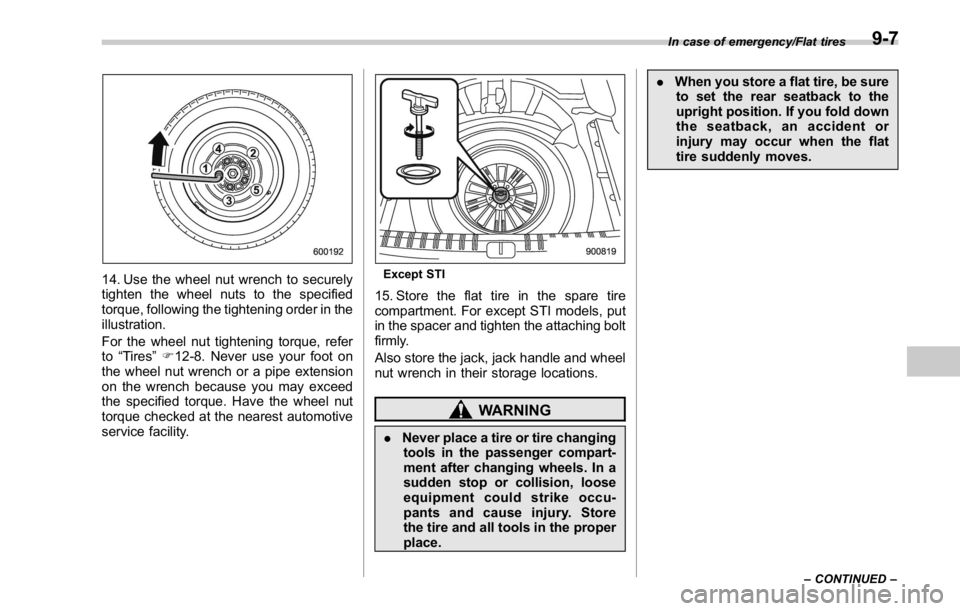
14. Use the wheel nut wrench to securely
tighten the wheel nuts to the specified
torque, following the tightening order in the
illustration.
For the wheel nut tightening torque, refer
to “ Tires ” F 12-8. Never use your foot on
the wheel nut wrench or a pipe extension
on the wrench because you may exceed
the specified torque. Have the wheel nut
torque checked at the nearest automotive
service facility. Except STI
15. Store the flat tire in the spare tire
compartment. For except STI models, put
in the spacer and tighten the attaching bolt
firmly.
Also store the jack, jack handle and wheel
nut wrench in their storage locations.
WARNING
. Never place a tire or tire changing
tools in the passenger compart-
ment after changing wheels. In a
sudden stop or collision, loose
equipment could strike occu-
pants and cause injury. Store
the tire and all tools in the proper
place. . When you store a flat tire, be sure
to set the rear seatback to the
upright position. If you fold down
the seatback, an accident or
injury may occur when the flat
tire suddenly moves. In case of emergency/Flat tires
– CONTINUED –9-7
Page 478 of 594

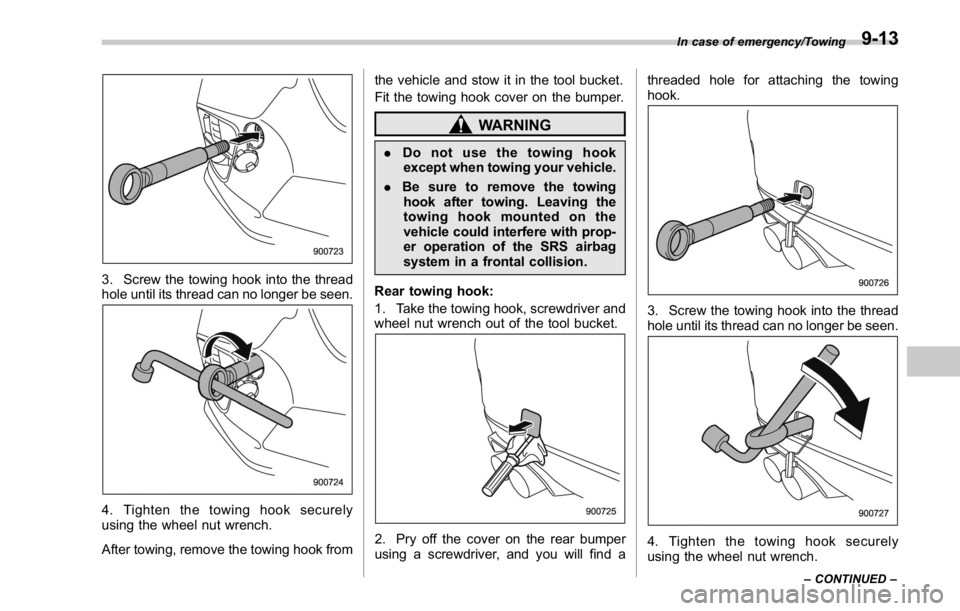
3. Screw the towing hook into the thread
hole until its thread can no longer be seen.
4. Tighten the towing hook securely
using the wheel nut wrench.
After towing, remove the towing hook from the vehicle and stow it in the tool bucket.
Fit the towing hook cover on the bumper.
WARNING. Do not use the towing hook
except when towing your vehicle.
. Be sure to remove the towing
hook after towing. Leaving the
towing hook mounted on the
vehicle could interfere with prop-
er operation of the SRS airbag
system in a frontal collision.
Rear towing hook:
1. Take the towing hook, screwdriver and
wheel nut wrench out of the tool bucket.
2. Pry off the cover on the rear bumper
using a screwdriver, and you will find a threaded hole for attaching the towing
hook.
3. Screw the towing hook into the thread
hole until its thread can no longer be seen.
4. Tighten the towing hook securely
using the wheel nut wrench. In case of emergency/Towing
– CONTINUED –9-13
Page 480 of 594

position for CVT models. Shift the shift
lever into the “ 1st ” position for MT models.
2. Apply the parking brake firmly.
3. Secure the vehicle onto the carrier
properly with safety chains. Each safety
chain should be equally tightened and
care must be taken not to pull the chains
so tightly that the suspension bottoms out.
CAUTIONIf your vehicle has a front under-
spoiler and rear underspoiler (both
optional), be careful not to scrape
them when placing the vehicle on
the carrier and when removing the
vehicle from the carrier. & Towing with all wheels on the
ground
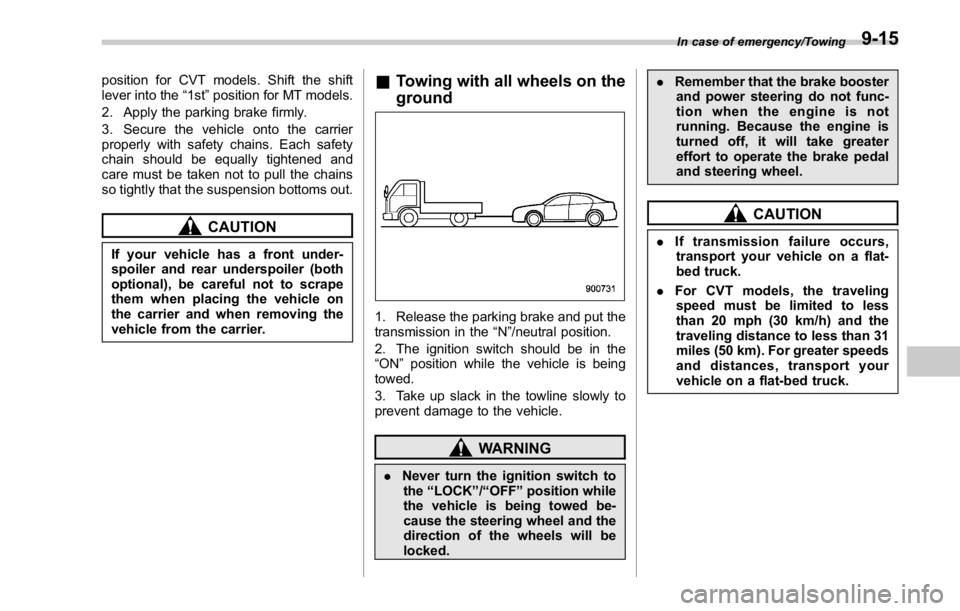
1. Release the parking brake and put the
transmission in the “ N ” /neutral position.
2. The ignition switch should be in the
“ ON ” position while the vehicle is being
towed.
3. Take up slack in the towline slowly to
prevent damage to the vehicle.
WARNING
. Never turn the ignition switch to
the “ LOCK ” / “ OFF ” position while
the vehicle is being towed be-
cause the steering wheel and the
direction of the wheels will be
locked. . Remember that the brake booster
and power steering do not func-
tion when the engine is not
running. Because the engine is
turned off, it will take greater
effort to operate the brake pedal
and steering wheel.
CAUTION. If transmission failure occurs,
transport your vehicle on a flat-
bed truck.
. For CVT models, the traveling
speed must be limited to less
than 20 mph (30 km/h) and the
traveling distance to less than 31
miles (50 km). For greater speeds
and distances, transport your
vehicle on a flat-bed truck. In case of emergency/Towing
9-15
Page 498 of 594

Engine hood To open the hood:
1. If the wiper blades are lifted off the
windshield, return them to their original
position.
2. Pull the hood release knob under the
instrument panel. 3. Release the secondary hood release
by moving the lever between the front
grille and the hood toward the left.
4. Lift up the hood.
To close the hood:
1. Lower the hood to a height of approxi-
mately 11.8 in (30 cm) above its closed
position and then let it drop.
2. After closing the hood, be sure the
hood is securely locked.
If this does not close the hood, release it
from a slightly higher position. Do not push
the hood forcibly to close it. It could
deform the metal. WARNINGAlways check that the hood is
properly locked before you start
driving. If it is not, it might fly open
while the vehicle is moving and
block your view, which may cause
an accident and serious bodily in-
jury.
CAUTION. When you open the engine hood,
do not stand the wiper blades up.
Furthermore, while the hood is
open, do not operate the wind-
shield wipers. Doing so could
result in damage to the engine
hood and wiper blades.
. Be extremely careful not to catch
fingers or other objects when
closing the engine hood.
. Do not push the hood forcibly to
close it. It could deform the
metal.
. Be extremely careful opening the
engine hood when the wind is
strong. The engine hood could
close suddenly, possibly causing
injuries from slamming.
. Do not install accessories other Maintenance and service/Engine hood
– CONTINUED –11-9
Page 505 of 594

Maintenance and service/Engine oil
Except STI
4. Drain out the engine oil by removing
the drain plug while the engine is still
warm. The used oil should be drained into
an appropriate container and disposed of
properly.
WARNING
Be careful not to burn yourself with
hot engine oil.
5. Wipe the seating surface of the drain
plug with a clean cloth and tighten it
securely with a new sealing washer after
the oil has completely drained out.
CAUTION
Thoroughly wipe off any engine oil that has spilled over the exhaust
pipe and/or under-cover. If spilled oil
is not promptly wiped up, the oil
could cause a fire.
6. Pour engine oil through the filler neck.
For the oil capacity (guideline), refer to
“ Engine oil ” F 12-4.
The oil quantity indicated above is only
guideline.
The necessary quantity of oil depends on
the quantity of oil that has been drained.
The quantity of drained oil differs slightly
depending on the temperature of the oil
and the time the oil is left flowing out. After
refilling the engine with oil, therefore, you
must use the level gauge to confirm that
the level is correct.
7. Start the engine and make sure that no
oil leaks appear around the drain plug.
8. Run the engine until it reaches the
normal operating temperature. Then stop
the engine and wait a few minutes to allow
the oil drain back. Check the oil level
again and if necessary, add more engine
oil.
CAUTION
Be careful not to spill engine oil
when adding it. If oil touches the exhaust pipe, it may cause a bad
smell, smoke, and/or a fire.
& Recommended grade and
viscosity CAUTIONUse only engine oil with the recom-
mended grade and viscosity.
Refer to “ Engine oil ” F 12-4.
NOTE Engine oil viscosity (thickness) affects
fuel economy. Oils of lower viscosity
provide better fuel economy. However,
in hot weather, oil of higher viscosity is
required to properly lubricate the en-
gine.
& Synthetic oil You must follow the oil and filter changing
intervals shown in the Warranty and
Maintenance booklet.
NOTE Synthetic oil of the grade and viscosity
noted in chapter 12 is the recom-
mended engine oil for optimum engine
performance. Conventional oil may be11-16