2016 SUBARU WRX ECO mode
[x] Cancel search: ECO modePage 188 of 594

Top menu Menu option Description Initial setting Page
Screen
Setting Top Display Set and customize the top display information
contents. Avg Cons, Inst Cons, Range
or Off Avg Cons 3-71
Cons Customize the fuel consumption information display. Upper part: Driv-
ing range, lower
part: Fuel con-
sumption 3-72
Eco History Set and customize the time of logging fuel
consumption history. 30 min, 60 min or 120 min 30 min 3-73
Triple Meter Set and customize the triple meter. Left: Lifetime fuel
consumption,
center: Average
fuel consumption,
right: Accelerator
opening ratio 3-75
Clock Select the clock format. Type A clock, Type B clock,
Calendar or Off Analog clock 3-76
Bypass Screen Set the bypass screen for each item. On or Off Welcome screen:
On
Eco Summary: Off
Birthday Remin-
der: On
Anniversary Re-
minder: On 3-77
Languages Select the display language. English or French or Spanish
(U.S.-spec. models only) The default lan-
guage settings
vary depending
on individual
countries. 3-78
Go Back Return to the top menu. ——Instruments and controls/Multi function display
– CONTINUED –3-59
Page 223 of 594

Instruments and controls/Light control switch
5. Reconfirmation will be displayed. If
you are sure you want to proceed, select
“ Ye s ” by operating the “
” switch.
6. Confirm the setting again by pushing
the
button. 7. The system will notify you that the
setting is complete. Light control switch CAUTION. Use of any lights for a long period
of time while the engine is not
running can cause the battery to
discharge.
. Before leaving the vehicle, make
sure that the lights are turned off.
If the vehicle is left unattended
for a long time with the lights
illuminated, the battery may be
discharged.
Models with “ keyless access with
push-button start system ” :
The light control switch operates when the
push-button ignition switch is in the “ ACC ”
or “ ON ” position.
Regardless of the position of the light
control switch, the illuminated lights are
turned off when the push-button ignition
switch is turned off.
Models without “ keyless access with
push-button start system ” :
The light control switch operates when the
key is inserted in the ignition switch.
Regardless of the position of the light
control switch, the illuminated lights are3-94
Page 228 of 594

Headlight beam leveler (if
equipped) & Automatic headlight beam
leveler (models with LED
headlights) The LED headlights generate more light
than conventional halogen headlights.
Therefore a driver of an oncoming vehicle
may experience too much glare if your
headlight beam height adjustment is high
when the vehicle is carrying a heavy load.
The automatic headlight beam leveler
adjusts the headlight beam height auto-
matically and optimally according to the
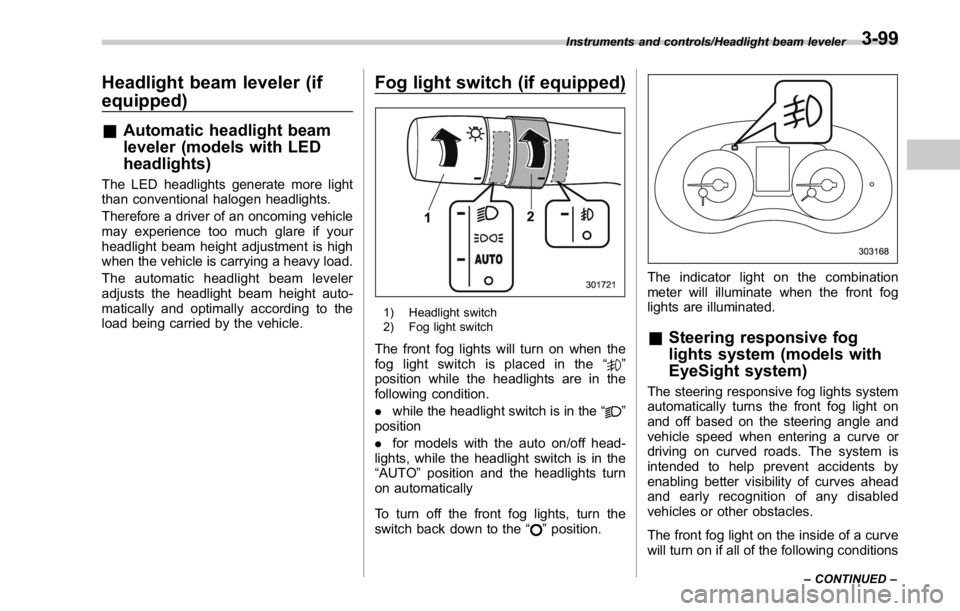
load being carried by the vehicle. Fog light switch (if equipped)
1) Headlight switch
2) Fog light switch
The front fog lights will turn on when the
fog light switch is placed in the “
”
position while the headlights are in the
following condition.
. while the headlight switch is in the “
”
position
. for models with the auto on/off head-
lights, while the headlight switch is in the
“ AUTO ” position and the headlights turn
on automatically
To turn off the front fog lights, turn the
switch back down to the “
” position. The indicator light on the combination
meter will illuminate when the front fog
lights are illuminated.
& Steering responsive fog
lights system (models with
EyeSight system) The steering responsive fog lights system
automatically turns the front fog light on
and off based on the steering angle and
vehicle speed when entering a curve or
driving on curved roads. The system is
intended to help prevent accidents by
enabling better visibility of curves ahead
and early recognition of any disabled
vehicles or other obstacles.
The front fog light on the inside of a curve
will turn on if all of the following conditionsInstruments and controls/Headlight beam leveler
– CONTINUED –3-99
Page 233 of 594

Instruments and controls/Mirrors
& Auto-dimming mirror/com-
pass (if equipped)
1) LED
2) Switch
3) Sensor
4) Compass display
The auto-dimming mirror has an anti-glare
feature which automatically reduces glare
coming from headlights of vehicles behind
you. It also contains a built-in compass.
. By pressing and holding the switch for
1 second, the automatic dimming function
is toggled on or off. When the automatic
dimming function is on, the LED indicator
will illuminate.
Even with the mirror in anti-glare mode,
the mirror surface turns bright if the
transmission is shifted into reverse. This is to ensure good rearward visibility during
reversing.
. By pressing and releasing the switch
for less than 6 seconds, the compass
display is toggled on or off. When the
compass is on, an illuminated compass
reading will appear in the upper right
corner of the mirror.
When cleaning the mirror, use a paper
towel or similar material dampened with
glass cleaner. Do not spray glass cleaner
directly on the mirror as that may cause
the liquid cleaner to enter the mirror
housing and damage the mirror.
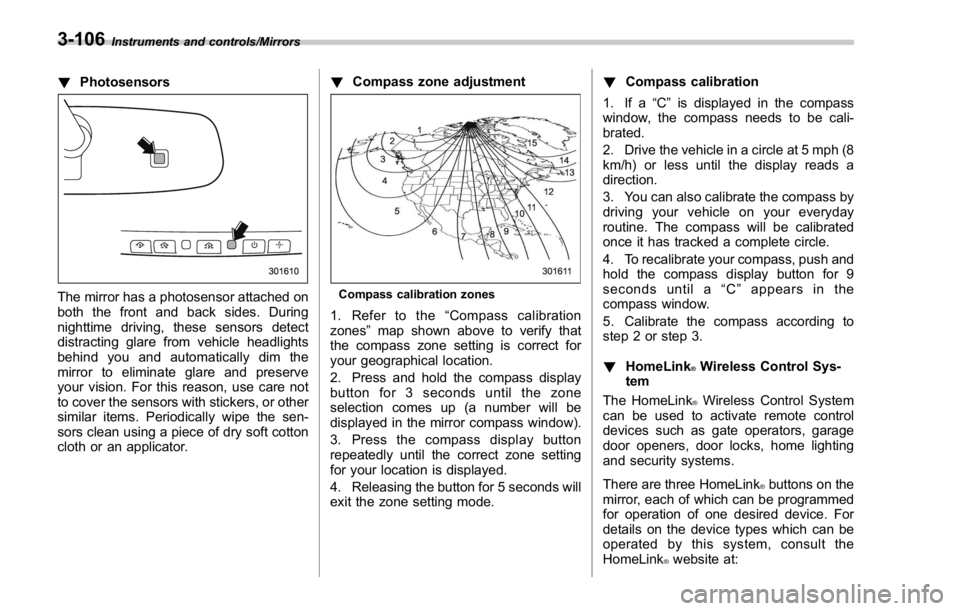
! Photosensors
The mirror has a photosensor attached on
the front and back sides. During nighttime
driving, these sensors detect distracting glare from vehicle headlights behind you
and automatically dim the mirror to elim-
inate glare and preserve your vision. For
this reason, use care not to cover the
sensors with stickers, or other similar
items. Periodically wipe the sensors clean
using a piece of dry soft cotton cloth or an
applicator.
! Compass zone adjustment
Compass calibration zones
1. Refer to the “ Compass calibration
zones ” map shown above to verify that
the compass zone setting is correct for
your geographical location.
2. Press and hold the switch for 6
seconds until the zone selection comes
up (a number will be displayed in the
mirror compass window).3-104
Page 234 of 594

3. Press the switch repeatedly until the
correct zone setting for your location is
displayed.
4. Releasing the button for 10 seconds
will exit the zone setting mode.
! Compass calibration
1. If a “ C ” is displayed in the compass
window, the compass needs to be cali-
brated.
2. Drive the vehicle in a circle at 5 mph (8
km/h) or less until the display reads a
direction.
3. You can also calibrate the compass by
driving your vehicle on your everyday
routine. The compass will be calibrated
once it has tracked a complete circle.
4. To recalibrate your compass, push and
hold the switch for 9 seconds until a “ C ”
appears in the compass window.
5. Calibrate the compass according to
step 2 or step 3. & Auto-dimming mirror/com-
pass with HomeLink ®
(if
equipped)
1) HomeLink ®
button 1
2) HomeLink ®
button 2
3) LED
4) HomeLink ®
button 3
5) Sensor
6) Automatic dimming on/off button
7) Compass display button
8) Compass display
The auto-dimming mirror has an anti-glare
feature which automatically reduces glare
coming from headlights of vehicles behind
you. It also contains a built-in compass
and HomeLink ®
wireless control system.
. By pressing the automatic dimming on/
off button, the automatic dimming function
is toggled on or off. When the automatic dimming function is on, the LED indicator
will illuminate.
Even with the mirror in the automatic
dimming mode, the mirror surface turns
bright if the transmission is shifted into
reverse. This is to ensure good rearward
visibility during reversing.
. By pressing the compass display but-
ton, the compass display is toggled on or
off. When the compass is on, an illumi-
nated compass reading will appear in the
upper right corner of the mirror.
When cleaning the mirror, use a paper
towel or similar material dampened with
glass cleaner. Do not spray glass cleaner
directly on the mirror as that may cause
the liquid cleaner to enter the mirror
housing and damage the mirror. Instruments and controls/Mirrors
– CONTINUED –3-105
Page 235 of 594

Instruments and controls/Mirrors
! Photosensors
The mirror has a photosensor attached on
both the front and back sides. During
nighttime driving, these sensors detect
distracting glare from vehicle headlights
behind you and automatically dim the
mirror to eliminate glare and preserve
your vision. For this reason, use care not
to cover the sensors with stickers, or other
similar items. Periodically wipe the sen-
sors clean using a piece of dry soft cotton
cloth or an applicator. ! Compass zone adjustment
Compass calibration zones
1. Refer to the “ Compass calibration
zones ” map shown above to verify that
the compass zone setting is correct for
your geographical location.
2. Press and hold the compass display
button for 3 seconds until the zone
selection comes up (a number will be
displayed in the mirror compass window).
3. Press the compass display button
repeatedly until the correct zone setting
for your location is displayed.
4. Releasing the button for 5 seconds will
exit the zone setting mode. ! Compass calibration
1. If a “ C ” is displayed in the compass
window, the compass needs to be cali-
brated.
2. Drive the vehicle in a circle at 5 mph (8
km/h) or less until the display reads a
direction.
3. You can also calibrate the compass by
driving your vehicle on your everyday
routine. The compass will be calibrated
once it has tracked a complete circle.
4. To recalibrate your compass, push and
hold the compass display button for 9
seconds until a “ C ” appears in the
compass window.
5. Calibrate the compass according to
step 2 or step 3.
! HomeLink ®
Wireless Control Sys-
tem
The HomeLink ®
Wireless Control System
can be used to activate remote control
devices such as gate operators, garage
door openers, door locks, home lighting
and security systems.
There are three HomeLink ®
buttons on the
mirror, each of which can be programmed
for operation of one desired device. For
details on the device types which can be
operated by this sys tem, consult the
HomeLink ®
website at:3-106
Page 249 of 594

Climate control/Manual climate control operation
properly and become damaged, the sys-
tem may not be able to control the interior
temperature correctly. To avoid damaging
the sensors, observe the following pre-
cautions.
– Do not subject the sensors to impact.
– Keep water away from the sensors.
– Do not cover the sensors.
The sensors are located as follows.
– Solar sensor: beside the windshield
defroster grille
– Interior air temperature sensor: next to
the steering column
– Outside temperature sensor: near the
front bumper opening Manual climate control op-
eration & Airflow mode selection To select the airflow mode:
Type A: Turn the airflow mode selection
dial.
Type B: Press the airflow mode selection
button.
To select the defrost mode:
Press the defroster button.
Airflow modes are as follows.
(Ventilation): Instrument panel outlets (Bi-level): Instrument panel outlets and
foot outlets
(Heat): Foot outlets, both side outlets of
the instrument panel and some through
windshield defroster outlets (A small
amount of air flows to the windshield and4-6
Page 261 of 594

Audio/Basic information before use
NOTE . For compatible discs, refer to “ CD
player and disc ” F 5-22.
. When inserting a disc, gently insert
it with the label facing up.
! Unloading a disc
1. Press
and remove the disc. & Connecting and disconnect-
ing a USB memory/portable
device ! Connecting a device
Connect a device to the USB port.
Turn on the power of the device when it is
not turned on.
NOTE . This device has a USB port for USB
memory/portable device.
. For compatible USB memory de-
vices, refer to “ USB memory device ”
F 5-24.
. For compatible iPod models, refer to
“ iPod ” F 5-24.
. Even if a USB hub is used to
connect more than two USB devices, only the last connected device will be
recognized.
5-6