2016 SUBARU WRX fold seats
[x] Cancel search: fold seatsPage 30 of 594

Front seats ........................................................... 1-2Manual seat ........................................................ 1-4
Power seat (driver ’ s seat – if equipped) ... ............ 1-5
Head restraint adjustment .................................... 1-5
Seat heater (if equipped) .................................... 1-6
Rear seats ............................................................ 1-7Head restraint adjustment .................................... 1-8
Folding down the rear seatback ........................... 1-9
Seatbelts ............................................................. 1-11Seatbelt safety tips ............................................. 1-11
Emergency Locking Retractor (ELR) ................... 1-13
Automatic Locking Retractor/Emergency Locking
Retractor (ALR/ELR) ......................................... 1-13
Seatbelt warning light and chime ........................ 1-13
Fastening the seatbelt ........................................ 1-13
Seatbelt maintenance ......................................... 1-16
Front seatbelt pretensioners ............................. 1-17Seatbelt with shoulder belt pretensioner .. ........... 1-17
Seatbelt with shoulder belt and lap belt
pretensioners ................................................... 1-18
System monitors ................................................ 1-20
System servicing ................................................ 1-20 Precautions against vehicle modification ............ 1-21
Child restraint systems ..................................... 1-21Where to place a child restraint system .............. 1-23
Choosing a child restraint system ...................... 1-24
Installing child restraint systems with ALR/ELR
seatbelt ........................................................... 1-24
Installing a booster seat ..................................... 1-28
Installation of child restraint systems by use of
lower and tether anchorages (LATCH) .............. 1-29
Top tether anchorages ....................................... 1-32
*SRS airbag (Supplemental Restraint
System airbag) ................................................ 1-33Models with SRS airbags and lap/shoulder
restraints for driver, front passenger, and
window-side rear passengers . .......................... 1-33
Components ...................................................... 1-36
SUBARU advanced frontal airbag system ........... 1-38
SRS side airbag and SRS curtain airbag ............. 1-50
SRS airbag system monitors .............................. 1-57
SRS airbag system servicing ... .......................... 1-58
Precautions against vehicle modification ............ 1-59Seat, seatbelt and SRS airbags 1
Page 38 of 594

cient clearance between the head re-
straint and the roof, tilt the seat and
then perform the installation and re-
moval tasks.
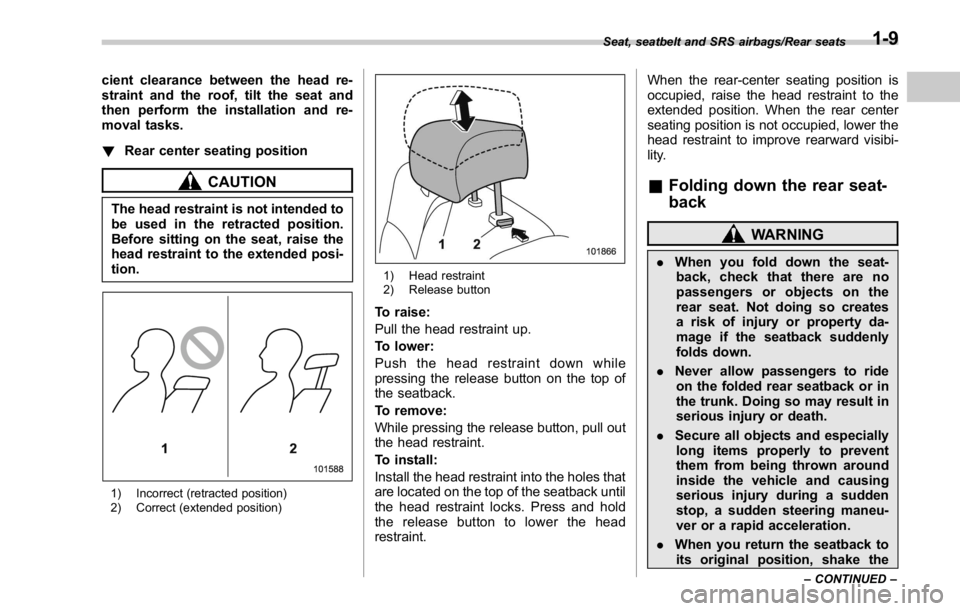
! Rear center seating position
CAUTIONThe head restraint is not intended to
be used in the retracted position.
Before sitting on the seat, raise the
head restraint to the extended posi-
tion.
1) Incorrect (retracted position)
2) Correct (extended position) 1) Head restraint
2) Release button
To raise:
Pull the head restraint up.
To lower:
Push the head restraint down while
pressing the release button on the top of
the seatback.
To remove:
While pressing the release button, pull out
the head restraint.
To install:
Install the head restraint into the holes that
are located on the top of the seatback until
the head restraint locks. Press and hold
the release button to lower the head
restraint. When the rear-center seating position is
occupied, raise the head restraint to the
extended position. When the rear center
seating position is not occupied, lower the
head restraint to improve rearward visibi-
lity.
& Folding down the rear seat-
back WARNING. When you fold down the seat-
back, check that there are no
passengers or objects on the
rear seat. Not doing so creates
a risk of injury or property da-
mage if the seatback suddenly
folds down.
. Never allow passengers to ride
on the folded rear seatback or in
the trunk. Doing so may result in
serious injury or death.
. Secure all objects and especially
long items properly to prevent
them from being thrown around
inside the vehicle and causing
serious injury during a sudden
stop, a sudden steering maneu-
ver or a rapid acceleration.
. When you return the seatback to
its original position, shake the Seat, seatbelt and SRS airbags/Rear seats
– CONTINUED –1-9
Page 39 of 594

Seat, seatbelt and SRS airbags/Rear seats
seatback slightly to confirm that
it is securely fixed in place. If the
seatback is not securely fixed in
place, the seatback may sud-
denly fold down in the event of
sudden braking, or objects may
move out from the trunk, which
could cause serious injury or
death.
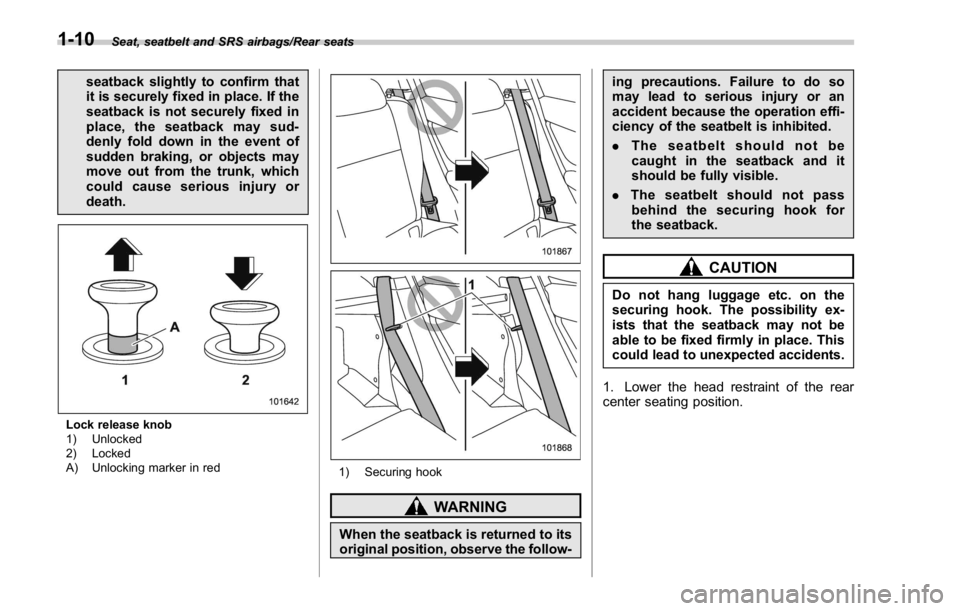
Lock release knob
1) Unlocked
2) Locked
A) Unlocking marker in red
1) Securing hook
WARNING
When the seatback is returned to its
original position, observe the follow- ing precautions. Failure to do so
may lead to serious injury or an
accident because the operation effi-
ciency of the seatbelt is inhibited.
. The seatbelt should not be
caught in the seatback and it
should be fully visible.
. The seatbelt should not pass
behind the securing hook for
the seatback.
CAUTIONDo not hang luggage etc. on the
securing hook. The possibility ex-
ists that the seatback may not be
able to be fixed firmly in place. This
could lead to unexpected accidents.
1. Lower the head restraint of the rear
center seating position.1-10
Page 488 of 594

Cleaning the interior Use a soft, damp cloth to clean the climate
control panel, audio equipment, instru-
ment panel, center console, combination
meter panel, and switches. (Do not use
organic solvents.)
& Seat fabric Remove loose dirt, dust or debris with a
vacuum cleaner. If the dirt is caked on the
fabric or hard to remove with a vacuum
cleaner, use a soft brush then vacuum it.
Wipe the fabric surface with a tightly
wrung cloth and dry the seat fabric
thoroughly. If the fabric is still dirty, wipe
using a solution of mild soap and luke-
warm water then dry thoroughly.
If the stain does not come out, try a
commercially-available fabric cleaner. Use
the cleaner on a hidden place and make
sure it does not affect the fabric adversely.
Use the cleaner according to its instruc-
tions.
CAUTION
When cleaning the seat, do not use
benzine, paint thinner, or any similar
materials. Doing so could damage
the surface and cause the color to deteriorate.
& Leather seat materials The leather used by SUBARU is a high
quality natural product which will retain its
distinctive appearance and feel for many
years with proper care.
Allowing dust or road dirt to build up on the
surface can cause the material to become
brittle and to wear prematurely. Regular
cleaning with a soft, moist, natural fiber
cloth should be performed monthly, taking
care not to soak the leather or allow water
to penetrate the stitched seams.
A mild detergent suitable for cleaning
woolen fabrics may be used to remove
difficult dirt spots, rubbing with a soft, dry
cloth afterwards to restore the luster. If
your SUBARU is to be parked for a long
time in bright sunlight, it is recommended
that the seats and head restraints be
covered, or the windows shaded, to
prevent fading or shrinkage.
Minor surface blemishes or bald patches
may be treated with a commercial leather
spray lacquer. You will discover that each
leather seat section will develop soft folds
or wrinkles, which is characteristic of
genuine leather. & Synthetic leather upholstery The synthetic leather material used on the
SUBARU may be cleaned using mild soap
or detergent and water, after first vacuum-
ing or brushing away loose dirt. Allow the
soap to soak in for a few minutes and wipe
off with a clean, damp cloth. Commercial
foam-type cleaners suitable for synthetic
leather materials may be used when
necessary.
CAUTIONStrong cleaning agents such as
solvents, paint thinners, window
cleaner or fuel must never be used
on leather or synthetic interior ma-
terials. Doing so could damage the
surface and cause the color to
deteriorate.
& Climate control panel, audio
panel, instrument panel,
console panel, and switches Use a soft, damp cloth to clean the climate
control panel, audio equipment, instru-
ment panel, center console, combination
meter panel, and switches. Appearance care/Cleaning the interior
– CONTINUED –10-5