2016 SUBARU WRX trunk
[x] Cancel search: trunkPage 10 of 594

They could accidentally injure
themselves or others through
inadvertent operation of the ve-
hicle. Also, on hot or sunny days,
the temperature in a closed ve-
hicle could quickly become high
enough to cause severe or pos-
sibly fatal injuries.
. Help prevent children, adults or
animals from locking themselves
in the trunk. On hot or sunny
days, the temperature in the
trunk could quickly become high
enough to cause death or serious
heat-related injuries including
brain damage to anyone locked
inside, particularly for small chil-
dren.
. When leaving the vehicle, close
all windows and lock all doors.
Also make certain that the trunk
is closed.
For instructions and precautions, carefully
read the following sections.
. For the seatbelt system, refer to “ Seat-
belts ” F 1-11.
. For the child restraint system, refer to
“ Child restraint systems ” F 1-21.
. For the SRS airbag system, refer to
“ *SRS airbag (Supplemental Restraint System airbag) ” F 1-33.
& Engine exhaust gas (carbon
monoxide) WARNING. Never inhale engine exhaust gas.
Engine exhaust gas contains
carbon monoxide, a colorless
and odorless gas which is dan-
gerous, or even lethal, if inhaled.
. Always properly maintain the en-
gine exhaust system to prevent
engine exhaust gas from enter-
ing the vehicle.
. Never run the engine in a closed
space, such as a garage, except
for the brief time needed to drive
the vehicle in or out of it.
. Avoid remaining in a parked
vehicle for a lengthy time while
the engine is running. If that is
unavoidable, then use the venti-
lation fan to force fresh air into
the vehicle.
. Always keep the front ventilator
inlet grille free from snow, leaves
or other obstructions to ensure
that the ventilation system al-
ways works properly. . If at any time you suspect that
exhaust fumes are entering the
vehicle, have the problem
checked and corrected as soon
as possible. If you must drive
under these conditions, drive
only with all windows fully open.
. Keep the trunk lid closed while
driving to prevent exhaust gas
from entering the vehicle.
& Drinking and driving
WARNINGDrinking and then driving is very
dangerous. Alcohol in the blood-
stream delays your reaction time
and impairs your perception, judg-
ment and attentiveness. If you drive
after drinking – even if you drink just
a little – it will increase the risk of
being involved in a serious or fatal
accident, injuring or killing yourself,
your passengers and others. In
addition, if you are injured in the
accident, alcohol may increase the
severity of that injury.
Please don ’ t drink and drive.
Drunken driving is one of the most
– CONTINUED –5
Page 16 of 594

1) Rear window defogger (page 3-112)
2) Fuel filler lid and cap (page 7-5)
3) Child safety locks (page 2-32)
4) Tie-down hole (page 9-12)
5) Trunk lid (page 2-36)
6) Towing hook (page 9-12)
– CONTINUED –11
Page 21 of 594

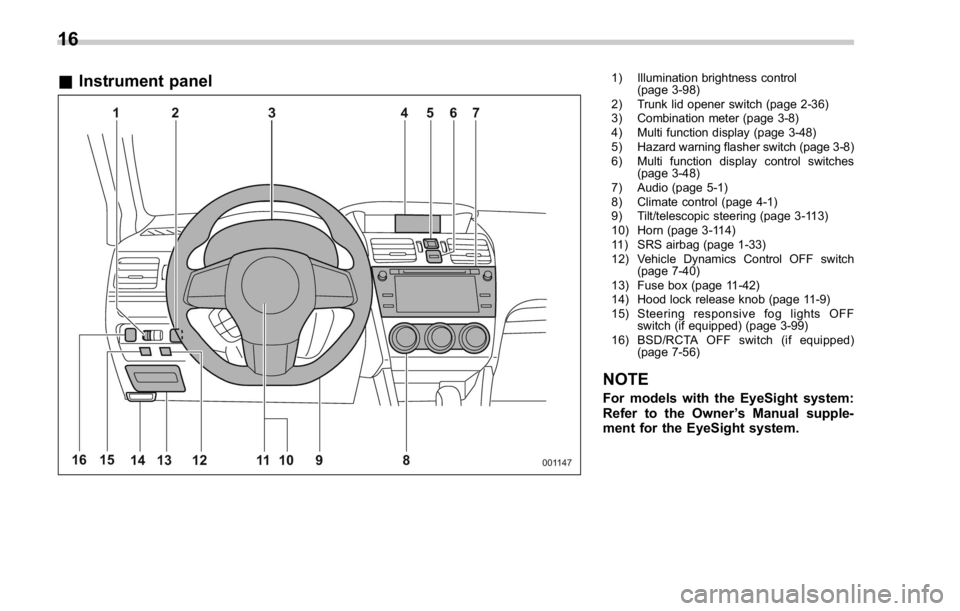
& Instrument panel 1) Illumination brightness control
(page 3-98)
2) Trunk lid opener switch (page 2-36)
3) Combination meter (page 3-8)
4) Multi function display (page 3-48)
5) Hazard warning flasher switch (page 3-8)
6) Multi function display control switches
(page 3-48)
7) Audio (page 5-1)
8) Climate control (page 4-1)
9) Tilt/telescopic steering (page 3-113)
10) Horn (page 3-114)
11) SRS airbag (page 1-33)
12) Vehicle Dynamics Control OFF switch
(page 7-40)
13) Fuse box (page 11-42)
14) Hood lock release knob (page 11-9)
15) Steering responsive fog lights OFF
switch (if equipped) (page 3-99)
16) BSD/RCTA OFF switch (if equipped)
(page 7-56)
NOTE For models with the EyeSight system:
Refer to the Owner ’ s Manual supple-
ment for the EyeSight system.16
Page 38 of 594

cient clearance between the head re-
straint and the roof, tilt the seat and
then perform the installation and re-
moval tasks.
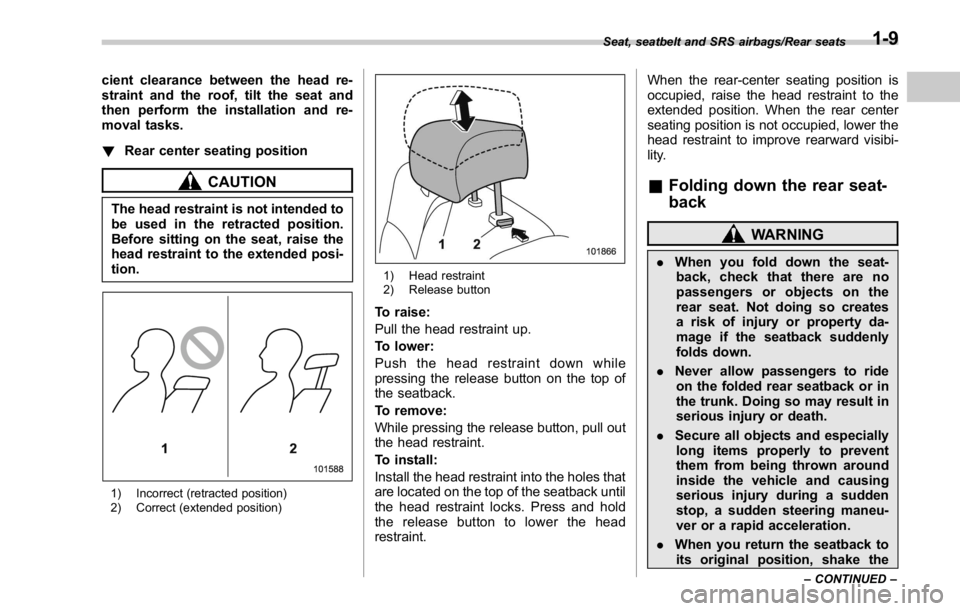
! Rear center seating position
CAUTIONThe head restraint is not intended to
be used in the retracted position.
Before sitting on the seat, raise the
head restraint to the extended posi-
tion.
1) Incorrect (retracted position)
2) Correct (extended position) 1) Head restraint
2) Release button
To raise:
Pull the head restraint up.
To lower:
Push the head restraint down while
pressing the release button on the top of
the seatback.
To remove:
While pressing the release button, pull out
the head restraint.
To install:
Install the head restraint into the holes that
are located on the top of the seatback until
the head restraint locks. Press and hold
the release button to lower the head
restraint. When the rear-center seating position is
occupied, raise the head restraint to the
extended position. When the rear center
seating position is not occupied, lower the
head restraint to improve rearward visibi-
lity.
& Folding down the rear seat-
back WARNING. When you fold down the seat-
back, check that there are no
passengers or objects on the
rear seat. Not doing so creates
a risk of injury or property da-
mage if the seatback suddenly
folds down.
. Never allow passengers to ride
on the folded rear seatback or in
the trunk. Doing so may result in
serious injury or death.
. Secure all objects and especially
long items properly to prevent
them from being thrown around
inside the vehicle and causing
serious injury during a sudden
stop, a sudden steering maneu-
ver or a rapid acceleration.
. When you return the seatback to
its original position, shake the Seat, seatbelt and SRS airbags/Rear seats
– CONTINUED –1-9
Page 39 of 594

Seat, seatbelt and SRS airbags/Rear seats
seatback slightly to confirm that
it is securely fixed in place. If the
seatback is not securely fixed in
place, the seatback may sud-
denly fold down in the event of
sudden braking, or objects may
move out from the trunk, which
could cause serious injury or
death.
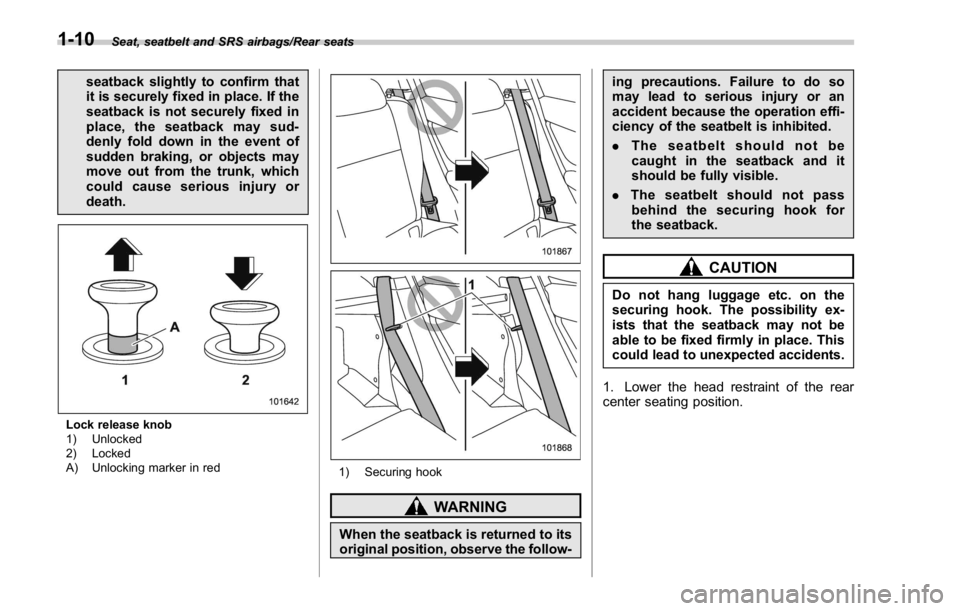
Lock release knob
1) Unlocked
2) Locked
A) Unlocking marker in red
1) Securing hook
WARNING
When the seatback is returned to its
original position, observe the follow- ing precautions. Failure to do so
may lead to serious injury or an
accident because the operation effi-
ciency of the seatbelt is inhibited.
. The seatbelt should not be
caught in the seatback and it
should be fully visible.
. The seatbelt should not pass
behind the securing hook for
the seatback.
CAUTIONDo not hang luggage etc. on the
securing hook. The possibility ex-
ists that the seatback may not be
able to be fixed firmly in place. This
could lead to unexpected accidents.
1. Lower the head restraint of the rear
center seating position.1-10
Page 90 of 594

Keys ..................................................................... 2-3Key number plate ................................................ 2-3
Immobilizer .......................................................... 2-3Security indicator light ........................................ 2-4
Key replacement ................................................. 2-4
Certification for immobilizer system ..................... 2-4
Door locks ........................................................... 2-5Locking and unlocking from the outside . ............. 2-5
Locking and unlocking from the inside ................ 2-7
Battery drainage prevention function ................... 2-7
Power door locking switches ............................. 2-8Key lock-in prevention function ........................... 2-9
Keyless access with push-button start
system (if equipped) ........................................ 2-9Safety precautions ............................................. 2-10
Locking and unlocking with “ keyless access ”
entry function. .................................................. 2-13
Selecting audible signal operation ...................... 2-16
Warning chimes and warning indicator ............... 2-16
Disabling keyless access function ...................... 2-16
When access key does not operate properly ....... 2-18
Replacing battery of access key ......................... 2-18
Replacing access key ......................................... 2-18
Certification for keyless access with push-button
start system ..................................................... 2-18
PIN Code Access (models with “ keyless
access with push-button start system ” )........ 2-19
Registering a PIN code ....................................... 2-20
Unlocking .......................................................... 2-21
Remote keyless entry system ........................... 2-21
Locking the doors .............................................. 2-22 Unlocking the doors .......................................... 2-22
Opening the trunk lid ......................................... 2-23
Vehicle finder function ....................................... 2-23
Sounding a panic alarm ..................................... 2-23
Selecting audible signal operation (models
without “ keyless access with push-button start
system ” ).......................................................... 2-23
Replacing the battery ......................................... 2-24
Replacing lost transmitters ................................ 2-24
Welcome lighting (if equipped) . .......................... 2-24
Certification for Remote keyless entry
system ............................................................ 2-24
Alarm system ..................................................... 2-25System operation ............................................... 2-26
Activating and deactivating the alarm system ..... 2-26
If you have accidentally triggered the alarm
system ............................................................ 2-26
Arming the system ............................................ 2-27
Disarming the system ........................................ 2-29
Valet mode ........................................................ 2-30
Passive arming (models without “ keyless access
with push-button start system ” ) ....................... 2-30
Tripped sensor identification .............................. 2-31
Shock sensors (dealer option).. .......................... 2-31
Child safety locks .............................................. 2-32
Windows ............................................................. 2-32
Power window operation by driver ..................... 2-33
Power window operation by passengers ............. 2-35
Initialization of power window .. .......................... 2-36
Trunk lid ............................................................. 2-36
To open and close the trunk lid from outside . ..... 2-36Keys and doors 2
Page 91 of 594

Keys and doors
To open the trunk lid from inside ........................ 2-36
Internal trunk lid release handle .......................... 2-37
Moonroof (if equipped) ...................................... 2-38Moonroof switches ............................................ 2-39
Sun shade ......................................................... 2-40
Page 96 of 594

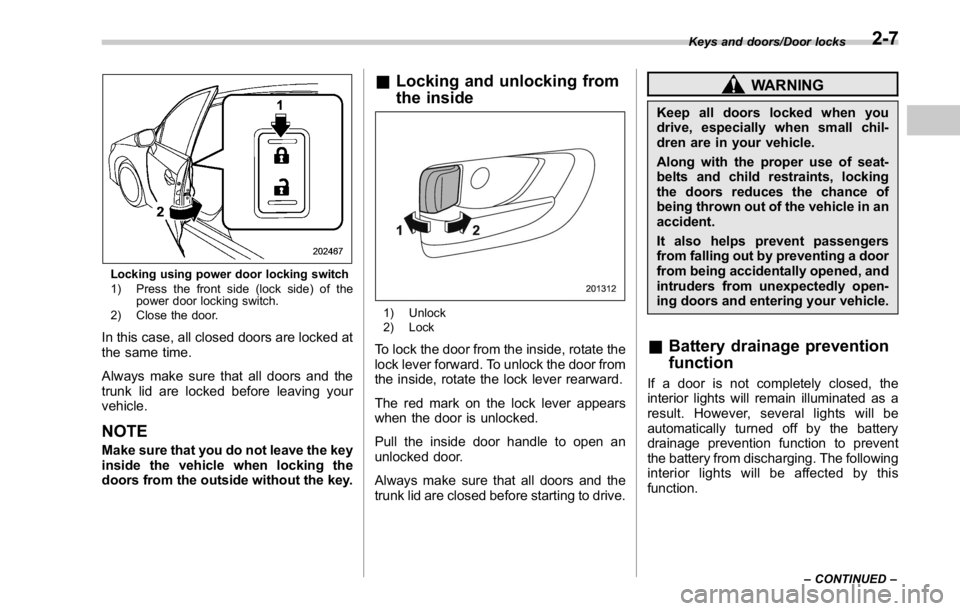
Locking using power door locking switch
1) Press the front side (lock side) of the
power door locking switch.
2) Close the door.
In this case, all closed doors are locked at
the same time.
Always make sure that all doors and the
trunk lid are locked before leaving your
vehicle.
NOTE Make sure that you do not leave the key
inside the vehicle when locking the
doors from the outside without the key. & Locking and unlocking from
the inside
1) Unlock
2) Lock
To lock the door from the inside, rotate the
lock lever forward. To unlock the door from
the inside, rotate the lock lever rearward.
The red mark on the lock lever appears
when the door is unlocked.
Pull the inside door handle to open an
unlocked door.
Always make sure that all doors and the
trunk lid are closed before starting to drive. WARNINGKeep all doors locked when you
drive, especially when small chil-
dren are in your vehicle.
Along with the proper use of seat-
belts and child restraints, locking
the doors reduces the chance of
being thrown out of the vehicle in an
accident.
It also helps prevent passengers
from falling out by preventing a door
from being accidentally opened, and
intruders from unexpectedly open-
ing doors and entering your vehicle.
& Battery drainage prevention
function If a door is not completely closed, the
interior lights will remain illuminated as a
result. However, several lights will be
automatically turned off by the battery
drainage prevention function to prevent
the battery from discharging. The following
interior lights will be affected by this
function. Keys and doors/Door locks
– CONTINUED –2-7