2016 SUBARU IMPREZA buttons
[x] Cancel search: buttonsPage 17 of 594
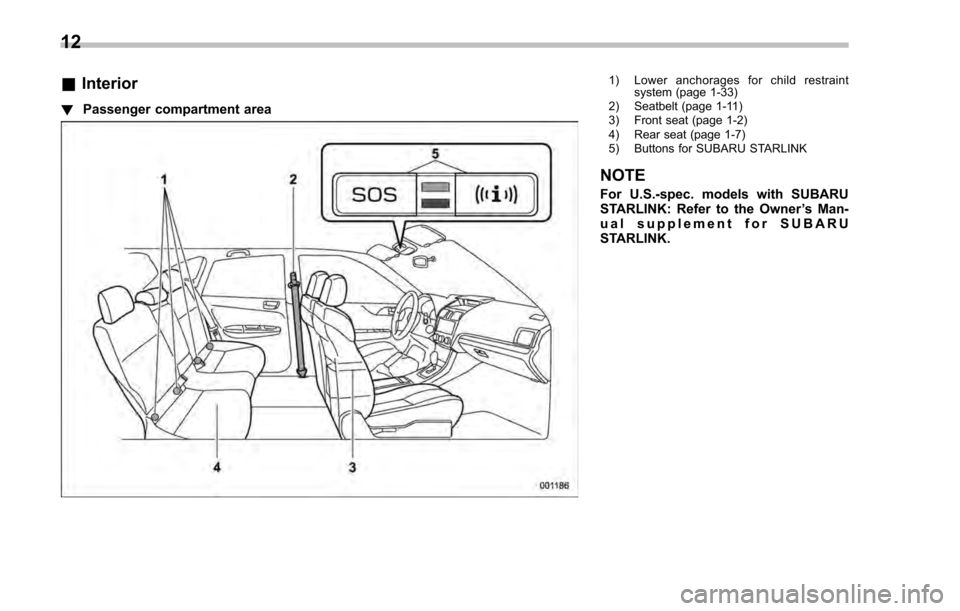
&Interior
! Passenger compartment area
1) Lower anchorages for child restraint
system (page 1-33)
2) Seatbelt (page 1-11)
3) Front seat (page 1-2)
4) Rear seat (page 1-7)
5) Buttons for SUBARU STARLINK
NOTE
For U.S.-spec. models with SUBARU
STARLINK: Refer to the Owner ’s Man-
ual supplement for SUBARU
STARLINK.
12
Page 111 of 594
Keys and doors/Keyless access with push–button start system
. Opening the trunk (4-door)
. Starting and stopping the engine. For
detailed information, refer to “Starting and
stopping engine (models with push-button
start system) ”F 7-12.
. Arming and disarming the alarm sys-
tem. For detailed information, refer to
“ Alarm system ”F 2-27.
Locking and unlocking by the remote
keyless entry system can also be con-
trolled with the buttons on the access key.
For detailed information, refer to “Remote
keyless entry system ”F 2-23.
A mechanical key is attached to each
access key. The mechanical key is used
for the following operations.
. Locking and unlocking the driver ’s door
. Locking and unlocking the glove box
You cannot unlock the glove box without
using the mechanical key. You can keep
the glove box locked when you leave your
vehicle and the access key (with the
mechanical key removed) at a parking
facility.
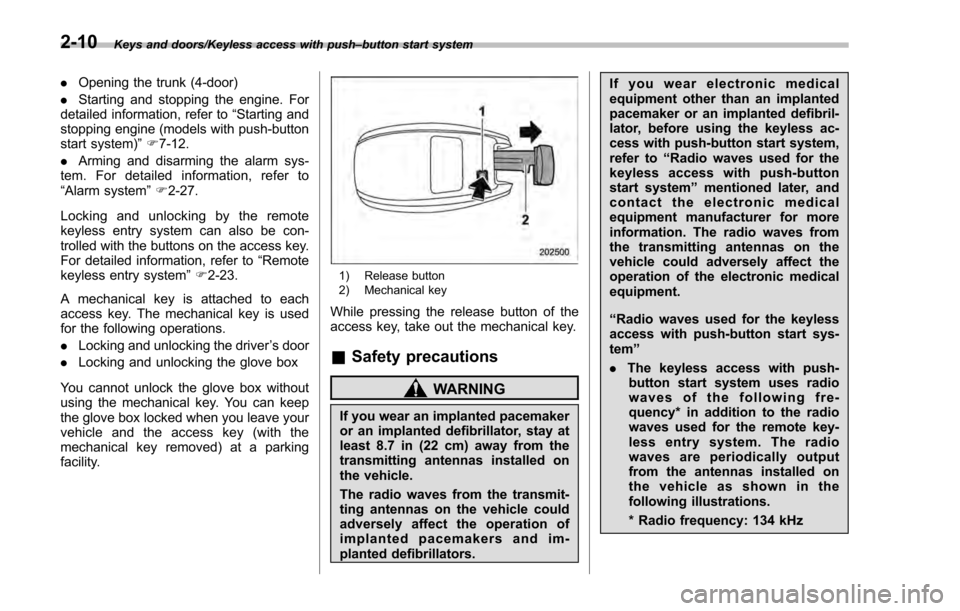
1) Release button
2) Mechanical key
While pressing the release button of the
access key, take out the mechanical key.
& Safety precautions
WARNING
If you wear an implanted pacemaker
or an implanted defibrillator, stay at
least 8.7 in (22 cm) away from the
transmitting antennas installed on
the vehicle.
The radio waves from the transmit-
ting antennas on the vehicle could
adversely affect the operation of
implanted pacemakers and im-
planted defibrillators. If you wear electronic medical
equipment other than an implanted
pacemaker or an implanted defibril-
lator, before using the keyless ac-
cess with push-button start system,
refer to
“Radio waves used for the
keyless access with push-button
start system ”mentioned later, and
contact the electronic medical
equipment manufacturer for more
information. The radio waves from
the transmitting antennas on the
vehicle could adversely affect the
operation of the electronic medical
equipment.
“Radio waves used for the keyless
access with push-button start sys-
tem ”
. The keyless access with push-
button start system uses radio
waves of the following fre-
quency* in addition to the radio
waves used for the remote key-
less entry system. The radio
waves are periodically output
from the antennas installed on
the vehicle as shown in the
following illustrations.
* Radio frequency: 134 kHz
2-10
Page 113 of 594

Keys and doors/Keyless access with push–button start system
– Do not wash the access key in
an ultrasonic washer.
– Do not leave the access key in
humid or dusty locations.
Doing so may cause malfunc-
tions.
– Do not leave the access key
near personal computers or
home electric appliances.
Doing so may cause the ac-
cess key to malfunction, re-
sulting in battery discharge.
. If the access key is dropped, the
integrated mechanical key inside
may become loose. Be careful
not to lose the mechanical key.
. When you carry the access key
on an airplane, do not press the
button of the access key while in
the airplane. When any button of
the access key is pressed, radio
waves are sent and may affect
the operation of the airplane.
When you carry the access key
in a bag on an airplane, take
measures to prevent the buttons
of the access key from being
pressed.NOTE
. The operational/non-operational
setting for the keyless access function
can be changed. For the setting proce-
dure, refer to “Disabling keyless ac-
cess function” F2-18. The setting can
also be changed by a SUBARU dealer.
For more details, contact a SUBARU
dealer.
. For detailed information about the
operation method for the push-button
ignition switch while the keyless ac-
cess function is switched to the non-
operational mode, refer to “Access key
– if access key does not operate
properly ”F 9-18.
. The keyless access with push-but-
ton start system uses weak radio
waves. The status of the access key
and environmental conditions may in-
terfere with the communication be-
tween the access key and the vehicle
under the following conditions, and it
may not be possible to lock or unlock
the doors or start the engine.
–When operating near a facility
where strong radio waves are trans-
mitted, such as a broadcast station
and power transmission lines
– When products that transmit
radio waves are used, such as an
access key or a remote transmitter key of another vehicle
–
When carrying more than one
access key
– When the access key is placed
near wireless communication
equipment such as a cell phone
– When the access key is placed
near a metallic object
– When metallic accessories are
attached to the access key
– When carrying the access key
with electronic appliances such as
a laptop computer
– When the battery of the access
key is discharged
. The access key is always commu-
nicating with the vehicle and is con-
tinuously using the battery. Although
the life of the battery varies depending
on the operating conditions, it is ap-
proximately 1 to 2 years. If the battery
becomes fully discharged, replace it
with a new one.
. If an access key is lost, it is
recommended that all of the remaining
access keys be reregistered. For rere-
gistration of an access key, contact a
SUBARU dealer.
. For a spare access key, contact a
SUBARU dealer.
. Up to 7 access keys can be regis-
tered for one vehicle.
2-12
Page 124 of 594

the registered PIN code will be deleted.
You cannot unlock the doors by PIN
Code Access until a new code is
registered.
.After registering a new PIN code,
make sure that you can unlock the
doors using the PIN code.
. The PIN code cannot be deleted
while the keyless access function is
disabled by operating the access key.
. Reregister the PIN code in the
following case.
–when you forget the PIN code
– when you want to change the PIN
code
& Unlocking
Perform steps 1 to 5 described in “Regis-
tration ”.
NOTE
. You cannot unlock by PIN Code
Access in the following cases.
–when the access key is within the
operating ranges
– when the ignition switch is in the
“ACC ”or “ON ”position
. If you make an operation error
during the unlocking procedure, start
over with the unlocking procedure after
waiting for 5 seconds or longer.
. To protect your vehicle from theft, a buzzer will sound if incorrect PIN codes
are entered five times continuously. If
this occurs, you cannot unlock the
doors by PIN Code Access for 5
minutes.
Remote keyless entry system
CAUTION
.
Do not expose the remote trans-
mitter to severe shocks, such as
those experienced as a result of
dropping or throwing.
. Do not take the remote transmit-
ter apart except when replacing
the battery.
. Do not get the remote transmitter
wet. If it gets wet, wipe it dry with
a cloth immediately.
. When you carry the remote trans-
mitteronanairplane,donot
press the button of the remote
transmitter while in the airplane.
When any button of the remote
transmitter is pressed, radio
waves are sent and may affect
the operation of the airplane.
When you carry the remote trans-
mitter in a bag on an airplane,
take measures to prevent the
buttons of the remote transmitter
from being pressed.
For models with “keyless access with
push-button start system ”, the access
Keys and doors/Remote keyless entry system
–CONTINUED –2-23
Page 248 of 594
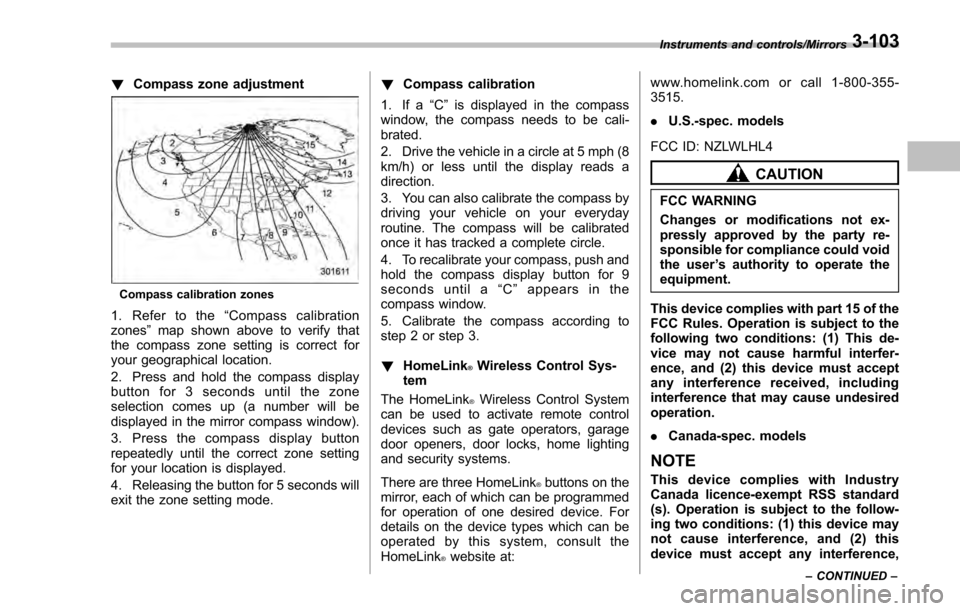
!Compass zone adjustment
Compass calibration zones
1. Refer to the “Compass calibration
zones” map shown above to verify that
the compass zone setting is correct for
your geographical location.
2. Press and hold the compass display
button for 3 seconds until the zone
selection comes up (a number will be
displayed in the mirror compass window).
3. Press the compass display button
repeatedly until the correct zone setting
for your location is displayed.
4. Releasing the button for 5 seconds will
exit the zone setting mode. !
Compass calibration
1. If a “C”is displayed in the compass
window, the compass needs to be cali-
brated.
2. Drive the vehicle in a circle at 5 mph (8
km/h) or less until the display reads a
direction.
3. You can also calibrate the compass by
driving your vehicle on your everyday
routine. The compass will be calibrated
once it has tracked a complete circle.
4. To recalibrate your compass, push and
hold the compass display button for 9
seconds until a “C ” appears in the
compass window.
5. Calibrate the compass according to
step 2 or step 3.
! HomeLink
®Wireless Control Sys-
tem
The HomeLink
®Wireless Control System
can be used to activate remote control
devices such as gate operators, garage
door openers, door locks, home lighting
and security systems.
There are three HomeLink
®buttons on the
mirror, each of which can be programmed
for operation of one desired device. For
details on the device types which can be
operated by this system, consult the
HomeLink
®website at: www.homelink.com or call 1-800-355-
3515.
.
U.S.-spec. models
FCC ID: NZLWLHL4
CAUTION
FCC WARNING
Changes or modifications not ex-
pressly approved by the party re-
sponsible for compliance could void
the user ’s authority to operate the
equipment.
This device complies with part 15 of the
FCC Rules. Operation is subject to the
following two conditions: (1) This de-
vice may not cause harmful interfer-
ence, and (2) this device must accept
any interference received, including
interference that may cause undesired
operation.
. Canada-spec. models
NOTE
This device complies with Industry
Canada licence-exempt RSS standard
(s). Operation is subject to the follow-
ing two conditions: (1) this device may
not cause interference, and (2) this
device must accept any interference,
Instruments and controls/Mirrors
–CONTINUED –3-103
Page 249 of 594
Instruments and controls/Mirrors
including interference that may cause
undesired operation of the device.
NOTE
Le présent appareil est conforme aux
CNR d’Industrie Canada applicables
aux appareils radio exempts de licence.
L ’exploitation est autorisée aux deux
conditions suivantes: (1) l ’appareil ne
doit pas produire de brouillage, et (2)
l ’utilisateur de l ’appareil doit accepter
tout brouillage radioélectrique subi,
même si le brouillage est susceptible
d ’en compromettre le fonctionnement.
HomeLink
®and the HomeLink®house are
registered trademarks of Johnson Con-
trols, Inc.
WARNING
. When programming the
HomeLink®Wireless Control Sys-
tem, you may be operating a
garage door opener or other
device. Make sure that people
and objects are out of the way
of the garage door or other
device to prevent potential harm
or damage.
. Do not use the HomeLink
®Wire-
less Control System with a gar- age door opener that lacks the
safety stop and reverse feature
as required by applicable safety
standards. A garage door opener
which cannot detect an object,
signaling the door to stop and
reverse, does not meet these
safety standards. Using a garage
door opener without these fea-
tures increases risk of serious
injury or death. For more infor-
mation, consult the HomeLink
®website at www.homelink.com or
call 1-800-355-3515.
CAUTION
When programming the HomeLink®Wireless Control System to operate
a garage door opener or an entrance
gate, unplug the device
’s motor
from the outlet during programming
to prevent motor burnout.
NOTE
. After programming your HomeLink®Wireless Control System for the de-
sired devices, retain the hand-held
transmitters for further programming
or device testing in the event of a
problem. .
It is recommended that you insert a
new battery in the hand-held transmit-
ter of a device to ensure correct
programming.
! Garage door opener program-
ming in the U.S.A.
NOTE
When programming the HomeLink®Wireless Control System for a garage
door opener, it is suggested that you
park the vehicle outside the garage.
1. Unplug the motor of the garage door
opener from the outlet.
NOTE
If any of the HomeLink®buttons are
already programmed for other devices,
skip step 2 because it clears the
memory of all three buttons.
3-104
Page 250 of 594
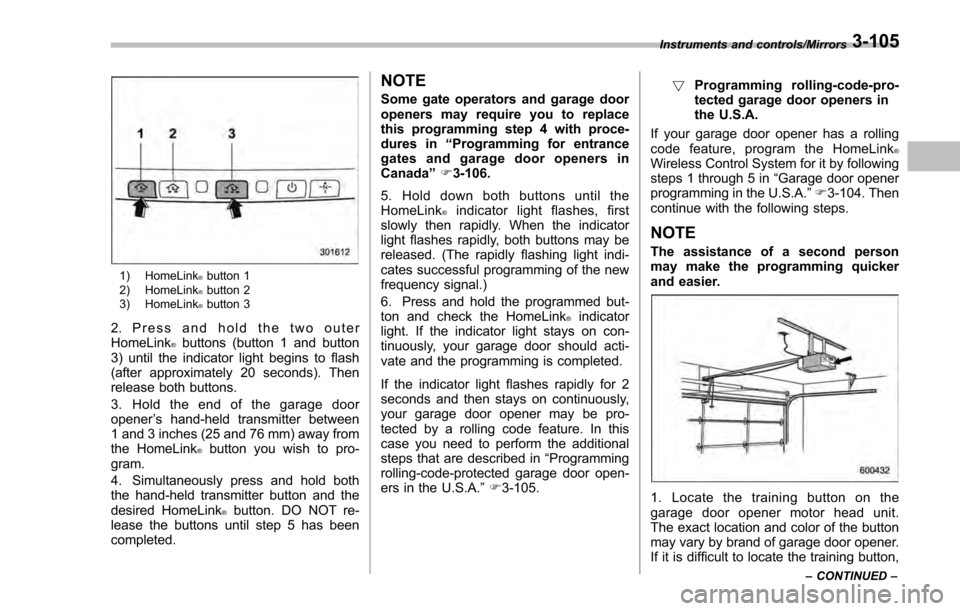
1) HomeLink®button 1
2) HomeLink®button 2
3) HomeLink®button 3
2. Press and hold the two outer
HomeLink®buttons (button 1 and button
3) until the indicator light begins to flash
(after approximately 20 seconds). Then
release both buttons.
3. Hold the end of the garage door
opener ’s hand-held transmitter between
1 and 3 inches (25 and 76 mm) away from
the HomeLink
®button you wish to pro-
gram.
4. Simultaneously press and hold both
the hand-held transmitter button and the
desired HomeLink
®button. DO NOT re-
lease the buttons until step 5 has been
completed.
NOTE
Some gate operators and garage door
openers may require you to replace
this programming step 4 with proce-
dures in “Programming for entrance
gates and garage door openers in
Canada ”F 3-106.
5. Hold down both buttons until the
HomeLink
®indicator light flashes, first
slowly then rapidly. When the indicator
light flashes rapidly, both buttons may be
released. (The rapidly flashing light indi-
cates successful programming of the new
frequency signal.)
6. Press and hold the programmed but-
ton and check the HomeLink
®indicator
light. If the indicator light stays on con-
tinuously, your garage door should acti-
vate and the programming is completed.
If the indicator light flashes rapidly for 2
seconds and then stays on continuously,
your garage door opener may be pro-
tected by a rolling code feature. In this
case you need to perform the additional
steps that are described in “Programming
rolling-code-protected garage door open-
ers in the U.S.A. ”F 3-105. !
Programming rolling-code-pro-
tected garage door openers in
the U.S.A.
If your garage door opener has a rolling
code feature, program the HomeLink
®Wireless Control System for it by following
steps 1 through 5 in “Garage door opener
programming in the U.S.A. ”F 3-104. Then
continue with the following steps.
NOTE
The assistance of a second person
may make the programming quicker
and easier.
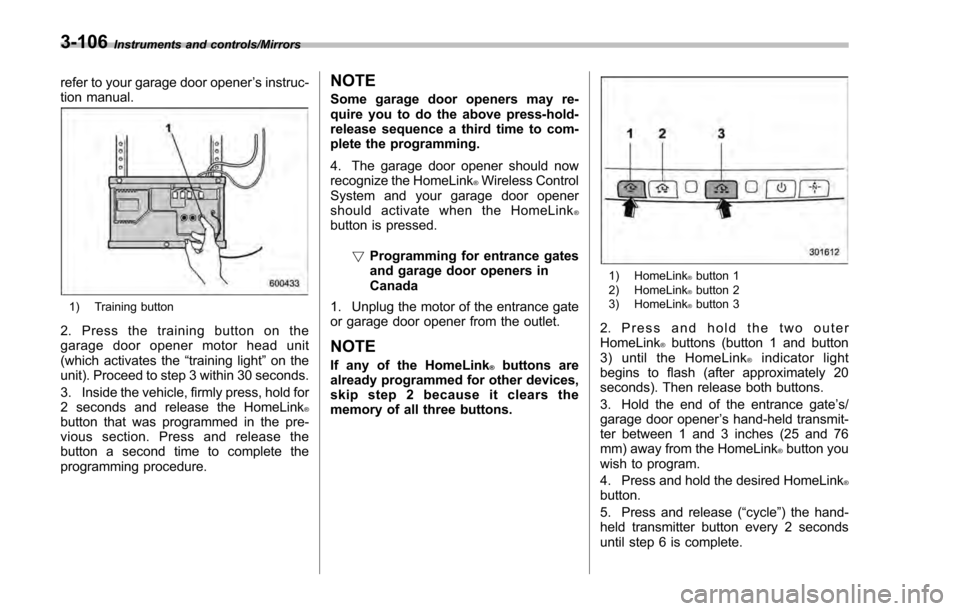
1. Locate the training button on the
garage door opener motor head unit.
The exact location and color of the button
may vary by brand of garage door opener.
If it is difficult to locate the training button,
Instruments and controls/Mirrors
–CONTINUED –3-105
Page 251 of 594
Instruments and controls/Mirrors
refer to your garage door opener’s instruc-
tion manual.
1) Training button
2. Press the training button on the
garage door opener motor head unit
(which activates the “training light ”on the
unit). Proceed to step 3 within 30 seconds.
3. Inside the vehicle, firmly press, hold for
2 seconds and release the HomeLink
®button that was programmed in the pre-
vious section. Press and release the
button a second time to complete the
programming procedure.
NOTE
Some garage door openers may re-
quire you to do the above press-hold-
release sequence a third time to com-
plete the programming.
4. The garage door opener should now
recognize the HomeLink
®Wireless Control
System and your garage door opener
should activate when the HomeLink
®button is pressed.
!Programming for entrance gates
and garage door openers in
Canada
1. Unplug the motor of the entrance gate
or garage door opener from the outlet.
NOTE
If any of the HomeLink®buttons are
already programmed for other devices,
skip step 2 because it clears the
memory of all three buttons.
1) HomeLink®button 1
2) HomeLink®button 2
3) HomeLink®button 3
2. Press and hold the two outer
HomeLink®buttons (button 1 and button
3) until the HomeLink®indicator light
begins to flash (after approximately 20
seconds). Then release both buttons.
3. Hold the end of the entrance gate ’s/
garage door opener ’s hand-held transmit-
ter between 1 and 3 inches (25 and 76
mm) away from the HomeLink
®button you
wish to program.
4. Press and hold the desired HomeLink
®button.
5. Press and release (“cycle”) the hand-
held transmitter button every 2 seconds
until step 6 is complete.
3-106