2016 SUBARU IMPREZA suspension
[x] Cancel search: suspensionPage 55 of 594
Seat, seatbelt and SRS airbags/Front seatbelt pretensioners
&System monitors
A diagnostic system continually monitors
the readiness of the seatbelt pretensioner
while the vehicle is being driven. The
seatbelt pretensioners share the control
modulewiththeSRSairbagsystem.
Therefore, if any malfunction occurs in a
seatbelt pretensioner, the SRS airbag
system warning light will illuminate. For
details, refer to “SRS airbag system
monitors ”F 1-67.
& System servicing
WARNING
. When discarding a seatbelt re-
tractor assembly or scrapping
the entire vehicle damaged by a
collision, consult your SUBARU
dealer.
. Tampering with or disconnecting
the system’ s wiring could result
in accidental activation of the
seatbelt pretensioner and/or
SRS airbag or could make the
system inoperative, which may
result in serious injury. Do not
use electrical test equipment on
any circuit related to the seatbelt
pretensioner and SRS airbag
systems. For required servicing of the seatbelt pretensioner, con-
sult your nearest SUBARU deal-
er.
CAUTION
The sensors and SRS airbag control
modules are located in the following
locations.
.
Front sub sensors: on both the
right and left side at the front of
the vehicle
. Front door impact sensors: on
both front doors
. Satellite safing sensor: under the
rear center seat
. SRS airbag control module (in-
cluding the impact sensors): un-
der the center of the instrument
panel
If you need service or repair in those
areas or near the front seatbelt
retractors, have the work performed
by your authorized SUBARU dealer.
NOTE
If the front or side part of the vehicle is
damaged in an accident to the extent
that the seatbelt pretensioner does not operate, contact your SUBARU dealer
as soon as possible.
&
Precautions against vehicle
modification
Always consult your SUBARU dealer if
you want to install any accessory parts to
your vehicle.
CAUTION
Do not perform any of the following
modifications. Such modifications
can interfere with proper operation
of the seatbelt pretensioners.
. Attachment of any equipment
(bush bar, winches, snow plow,
skid plate, etc.) other than genu-
ine SUBARU accessory parts to
the front end.
. Modification of the suspension
system or front end structure.
. Installation of a tire of different
size and construction from the
tires specified on the vehicle
placard attached to the driver ’s
door pillar or specified for indivi-
dual vehicle models in this Own-
er ’s Manual.
1-24
Page 84 of 594

3. If wearing excessive layers of clothing,
the front passenger should remove any
unnecessary items before sitting in the
front passenger’s seat, or should sit in a
rear seat.
4. Turn the ignition switch to the “ON”
position and wait 6 seconds to allow the
system to complete self-checking. Follow-
ing the system check, both indicators turn
off for 2 seconds. Now, the ON indicator
should illuminate while the OFF indicator
remains off.
If the OFF indicator still remains illumi-
nated while the ON indicator remains off,
ask the occupant to move to the rear seat
and immediately contact your SUBARU
dealer for an inspection.
! How to contact the vehicle manu-
facturer concerning modifications
for persons with disabilities that
may affect the advanced airbag
system
Changing or moving any parts of the front
seats, rear seat, seatbelts, front bumper,
front side frame, radiator panel, instrument
panel, combination meter, steering wheel,
steering column, tire, suspension or floor
panel can affect the operation of the
SUBARU advanced airbag system. If
you have any questions, you may contact
the following SUBARU distributors.
Subaru of America, Inc.
Customer Dealer Services Department
P.O. Box 6000
Cherry Hill, NJ 08034-6000
1-800-SUBARU3 (1-800-782-2783)
Subaru Hawaii
2850 Pukoloa Street, Suite 202,
Honolulu, HI 96819-4467
808-839-2273
Shen
’s Corporation dba Prestige Automo-
bile
491, East Marine Corps Drive, Route 1
Dededo, Guam 96921-6225
671-633-2698
Trebol Motors
P.O. Box 11204, San Juan, Puerto Rico
00910
787-793-2828
Subaru Canada, Inc.
Consumer Support Department
560 Suffolk Court, Mississauga, Ontario
L5R 4J7
1-800-894-4212
There are currently no SUBARU distribu-
tors in any other U.S. territories. If you are
in such an area, please contact the
SUBARU distributor or dealer from which
you bought your vehicle.
Seat, seatbelt and SRS airbags/*SRS airbag (Supplemental Restraint System airbag)
–CONTINUED –1-53
Page 101 of 594
Seat, seatbelt and SRS airbags/*SRS airbag (Supplemental Restraint System airbag)
&Precautions against vehicle
modification
WARNING
To avoid accidental activation of the
system or rendering the system
inoperative, which may result in
serious injury, no modifications
should be made to any components
or wiring of the SRS airbag system.
This includes following modifica-
tions.
. Installation of custom steering
wheels
. Attachment of additional trim
materials to the dashboard
. Installation of custom seats
. Replacement of seat fabric or
leather
. Installation of additional fabric or
leather on the front seat
. Attachment of a hands-free mi-
crophone or any other accessory
to a front pillar, a center pillar, a
rear pillar, the windshield, a side
window, an assist grip, or any
other cabin surface that would be
near a deploying SRS curtain
airbag. .
Installation of additional electri-
cal/electronic equipment such as
a mobile two-way radio on or
near the SRS airbag system
components and/or wiring is not
advisable. This could interfere
with proper operation of the
SRS airbag system.
CAUTION
Do not perform any of the following
modifications. Such modifications
can interfere with proper operation
of the SRS airbag system.
. Attachment of any equipment
(bush bar, winches, snow plow,
skid plate, etc.) other than genu-
ine SUBARU accessory parts to
the front end.
. Modification of the suspension
system or front end structure.
. Installation of a tire of different
size and construction from the
tires specified on the vehicle
placard attached to the driver ’s
door pillar or specified for indivi-
dual vehicle models in this Own-
er ’s Manual.
. Attachment of any equipment
(side steps or side sill protectors, etc.) other than genuine SUBARU
accessory parts to the side body.
Always consult your SUBARU dealer if
you want to install any accessory parts on
your vehicle.
1-70
Page 420 of 594

face; since having Vehicle Dy-
namics Control is no guarantee
that full vehicle control will be
maintained at all times and under
all conditions, its activation
should be seen as a sign that
the speed of the vehicle should
be reduced considerably.
. Whenever suspension compo-
nents, steering components, or
an axle are removed from a
vehicle, have an inspection of
that system performed by an
authorized SUBARU dealer.
. The following precautions should
be observed in order to ensure
that the Vehicle Dynamics Con-
trol system is operating properly:
– All four wheels should be
fitted with tires of the same
size, type, and brand. Further-
more, the amount of wear
should be the same for all
four tires.
– Keep the tire pressure at the
proper level as shown on the
vehicle placard attached to
the driver ’s side door pillar.
– Use only the specified tem-
porary spare tire to replace a
flat tire. With a temporary spare tire, the effectiveness of
the Vehicle Dynamics Control
system is reduced and this
should be taken into account
when driving the vehicle in
such a condition.
. If non-matching tires are used,
the Vehicle Dynamics Control
system may not operate cor-
rectly.
. The Vehicle Dynamics Control
system helps prevent unstable
vehicle motion such as skidding
using control of the brakes and
engine power. Do not turn off the
Vehicle Dynamics Control sys-
tem unless it is absolutely ne-
cessary. If you must turn off the
Vehicle Dynamics Control sys-
tem, drive very carefully accord-
ing to the road surface condi-
tions.
& System features
In the event of wheelspin and/or skidding
on a slippery road surface and/or during
cornering and/or an evasive maneuver,
the Vehicle Dynamics Control system
adjusts the engine ’s output and the
wheels’ respective braking forces to help maintain traction and directional control.
.
Traction Control Function
The traction control function is designed to
prevent spinning of the driving wheels on
slippery road surfaces, thereby helping to
maintain traction and directional control.
Activation of this function is shown by
steady illumination of the Vehicle Dy-
namics Control operation indicator light.
. Skid Suppression Function
The skid suppression function is designed
to help maintain directional stability by
suppressing the wheels’ tendency to slide
sideways during steering operations. Acti-
vation of this function is shown by flashing
of the Vehicle Dynamics Control operation
indicator light.
NOTE
. The Vehicle Dynamics Control sys-
tem may be considered normal when
the following conditions occur.
–Slight twitching of the brake
pedal is felt.
– The vehicle or steering wheel
shakes to a small degree.
– An operating sound from the
engine compartment is heard
briefly when starting the engine
and when driving off after starting
the engine.
Starting and operating/Vehicle Dynamics Control system
–CONTINUED –7-35
Page 450 of 594

sudden stops or jolts, unsecured cargo
could be thrown around in the vehicle and
cause injury. Do not pile heavy loads on
the roof. Those loads raise the vehicle’s
center of gravity and make it more prone
to tip over.
. Never equip your vehicle with tires
larger than those specified in this manual.
! During driving
General precautions:
. Drive carefully. Do not take unneces-
sary risks by driving in dangerous areas or
over rough terrain.
. Slow down and employ extra caution at
all times. When driving off-road, you will
not have the benefit of marked traffic
lanes, banked curves, traffic signs and
the like.
. Do not drive across steep slopes.
Instead, drive either straight up or straight
down the slopes. A vehicle can much
more easily tip over sideways than it can
end over end. Avoid driving straight up or
down slopes that are too steep.
. Avoid sharp turning maneuvers, espe-
cially at higher speeds.
. Do not grip the inside or spokes of the
steering wheel. A bad bump could jerk the
wheel and injure your hands. Instead,
drive with your fingers and thumbs on
the outside of the rim. .
Do not drive or park over or near
flammable materials such as dry grass or
fallen leaves, as they may burn easily. The
exhaust system is very hot while the
engine is running and right after the
engine stops. This could create a fire
hazard.
Precautions when driving under espe-
cially dangerous situations:
. If driving through water, such as when
crossing shallow streams, first check the
depth of the water and the bottom of the
stream bed for firmness and ensure that
the bed of the stream is flat. Drive slowly
and cross the stream without stopping.
The water should be shallow enough that
it does not reach the vehicle’ s under-
carriage. Water entering the engine air
intake or the exhaust pipe or water
splashing onto electrical parts may da-
mage your vehicle and may cause it to
stall. Never attempt to drive through
rushing water; regardless of its depth, it
can wash away the ground from under
your tires, resulting in possible loss of
traction and even vehicle rollover.
. If you must rock the vehicle to free it
from sand or mud, depress the accelerator
pedal slightly and move the shift lever/
select lever back and forth between “1”/
“D ”and “R”repeatedly. Do not race the
engine. For the best possible traction, avoid spinning the wheels when trying to
free the vehicle.
.
When the road surface is extremely
slippery, you can obtain better traction by
starting the vehicle with the transmission
in 2nd than 1st (both for MT and CVT). For
CVT models, refer to “Selection of manual
mode ”F 7-26.
! After driving
. Always check your brakes for effec-
tiveness immediately after driving in sand,
mud or water. Do this by driving slowly
and stepping on the brake pedal. Repeat
that process several times to dry out the
brake discs and brake pads.
. After driving through tall grass, mud,
rocks, sand, rivers, etc., check that there
is no grass, bush, paper, rags, stones,
sand, etc. adhering to or trapped on the
underbody. Clear off any such matter from
the underbody. If the vehicle is used with
these materials trapped or adhering to the
underbody, a mechanical breakdown or
fire could occur.
. Wash the vehicle’ s underbody after off-
road driving. Suspension components are
particularly prone to dirt buildup, so they
need to be washed thoroughly.
Driving tips/Off road driving8-7
Page 452 of 594
Clear away ice and snow that has
accumulated under the fenders to avoid
making steering difficult. During severe
winter driving, stop when and where it is
safe to do so and check under the fenders
periodically.
!Parking in cold weather
WARNING
Snow can trap dangerous exhaust
gases under your vehicle. Keep
snow clear of the exhaust pipe and
from around your vehicle if you park
the vehicle in snow with the engine
running.
CAUTION
.Do not use the parking brake
when parking for long periods in
cold weather since it could freeze
in that position.
. When the vehicle is parked in
snow or when it snows, raise the
wiper blades off the glass to
prevent damage to them.
. When the vehicle has been left
parked after use on roads heavily
covered with snow, or has been
left parked during a snowstorm, icing may develop on the brake
system, which could cause poor
braking action. Check for snow
or ice buildup on the suspension,
disc brakes and brake hoses
underneath the vehicle. If there
is caked snow or ice, remove it,
being careful not to damage the
disc brakes and brake hoses and
ABS harness.
When parking for long periods in cold
weather, you should observe the following
tips.
1. For MT models, place the shift lever in
the “1”or “R”position. For CVT models,
place the select lever in the “P ”position.
2. Use tire stops under the tires to
prevent the vehicle from moving.
! Refueling in cold weather
To help prevent moisture from forming in
the fuel system and the risk of its freezing,
use of an antifreeze additive in the fuel
tank is recommended during cold weather.
Use only additives that are specifically
designed for this purpose. When an
antifreeze additive is used, its effect lasts
longer if the tank is refilled whenever the
fuel level reaches half empty.
If your SUBARU is not going to be used for an extended period, it is best to have
the fuel tank filled to capacity.
&
Driving on snowy and icy
roads
To prevent skidding and slipping, avoid
sudden braking, abrupt acceleration, high-
speed driving, and sharp turning when
driving on snowy or icy roads.
Always maintain ample distance between
your vehicle and the vehicle ahead of you
to avoid the need for sudden braking.
To supplement the foot brake, use the
engine brake effectively to control the
vehicle speed. (Shift into a lower gear
when necessary.)
Avoid shifting down abruptly. Such beha-
vior can cause the wheels to lock, possibly
leading to loss of vehicle control.
An anti-lock brake system (ABS) en-
hances your vehicle ’s braking perfor-
manceonsnowyandicyroads.For
information on braking on slippery sur-
faces, refer to “ABS (Anti-lock Brake
System) ”F 7-32 and “Vehicle Dynamics
Control system ”F 7-34.
WARNING
Do not use the cruise control on
slippery roads such as snowy or icy
roads. This may cause loss of
Driving tips/Winter driving
–CONTINUED –8-9
Page 461 of 594
Driving tips/Trailer towing (Crosstrek models)
maximum gross weight. The chains
should cross under the trailer tongue to
prevent the tongue from dropping onto the
ground in case it should disconnect from
the hitch ball. Allow sufficient slack in the
chains taking tight turn situations into
account; however, be careful not to let
them drag on the ground.
WARNING
Do not connect safety chains to any
part of the vehicle other than the
safety chain hooks.
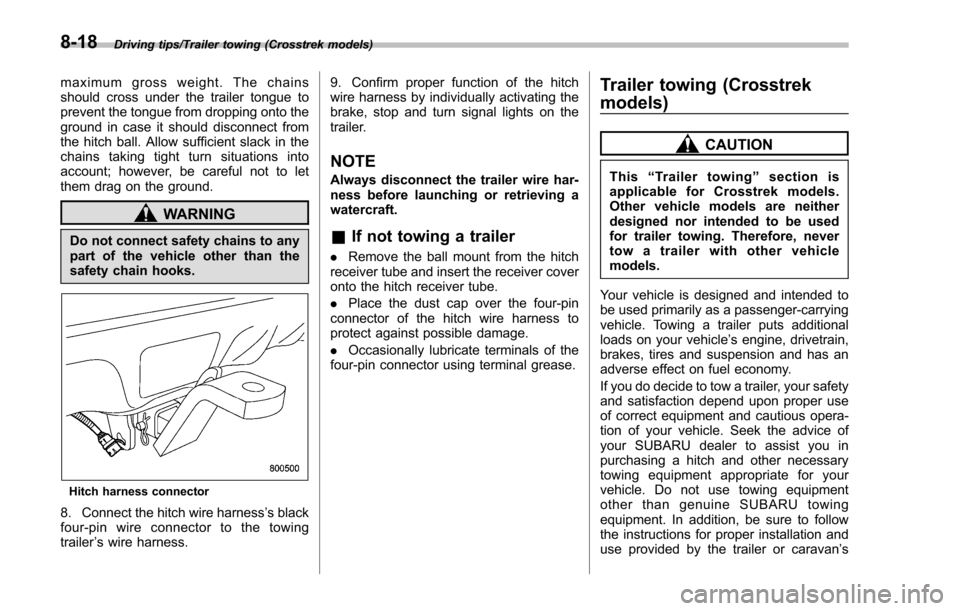
Hitch harness connector
8. Connect the hitch wire harness’s black
four-pin wire connector to the towing
trailer ’s wire harness. 9. Confirm proper function of the hitch
wire harness by individually activating the
brake, stop and turn signal lights on the
trailer.
NOTE
Always disconnect the trailer wire har-
ness before launching or retrieving a
watercraft.
&
If not towing a trailer
. Remove the ball mount from the hitch
receiver tube and insert the receiver cover
onto the hitch receiver tube.
. Place the dust cap over the four-pin
connector of the hitch wire harness to
protect against possible damage.
. Occasionally lubricate terminals of the
four-pin connector using terminal grease.
Trailer towing (Crosstrek
models)
CAUTION
This “Trailer towing ”section is
applicable for Crosstrek models.
Other vehicle models are neither
designed nor intended to be used
for trailer towing. Therefore, never
tow a trailer with other vehicle
models.
Your vehicle is designed and intended to
be used primarily as a passenger-carrying
vehicle. Towing a trailer puts additional
loads on your vehicle’ s engine, drivetrain,
brakes, tires and suspension and has an
adverse effect on fuel economy.
If you do decide to tow a trailer, your safety
and satisfaction depend upon proper use
of correct equipment and cautious opera-
tion of your vehicle. Seek the advice of
your SUBARU dealer to assist you in
purchasing a hitch and other necessary
towing equipment appropriate for your
vehicle. Do not use towing equipment
other than genuine SUBARU towing
equipment. In addition, be sure to follow
the instructions for proper installation and
use provided by the trailer or caravan ’s
8-18
Page 483 of 594
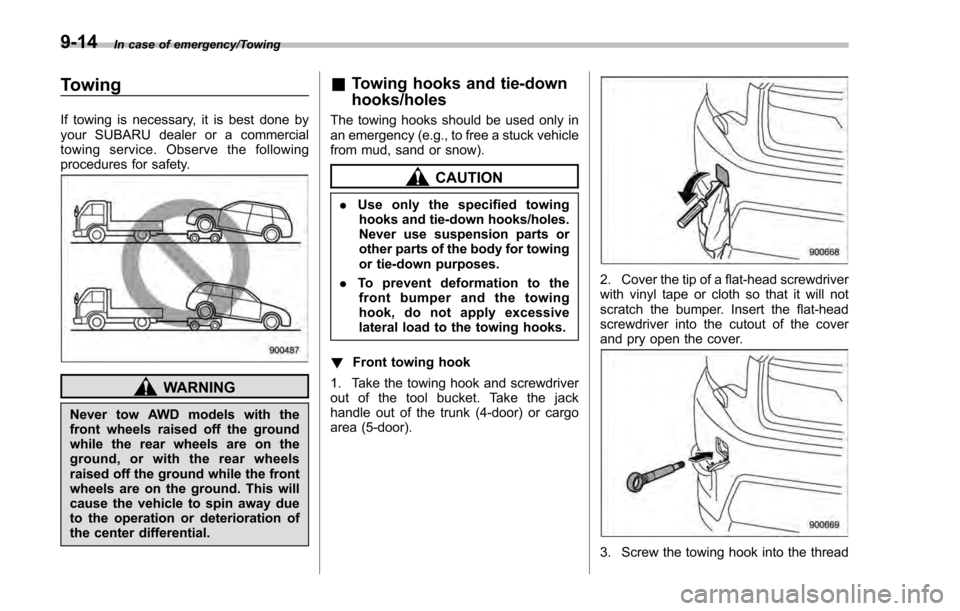
In case of emergency/Towing
Towing
If towing is necessary, it is best done by
your SUBARU dealer or a commercial
towing service. Observe the following
procedures for safety.
WARNING
Never tow AWD models with the
front wheels raised off the ground
while the rear wheels are on the
ground, or with the rear wheels
raised off the ground while the front
wheels are on the ground. This will
cause the vehicle to spin away due
to the operation or deterioration of
the center differential.
&Towing hooks and tie-down
hooks/holes
The towing hooks should be used only in
an emergency (e.g., to free a stuck vehicle
from mud, sand or snow).
CAUTION
. Use only the specified towing
hooks and tie-down hooks/holes.
Never use suspension parts or
other parts of the body for towing
or tie-down purposes.
. To prevent deformation to the
front bumper and the towing
hook, do not apply excessive
lateral load to the towing hooks.
! Front towing hook
1. Take the towing hook and screwdriver
out of the tool bucket. Take the jack
handle out of the trunk (4-door) or cargo
area (5-door).
2. Cover the tip of a flat-head screwdriver
with vinyl tape or cloth so that it will not
scratch the bumper. Insert the flat-head
screwdriver into the cutout of the cover
and pry open the cover.
3. Screw the towing hook into the thread
9-14