2016 SUBARU IMPREZA trunk
[x] Cancel search: trunkPage 484 of 594
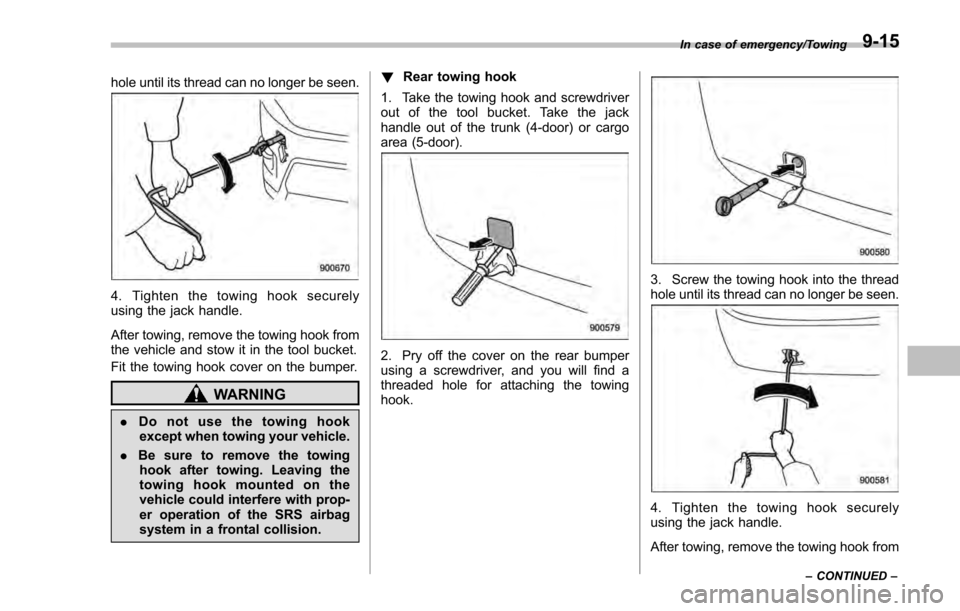
hole until its thread can no longer be seen.
4. Tighten the towing hook securely
using the jack handle.
After towing, remove the towing hook from
the vehicle and stow it in the tool bucket.
Fit the towing hook cover on the bumper.
WARNING
.Do not use the towing hook
except when towing your vehicle.
. Be sure to remove the towing
hook after towing. Leaving the
towing hook mounted on the
vehicle could interfere with prop-
er operation of the SRS airbag
system in a frontal collision. !
Rear towing hook
1. Take the towing hook and screwdriver
out of the tool bucket. Take the jack
handle out of the trunk (4-door) or cargo
area (5-door).
2. Pry off the cover on the rear bumper
using a screwdriver, and you will find a
threaded hole for attaching the towing
hook.
3. Screw the towing hook into the thread
hole until its thread can no longer be seen.
4. Tighten the towing hook securely
using the jack handle.
After towing, remove the towing hook from
In case of emergency/Towing
–CONTINUED –9-15
Page 493 of 594
Appearance care/Corrosion protection
Corrosion protection
Your SUBARU has been designed and
built to resist corrosion. Special materials
and protective finishes have been used on
most parts of the vehicle to help maintain
fine appearance, strength, and reliable
operation.
&Most common causes of
corrosion
The most common causes of corrosion
are:
. The accumulation of moisture retaining
dirt and debris in body panel sections,
cavities, and other areas.
. Damage to paint and other protective
coatings caused by gravel and stone
chips or minor accidents.
Corrosion is accelerated on the vehicle
when:
. It is exposed to road salt or dust control
chemicals, or used in coastal areas where
there is more salt in the air, or in areas
where there is considerable industrial
pollution.
. It is driven in areas of high humidity,
especially when temperatures range just
above freezing.
. Dampness in certain parts of the vehicle remains for a long time, even
though other parts of the vehicle may be
dry.
.
High temperatures will cause corrosion
to parts of the vehicle which cannot dry
quickly due to lack of proper ventilation.
& To help prevent corrosion
Wash the vehicle regularly to prevent
corrosion of the body and suspension
components. Also, wash the vehicle
promptly after driving on any of the
following surfaces.
. roads that have been salted to prevent
them from freezing in winter
. mud, sand, or gravel
. coastal roads
After the winter has ended, it is recom-
mended that the underbody be given a
very thorough washing.
Before the beginning of winter, check the
condition of underbody components, such
as the exhaust system, fuel and brake
lines, brake cables, suspension, steering
system, floor pan, and fenders. If any of
them are found to be rusted, they should
be given an appropriate rust prevention
treatment or should be replaced. Contact
your SUBARU dealer to perform this kind
of maintenance and treatment if you need assistance.
Repair chips and scratches in the paint as
soon as you find them.
Check the interior of the vehicle for water
and dirt accumulation under the floor mats
because that could cause corrosion.
Occasionally check under the mats to
make sure the area is dry.
Keep your garage dry. Do not park your
vehicle in a damp, poorly ventilated
garage. In such a garage, corrosion can
be caused by dampness. If you wash the
vehicle in the garage or put the vehicle
into the garage when wet or covered with
snow, that can cause dampness.
If your vehicle is operated in cold weather
and/or in areas where road salts and other
corrosive materials are used, the door
hinges and locks, trunk lid lock, and hood
latch should be inspected and lubricated
periodically.
10-4
Page 497 of 594
Maintenance and service
Tire rotation..................................................... 11-26
Tire replacement .............................................. 11-27
Wheel replacement ........................................... 11-28
Aluminum wheels............................................. 11-28
Windshield washer fluid .................................. 11-28
Adding the windshield washer fluid .................. 11-29
Windshield washer fluid ................................... 11-29
Replacement of wiper blades .......................... 11-30Windshield wiper blade assembly ..................... 11-30
Windshield wiper blade rubber ......................... 11-31
Rear window wiper blade assembly .................. 11-32
Rear window wiper blade rubber ....................... 11-32
Battery............................................................... 11-34
Fuses ................................................................ 11-35
Installation of accessories ............................... 11-36 Replacing bulbs
............................................... 11-36
Headlights (models with HID headlights) ........... 11-36
Headlights (models without HID headlights) ...... 11-37
Front turn signal light ...................................... 11-38
Parking light .................................................... 11-38
Front fog light (if equipped) .............................. 11-38
Rear combination lights ................................... 11-38
License plate light ........................................... 11-41
Map light ......................................................... 11-42
Dome light and cargo area light ....................... 11-42
Trunk light ....................................................... 11-43
Other bulbs ..................................................... 11-43
Replacing key battery ...................................... 11-43Safety precautions........................................... 11-43
Replacing battery of access key ....................... 11-44
Replacing transmitter battery ........................... 11-45
Page 533 of 594
Maintenance and service/Replacing bulbs
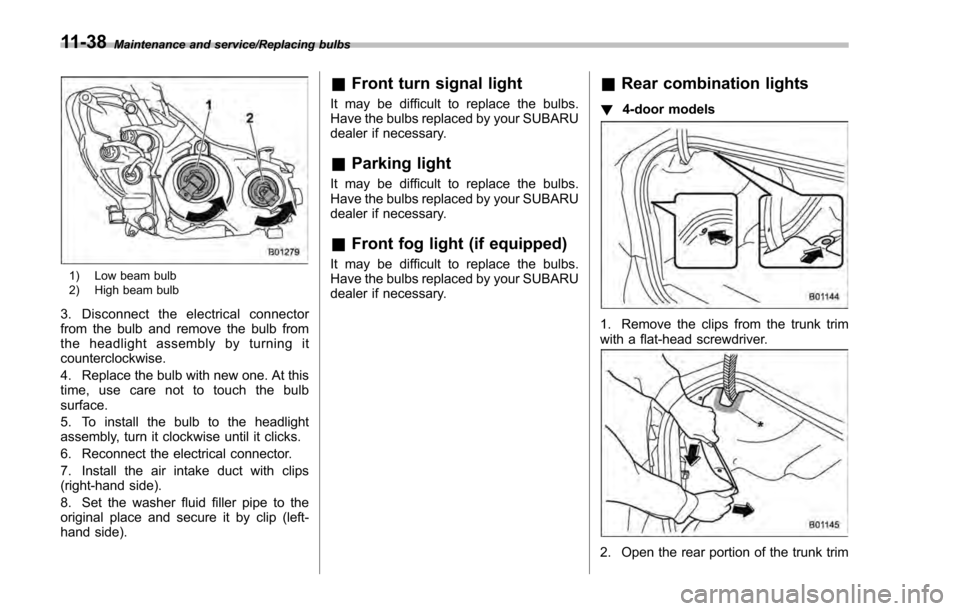
1) Low beam bulb
2) High beam bulb
3. Disconnect the electrical connector
from the bulb and remove the bulb from
the headlight assembly by turning it
counterclockwise.
4. Replace the bulb with new one. At this
time, use care not to touch the bulb
surface.
5. To install the bulb to the headlight
assembly, turn it clockwise until it clicks.
6. Reconnect the electrical connector.
7. Install the air intake duct with clips
(right-hand side).
8. Set the washer fluid filler pipe to the
original place and secure it by clip (left-
hand side).
&Front turn signal light
It may be difficult to replace the bulbs.
Have the bulbs replaced by your SUBARU
dealer if necessary.
&Parking light
It may be difficult to replace the bulbs.
Have the bulbs replaced by your SUBARU
dealer if necessary.
&Front fog light (if equipped)
It may be difficult to replace the bulbs.
Have the bulbs replaced by your SUBARU
dealer if necessary.
&Rear combination lights
! 4-door models
1. Remove the clips from the trunk trim
with a flat-head screwdriver.
2. Open the rear portion of the trunk trim
11-38
Page 534 of 594
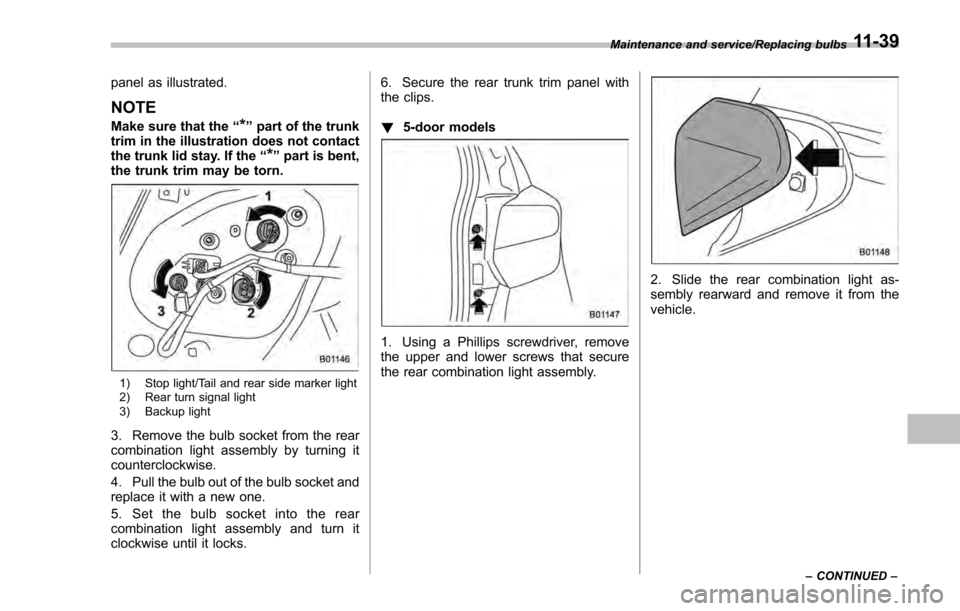
panel as illustrated.
NOTE
Make sure that the“*”part of the trunk
trim in the illustration does not contact
the trunk lid stay. If the “
*”part is bent,
the trunk trim may be torn.
1) Stop light/Tail and rear side marker light
2) Rear turn signal light
3) Backup light
3. Remove the bulb socket from the rear
combination light assembly by turning it
counterclockwise.
4. Pull the bulb out of the bulb socket and
replace it with a new one.
5. Set the bulb socket into the rear
combination light assembly and turn it
clockwise until it locks. 6. Secure the rear trunk trim panel with
the clips.
!
5-door models
1. Using a Phillips screwdriver, remove
the upper and lower screws that secure
the rear combination light assembly.
2. Slide the rear combination light as-
sembly rearward and remove it from the
vehicle.
Maintenance and service/Replacing bulbs
–CONTINUED –11-39
Page 536 of 594
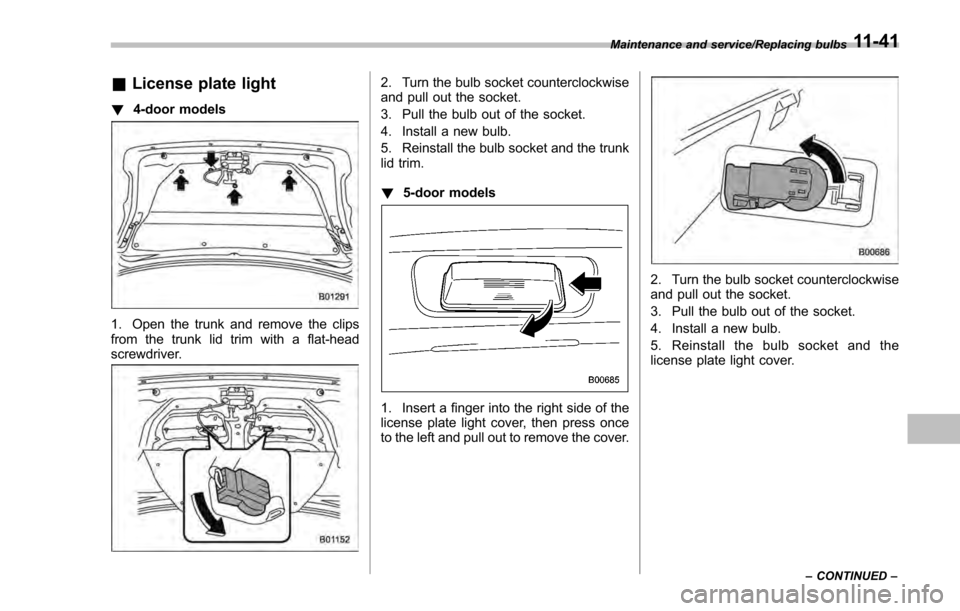
&License plate light
! 4-door models
1. Open the trunk and remove the clips
from the trunk lid trim with a flat-head
screwdriver.
2. Turn the bulb socket counterclockwise
and pull out the socket.
3. Pull the bulb out of the socket.
4. Install a new bulb.
5. Reinstall the bulb socket and the trunk
lid trim.
!5-door models
1. Insert a finger into the right side of the
license plate light cover, then press once
to the left and pull out to remove the cover.
2. Turn the bulb socket counterclockwise
and pull out the socket.
3. Pull the bulb out of the socket.
4. Install a new bulb.
5. Reinstall the bulb socket and the
license plate light cover.
Maintenance and service/Replacing bulbs
–CONTINUED –11-41
Page 538 of 594
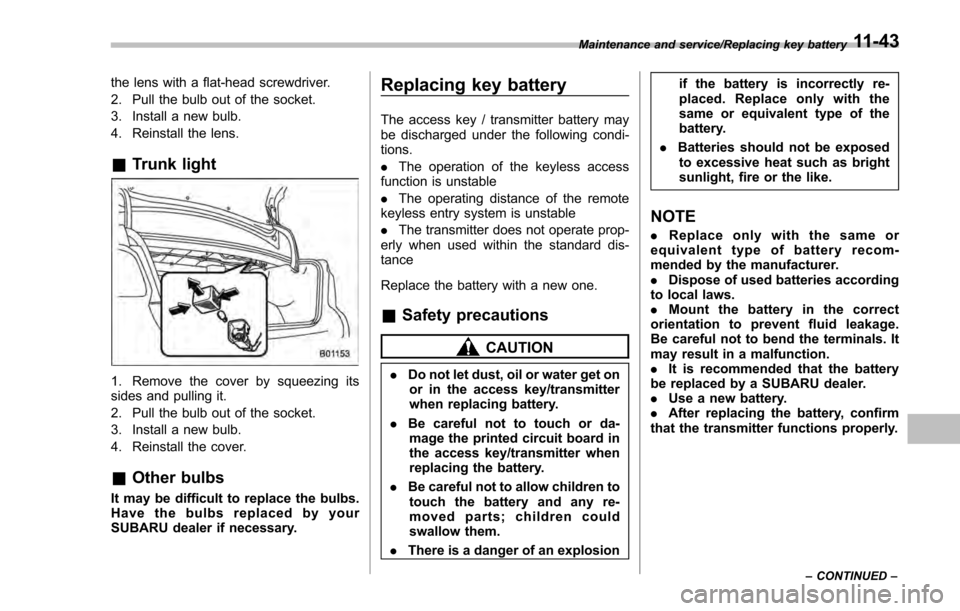
the lens with a flat-head screwdriver.
2. Pull the bulb out of the socket.
3. Install a new bulb.
4. Reinstall the lens.
&Trunk light
1. Remove the cover by squeezing its
sides and pulling it.
2. Pull the bulb out of the socket.
3. Install a new bulb.
4. Reinstall the cover.
&Other bulbs
It may be difficult to replace the bulbs.
Have the bulbs replaced by your
SUBARU dealer if necessary.
Replacing key battery
The access key / transmitter battery may
be discharged under the following condi-
tions.
. The operation of the keyless access
function is unstable
. The operating distance of the remote
keyless entry system is unstable
. The transmitter does not operate prop-
erly when used within the standard dis-
tance
Replace the battery with a new one.
& Safety precautions
CAUTION
. Do not let dust, oil or water get on
or in the access key/transmitter
when replacing battery.
. Be careful not to touch or da-
mage the printed circuit board in
the access key/transmitter when
replacing the battery.
. Be careful not to allow children to
touch the battery and any re-
moved parts; children could
swallow them.
. There is a danger of an explosion if the battery is incorrectly re-
placed. Replace only with the
same or equivalent type of the
battery.
. Batteries should not be exposed
to excessive heat such as bright
sunlight, fire or the like.
NOTE
. Replace only with the same or
equivalent type of battery recom-
mended by the manufacturer.
. Dispose of used batteries according
to local laws.
. Mount the battery in the correct
orientation to prevent fluid leakage.
Be careful not to bend the terminals. It
may result in a malfunction.
. It is recommended that the battery
be replaced by a SUBARU dealer.
. Use a new battery.
. After replacing the battery, confirm
that the transmitter functions properly.
Maintenance and service/Replacing key battery
–CONTINUED –11-43
Page 557 of 594
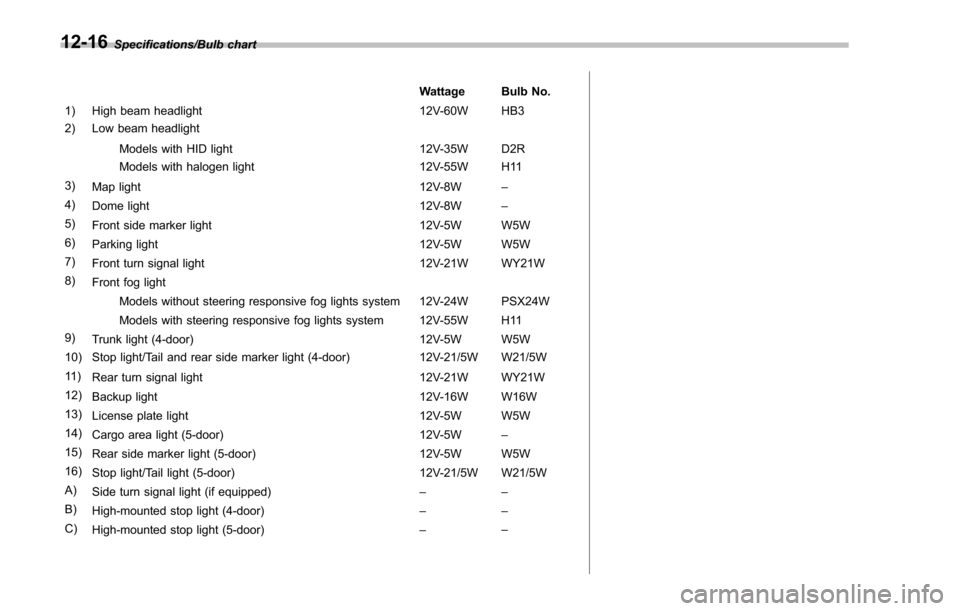
Specifications/Bulb chartWattage Bulb No.
1) High beam headlight 12V-60W HB3
2) Low beam headlight
Models with HID light 12V-35W D2R
Models with halogen light 12V-55W H11
3) Map light 12V-8W–
4) Dome light 12V-8W–
5) Front side marker light 12V-5W W5W
6) Parking light 12V-5W W5W
7) Front turn signal light 12V-21W WY21W
8) Front fog light
Models without steering responsive fog lights system 12V-24W PSX24W
Models with steering responsive fog lights system 12V-55W H11
9) Trunk light (4-door) 12V-5W W5W
10) Stop light/Tail and rear side marker light (4-door) 12V-21/5W W21/5W
11 ) Rear turn signal light 12V-21W WY21W
12) Backup light 12V-16W W16W
13) License plate light 12V-5W W5W
14) Cargo area light (5-door) 12V-5W–
15) Rear side marker light (5-door) 12V-5W W5W
16) Stop light/Tail light (5-door) 12V-21/5W W21/5W
A) Side turn signal light (if equipped) ––
B) High-mounted stop light (4-door) ––
C) High-mounted stop light (5-door) ––12-16