Page 286 of 594
&Basic information before use
WARNING
When the vehicle is stopped with the
engine running, always apply the
parking brake for safety. Failure to
do so may result in loss of control of
your vehicle and cause an accident
or serious injury.
CAUTION
. To prevent damaging the screen,
touch the screen keys with your
finger lightly.
. Wipe off fingerprints using a
glass cleaning cloth. Do not use
chemical cleaners to clean the
screen, as they may damage the
touch screen. !
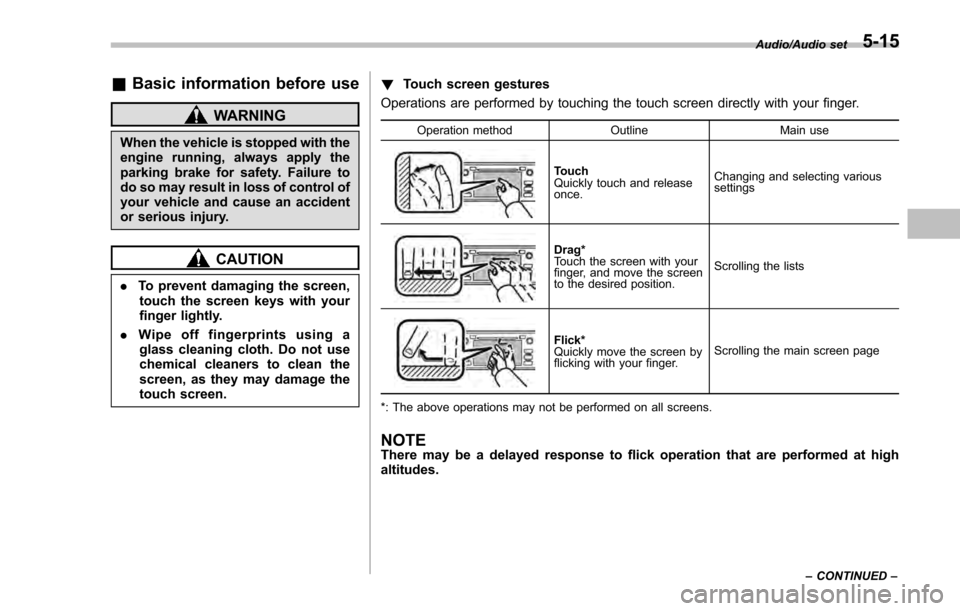
Touch screen gestures
Operations are performed by touching the touch screen directly with your finger.
Operation method OutlineMain use
Touch
Quickly touch and release
once.Changing and selecting various
settings
Drag*
Touch the screen with your
finger, and move the screen
to the desired position.
Scrolling the lists
Flick*
Quickly move the screen by
flicking with your finger.
Scrolling the main screen page
*: The above operations may not be performed on all screens.
NOTEThere may be a delayed response to flick operation that are performed at high
altitudes.
Audio/Audio set
–CONTINUED –5-15
Page 287 of 594
Audio/Audio set
!Touch screen operation
This system is operated mainly by the
keys on the screen.
When a screen key is touched, a beep
sounds. You can set the beep sound.
Refer to “Unit settings” F5-19.
NOTE
. If the system does not respond to
touching a screen key, move your
finger away from the screen and touch
it again.
. Grayed-out screen keys cannot be
operated.
. The displayed image may become
darkerandmovingimagesmaybe
slightly distorted when the screen is
cold.
. In extremely cold conditions, the
screen may not be displayed correctly.
Also, the screen keys may be less
responsive than usual when pressed.
. When you look at the screen
through polarized material such as
polarized sunglasses, the screen may
be dark and difficult to see. If so, look at
the screen from different angles, adjust
the screen settings or take off your
sunglasses. Refer to “Unit settings”
F 5-19. !
Entering letters and numbers/list
screen operation
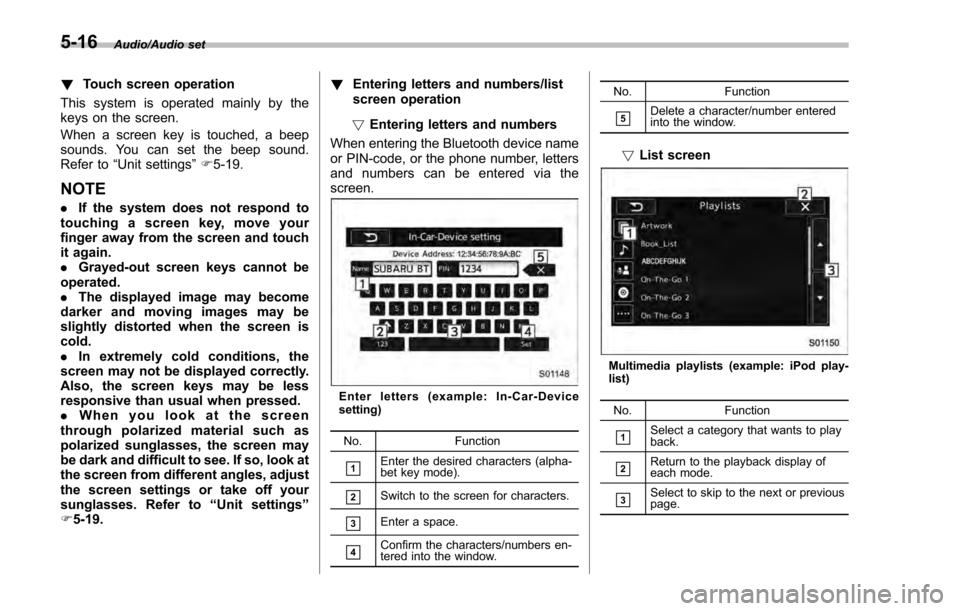
! Entering letters and numbers
When entering the Bluetooth device name
or PIN-code, or the phone number, letters
and numbers can be entered via the
screen.
Enter letters (example: In-Car-Device
setting)
No. Function
&1Enter the desired characters (alpha-
bet key mode).
&2Switch to the screen for characters.
&3Enter a space.
&4Confirm the characters/numbers en-
tered into the window. No. Function
&5Delete a character/number entered
into the window.
!
List screen
Multimedia playlists (example: iPod play-
list)
No. Function
&1Select a category that wants to play
back.
&2Return to the playback display of
each mode.
&3Select to skip to the next or previous
page.
5-16
Page 296 of 594
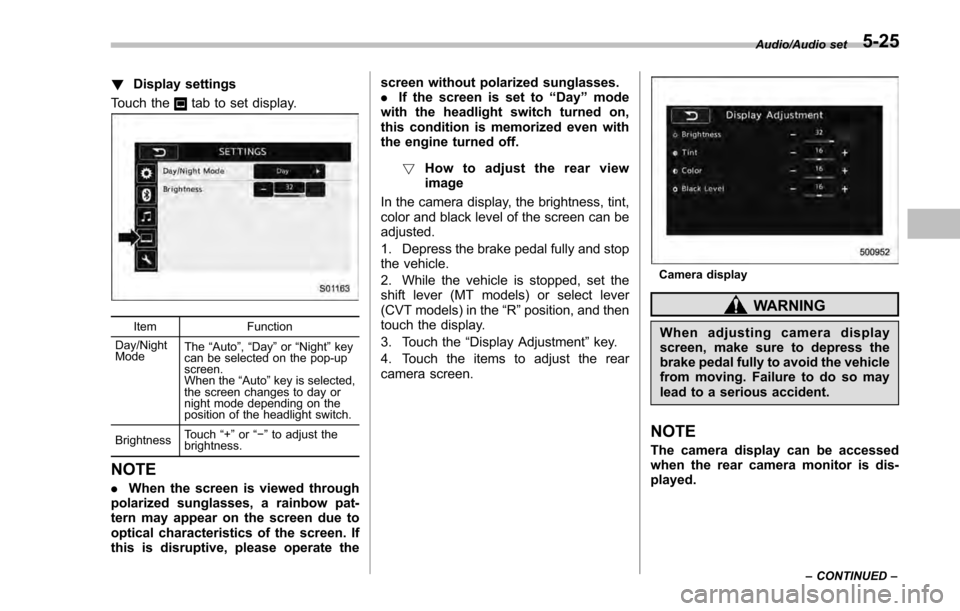
!Display settings
Touch the
tab to set display.
Item Function
Day/Night
Mode The
“Auto ”, “Day ”or “Night ”key
can be selected on the pop-up
screen.
When the “Auto ”key is selected,
the screen changes to day or
night mode depending on the
position of the headlight switch.
Brightness Touch
“+” or“−” to adjust the
brightness.
NOTE
. When the screen is viewed through
polarized sunglasses, a rainbow pat-
tern may appear on the screen due to
optical characteristics of the screen. If
this is disruptive, please operate the screen without polarized sunglasses.
.
If the screen is set to “Day”mode
with the headlight switch turned on,
this condition is memorized even with
the engine turned off.
! How to adjust the rear view
image
In the camera display, the brightness, tint,
color and black level of the screen can be
adjusted.
1. Depress the brake pedal fully and stop
the vehicle.
2. While the vehicle is stopped, set the
shift lever (MT models) or select lever
(CVT models) in the “R”position, and then
touch the display.
3. Touch the “Display Adjustment ”key.
4. Touch the items to adjust the rear
camera screen.
Camera display
WARNING
When adjusting camera display
screen, make sure to depress the
brake pedal fully to avoid the vehicle
from moving. Failure to do so may
lead to a serious accident.
NOTE
The camera display can be accessed
when the rear camera monitor is dis-
played.
Audio/Audio set
–CONTINUED –5-25
Page 366 of 594

Interior lights....................................................... 6-2Dome light.......................................................... 6-2
Cargo area light (5-door models) ......................... 6-2
Map lights ........................................................... 6-3
OFF delay timer .................................................. 6-3
Sun visors........................................................... 6-4Sun visor extension plate (models with the
EyeSight system) .............................................. 6-4
Vanity mirror ....................................................... 6-5
Storage compartment ......................................... 6-5Glove box........................................................... 6-6
Center console .................................................... 6-6
Cup holders......................................................... 6-7
Bottle holders ...................................................... 6-7
Accessory power outlets .................................... 6-8
Use with a cigarette lighter (dealer option) ........... 6-9
Ashtray (dealer option)...................................... 6-10 Floor mat (if equipped)
...................................... 6-11
Coat hook ........................................................... 6-11
Shopping bag hook (5-door) ............................. 6-12
Cargo area cover (5-door –if equipped) .......... 6-12
Using the cover ................................................. 6-12
To remove the cover housing ... .......................... 6-13
Stowage of the cargo area cover ........................ 6-13
To install the cover housing ............................... 6-14
Cargo tie-down hooks (5-door –if
equipped) ........................................................ 6-14
Under-floor storage compartment (if equipped) ........................................................ 6-15
Rear view camera .............................................. 6-15
How to use the rear view camera ....................... 6-17
Viewing range on the screen .............................. 6-17
Help line ............................................................ 6-18
Interior equipment
6
Page 367 of 594
Interior equipment/Interior lights
Interior lights
CAUTION
When leaving your vehicle, make
sure the lights are turned off to
avoid battery discharge.
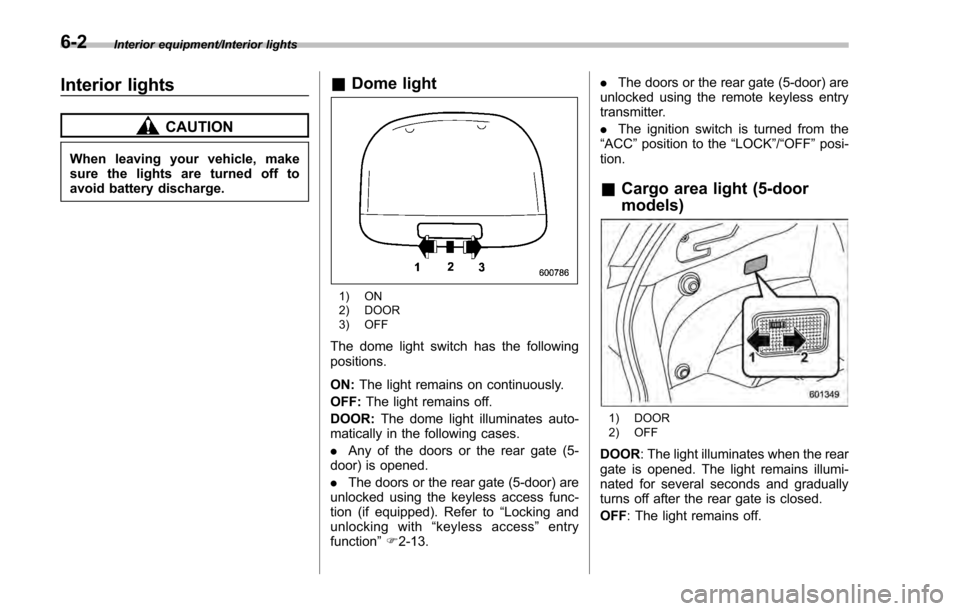
&Dome light
1) ON
2) DOOR
3) OFF
The dome light switch has the following
positions.
ON: The light remains on continuously.
OFF: The light remains off.
DOOR: The dome light illuminates auto-
matically in the following cases.
. Any of the doors or the rear gate (5-
door) is opened.
. The doors or the rear gate (5-door) are
unlocked using the keyless access func-
tion (if equipped). Refer to “Locking and
unlocking with “keyless access” entry
function ”F 2-13. .
The doors or the rear gate (5-door) are
unlocked using the remote keyless entry
transmitter.
. The ignition switch is turned from the
“ ACC ”position to the “LOCK”/ “OFF”posi-
tion.
& Cargo area light (5-door
models)
1) DOOR
2) OFF
DOOR : The light illuminates when the rear
gate is opened. The light remains illumi-
nated for several seconds and gradually
turns off after the rear gate is closed.
OFF : The light remains off.
6-2
Page 368 of 594
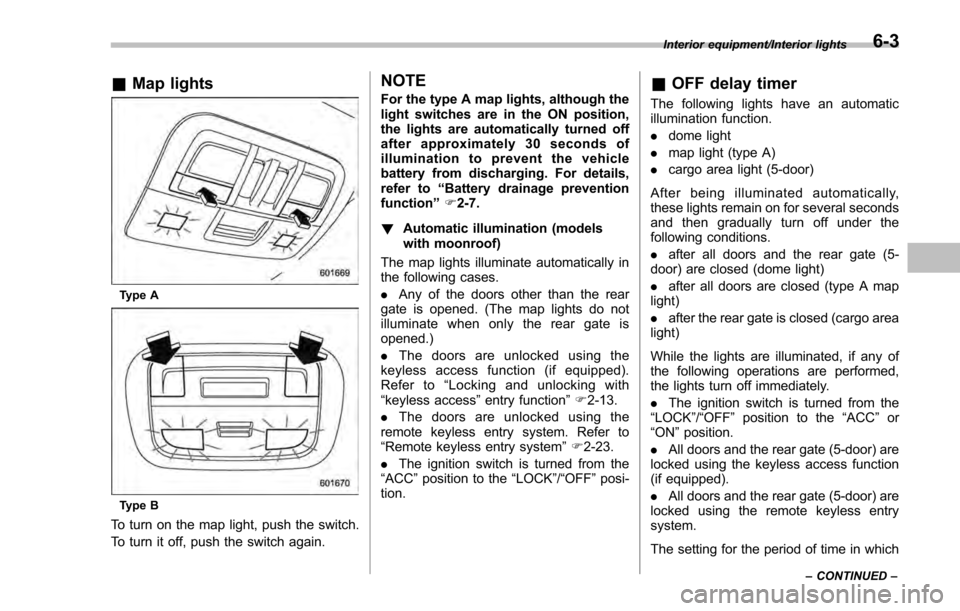
&Map lights
Type A
Type B
To turn on the map light, push the switch.
To turn it off, push the switch again.
NOTE
For the type A map lights, although the
light switches are in the ON position,
the lights are automatically turned off
after approximately 30 seconds of
illumination to prevent the vehicle
battery from discharging. For details,
refer to “Battery drainage prevention
function” F2-7.
! Automatic illumination (models
with moonroof)
The map lights illuminate automatically in
the following cases.
. Any of the doors other than the rear
gate is opened. (The map lights do not
illuminate when only the rear gate is
opened.)
. The doors are unlocked using the
keyless access function (if equipped).
Refer to “Locking and unlocking with
“keyless access” entry function”F 2-13.
. The doors are unlocked using the
remote keyless entry system. Refer to
“Remote keyless entry system ”F 2-23.
. The ignition switch is turned from the
“ACC ”position to the “LOCK”/ “OFF”posi-
tion.& OFF delay timer
The following lights have an automatic
illumination function.
. dome light
. map light (type A)
. cargo area light (5-door)
After being illuminated automatically,
these lights remain on for several seconds
and then gradually turn off under the
following conditions.
. after all doors and the rear gate (5-
door) are closed (dome light)
. after all doors are closed (type A map
light)
. after the rear gate is closed (cargo area
light)
While the lights are illuminated, if any of
the following operations are performed,
the lights turn off immediately.
. The ignition switch is turned from the
“ LOCK ”/“OFF ”position to the “ACC”or
“ON ”position.
. All doors and the rear gate (5-door) are
locked using the keyless access function
(if equipped).
. All doors and the rear gate (5-door) are
locked using the remote keyless entry
system.
The setting for the period of time in which
Interior equipment/Interior lights
–CONTINUED –6-3
Page 369 of 594
Interior equipment/Sun visors
the lights remain on (OFF delay timer) can
be changed by a SUBARU dealer. Con-
tact your SUBARU dealer for details. For
models with multi function display, the
setting can be changed by operating the
multi function display. For details, refer to
“Interior light off delay timer setting”F 3-
82.Sun visors
To block out glare, swing down the visors.
To use the sun visor at a side window,
swing it down and move it sideways.
& Sun visor extension plate
(models with the EyeSight
system)
With the sun visor positioned over the side
window, you can use the sun visor
extension plate to prevent glare through
the gap between the sun visor and center
pillar. To use the extension plate, pull it
toward the rear of the vehicle. When you
have finished using it, stow it by pushing it
toward the front of the vehicle.
6-4
Page 370 of 594
CAUTION
Do not pull out the extension plate
with the sun visor positioned over
the windshield. The extension plate
would obstruct your view of the
rearview mirror.
&Vanity mirror
CAUTION
Keep the vanity mirror cover closed
while the car is being driven to avoid
being temporarily blinded by the
glare of bright light.
To use the vanity mirror, swing down the
sun visor and open the vanity mirror cover.
Storage compartment
CAUTION
. Always keep the storage com-
partment closed while driving to
reduce the risk of injury in the
event of a sudden stop or an
accident.
. Do not store spray cans, contain-
ers with flammable or corrosive
liquids or any other dangerous
items in the storage compart-
ment.
Interior equipment/Storage compartment
–CONTINUED –6-5