Page 49 of 100

Search for a contact using the numeric keypad
The numeric keypad can also be used for a contact search.
For example, if you enter 32, the unit will display contacts with the letter se-
quence DA, FA, EB, etc. next to the numerical keypad in areas 1
» Fig. 43 .
Voice mailbox
If not import the voicemail number or was not imported or entered, then this
can be entered or changed as follows.
▶ In the Telephone main menu, tap on the function surface,
Tap →
user profile
→
voicemail number:
.
▶ To select the voice mailbox number, tap the functional surface
surface.
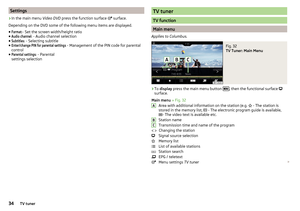
List of telephone contacts
Fig. 44
List of telephone contacts / contact details
›
In the Telephone main menu, tap on the function surface,
a list of tele-
phone contacts is displayed » Fig. 44-
,
The main telephone is connected to the device, the telephone contacts from
the telephone are used.
If there is a SIM card with activated phone services in the external module, the
SIM card phone contacts are available. If necessary, you can choose another
external device to import the phone contacts by tapping the functional surface
D
» Fig. 37 on page 41 .
Function interfaces Contact search
Select a number in the telephone contact list - if a telephone contact con-
tains several telephone numbers, the system displays a menu containing
the telephone numbers for this contact after selecting the contact)
ABDisplay the contact details » Fig. 44 -
The contact name can be read out by the device's generated voice
Select the number in the contact details
Opens the menu for sending a text message (SMS)
Processing the telephone number of the contact before dialling
Start the route guidance to the contact address (applies to Columbus,
Amundsen)
Import list
After the first connection of the primary telephone and/or the SIM card (ap-
plies to Columbus) with the device, the import of the telephone contacts to the
device memory starts. The import can take several minutes.
In the device phonebook there are 4000 (applies to Columbus) and 2000 (ap-
plies to Amundsen, Bolero) free storage locations for imported telephone con-
tacts. Each contact can contain up to 5 telephone numbers.
For the 4 last connected phones, the import of a maximum of 5000 takes place (applies to Columbus) and 1000 (applies to Amundsen, Bolero) images alloca-
ted to contacts in the device memory.
The number of imported contacts can be viewed in the menu item
→ userprofile
→
Import contacts:
.
If an error occurs during the import, an appropriate message appears on the
screen.
Refresh list
When the telephone reconnects with the device the list is automatically upda-
ted.
The update can be performed manually as follows. ▶ In the Telephone main menu, tap on the function surface,
Tap
→
User pro-file
→
Import contacts
.
During updating, the number of imported contacts to the device memory/the
number of contacts in the telephone is displayed.
C47Phone
Page 50 of 100
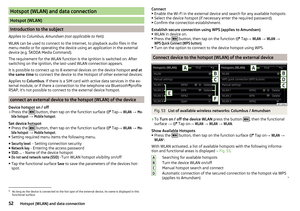
Fig. 45
Favourite contacts
Connecting to a favourite
The functional surfaces of preferred contacts allow for an immediate dial of
the contact telephone nu")
Management of preferred contacts (favourites)Fig. 45
Favourite contacts
Connecting to a favourite
The functional surfaces of preferred contacts allow for an immediate dial of
the contact telephone number.
The favourites are available in two storage groups.
›
To the change Storage Group tap on the functional surface
B
» Fig. 45 .
›
To choose tap on the assigned function area
A
» Fig. 45 .
Assigning preferred favourite
›
In the main menu Telephone, tap on the desired function surface
A
» Fig. 45 .
›
Select the desired contact (if necessary one of the contact numbers).
Change allocated preferred favourites
›
In the Telephone main menu, hold the desired function surface
A
» Fig. 45 .
›
Select the desired contact (if necessary one of the contact numbers).
Clear preferred favourite
›
Press the button, then tap on the function surface
Tap
→
User profile
→
Manage favourites
.
›
Press the desired function surface of the preferred contact and confirm the
deletion.
You can delete all contacts by tapping on the function surface
Delete all
and
confirm the deletion process.
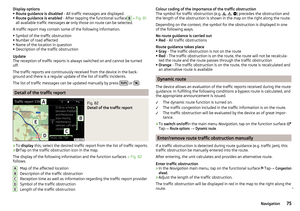
Call listFig. 46
Call history / Contact details
›
In the Telephone main menu, tap on the function surface,
a call list is dis-
played » Fig. 46 -
.
The call list can also be displayed during a telephone call.
Function surfaces and symbols Setting the display depending on the type of call▶
All
- List of all calls
▶
Missed calls
- list of missed calls
▶
Dialled numbers
- list of dialled numbers
▶
Received calls
- list of received calls
Dial a number from the call list
Display the contact details » Fig. 46 -
Select the number in the contact details
Edit the phone number before dialling (the number is not assigned to any
telephone contact)
Answered call
Outgoing call
Missed call
ABC48Phone
Page 51 of 100

Telephone callFig. 47
Incoming call / Current conversation
Fig. 48
Next incoming call / Next call taken
Depending on the conversation context, the following functions can be execu- ted.
End dialling / reject incoming call / end callAccept incoming call / return to held call
Switch on/off ringer
Hold a call
Switch off/on microphone
Connect conference call
Show caller details (if the contact is stored in the list)
Switch on/off hands-free (call to the telephone / switch to device)
▶ To switch off the hands-free system, in the Telephone main menu, tap on
the function surface
TapHands-free
during a call.
▶ To switch off the hands-free system, tap on the function surface
during a
call.
Note
If the incoming call is answered by the auxiliary telephone and the caller has
been imported into your contact list from the main telephone, the caller details
are displayed.
Conference
Fig. 49
Conference call / Meeting details
The conference is a shared call with between three and six participants.
Start a conference/invite additional participants
›
During a call/conference, make the next call.
›
or: Take the new incoming call by tapping the functional surface
.
›
To initiate conference call or. return to the conference call , tap on the func-
tional surface
surface.
Ongoing conference
During an ongoing conference call, the call duration is displayed on the screen.
Depending on the context, the following functions can be selected.
Hold a conference - leave the conference temporarily (the conference
continues in your absence)
Return to the held conference
Switch off/on microphone
49Phone
Page 52 of 100

End conference call
Conference call details
Conference details ▶ During the ongoing conference call, press the function surface
surface.
A list of other conference participants is displayed. The following functions can
be selected depending on the type of telephone.
View details of participant
Talk to a participant separately from the conference
End the call to a conference participant
Text messages (SMS)
Main menu
Fig. 50
Main menu text messages
›
In the Telephone main menu, tap on the function surface,
A menu for text
messages appears » Fig. 50.
›
If necessary, Select whether the source of the text messages to be used
should be the SIM card inserted in the external module or the telephone (ap-
plies to Columbus).
Open a list for quick answer provided short messages (called templates)
New text message
- Creating and sending the message
Inbox
- Open a list of received messages
Sent
- Open a list of sent messages
Outbox
- Open a list of messages not sent
Drafts
- Open a list of drafts (messages in progress)
Deleted
- Open a list of deleted messages
Send contact details
- send the contact details (Contact business card) (applies
to Columbus)
1Display options to set the source of text messages (applies to Columbus)
If there is a SIM card with telephone services and it is connected to the device
at the same time, then it can be set for which source, after tapping on the
function surface.
From the phone, main menu, a menu of text messages
should be displayed automatically.
▶ In the Telephone main menu, tap on the function surfaces
Tap on → Textmessage settings
→
Standard account
.
▶ Select the desired menu item.
New text message
Fig. 51
Composing a text message / viewing a text message
Fig. 52
Contact list / recipient list
Creating and sending the message
›
In the main menu of the text messages press the function surface
inter-
face » Fig. 50 on page 50 .
›
Write a message and press the function surface
» Fig. 51 -
A text mes-
sage view is displayed » Fig. 51-
.
›
Tap on the function
surface.
50Phone
Page 53 of 100

›Enter the recipient of the message from the displayed list
» Fig. 52 - .›Tap on the function » Fig. 52 Tap on- the message is sent.
While composing the message is in the functional surface
the number of en-
tered characters displayed » Fig. 51 -
.
The maximum number of characters entered in a message is 440. If a message
is longer than 70 characters, then it is split into multiple messages.
Viewing the text message
After opening the view message function » Fig. 51 -
the following functions
can be executed.
The text can be read out by the device's generated voice
The text can be stored as a draft
Open a list of templates with the possibility to replace the recorded text
by the selected template
Open the contact list
The message can be edited, as long as the text range is within the entered
view.
Contact list
After the list has been opened the following functions can be executed
» Fig. 52 -
.
Insert a contact in the recipient list
Contact search
Enter the telephone number
Return to view the message
After selecting the contact number or entering the telephone number, the re-
cipient list will be displayed in the screen » Fig. 52 -
.
Recipient list
The following functions can be performed by tapping one of the functional sur-
faces » Fig. 52 -
.
To display the contact list with the option to add/remove additional mes-
sage recipients / (to return to the recipient list » Fig. 52 -
the functional
surface.
Removal of the selected contact from the recipient list
Sending the message
Return to view the message1Received text message
When you receive a new message, the number of new messages received is
displayed next to the function surface
and at the same time the icon in the
status bar is
displayed.›
To Open the list of received messages tap on the button, then the func-
tional surface
→
surface.
›
Select a message.
The message content and the following menu is displayed.
The text can be read out by the device's generated voice
Display a menu with additional options
▶
Reply with template
- Reply using a template
▶
Delete the current SMS
- Distance of displayed text message (with SIM card
inserted in external module)
▶
Display numbers
- Recognition of telephone numbers in the message in-
cluding the contact number (recognized numbers can be dialled directly or edited before dialling, or may be sent to this message)
Forwarding a message with the option to edit the message before sending
Reply to the sender via a message
51Phone
Page 54 of 100
 and data connection
Hotspot (WLAN)
Introduction to the subject
Applies to Columbus, Amundsen (not applicable to Yeti).
WLAN can be used to connect to the Internet, to playback audio fil")
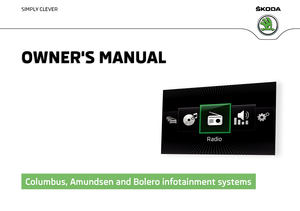
Hotspot (WLAN) and data connection
Hotspot (WLAN)
Introduction to the subject
Applies to Columbus, Amundsen (not applicable to Yeti).
WLAN can be used to connect to the Internet, to playback audio files in the menu media or for operating the device using an application in the external
device (e.g. ŠKODA Media Command).
The requirement for the WLAN function is the ignition is switched on. After
switching on the ignition, the last-used WLAN connection appears.
It is possible to connect up to 8 external devices on the device hotspot and at
the same time to connect the device to the Hotspot of other external devices.
Applies to Columbus: If there is a SIM card with active data services in the ex-
ternal module, or if there a connection to the telephone via Bluetooth ®profile
RSAP, it's not possible to connect to the external device hotspot.
connect an external device to the hotspot (WLAN) of the device
Device hotspot on / off
›
Press the button, then tap on the function surface
Tap
→
WLAN
→
Mo-bile hotspot
→
Mobile hotspot
.
Set device hotspot
▶ Press the
button, then tap on the function surface
Tap
→
WLAN
→
Mo-bile hotspot
→
Mobile hotspot
.
▶ Setting required menu items the following menu.
■
Security level:
- Setting connection security
■
Network key
- Entering the access password
■
SSID: ...
- Name of the device hotspot
■
Do not send network name (SSID)
-Turn WLAN hotspot visibility on/off
▶ Tap the functional surface
Save
to save the parameters of the devices hot-
spot.
Connect ▶ Enable the Wi-Fi in the external device and search for any available hotspots
▶ Select the device hotspot (if necessary enter the required password).
▶ Confirm the connection establishment.
Establish secure connection using WPS (applies to Amundsen) ▶ WLAN in device on.
▶ Press the
button, then tap on the function
Tap →
WLAN
→
WLAN
→
WPS Quick Connect (WPS button)
.
▶ Turn on the option to connect to the device hotspot using WPS.
Connect device to the hotspot (WLAN) of the external device
Fig. 53
List of available wireless networks: Columbus / Amundsen
›
To Turn on / off the device WLAN press the button , then the functional
surface →
Tap on
→
WLAN
→
WLAN
→
WLAN
.
Show Available Hotspots
▶ Press the
button, then tap on the function surface
Tap on
→
WLAN
→
WLAN
1)
.
With WLAN activated, a list of available hotspots with the following informa-
tion and functional areas is displayed » Fig. 53.
Searching for available hotspots
Turn the device WLAN on/off
Manual hotspot search and connect
Automatic connection of the secured connection to the hotspot via WPS
(applies to Amundsen)
ABCD1)
As long as the device is connected to the hot spot of the external device, its name is displayed in this
functional surface.
52Hotspot (WLAN) and data connection
Page 55 of 100

Functional surfaces of the available hotspots
Disconnection from the currently connected hotpot by deleting the de-
vice memory access password (The functional surface will only be shown
when connected)
Current connection
Wi-Fi strength of the external device
Connect ▶ WLAN in device on.
▶ Show the list of available hotspots, if necessary, update the list by tapping
the functional surfaceSearch
.
▶ Select the desired hotspot
▶ If the access to the hotspot is password protected, then enter the required
password.
Search for connection manually and connect ▶ Turn on WLAN in the device.
▶ Display list of available hotspots.
▶ Tap on the functional surface
Manual settings
and set the required hotspot pa-
rameters.
▶ Tap the function surface
Connect
.
▶ If the parameters for the search are set correctly and the hotspot is available,
then the connection will take place.
Establish secure connection using WPS (applies to Amundsen)
▶ Turn on WLAN in the device.
▶ In the external device, turn on the option to connect to the external device
via WPS.
▶ Press the
button, then tap on the function surface
Tap on
→
WLAN
→
Portable hotspot
→
WPS Quick Connect (WPS button)
.
End connection to the hotspot ▶ Press button when the desired Hotspot (WLAN) is found
,then the func-
tional surface →
Tap
→
WLAN
→
WLAN
→
Delete
.
data connection
Using the data connection, the device can be connected to the Internet. The
data connection can be established in one of the following ways.
Data connection using rSAP (applies to Columbus)
›
Connect the device via Bluetooth ®
profile rSAP to a telephone with activated
data services » page 46.
EFData connection using the SIM card in the external module (applies to
Columbus)›
Insert a SIM card with activated data services into the external module
» page 45 .
Data connection via WLAN
›
Connect the equipment to the hotspot of an external device with activated
data services » page 52, Connect device to the hotspot (WLAN) of the exter-
nal device .
Note
If the device is connected to an external device via Apple CarPlay ™
or Android
car ™
, then using the data connection by means of rSAP is not possible.53Hotspot (WLAN) and data connection
Page 56 of 100

SmartLink
Introductory information
Introduction to the subject
Fig. 54
QR code with reference to the
ŠKODA websites
Read in the QR code » Fig. 54using the respective application on your external
device orenter the following address in the web browser to open the website
with information on the SmartLink communication system.
http://go.skoda.eu/connectivity-smartlink
SmartLink offers the ability to display certified applications on an external de-
vice equipped with a USB device on the device screen and to operate them.
SmartLink supports the following communication systems. ▶ Android Auto ™
▶ Apple CarPlay ™
▶ MirrorLink ®
Using the applications in the connected external device it is possible to use
the navigation, to make a call, to listen to music.
For reasons of safety, the operation of some applications while driving is limi-
ted or not possible.
Depending on model of the connected external device, some applications can
be started using the voice activation, via the device screen, using the operat-
ing elements on the device or using the buttons on the multi-function steering
wheel.
The voice control of the connected external device can be activated by holding
the button
or holding the button
on the multifunction steering wheel.
CAUTION■
Depending on the type of the connected external device and the frequency
of use, the charging current may not be sufficient to charge the battery of the
connected device.■
To establish the connection, it is necessary that the date and time in the de-
vice are set correctly. If the date and time setting is based on the GPS signal,
then problems may arise with establishing a connection with a poor GPS signal
reception.
Note
■ During the connection process, information messages may be displayed on
the device screen, and in the phone display. These messages must be ob-
served and confirmed if necessary (e.g. Release of data transfer, enabling the
contact import, release of text messages).■
We recommend that you use extension cords from ŠKODA Original Accesso-
ries.
■
With some connected devices, it is necessary that the connected external
device is unlocked over the entire duration of the connection for trouble-free
functioning of the SmartLink function“”.
Main menu
Fig. 55
Main menu: no connection / example of an active connection
›
To display the main menu SmartLinkpress the button , then the function-
al surface
surface.
Main menu - functional surfaces » Fig. 55
Active connection
Display of information about SmartLink
A54SmartLink