Page 9 of 100

ŠKODA AUTO does not accept any liability for any damage to the device or ve-
hicle due to the use of incorrect or illegal applications or the improper or unau-
thorized use of mobile phones.
Applications
Applications can be installed in external devices (e.g. Mobile, tablet) making it
possible to display additional information in the device screen or to operate
the device.
Due to the large number of applications and communication systems (e.g..
SmartLink » page 54) As well as the ongoing development of these devices,
the applications may not be functional in all external devices. ŠKODA AUTO can
accept no liability for their proper function.
Applications, their use and the required data connection may be chargeable.
The range of available applications and their functionality is dependent on the
device, vehicle and region.
The function of mobile applications can be influenced by the quality of the In-
ternet connection.
Some applications are dependent on the availability of services that are provi-
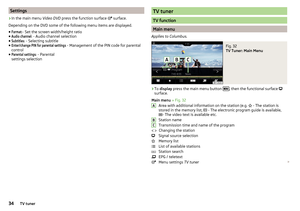
ded by third parties.Device overview
Device Description - Columbus
The device may differ depending on the vehicle model, in which it is installed
in both its appearance and in the arrangement of the controls.
Fig. 2
Illustrative device description: Columbus
Left control dial for switching the device on and off; volume adjustment
Control dial for calls and confirmations
- Radio menu » page 21
- Media menu » page 24
- Telephone menu » page 39
- Voice control » page 14
- Navigation menu » page 59
- Traffic news » page 74
- Vehicle systems settings » page 78
- Display of the device menu overview » page 11
Touchscreen » page 10
1234567897Introductory information
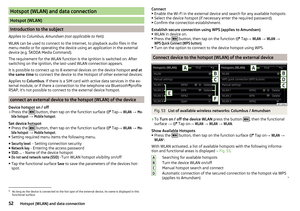
Page 10 of 100

The device may differ depending on the vehicle model, in which it is installed
in both its appearance and in the arrangement of the controls.Fig.")
Device Description - Amundsen (not applicable to Yeti)
The device may differ depending on the vehicle model, in which it is installed
in both its appearance and in the arrangement of the controls.Fig. 3
Illustrative device description: Amundsen 6.5 -Screen
Fig. 4
Device overview: Amundsen 8
Screen (applies to Superb)
Left control dial for switching the device on and off; volume adjustment
Control dial for calls and confirmations
- Radio menu » page 21
- Media menu » page 24
- Telephone menu » page 39
123 - Voice control » page 14
- Navigation menu » page 59
- Target-oriented traffic information » page 74
- Vehicle system settings » page 78
- Display of the device menu overview » page 11
Touchscreen » page 10
Device Description - Amundsen (applies to Yeti)
Fig. 5
Equipment overview
Left control dial for switching the device on and off; volume adjustment
Control dial for calls and confirmations
- Radio menu » page 21
- Media menu » page 24
- Telephone menu » page 39
- Voice control » page 14
- Switches traffic programme on/off » page 23
- Navigation menu » page 59
- Target-oriented traffic information » page 74
- Display of the device menu overview » page 11
Touchscreen » page 10
SD memory card slot “SD1”
SD memory card slot “SD2”
45678912345678910118Introductory information
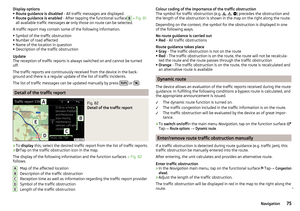
Page 11 of 100

The device may differ depending on the vehicle model, in which it is installed
in both its appearance and in the arrangement of the controls.Fig. 6")
Device Description - Bolero (not applicable to Yeti)
The device may differ depending on the vehicle model, in which it is installed
in both its appearance and in the arrangement of the controls.Fig. 6
Illustrative devices Description: Bolero 6.5 Screen
Fig. 7
Device Overview: Bolero with 8
Screen (applies to Superb)
Left control dial for switching the device on and off; volume adjustment
Control dial for calls and confirmations
- Radio menu » page 21
- Media menu » page 24
- Telephone menu » page 39
123Depending on equipment fitted:
▶ - Voice control » page 14
▶ - Switches traffic programme on/off » page 23
- Device Settings » page 16
- Sound settings
- Vehicle systems settings » page 78
- Display of the device menu overview » page 11
Touchscreen » page 10
Device Description - Bolero (applies to Yeti)
Fig. 8
Equipment overview
Left control dial for switching the device on and off; volume adjustment
Control dial for calls and confirmations
- Radio menu » page 21
- Media menu » page 24
- Telephone menu » page 39
- Voice control » page 14
- Switches traffic programme on/off » page 23
- Muting
- Sound settings
- Display of the device menu overview » page 11
Touchscreen » page 10
SD memory card slot “SD1”
456789123456789109Introductory information
Page 12 of 100
Fig. 9
Columbus External infotainment module: with SIM card slot / with-
out SIM card slot
Fig. 10
External infotainment module: Bolero / Amundsen
The extern")
External module (not applicable to Fabia)Fig. 9
Columbus External infotainment module: with SIM card slot / with-
out SIM card slot
Fig. 10
External infotainment module: Bolero / Amundsen
The external module is located in the storage compartment on the front pas-
senger side.
SD1 card slot
SD2 card slot
- CD / DVD eject button
CD/DVD case
SIM card slot
12345External module (applies to Fabia)Fig. 11
External module: Bolero and
Amundsen
The external module is located in the storage compartment on the front pas-
senger side.
Only the SD1 card slot
A
is visible and accessible » Fig. 11.
Touch screen
The unit is equipped with a touch screen which can be operated with a light
touch or swipe of a finger.
The brightness level of the screen can be set in the menu
→
→
screen
→
Brightness:
.
CAUTION
■
It is not possible to operate the screen with your fingernails or while wearing
gloves.■
To protect the screen, you can use a suitable screen protector for touchpads
that does not affect its functionality.
■
Dirt can be removed from the screen by using a soft cloth and, if necessary,
methylated spirits.
10Introductory information
Page 13 of 100

Software updateFig. 12
QR code with reference to the
ŠKODA websites
Part of the device is the installed software.
The software update ensures optimum operation of the device (e.g.. Compati-
bility with new phones, updating the radio station logo).
Current information on the compatibility of external devices can be found on
the following ŠKODAInternet pages. This is done by reading the QR code
» Fig. 12 by the associated application in the external device (e.g. phone, tablet)
or after typing the following address into the web browser.
http://go.skoda.eu/updateportal
▶ To display the software information , press the
button, then tap on the
System information function surface Tap on
→
system information
.
▶ To start the software update , tap on the
Update software
function surface in
the displayed menu.
Device on / off
›
To power on/off the device, press .
Automatic Power On of the device
If the device was not turned off with the control switch
before the ignition
was turned off, it will automatically switch on after the ignition is switched on.
Automatic Power Off of the device
If the vehicle key is pulled out of the ignition lock while the unit is switched on,
the device will switch off automatically.
If the vehicle is fitted with the starter button, the device will switch off auto-
matically after the engine is switched off and the door is opened.
With the ignition off, the device will automatically turn off after about 30 mi-
nutes.
The device turns off automatically under certain circumstances. The device in-
forms of this via a text message on the device display.
Restart the device
If the device does not respond (if it “freezes”) This can be restarted by holing
for longer than 10 s.
Unit menus
Fig. 13
Overview of the device menu
›
To
display the device menu overview, press the button.
Overview of the device menu » Fig. 13
Menu Radio » page 21
Menu Media » page 24
Menu Images » page 31
sound settings
Unit set-up » page 16
- Adjusting the vehicle systems (not applicable to Yeti) » page 78
Navigation menu » page 59 (Applies to Columbus, Amundsen)
Menu Telephone » page 39
TV tuner (Applies to Columbus) » page 34
Target-oriented traffic information (TMC) (applies to Columbus, Amundsen)
» page 74
Media Command menu » page 36
Menu SmartLink » page 54
When connecting a supported external device instead of the symbol
the actual connection is shown instead of a symbol
▶ -
Android Auto
» page 55
▶ -
Apple CarPlay
» page 56
▶ -
MirrorLink®
» page 56
11Introductory information
Page 14 of 100

Adjusting the volume
Every change in volume is displayed on the screen.›
To increase the volume , turn the controller clockwise.
›
To
reduce volume , turn the controller anticlockwise.
›
To
mute , turn the controller to the left to 0.
›
or:
Press The button (applies to Bolero in the Yeti model).
The following symbol appears in the display when the sound is muted:
.
If, at the time of muting, sound is played from the source in the media menu,
then the playback is interrupted (pause) 1)
.
CAUTION
■ High volumes can cause sound resonance in the vehicle.■When changing or connecting an audio source, this may cause sudden
changes in volume. Reduce the volume before changing or connecting an au-
dio source.Device operation and settings
Device operation
Operating principles
Fig. 14
Screen area / screen display
Fig. 15
Using the menus
Description of the display » Fig. 14
Status line with time and outdoor temperature data and other information
Information and the operation of the current menu
Function surfaces of the current menu
Identification of the current menu
Return to the higher-level menu
ABCDE1)
Does not apply to AUX.
12Device operation and settings
Page 15 of 100

Scroll symbol - positioning and moving in the menu is possible by moving
fingers on the scroll symbol up or down
Menu item with “Checkbox”
▶ - Function is switched on
▶ - Function is switched off
Open a sub menu of the menu item with the “pop-up window”
Using the menus » Fig. 15
Reduction / enlargement of the menu window Browse the menu- List entries Open / close the menu window
Close the menu window
Function interfaces
The screen areas which confirm a function or a menu are called “ function in-
terfaces ”.
▶ White background - The button is active and thus selectable
▶ Grey background - The button is inactive and thus not selectable
▶ Green frame - Currently selected key
Selecting menu/menu item/function ▶ Drag your finger over the screen in the required direction.
▶ Turning the knob .
Confirming menu/menu item/function
▶ By tapping on the function interface.
▶ Press the wheel .
Returning to higher-level menu ▶ By tapping on the function interface .
▶ By tapping on the screen outside of the “pop-up window”.
▶ By pressing the corresponding button next to the screen (e.g. in the menu
Media , by pressing the
button).
Select the menu item / function value ▶ - Selected menu item / function value
▶ - Deselected menu item / function value
Set value
▶ By pressing the function surface with one of the following symbols
.
▶ Touching or moving your finger over the scale.
▶ Turning the knob .
FGH
NoteDepending on the equipment fitted, the device can be operated using the but-
tons on the multifunction steering wheel. Additional information » Owner's
Manual .
Alphanumeric with keyboard
Fig. 16
Example of the keyboard display
The alphanumeric keypad is used to enter for letters, numbers and characters.
Description of the alphanumeric keyboard » Fig. 16
Input line
Context-dependent: ▶ - Switch to capital letters
▶ - Switch to special characters
▶ - Switch to numbers
Context-dependent: ▶ - Switch to numbers
▶ - Switch to Latin letters
▶
- Switch to Cyrillic letters
- Display of searched entries (the number of searched entries is displayed
in the function surface)
Erase the entered characters
By holding the variants of each type are displayed.
Switching between keyboards with specific characters of the selected lan-
guages » page 18
Enters a blank
Move the cursor within the input line to the left
Move the cursor within the input line to the right
Confirmation of the entered number
ABC13Device operation and settings
Page 16 of 100
.
B")
Search
While entering characters, a search is made for corresponding entries.
The entry such as a telephone contact to be searched for must be entered
along with the special characters (diacritics).
By tapping on the function surface
a list of matching entries opens. If less
than 5 entries were found, a list of the found entries opens automatically.
Operating using an application in the external device
Applies to Columbus, Amundsen (not applicable to Yeti).
Several device functions can be operated using an application in the supported
external device.
›
Enable the data transfer in the device. To do this, press and then tap on
→
Data device transfer mobile
→
enable data transfer for ŠKODA Apps
.
›
Release the device operation using the application. To do this, press and
then tap on Tap
→
Data transfer mobile devices
→
Operation using Apps:
→
Con-firm
/
Allow
.
›
Connect the equipment to an external device via WLAN » page 52.
›
In the external device, install an application for the device operation (e.g.
Start ŠKODA Media Command).
Note
The description of the device operation ŠKODA Media Command is part of the
application.
Voice control
Introduction to the subject
Fig. 17
Voice mode: Main menu
Some equipment functions can be operated by using voice commands.
The voice control system can be used either by the driver or by the front pas-
senger.
The voice control is available in the following menus » Fig. 17.
▶ “Navigation”
▶ “Telephone”
▶ “Radio”
▶ “Media”
Voice commands that can be issued, are indicated during voice control in “quo-
tation marks”.WARNINGdo not use the function of the phone voice control in an emergency . Your
voice commands may not be recognized in such situations. The telephone
connection may not be established or the connection may take too much
time to complete. The emergency number should be dialled manually!
CAUTION
The messages are generated by the device. The flawless clarity (e.g. road or
city name) cannot always be guaranteed.
Voice control on / off
Switching on
›
Press the key on the device.
›
or
: Press the button
on the multifunction steering wheel.
Switching off
›
Press the button twice on the device.
›
or
:Press the button
twice on the multifunction steering wheel.
›
Or Issue the voice command“ End voice control”.
14Device operation and settings