2016 SKODA KODIAQ seats
[x] Cancel search: seatsPage 97 of 344

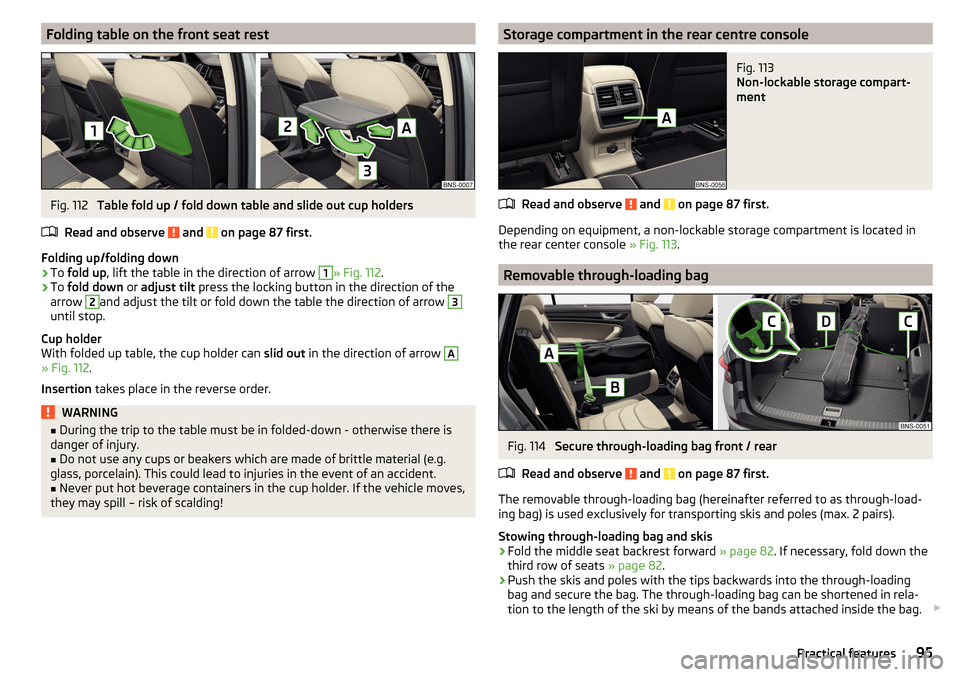
Folding table on the front seat restFig. 112
Table fold up / fold down table and slide out cup holders
Read and observe
and on page 87 first.
Folding up/folding down
›
To fold up , lift the table in the direction of arrow
1
» Fig. 112 .
›
To fold down or adjust tilt press the locking button in the direction of the
arrow
2
and adjust the tilt or fold down the table the direction of arrow
3
until stop.
Cup holder
With folded up table, the cup holder can slid out in the direction of arrow
A
» Fig. 112 .
Insertion takes place in the reverse order.
WARNING■
During the trip to the table must be in folded-down - otherwise there is
danger of injury.■
Do not use any cups or beakers which are made of brittle material (e.g.
glass, porcelain). This could lead to injuries in the event of an accident.
■
Never put hot beverage containers in the cup holder. If the vehicle moves,
they may spill – risk of scalding!
Storage compartment in the rear centre consoleFig. 113
Non-lockable storage compart-
ment
Read and observe and on page 87 first.
Depending on equipment, a non-lockable storage compartment is located in
the rear center console » Fig. 113.
Removable through-loading bag
Fig. 114
Secure through-loading bag front / rear
Read and observe
and on page 87 first.
The removable through-loading bag (hereinafter referred to as through-load-
ing bag) is used exclusively for transporting skis and poles (max. 2 pairs).
Stowing through-loading bag and skis
›
Fold the middle seat backrest forward » page 82. If necessary, fold down the
third row of seats » page 82.
›
Push the skis and poles with the tips backwards into the through-loading
bag and secure the bag. The through-loading bag can be shortened in rela-
tion to the length of the ski by means of the bands attached inside the bag.
95Practical features
Page 98 of 344

›Place the empty through-loading bag in the opening in such a way that the
end of the bag with the zip is in the luggage compartment.
Securing through-loading bag and skis›
Tighten the strap
A
around the skis in front of the bindings » Fig. 114. The
strap must hold the skis tight.
›
Insert the lock tongue
B
into the belt buckle of the middle seat.
›
The carabiners on the two sides latch into the lashing eyes
C
. To better ac-
cess the eyelets, fold forward the seat backrests of the second seat row
» page 81 .
›
Pull the belt
D
taut.
WARNING■
The total weight of the skis which are transported must not exceed 10 kg.■Always stow and secure the skis and the bag securely - otherwise there is
a risk of injury or accident!
CAUTION
Never fold and stow the through-loading bag when it is wet - risk of damaging
the through-loading bag.
Blanket
Read and observe
and on page 87 first.
To increase comfort for the occupants, the vehicle may be equipped with a
blanket.
The blanket is in a bag that can be attached to one of the following locations.
▶ On the guide rods of the front headrests.
▶ On operating lever for adjusting the second seat row in the longitudinal di-
rection.
▶ In the storage pockets on the backs of the front seats.
Electrical sockets
Introduction
This chapter contains information on the following subjects:
12-volt socket in the front centre console
97
12 volt socket in the rear centre console
9712 volt socket in luggage compartment97230-volt socket in the rear centre console97WARNING■ Do not place anything on the dashboard. These objects might slide or fall
down when driving and may distract you from concentrating on the traffic –
risk of accident!■
Make sure that while driving no objects can enter the driver's footwell -
cause an accident!
■
Safely stow all devices during the journey to prevent them from being
thrown around the interior in the event of a sudden braking manoeuvre or
an accident – risk of death!
■
The devices may warm up during operation – risk of injury or fire!
■
Improper use of the power sockets and the electrical accessories can
cause fires, burns and other serious injuries.
■
The 12-Volt sockets also work if the ignition is switched off. When leaving
the vehicle, never leave persons who are not completely independent, such
as children, unattended in the vehicle.
CAUTION
When using the 12 volt power outlets the following notes are to be observed.■The sockets can only be used for the connection of approved electrical ac-
cessories with a total power consumption of up to 120 watts, otherwise the
electrical system of the vehicle may be damaged.■
Connecting appliances when the engine is not running will drain the battery
of the vehicle!
■
Before switching the ignition on / off or before starting the engine, switch
off the devices which are connected to the sockets - there is a risk of damage
to the equipment due to voltage fluctuations.
96Operation
Page 103 of 344

WARNING■Never exceed the maximum permissible load of the respective fasteners,
nets, hooks etc. Heavy objects were not secured sufficiently – risk of injury!■
Do not exceed the permissible axle loads and permissible gross weight of
the vehicle – risk of accident!
■
An unfixed or improperly fixed load can slip during a sudden manoeuvre
or an accident - danger of injury!
■
Loose cargo could hit a deployed airbag and injure occupants – danger of
death!
■
When transporting loads in the luggage compartment that has been en-
larged by folding the rear seats forward, ensure the safety of the passen-
gers transported on the other rear seats .
CAUTION
■ Never exceed the maximum permissible load of the respective fasteners,
nets, hooks etc. - these could be damaged.■
Make sure that the heating elements of the rear window heater, the ele-
ments of the integrated aerial in the rear window or in the rear side windows
are not damaged by abrasive items.
■
Do not place sharp objects in the nets and storage compartments in the lug-
gage compartment - there is a risk of damage to the net as well as the com-
partments.
■
Put the items in the storage compartments carefully and not load these
punctiform - there is a risk of damage to the compartments.
Fastening elements
Fig. 125
Fasteners: Version 1 / version 2
Fig. 126
Fasteners: Variant 3
Read and observe and on page 101 first.
The fasteners are located on both sides of the luggage compartment.
Overview of the fastening elements » Fig. 125 and » Fig. 126
Mounting bar with integrated hooks for fixing fastening nets.
Lashing eyes for fastening cargo and fastening nets
Fixing hooks of fastening systems in the trough of the foldable luggage
compartment cover
Lashing eyes for fastening cargo and fastening nets
Hooks for securing fastening nets
The maximum permissible static load for the individual lashing eyes
B
and
D
is 350 kg.
Fixing nets
Fig. 127
Fastening examples for nets: five-seat version / five-seat version
with the variable loading floor
ABCDE101Transport of cargo
Page 106 of 344

Retracting›Push the cover in the handle area A in the direction of arrow 2 » Fig. 132 .
The cover rolls up automatically. The rolled-up cover can now be removed.
Removing/inserting›
Press on the side of the cross bar in the direction of arrow
3
and remove
the cover in the arrow direction
4
» Fig. 132 .
Insertion takes place in reverse order.
Stowing - seven-seat variant
The removed roll-up cover can be stowed in the recesses of the luggage com-
partment side trim.
›
Lift the variable loading floor in direction of arrow
1
and slide cover into the
side recesses » Fig. 133.
›
Open the side pockets on both sides of the luggage compartment in the di-
rection of arrows
2
.
›
Insert the roll-up cover in an inclined position in the recess of the right side
panel in the direction of arrow
3
and stow in arrow direction
4
.
›
Close the side pockets on both sides of the luggage compartment in the op-
posite direction to arrow
2
and restore the original position of the variable
loading floor.
WARNINGNo objects should be placed on the roll-up cover - there is a risk of damage
to the cover and a risk of injury in the event of a sudden stop or a vehicle
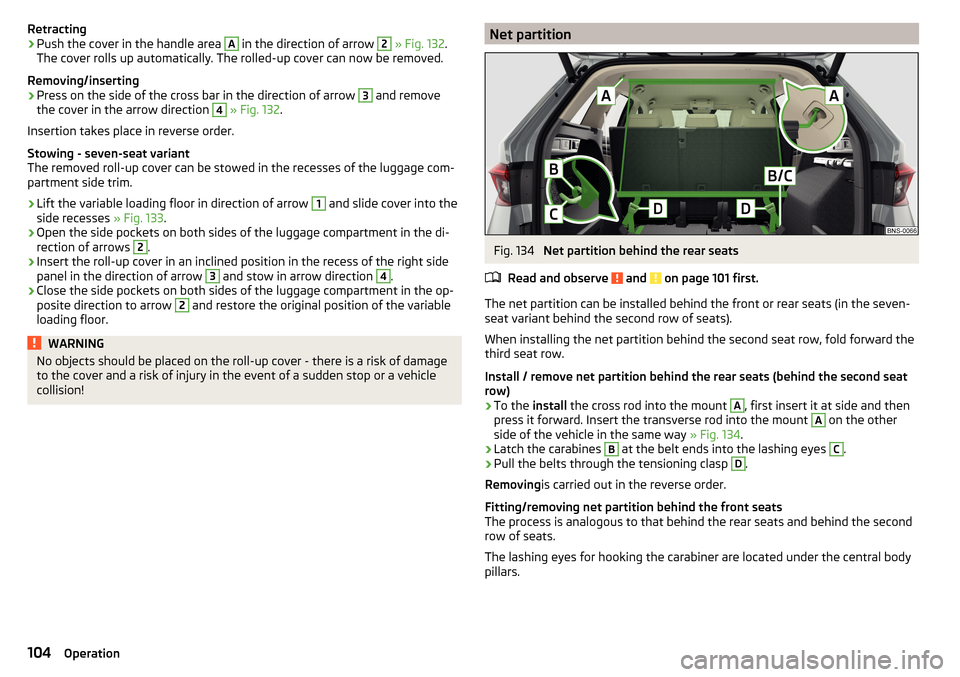
collision!Net partitionFig. 134
Net partition behind the rear seats
Read and observe
and on page 101 first.
The net partition can be installed behind the front or rear seats (in the seven-
seat variant behind the second row of seats).
When installing the net partition behind the second seat row, fold forward the third seat row.
Install / remove net partition behind the rear seats (behind the second seat
row)
›
To the install the cross rod into the mount
A
, first insert it at side and then
press it forward. Insert the transverse rod into the mount
A
on the other
side of the vehicle in the same way » Fig. 134.
›
Latch the carabines
B
at the belt ends into the lashing eyes
C
.
›
Pull the belts through the tensioning clasp
D
.
Removing is carried out in the reverse order.
Fitting/removing net partition behind the front seats
The process is analogous to that behind the rear seats and behind the second row of seats.
The lashing eyes for hooking the carabiner are located under the central body
pillars.
104Operation
Page 107 of 344

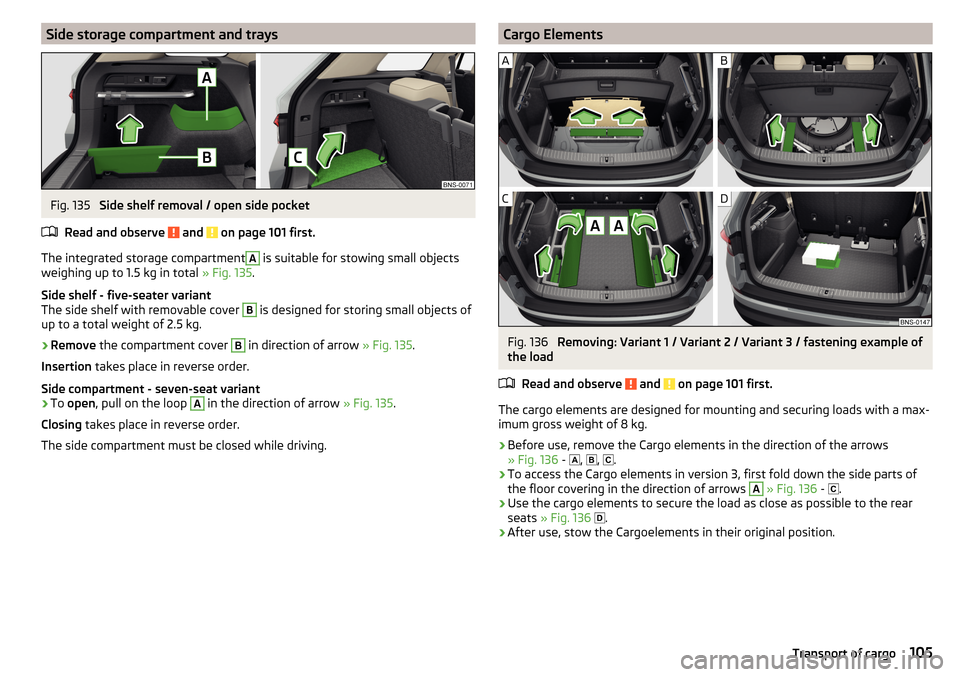
Side storage compartment and traysFig. 135
Side shelf removal / open side pocket
Read and observe
and on page 101 first.
The integrated storage compartment
A
is suitable for stowing small objects
weighing up to 1.5 kg in total » Fig. 135.
Side shelf - five-seater variant
The side shelf with removable cover
B
is designed for storing small objects of
up to a total weight of 2.5 kg.
›
Remove the compartment cover
B
in direction of arrow » Fig. 135.
Insertion takes place in reverse order.
Side compartment - seven-seat variant
›
To open , pull on the loop
A
in the direction of arrow » Fig. 135.
Closing takes place in reverse order.
The side compartment must be closed while driving.
Cargo ElementsFig. 136
Removing: Variant 1 / Variant 2 / Variant 3 / fastening example of
the load
Read and observe
and on page 101 first.
The cargo elements are designed for mounting and securing loads with a max-imum gross weight of 8 kg.
›
Before use, remove the Cargo elements in the direction of the arrows
» Fig. 136 -
,
,
.
›
To access the Cargo elements in version 3, first fold down the side parts of
the floor covering in the direction of arrows
A
» Fig. 136 -
.
›
Use the cargo elements to secure the load as close as possible to the rear
seats » Fig. 136
.
›
After use, stow the Cargoelements in their original position.
105Transport of cargo
Page 114 of 344

Operate Climatronic in InfotainmentFig. 148
Infotainment Columbus, Amund-
sen, Bolero: Climatronic main
menu
Fig. 149
Infotainment Swing: Main Menu
Climatronic
Read and observe on page 110 first.
›
To display the main menupress the button
on the Climatronic control
unit.
Function surfaces and screen display » Fig. 148 and. » Fig. 149ADisplays the current operation mode (or set the operation mode) of
the ClimatronicBSet the desired temperature, front - left sideCSet the desired temperature, front - right sideDSetting the power in operationESwitching on/off and adjusting the fan speed, cooling system, air dis-
tribution and the air recirculation a)FSet the desired temperature (rear)
Colour representation of the air flow from the air vents at the front
(Blue colour - temperature reduction / red colour - temperature in-
crease)Switching on/off the ClimatronicSwitch on / off the temperature synchronisation throughout the inte-
rior of the vehicle according to the temperature setting on the driv-
er's side a)
Locking / unlocking of the temperature setting and heating of the
rear seats using the rear buttons a)Set the auxiliary heater and ventilationSwitch on/off the windscreen heating
a)Turn on / off the steering wheel heaterOther Climatronic settingsa)
When function is switched on, the symbol in the function surface is green.
Other Climatronic settings
Press the button on the Climatronic control panel
→ tap the function sur-
face on the Infotainment screen.
■
Air con. profile
- Setting the operating performance during operation (ap-
plies to the Infotainment Swing)
■
Automatic air recirculation
- Automatic re-circulated air mode on/off
■
Automatic auxiliary heater
- Quick interior heating on/off
■
Automatic windscreen heating
- Activates/deactivates the automatic windscreen
heating
Climatronic - automatic operation
Read and observe
on page 110 first.
The automatic mode is used in order to maintain a constant temperature andto demist the windows in the interior of the car.
›
To turn on , press the
» Fig. 146 on page 110 the button.
›
To turn off , press any button for the air distribution or change the blower
speed. The temperature regulation is continued.
Holding the button will turn on
automatically.
Operating modes
Automatic mode works in three modes - moderate, medium, and intensive.
Setting the different modes is carried out via the function surface
D
» Fig. 148
on page 112 and. » Fig. 149 on page 112 .
After the automatic mode is switched on, Climatronic works in the last selec-
ted mode. The currently selected mode is displayed on the Infotainment
screen.
112Operation
Page 132 of 344

Applies to Infotainment Swing▶ To determine the software version , press the button, then tap on the
system information
function surface.
▶ To determine the software version , press the button, then tap on the
system information
→
Update software
function surface.
Infotainment settings - Columbus, Amundsen, Bolero
Infotainment system settings
sound settings
›
Press the button, then tap on the function surface
.
■
Volume
- Volume settings
■
Message
- Adjustment of traffic announcements volume (TP)
■
Nav. announcements
- sets the volume for the nav. announcements
■
Voice control
- volume setting for voice output
■
Maximum switch-on volume
- Setting the maximum volume when switching on
Infotainment
■
Speed-dependent volume adjustment
- increases the volume as speed increases
■
AUX volume:
- Sets the volume for the device connected through AUX
■
Quiet
- Low volume
■
Medium
- Medium volume
■
Loud
- High volume
■
Bluetooth audio:
- Volume setting of the device connected via Bluetooth ®
au-
dio profile of the connected device
■
Entertainment fading while parking
- Lowers the audio volume (e.g. radio volume)
with activated parking aid
■
Entertainment fading (nav. announce.)
- Lowers the audio volume (e.g. radio vol-
ume) in the event of a nav. announcements
■
Voice Enhancer
- Volume adjustment of speech amplification for driver and
front passenger to the speakers in the rear
■
Bass - Mid - Treble
- Setting the equalizer
■
Balance - Fader
- Sets the balance between left and right, front and rear
■
CANTON Equaliser
- Setting the equaliser
■
Individual
- Adjustment of treble, mid and bass
■
Profile
- Setting of the profile (e.g.
Rock
,
Classical
and so on.)
■
CANTON optimisation
-Setting the optimum room sound perception
■
All
- Setting optimised for the whole vehicle interior
■
Front
- Setting optimised for the front seats
■
Driver
- Setting optimised for the driver
■
CANTON surround
- Setting the surround sound level (“-9 ”Stereo / “+9”full sur-
round)
■
Subwoofer
- Subwoofer volume settings
■
Sound focus
-Setting the optimum room sound perception
■
All
- Setting optimised for the whole vehicle interior
■
Driver
- Setting optimised for the driver
130Infotainment
Page 255 of 344

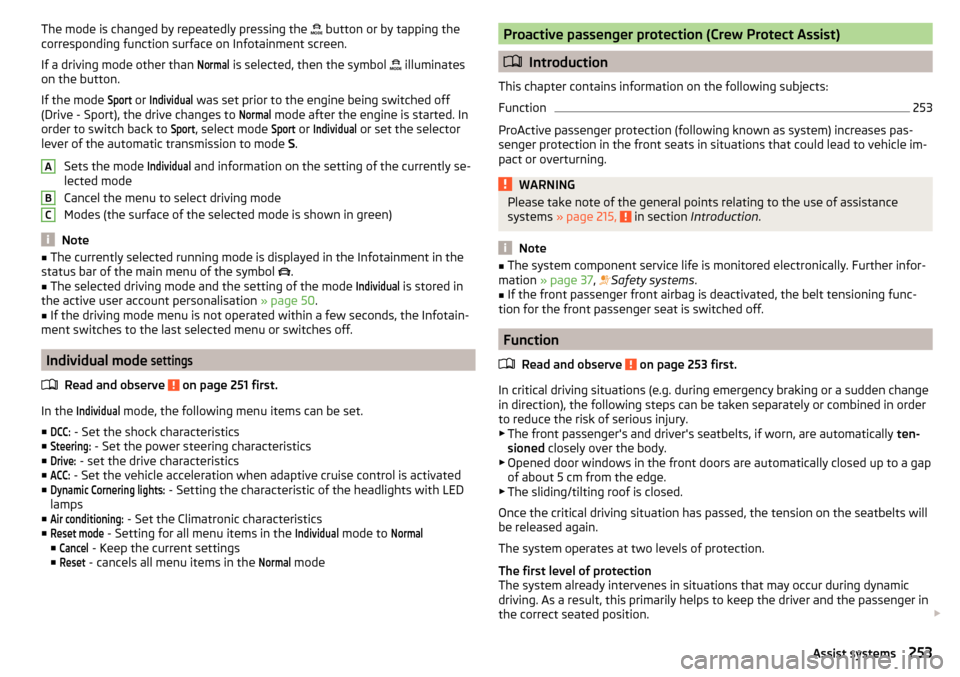
The mode is changed by repeatedly pressing the button or by tapping the
corresponding function surface on Infotainment screen.
If a driving mode other than Normal
is selected, then the symbol
illuminates
on the button.
If the mode
Sport
or
Individual
was set prior to the engine being switched off
(Drive - Sport), the drive changes to
Normal
mode after the engine is started. In
order to switch back to
Sport
, select mode
Sport
or
Individual
or set the selector
lever of the automatic transmission to mode S.
Sets the mode
Individual
and information on the setting of the currently se-
lected mode
Cancel the menu to select driving mode
Modes (the surface of the selected mode is shown in green)
Note
■ The currently selected running mode is displayed in the Infotainment in the
status bar of the main menu of the symbol .■
The selected driving mode and the setting of the mode
Individual
is stored in
the active user account personalisation » page 50.
■
If the driving mode menu is not operated within a few seconds, the Infotain-
ment switches to the last selected menu or switches off.
Individual mode
settings
Read and observe on page 251 first.
In the
Individual
mode, the following menu items can be set.
■
DCC:
- Set the shock characteristics
■
Steering:
- Set the power steering characteristics
■
Drive:
- set the drive characteristics
■
ACC:
- Set the vehicle acceleration when adaptive cruise control is activated
■
Dynamic Cornering lights:
- Setting the characteristic of the headlights with LED
lamps
■
Air conditioning:
- Set the Climatronic characteristics
■
Reset mode
- Setting for all menu items in the
Individual
mode to
Normal
■
Cancel
- Keep the current settings
■
Reset
- cancels all menu items in the
Normal
mode
ABCProactive passenger protection (Crew Protect Assist)
Introduction
This chapter contains information on the following subjects:
Function
253
ProActive passenger protection (following known as system) increases pas-
senger protection in the front seats in situations that could lead to vehicle im-
pact or overturning.
WARNINGPlease take note of the general points relating to the use of assistance
systems » page 215, in section Introduction .
Note
■
The system component service life is monitored electronically. Further infor-
mation » page 37 , Safety systems .■
If the front passenger front airbag is deactivated, the belt tensioning func-
tion for the front passenger seat is switched off.
Function
Read and observe
on page 253 first.
In critical driving situations (e.g. during emergency braking or a sudden changein direction), the following steps can be taken separately or combined in order
to reduce the risk of serious injury.
▶ The front passenger's and driver's seatbelts, if worn, are automatically ten-
sioned closely over the body.
▶ Opened door windows in the front doors are automatically closed up to a gap
of about 5 cm from the edge.
▶ The sliding/tilting roof is closed.
Once the critical driving situation has passed, the tension on the seatbelts will
be released again.
The system operates at two levels of protection.
The first level of protection
The system already intervenes in situations that may occur during dynamic
driving. As a result, this primarily helps to keep the driver and the passenger in
the correct seated position.
253Assist systems