2016 SKODA KODIAQ seats
[x] Cancel search: seatsPage 275 of 344

■Front, side and rear view cameras
The following instructions must be observed, otherwise there is a risk of
camera damage.
■ Do not remove snow / ice with warm / hot water.
■ To wash, never use a pressure washer or steam jet.
■ For cleaning, do not use abrasive cleaners.■
Door lock cylinder
■ Make sure that as little water as possible gets into the locking cylinder
when washing the vehicle - there is a risk of freezing the lock cylinder!
■
Wheels ■ Heavy contamination of the wheels can affect the balance of the wheels -
this can result in vibrations and, under some circumstances, can cause pre-
mature wear of the steering wheel.
Remove ice and snow from the windows
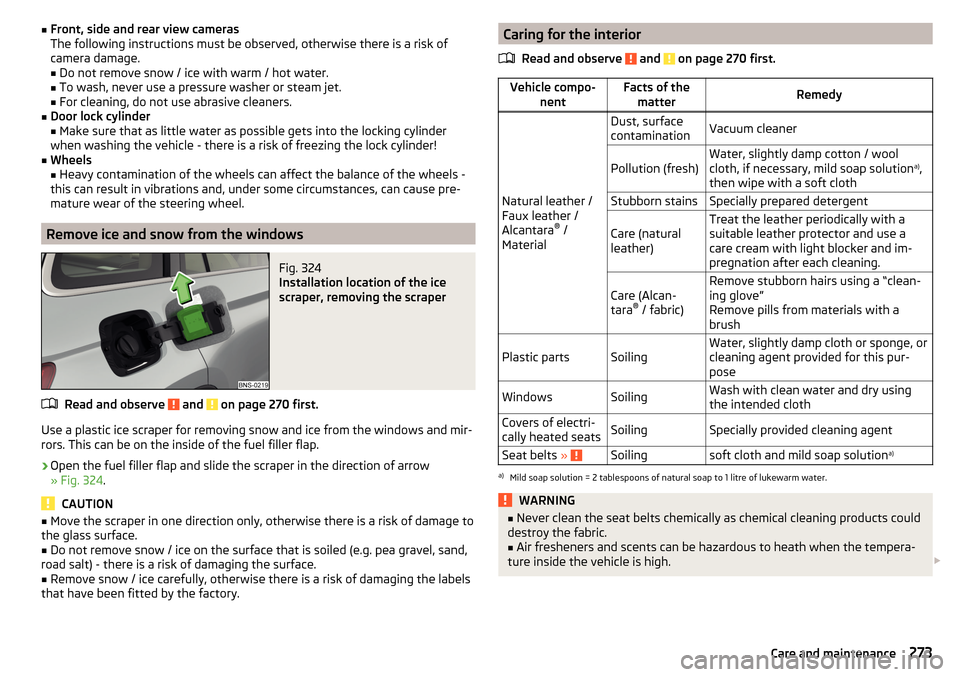
Fig. 324
Installation location of the ice
scraper, removing the scraper
Read and observe and on page 270 first.
Use a plastic ice scraper for removing snow and ice from the windows and mir-
rors. This can be on the inside of the fuel filler flap.
›
Open the fuel filler flap and slide the scraper in the direction of arrow
» Fig. 324 .
CAUTION
■
Move the scraper in one direction only, otherwise there is a risk of damage to
the glass surface.■
Do not remove snow / ice on the surface that is soiled (e.g. pea gravel, sand,
road salt) - there is a risk of damaging the surface.
■
Remove snow / ice carefully, otherwise there is a risk of damaging the labels
that have been fitted by the factory.
Caring for the interior
Read and observe
and on page 270 first.
Vehicle compo- nentFacts of thematterRemedy
Natural leather /
Faux leather /
Alcantara ®
/
Material
Dust, surface
contaminationVacuum cleanerPollution (fresh)Water, slightly damp cotton / wool
cloth, if necessary, mild soap solution a)
,
then wipe with a soft clothStubborn stainsSpecially prepared detergentCare (natural
leather)Treat the leather periodically with a
suitable leather protector and use a
care cream with light blocker and im-
pregnation after each cleaning.Care (Alcan-
tara ®
/ fabric)Remove stubborn hairs using a “clean-
ing glove”
Remove pills from materials with a
brushPlastic partsSoilingWater, slightly damp cloth or sponge, or
cleaning agent provided for this pur-
poseWindowsSoilingWash with clean water and dry using
the intended clothCovers of electri-
cally heated seatsSoilingSpecially provided cleaning agentSeat belts » Soilingsoft cloth and mild soap solution a)a)
Mild soap solution = 2 tablespoons of natural soap to 1 litre of lukewarm water.
WARNING■
Never clean the seat belts chemically as chemical cleaning products could
destroy the fabric.■
Air fresheners and scents can be hazardous to heath when the tempera-
ture inside the vehicle is high.
273Care and maintenance
Page 276 of 344

CAUTION■Natural leather /Faux leather / Alcantara ®
/ material
■ In lengthy periods in bright sunlight, it might be sensible to cover these
materials in order to avoid bleaching. ■ Fresh stains (e.g. from pens, lipstick, shoe polish etc.) should be removed as
soon as possible.
■ Ensure that no part of the leather is soaked through during cleaning and
that no water gets into the seams.
■ Do not clean the roof panelling with a brush – risk of damage to the surface
of the panelling.
■ Do not use solvents, floor wax, shoe cream, stain remover or similar agents
on Alcantara ®
seat upholstery.
■ Some clothing fabrics (e.g. dark denim) do not have sufficient colour fast-
ness - this may leave evident marks on upholstery. This is not a defect in the
fabric.
■ Sharp objects on garments (e.g. zips, rivets, sharp- edged belts) can dam-
age the upholstery fabrics in the vehicle. Such damage cannot be subse-
quently recognised as a justified complaint.■
Plastic parts ■ Do not attach scents or air fresheners to the dashboard – there is a risk of
damage to the dashboard.
■
Windows
■ Do not attach any stickers to the filaments or glass antenna - there is risk
of damage.
■
Covers of electrically heated seats
■ Do not clean with water or other liquids - there is a risk of damage to the
heating system.
■ Do not dry by switching on the heating.
■
Seat belts
■ Allow to dry before rolling up the seat belts.
Note
During vehicle use, the leather and Alcantara ®
parts may show minor changes
(e.g. folds, discolouration).Inspecting and replenishing
Fuel
Introduction
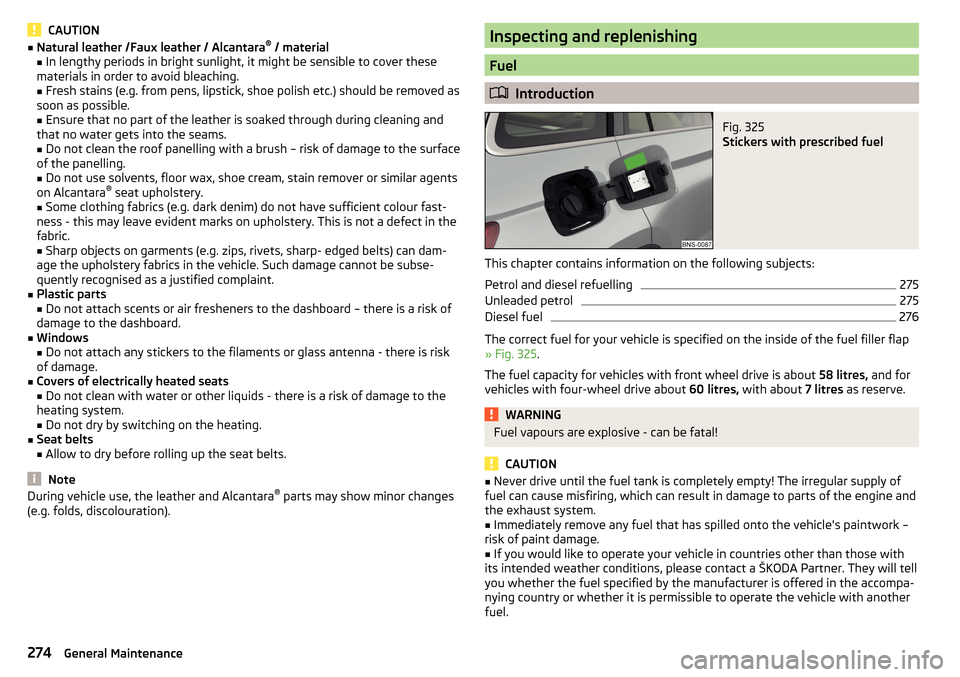
Fig. 325
Stickers with prescribed fuel
This chapter contains information on the following subjects:
Petrol and diesel refuelling
275
Unleaded petrol
275
Diesel fuel
276
The correct fuel for your vehicle is specified on the inside of the fuel filler flap
» Fig. 325 .
The fuel capacity for vehicles with front wheel drive is about 58 litres, and for
vehicles with four-wheel drive about 60 litres, with about 7 litres as reserve.
WARNINGFuel vapours are explosive - can be fatal!
CAUTION
■
Never drive until the fuel tank is completely empty! The irregular supply of
fuel can cause misfiring, which can result in damage to parts of the engine and
the exhaust system.■
Immediately remove any fuel that has spilled onto the vehicle's paintwork –
risk of paint damage.
■
If you would like to operate your vehicle in countries other than those with
its intended weather conditions, please contact a ŠKODA Partner. They will tell
you whether the fuel specified by the manufacturer is offered in the accompa-
nying country or whether it is permissible to operate the vehicle with another
fuel.
274General Maintenance
Page 285 of 344

Specification - the brake fluid must comply with VW 501 14 standard (this
standard meets the requirements of FMVSS 116 DOT4).WARNING■ The following warning instructions must be followed at all times when
working in the engine compartment » page 278.■
There may be an indication of a leak in the brake system, however, if the
fluid level drops significantly within a short time or if it drops below the
“MIN” » Fig. 334 marking.
Stop driving - There is a risk of an accident!
Seek help from a specialist garage.
Note
■ The brake fluid is changed as part of a compulsory inspection service.■A low brake fluid level which is too low is indicated by the warning light
being shown on the display of the instrument cluster as well as the corre-
sponding message » page 35. We therefore recommend that you check the
coolant level directly at the reservoir from time to time.
Vehicle battery
Introduction
This chapter contains information on the following subjects:
Check condition
284
Charging
284
Disconnect/reconnect and change
285
The vehicle battery represents a power source for the motor to start and for the supply of electrical consumers in the car.
Automatic consumer shutdown - Discharge protection of the vehicle battery
The on-board power supply tries as follows to avoid draining the vehicle bat-
tery when it is heavily loaded.
▶ By increasing the engine idle speed.
▶ By limiting the power of certain consumers.
▶ By turning off some consumers (heated seats, heated rear window) for as
long as necessary.
Warning symbols on the vehicle batterySymbolMeaningAlways wear eye protection.Battery acid is severely caustic. Always wear gloves and eye pro-
tection.Keep fire, sparks, open flames and lit cigarettes well clear of the
vehicle battery.When charging the vehicle battery, a highly explosive gas mixture
is produced.Keep children away from the vehicle battery.WARNINGBattery acid is highly corrosive - risk of injury, irritation or poisoning! Corro-
sive vapours in the air irritate and damage the respiratory tract and the
eyes. The following guidelines must be observed.■
Always wear protective gloves, eye and skin protection when handling
the vehicle battery.
■
If your eyes or skin come into contact with the electrolyte fluid, immedi-
ately wash the affected area for a few minutes with plenty of water. Seek
medical assistance if required.
■
Keep the vehicle battery away from people who are not completely inde-
pendent, especially children.
■
Do not tilt the battery otherwise battery electrolyte may flow out of the
battery vent openings.
WARNINGWhen working on the car battery, there is the risk of explosion, fire, injury
or irritation! The following guidelines must be observed.■
Avoid smoking, the use of open flames or light and any activities that
could cause sparks.
■
A discharged vehicle battery can freeze slightly. Never charge up a fro-
zen or thawed vehicle battery. Replace a frozen vehicle battery.
■
Never use a damaged vehicle battery – risk of explosion!
■
Do not connect the battery terminals with each other by bridging the two
poles of a short circuit.
283Inspecting and replenishing
Page 294 of 344

Changing a wheel›
Take out the emergency or spare wheel » page 292.
›
Remove the full wheel trim » page 293 or caps » page 294 .
›
Loosen the wheel bolts » page 294 » .
›
Jack up the vehicle » page 295 until the wheel that needs changing is clear of
the ground.
›
Unscrew the wheel bolts and place them on a clean surface (cloth, paper,
etc.).
›
Remove the wheel carefully.
›
Attach the spare wheel and slightly screw on the wheel bolts.
›
Lower the vehicle.
›
Tighten the wheel bolts opposite each other using the wheel wrench (“alter- nating crosswise”) » page 294.
›
Replace the wheel trim » page 293and the caps » page 294.
When fitting a wheel with unidirectional tyres, ensure that the direction of ro-
tation is correct » page 286.
All bolts must be clean and must turn easily. If the screws are corroded and dif-
ficult to move, then these must be replaced.
WARNING■ Undo the wheel bolts just a little (about one turn) while the vehicle is not
jacked up. Otherwise, the wheel could come off and fall down – there is a
risk of injury.■
Under no circumstances grease or oil the wheel bolts - risk of accident!
Subsequent steps
After changing the wheel, the following work must be carried out.
›
Stow the replaced wheel in the well under the floor covering of the luggage
compartment and secure with a locking screw.
›
Stow the tool kit in the space provided and secure using the band.
›
Check and, if necessary, adjust the tyre pressure on the assembled wheel,
and, for vehicle with tyre pressure monitoring, save the tyre pressure values
in the system » page 260.
›
Have the tightening torque of the wheel bolts checked with a torque wrench
as soon as possible. The prescribed tightening torque is 140 Nm.
Replace the damaged tyre. It is not recommended to repair the tyre.
WARNINGA tightening torque which is too high can damage the bolts and threads
and this can result in permanent deformation of the contact surfaces on
the rim. Too low tightening torque, the wheels may fall off while driving -
risk of an accident. Drive cautiously and only at a moderate speed until the
tightening torque has been checked.
Removing/stowing the emergency or spare wheel
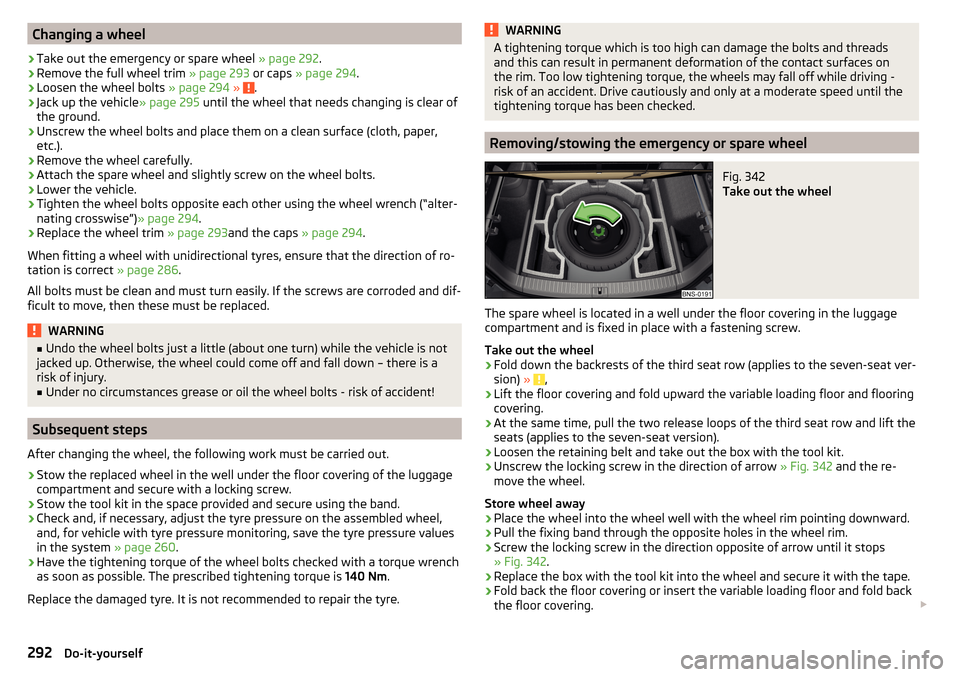
Fig. 342
Take out the wheel
The spare wheel is located in a well under the floor covering in the luggage
compartment and is fixed in place with a fastening screw.
Take out the wheel
›
Fold down the backrests of the third seat row (applies to the seven-seat ver-
sion) » ,
›
Lift the floor covering and fold upward the variable loading floor and flooring
covering.
›
At the same time, pull the two release loops of the third seat row and lift the
seats (applies to the seven-seat version).
›
Loosen the retaining belt and take out the box with the tool kit.
›
Unscrew the locking screw in the direction of arrow » Fig. 342 and the re-
move the wheel.
Store wheel away
›
Place the wheel into the wheel well with the wheel rim pointing downward.
›
Pull the fixing band through the opposite holes in the wheel rim.
›
Screw the locking screw in the direction opposite of arrow until it stops
» Fig. 342 .
›
Replace the box with the tool kit into the wheel and secure it with the tape.
›
Fold back the floor covering or insert the variable loading floor and fold back
the floor covering.
292Do-it-yourself
Page 295 of 344

›Restore the original position of the third seat row (applies to the seven-seat
version).
CAUTION
■ When handling the wheel, do not put this down on the lining parts in the
area next to the wheel, otherwise there is a risk of damaging these parts.■
Before lowering the seats, unlock the lock tongues of the seat belts (the
straps must be completely rolled up behind the lining of the rear body pillar) -
otherwise there is a risk of damage to the locks, lock tongues as well as the
seats.
Removing/stowing wheel in vehicles with sound system
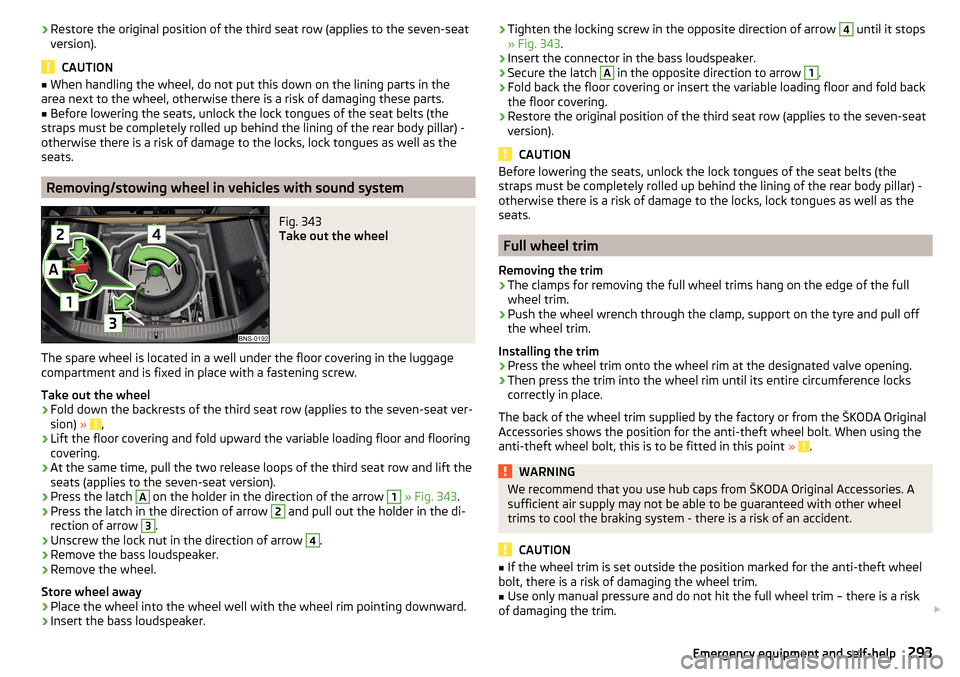
Fig. 343
Take out the wheel
The spare wheel is located in a well under the floor covering in the luggage
compartment and is fixed in place with a fastening screw.
Take out the wheel
›
Fold down the backrests of the third seat row (applies to the seven-seat ver-
sion) » ,
›
Lift the floor covering and fold upward the variable loading floor and flooring
covering.
›
At the same time, pull the two release loops of the third seat row and lift the
seats (applies to the seven-seat version).
›
Press the latch
A
on the holder in the direction of the arrow
1
» Fig. 343 .
›
Press the latch in the direction of arrow
2
and pull out the holder in the di-
rection of arrow
3
.
›
Unscrew the lock nut in the direction of arrow
4
.
›
Remove the bass loudspeaker.
›
Remove the wheel.
Store wheel away
›
Place the wheel into the wheel well with the wheel rim pointing downward.
›
Insert the bass loudspeaker.
› Tighten the locking screw in the opposite direction of arrow 4 until it stops
» Fig. 343 .›
Insert the connector in the bass loudspeaker.
›
Secure the latch
A
in the opposite direction to arrow
1
.
›
Fold back the floor covering or insert the variable loading floor and fold back
the floor covering.
›
Restore the original position of the third seat row (applies to the seven-seat
version).
CAUTION
Before lowering the seats, unlock the lock tongues of the seat belts (the
straps must be completely rolled up behind the lining of the rear body pillar) -
otherwise there is a risk of damage to the locks, lock tongues as well as the
seats.
Full wheel trim
Removing the trim
›
The clamps for removing the full wheel trims hang on the edge of the full
wheel trim.
›
Push the wheel wrench through the clamp, support on the tyre and pull off
the wheel trim.
Installing the trim
›
Press the wheel trim onto the wheel rim at the designated valve opening.
›
Then press the trim into the wheel rim until its entire circumference locks
correctly in place.
The back of the wheel trim supplied by the factory or from the ŠKODA Original
Accessories shows the position for the anti-theft wheel bolt. When using the
anti-theft wheel bolt, this is to be fitted in this point »
.
WARNINGWe recommend that you use hub caps from ŠKODA Original Accessories. A
sufficient air supply may not be able to be guaranteed with other wheel
trims to cool the braking system - there is a risk of an accident.
CAUTION
■ If the wheel trim is set outside the position marked for the anti-theft wheel
bolt, there is a risk of damaging the wheel trim.■
Use only manual pressure and do not hit the full wheel trim – there is a risk
of damaging the trim.
293Emergency equipment and self-help
Page 309 of 344

No.Consumer19KESSY20SCR21All-wheel drive22Towing hitch23Panoramic slide / tilt sunroof24Light - right25Central locking- front and rear door left, power window - left, exte-
rior mirrors left - heating, fold-in function, setting the mirror surface26Heated front seats27Interior lighting28Trailer device - electrical outlet29Not assigned30Shock absorber setting31Not assigned32Parking aid (Park Assist)33airbag34Air conditioning, reversing light switch, mirror with automatic dim-
ming, seat heating, parking brake, light switches, bar with switches,
electric auxiliary heating35Diagnostic connector, camera, radar36AFS headlights - right37AFS headlights - left38Trailer device - electrical outlet39Central locking- front and rear door right, power window - right, ex-
terior mirrors right - heating, fold-in function, setting the mirror sur-
face4012-volt power outlets41Right side belt tensioner42Luggage compartment cover lock, headlight washers, front and rear
window washer43Music amplifier44Trailer device - electrical outlet45Electrical operation of driver's seatNo.Consumer46230-Volt power socket47Rear window wiper48“Blind spot” detection49Engine starting, clutch pedal switch50Opening the boot lid51Heating of the rear seats52Heated front seats53Heated rear window
Fuses in the engine compartment
Fig. 371
Fuse box cover: Removing cover / plastic clips for fuses
Read and observe
and on page 305 first.
Replacing fuses
›
Remove the ignition key, turn off the lights and all electrical consumers.
›
Press together the lock buttons of the cover simultaneously in the direction
of arrow
1
and remove the cover in the direction of arrow
2
» Fig. 371 .
›
Remove the cover in the direction of the arrow
3
.
›
Remove the plastic clip under the cover of the fuse box » Fig. 371.
›
Use the clip to pull the fuse out, then insert a new fuse.
›
Replace the clamp in the original position.
›
Replace the cover, push the lock buttons of the cover together and lock.
CAUTION
The cover of the fuse box in the engine compartment must always be used
correctly, otherwise water may penetrate into the fuse box – there is a danger
of damage to the vehicle!307Fuses and light bulbs
Page 323 of 344

Index
A
A2DP/AVRCP
160
Abort route guidance194
ABS36, 216
ACC
42
see Automatic Distance Control243
Acceptance and recycling of used vehicles268
Accessories266
Activation of online services117
Active steering assist (DSR)217
Adaptive Chassis Control (DCC)42, 251
Adaptive cruise control Set/change desired speed
246
Warning light35
Adaptive Cruise Control42
automatic stopping and starting245
Malfunctions248
Operation244
Operation overview245
Overtaking247
Radar sensor215
Set the clearance level246
Special driving conditions247
Start control246
Stop/resume control246
Trailer towing247
AdBlue277
Check level277
refill277
Warning light40
Additional keyboard languages131, 139
additional window181
Additional windows Manoeuvre
193
Adjusting Steering wheel
13
Adjusting seats manually78
Adjusting the seats12
Advice on tyre/wheel usage285
aim Favourite
185
Flagged destination185
Online goals185
own goal187
saved destination185
search182
Telephone contact185
vCard185
Air-conditioning system Air outlet vents
113
Airbag19
Adjustments and impairments on the airbag system
267
Deactivation22
Deployment20
Warning light37
Airbag system19
Air conditioning109
Air distribution control113
Climatronic110
Manual air conditioning110
Air conditioning system120
Air distribution control113
Air outlet vents113
Alarm57
Trailer265
All season tyres288
Alphanumeric keyboard125
Alternative routes136
Ambient lighting72
Amundsen external module
123
infotainment Description121
Android Auto173
Anti-blocking system (ABS)216
Anti-theft alarm system57
Trailer265
Anti-theft wheel bolts294
APN132
Apple CarPlay174
applications Disclaimer
120
Application ŠKODA One App176
Area view230
Operating principle231
View of the front camera233
View of the rear camera back233
View of the side cameras233
Views and functional surfaces232
AreaView230
Armrest Front
80
Second seat row83
Ashtray98
ASR36 , 217
Assistant for emergencies257
Assist systems215
AT THE141, 142
Audio source146
Auto Check Control Vehicle condition
45
Auto Hold39, 207
Auto Hold function39, 207
Automatic consumer shutdown283
Automatic Distance Control243
Settings in Infotainment244
Automatic drive Selector lever
210
Automatic driving light control67
Automatic gearbox Disengage selector lever
210
Kickdown211
Launch control212
Malfunction39
321Index
Page 327 of 344

Jack291
Reflective vest290
Vehicle tool kit291
Warning triangle290
Emergency spare Removing / stowing
292
Emission control system36
Emissions315
Engine Information messages
39
Run in212
Engine compartment278
Brake fluid282
Coolant281
Engine oil280
Overview279
Vehicle battery283
Windscreen washer fluid280
Engine drag torque control (MSR)216
Engine number313
Engine oil280
Check281
Oil changing280
Refilling281
Specification280
Warning light40
Engine revolutions counter32
Enter destination183
EPC37
equalizer130
ESC ESC Sport
216
Operation216
External device data transfer131, 139
External devices Disclaimer
120
External module123
CD / DVD147
SD card148
SIM card162
Video DVD153
F
Factory settings
132 , 139
Fastening elements101
Fatigue detection259
Favourite185, 192
file formats media
150
Requirements and Restrictions150
File formats DVD video
154
Pictures152
Finish route guidance194
Fire extinguisher290
First aid kit290
Flagged destination185
Flashing67
Floor covering in the luggage compartment103
Flooring in the luggage compartment103
Floor mats209
See Floor mats209
FM141, 142
set to133, 140
Fog lights69
Warning light38
Fog lights/rear fog light69
Fog lights with CORNER function69
Foils271
Folding table95
Force limiter Electric boot lid
59
Sliding/tilting roof64
Window63
Front assist Warning light42
Front Assist248
Deactivation/activation250
Distance warning249
Malfunctions251
Operation248
Pedestrian recognition250
Radar sensor215
Settings in Infotainment248
Warning and automatic braking249
Front head restraints Adjust height
83
Front seats78
Fuel274
Diesel276
Fuel gauge33
refer to Fuel274
Refuelling275
Unleaded petrol275
Warning light38
Fuel consumption315
Fuel filter42
Fuel options137
Fuel reserve38
Function surfaces124
Fuses305
in the engine compartment307, 308
in the switchboard305, 306
Plastic clip307
G
Gas station
184
Gearbox Information messages
39
Gear change Gear recommendation
44
Information on the selected gear44
Gear changing lever
209
325Index