Page 105 of 292
1.99
Then press and hold button 2 or 3 to
confirm the time set.
The minute display flashes: repeatedly
press or press and hold button 2 or 3 to
set the time.
When setting is complete, the hours
and minutes remain displayed continu-
ously for 2 seconds: your setting is reg-
istered.
You may change the display.Display A(depending on the vehicle)
To access display 1 for setting the time,
press button 2 or 3. Wait for a few sec-
onds.
The hours and minutes flash and you
are now in setting mode; press and
hold button 2 or 3 to set the hours.
Once the minutes flash, repeatedly
press or press and hold button 2 ou 3
to set the time.
CLOCK AND EXTERIOR TEMPERATURE (1/2)
2
3
If the power supply is cut (battery
disconnected, supply wire cut, etc.),
the clock must be reset.
We recommend that you do not
adjust these settings while driving.
9°C 12:00
1
A
Page 106 of 292
1.100
Display B
Vehicles fitted with touch-screen
multimedia, navigation aid systems,
telephones, etc.
Refer to the separate instructions for
the function to understand the special
features of this equipment.
External temperature
indicator
Special note:
When the exterior temperature is - 3°C
to + 3°C, the °C characters flash (sig-
nalling a risk of ice on the road).
External temperature in-
dicator
As ice formation is related
to climatic exposure, local
air humidity and temperature, the
external temperature alone is not
sufficient to detect ice.
CLOCK AND EXTERIOR TEMPERATURE (2/2)
If the power supply is cut (battery disconnected, supply wire cut, etc.\
), the clock
must be reset.
We recommend that you do not adjust these settings while driving.
B
Page 107 of 292
1.101
Heated door mirrors
Depending on the vehicle, with the
engine running, the mirrors are heated
in conjunction with the rear windows.
Manual door mirrors
To adjust, press the mirror A.
The driver’s door mirror
may have two clearly de-
fined zones. Zone A shows
what can normally be seen
in an ordinary rear-view mirror.
Zone B increases rear side visibility.
Objects in the mirror are closer
than they appear.
REAR-VIEW MIRRORS (1/2)
Electrically-adjustable door
mirrors
With the ignition on , position control 1
on:
C to adjust the left-hand door mirror,
E to adjust the right-hand door mirror,
D to deactivate it.
1CD
E
For safety reasons, carry
out any adjustments when
the vehicle is stationary.
A
B
Page 108 of 292
1.102
REAR-VIEW MIRRORS (2/2)
Additional rear-view mirror 4(depending on the vehicle)
Lower the sun visor 3 to access the
special mirror to increase lateral vision
when manoeuvring.
4
Interior rear view mirror
Its position can be adjusted.
Rear-view mirror with lever 2
For night driving, to avoid being dazzled
by the headlights of the car behind you,
flip the small lever 2 located behind the
rear view mirror.
Rear view mirror without lever 2
The rear view mirror darkens automati-
cally at night if you are being followed
by a vehicle with its lights on.
2
3
Page 109 of 292
1.103
Daytime running lights
function
(front lights only)
The daytime running lights come on
automatically with no action on stalk 1
when the engine is started, and they go
off once the engine is switched off.
EXTERIOR LIGHTING AND SIGNALS (1/3)
šSide lights
Turn the ring 2 until the symbol
is opposite mark 3.
An indicator light on the instrument
panel will come on.
Switching off the side lights
Manually, move ring 2 to position 0.
1
Before driving at night,
check that the electrical
equipment is operating cor-
rectly and adjust the head-
light beams (if your vehicle is not
carrying its normal load). As a gen-
eral precaution, check that the lights
are not obscured (by dirt, mud,
snow or objects being transported).
312
When driving on the left in a left-
hand drive vehicle (or vice versa),
drivers must re-adjust their lights
throughout their stay (see “Adjusting
headlight beams” in Section 1).
Page 110 of 292

1.104
EXTERIOR LIGHTING AND SIGNALS (2/3)
áMain beam headlightsWith the engine running and
the dipped beam headlights lit, push
stalk 1. This indicator light on the instru-
ment panel comes on.
To return to the dipped headlight posi-
tion, pull the stalk 1 towards you again.
Switching off the main beam
headlights
Manually, move ring 2 to position 0.
Lights-on reminder buzzer
When the lights have been switched
on manually, a warning beep will sound
when the engine is switched off and
when the driver’s door is opened to
remind you that the lights are still on.
12
Switching off the dipped beam
headlights
– Manually, move ring 2 to position 0;
– automatically, with ring 2 in position
AUTO, the dipped beam headlights
go out upon stopping the engine, the
driver’s door is opened or the vehi-
cle is locked. In this case, the next
time the engine is started, the dipped
beam headlights will be switched
back on, taking into account the ex-
terior light level, without moving the
stalk 1.
NB: If the main beam headlights or
the fog lights are on, the lights are not
switched off automatically.
kDipped beam
headlights
Manual operation
Turn the ring 2 until the symbol is oppo-
site mark 3. This indicator light on the
instrument panel comes on.
Automatic operation
(depending on vehicle)
Turn ring 2 until the AUTO symbol is op-
posite mark 3: with the engine running,
the dipped beam headlights switch on
or off automatically depending on the
brightness of the light outside, without
any action on stalk 1.
If the vehicle is parked on
the hard shoulder with tail-
gate open, the rear lights
may be obscured. You
should make other road users aware
of your vehicle by using a warning
triangle or other equipment speci-
fied by the road traffic regulations of
the country you are driving in.
Page 111 of 292

1.105
EXTERIOR LIGHTING AND SIGNALS (3/3)
Cornering lights function
Whenever the dipped beam headlights
are on and under certain conditions (at
speed, the steering wheel at an angle,
in forward gear, the indicator lights on,
etc.), when taking a corner one of the
front fog lights will come on to light the
inside of the bend.
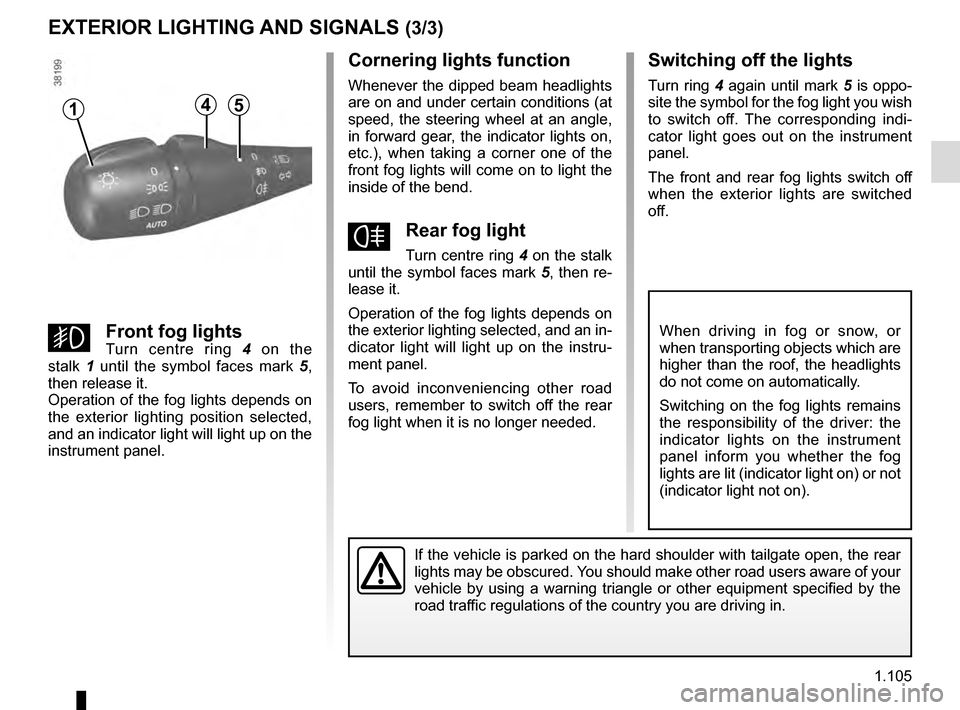
fRear fog light
Turn centre ring 4 on the stalk
until the symbol faces mark 5, then re-
lease it.
Operation of the fog lights depends on
the exterior lighting selected, and an in-
dicator light will light up on the instru-
ment panel.
To avoid inconveniencing other road
users, remember to switch off the rear
fog light when it is no longer needed.
Switching off the lights
Turn ring 4 again until mark 5 is oppo-
site the symbol for the fog light you wish
to switch off. The corresponding indi-
cator light goes out on the instrument
panel.
The front and rear fog lights switch off
when the exterior lights are switched
off.
gFront fog lightsTurn centre ring 4 on the
stalk 1 until the symbol faces mark 5,
then release it.
Operation of the fog lights depends on
the exterior lighting position selected,
and an indicator light will light up on the
instrument panel.
When driving in fog or snow, or
when transporting objects which are
higher than the roof, the headlights
do not come on automatically.
Switching on the fog lights remains
the responsibility of the driver: the
indicator lights on the instrument
panel inform you whether the fog
lights are lit (indicator light on) or not
(indicator light not on).
If the vehicle is parked on the hard shoulder with tailgate open, the re\
ar
lights may be obscured. You should make other road users aware of your
vehicle by using a warning triangle or other equipment specified by the \
road traffic regulations of the country you are driving in.
415
Page 112 of 292
1.106
HEADLIGHT BEAM ADJUSTMENT (1/2)
On vehicles fitted with this function,
control A allows you to adjust the height
of the beams according to the load.
Turn control A downwards to lower the
headlights and upwards to raise them.
Load status Control position
Empty, driver only 0
Driver with passenger(s) and luggage compartment full (1) 2
Other cases According to driver’s judgement
(1) Load status at maximum permitted weight.
A