Page 130 of 274
2.32
Recalling the limit speed
If a speed has been stored, it can be re-
called by pressing switch 5 (R).
CRUISE CONTROL/SPEED LIMITER: speed limiter function (3/3)
Putting the function on
standby
The speed limiter function is deacti-
vated when you press switch 4 (O). In
this case, the speed limit will remain
stored and is no longer displayed in
zone 6 and the message “Memorised”
along with the stored speed will appear
on the display.
1
When the speed limiter is put on
standby, pressing switch 2 (+) re-
activates the function without taking
into account the stored speed: it is
the speed at which the vehicle is
moving that is taken into account.
Switching off the function
The speed limiter function is deacti-
vated if you press switch 1: in this case
a speed is no longer stored. The in-
strument panel orange indicator light 7
goes out to confirm that the function is
deactivated.
6
2354
7
Page 132 of 274
2.34
CRUISE CONTROL/SPEED LIMITER: cruise control function (2/4)
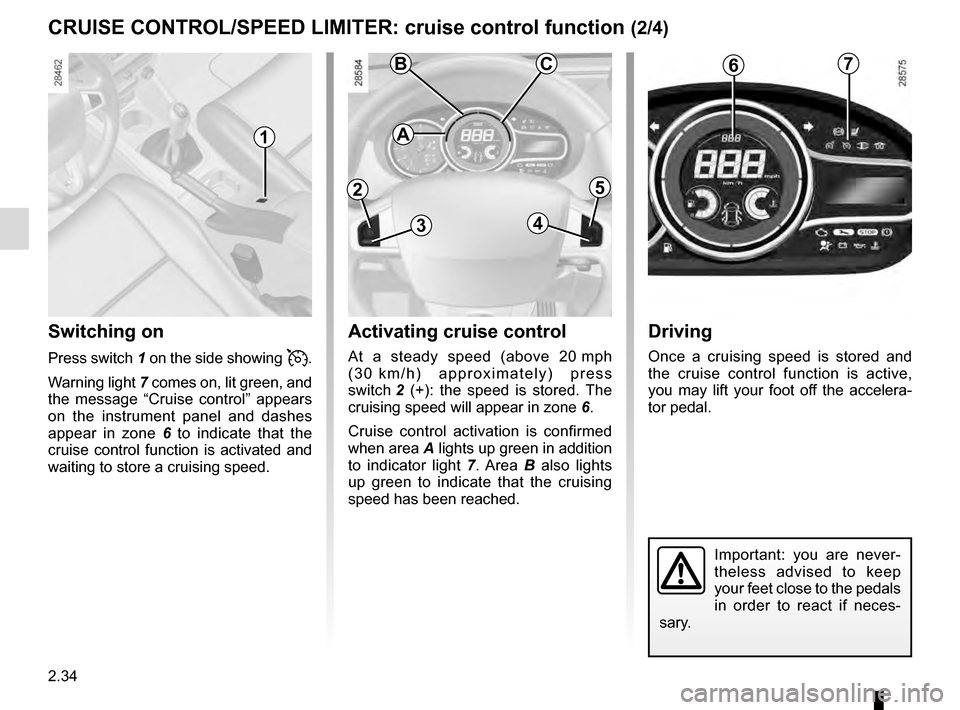
Switching on
Press switch 1 on the side showing �.
Warning light 7 comes on, lit green, and
the message “Cruise control” appears
on the instrument panel and dashes
appear in zone 6 to indicate that the
cruise control function is activated and
waiting to store a cruising speed.
Activating cruise control
At a steady speed (above 20 mph
(30 km/h) approximately) press
switch 2 (+): the speed is stored. The
cruising speed will appear in zone 6.
Cruise control activation is confirmed
when area A lights up green in addition
to indicator light 7. Area B also lights
up green to indicate that the cruising
speed has been reached.
Driving
Once a cruising speed is stored and
the cruise control function is active,
you may lift your foot off the accelera-
tor pedal.
Important: you are never-
theless advised to keep
your feet close to the pedals
in order to react if neces-
sary.
7
A
BC6
2
3
5
4
1
Page 133 of 274
;
– depress the brake pedal;
– depress the clutch pedal or shift into neutral if the vehicle has")
2.35
Putting the function on
standby
The function is suspended when you:
– press switch 4 (O);
– depress the brake pedal;
– depress the clutch pedal or shift into neutral if the vehicle has an auto-
matic gearbox.
In all three cases, the cruising speed re-
mains stored, it is no longer displayed in
zone 6 and the message “Memorised”
along with the stored speed will appear
on the instrument panel.
Standby is confirmed when zones A, B
and C go out.
Exceeding the cruising speed
The cruising speed may be exceeded
at any time by depressing the acceler-
ator pedal. The cruising speed flashes
on the instrument panel along with the
illumination of zone C in red.
Then, release the accelerator: after a
few seconds, the vehicle will automati-
cally return to its set cruising speed.
Cruising speed cannot be
maintained
If driving up or down a steep gradient,
the system is unable to maintain the
cruising speed: the stored speed on the
instrument panel will flash and zone C
will light up in red to inform you of this
situation.
CRUISE CONTROL/SPEED LIMITER: cruise control function (3/4)
Adjusting the cruising speed
The cruising speed may be changed by
pressing the following repeatedly:
– switch 2 (+) to increase the speed;
– switch 3 (-) to decrease the speed.
The cruise control function
is in no way linked to the
braking system.
A
BC6
2
3
5
4
Page 134 of 274

Note: if the speed previously stored is
much higher than the current speed,
the vehicle will accelerate more rapidly
to reach this t")
2.36
CRUISE CONTROL/SPEED LIMITER: cruise control function (4/4)
Note: if the speed previously stored is
much higher than the current speed,
the vehicle will accelerate more rapidly
to reach this threshold.
When the cruise control function is
put on standby, pressing switch 2 (+)
reactivates the cruise control func-
tion without taking into account the
stored speed: it is the speed at
which the vehicle is moving that is
taken into account.
Switching off the function
The cruise control function is deacti-
vated if you press switch 1: in this case
a speed is no longer stored. The instru-
ment panel green indicator light 7 and
zones A , B and C go out, confirming
that the function is deactivated.
Putting the cruise control
on standby or switching it
off does not cause a rapid
reduction in speed: you
must brake by depressing the brake
pedal.
1
Returning to the cruising speed
If a speed is stored, it can be recalled,
once you are sure that the road condi-
tions are suitable (traffic, road surface,
weather conditions, etc.).
Press switch 5 (R) if the vehicle speed
is above 20 mph (30 km/h).
When recalling the stored speed
zone A lights up to confirm activation.
Zone B lights up as soon as the cruis-
ing speed is reached.
A
BC
2
3
5
4
7
Page 139 of 274

1
3
C
B
A
4
This gauge remains fixed and indicates
the vehicle trajectory if the wheels are
in line with the vehicle.
Special feature
Make sure that the camera is not ob-")
2.41
REVERSING CAMERA (1/2)
1
3
C
B
A
4
This gauge remains fixed and indicates
the vehicle trajectory if the wheels are
in line with the vehicle.
Special feature
Make sure that the camera is not ob-
scured (by dirt, mud, snow, etc.).
3 moving guide line:
This is shown in blue on screen
2. It in-
dicates the vehicle trajectory according
to the position of the steering wheel.
Fixed gauge 4
The fixed clearance gauge comprises
coloured markers A, B and C , indicat-
ing the distance behind the vehicle:
– A (red) approximately 30 centime-
tres from the vehicle;
– B (yellow) approximately 70 centi-
metres from the vehicle;
– C (green) approximately 150 centi-
metres from the vehicle.
Operation
Moving into reverse gear, the camera 1
located near the number plate lights
provides a view of the area behind the
vehicle on the multimedia display 2,
accompanied by two moving or fixed
guide lines 3 and 4.
This system is initially used with the aid
of several gauges (mobile for trajectory
and fixed for distance). When the red
zone is reached, use the bumper image
to stop accurately.
2
Page 140 of 274

Park Assist
Rear parking sensor
Volume
Image settings Rear camera view settings
You can also adjust the camera image
settings (brightness, contrast, etc.)
The scre")
2.42
REVERSING CAMERA (2/2)
Park Assist
Rear parking sensor
Volume
Image settings Rear camera view settings
You can also adjust the camera image
settings (brightness, contrast, etc.)
The screen shows a reverse image.
The frames are a representation
projected onto flat ground; this in-
formation must not be taken into
account when superimposed on a
vertical object or an object on the
ground.
Objects which appear on the edge
of the screen may be deformed.
In very bright light (snow, vehicle in
sunshine etc.), the camera vision
may be adversely affected.
If the boot is open or poorly closed,
the message “Boot open” appears
and the camera display disappears.
This function is an additional aid. It cannot, therefore, under any circ\
um-
stances replace the vigilance or the responsibility of the driver.
The driver should always pay attention to sudden incidents during driv-
ing: always ensure that there are no moving obstacles (such as a child,\
animal, pram, bicycle, etc.) or small, narrow objects such as stones or\
posts in
your path when manoeuvring.
Activating, deactivating the
reversing camera
From the multimedia display 2 , select
“menu”, “Settings”, “Park Assist” then
“Rear camera view settings”. Activate
or deactivate the reversing camera and
confirm your choice by selecting
“Done”.
2
Done
Page 141 of 274

2.43
Selector lever 1
Display 3 on the instrument panel
shows the mode and gear selected.
4: P: park
5: R: reverse gear
6: N: neutral
7: D: automatic mode
8 : manual mode
9: zone displaying gearbox mode or
gear engaged in manual mode
Operation
With the gear lever 1 in position P,
switch on the ignition.
To move out of position P, you must de-
press the brake pedal before pressing
unlocking button 2.
With the foot on the brake pedal (warn-
ing light
c on the display 3 goes out),
move the lever out of position P.
Only engage D or R when the vehi-
cle is stopped, with your foot on the
brake and the accelerator pedal re-
leased.
AUTOMATIC TRANSMISSION (1/3)
Driving in automatic mode
Select position D. In most traffic con-
ditions, you will not have to touch the
gear selector lever again: the gears will
change automatically at the right time
and at the most suitable engine speed
because the automatic system takes
into account the vehicle load and road
contour and adjusts itself to the particu-
lar driving style you have chosen.
Economical driving
When driving, always leave the lever
in position D, keeping the accelerator
pedal lightly depressed to ensure auto-
matic gear changes at a lower engine
speed.
Accelerating and overtaking
Depress the accelerator pedal firmly
and fully (so that it goes beyond the
kickdown point).
This will enable you to change down
to the optimum gear within the
engine range.
3
2
1
4
5
6
78
9
Page 145 of 274

3.1
Section 3: Your comfort
Air Vents . . . . . . . . . . . . . . . . . . . . . . . . . . . . . . . . . . . .\
. . . . . . . . . . . . . . . . . . . . . . . . . . . . . . . . . . 3.2
Manual air conditioning . . . . . . . . . . . . . . . . . . . . . . . . \
. . . . . . . . . . . . . . . . . . . . . . . . . . . . . . . . . . . 3.4
Automatic climate control . . . . . . . . . . . . . . . . . . . . . . . . . . . . . . . . . . . .\
. . . . . . . . . . . . . . . . . . . . . 3.6
Air conditioning: information and advice on use . . . . . . . . . . . . . . . . . . . . . . . . . . . . . . . . . . . .\
. . . . 3.11
Electric windows . . . . . . . . . . . . . . . . . . . . . . . . . . . . . . . . . . . .\
. . . . . . . . . . . . . . . . . . . . . . . . . . . . 3.12
Manual window winders - Sun visor . . . . . . . . . . . . . . . . . . . . . . . . . . . . . . . . . . . . \
. . . . . . . . . . . . . 3.16
Interior lighting . . . . . . . . . . . . . . . . . . . . . . . . . . . . . . . . . . . . \
. . . . . . . . . . . . . . . . . . . . . . . . . . . . . . 3.17
Passenger compartment storage/fittings . . . . . . . . . . . . . . . . . . . . . . . . . . . . . . . . . . . . \
. . . . . . . . . . 3.19
Accessories socket . . . . . . . . . . . . . . . . . . . . . . . . . . . . . . . . . . . .\
. . . . . . . . . . . . . . . . . . . . . . . . . . 3.23
Ashtray – Cigarette lighter . . . . . . . . . . . . . . . . . . . . . . . . . . . . . . . . . . . . \
. . . . . . . . . . . . . . . . . . . . . 3.23
Rear bench seat . . . . . . . . . . . . . . . . . . . . . . . . . . . . . . . . . . . .\
. . . . . . . . . . . . . . . . . . . . . . . . . . . . 3.24
Luggage compartment. . . . . . . . . . . . . . . . . . . . . . . . . . .\
. . . . . . . . . . . . . . . . . . . . . . . . . . . . . . . . . 3.26
Rear parcel shelf . . . . . . . . . . . . . . . . . . . . . . . . . . . . . . . . . . . . \
. . . . . . . . . . . . . . . . . . . . . . . . . . . . 3.27
Luggage compartment cover: sport tourer versions . . . . . . . . . . . . . . . . . . . . . . . . . . . . . . . . . . . .\
. 3.28
Luggage compartment storage space/fittings . . . . . . . . . . . . . . . . . . . . . . . . . . . . . . . . . . . .\
. . . . . . 3.29
Transporting objects in the luggage compartment . . . . . . . . . . . . . . . . . . . . . . . . . . . . . . . . . . . .\
. . 3.32
Transporting objects: . . . . . . . . . . . . . . . . . . . . . . . . . . . . . . . . . . . . \
. . . . . . . . . . . . . . . . . . . . . . . . . 3.33 equipment . . . . . . . . . . . . . . . . . . . . . . . . . . . . . . . . . . . .\
. . . . . . . . . . . . . . . . . . . . . . . . . . . 3.33
Luggage net. . . . . . . . . . . . . . . . . . . . . . . . . . . . . . .\
. . . . . . . . . . . . . . . . . . . . . . . . . . . . . . . . . . . . . 3.34
Roof bars . . . . . . . . . . . . . . . . . . . . . . . . . . . . . . . . . . . . \
. . . . . . . . . . . . . . . . . . . . . . . . . . . . . . . . . . 3.36
Multimedia equipment . . . . . . . . . . . . . . . . . . . . . . . . . . . . . . . . . . . . \
. . . . . . . . . . . . . . . . . . . . . . . . 3.37
.
CRUISE CONTROL/SPEED LIMITER: speed limiter function (3/3)
Putting the function on
standby
Th")