2016 RENAULT GRAND SCENIC Scree
[x] Cancel search: ScreePage 183 of 270

4.1
Section 4: Maintenance
Bonnet . . . . . . . . . . . . . . . . . . . . . . . . . . . . . . . . . . . . \
. . . . . . . . . . . . . . . . . . . . . . . . . . . . . . . . . . . . 4.2
Engine oil level: general information . . . . . . . . . . . . . . . . . . . . . . . . . . . . . . . . . . . .\
. . . . . . . . . . . . . 4.4
Engine oil level: topping up/filling . . . . . . . . . . . . . . . . . . . . . . . . . . . . . . . . . . . .\
. . . . . . . . . . . . . . . 4.5
Oil change . . . . . . . . . . . . . . . . . . . . . . . . . . . . . . . . . . . . \
. . . . . . . . . . . . . . . . . . . . . . . . . . . . . . . . . 4.7
Levels: . . . . . . . . . . . . . . . . . . . . . . . . . . . . . . . . . . . . \
. . . . . . . . . . . . . . . . . . . . . . . . . . . . . . . . . . . . 4.8engine coolant . . . . . . . . . . . . . . . . . . . . . . . . . . . . . . . . . . . .\
. . . . . . . . . . . . . . . . . . . . . . . . 4.8
brake fluid . . . . . . . . . . . . . . . . . . . . . . . . . . . . . . . . . . . . \
. . . . . . . . . . . . . . . . . . . . . . . . . . . . 4.9
windscreen/headlight washer reservoir . . . . . . . . . . . . . . . . . . . . . . . . . . . . . . . . . . . .\
. . . . . 4.10
Filters . . . . . . . . . . . . . . . . . . . . . . . . . . . . . . . . . . . . \
. . . . . . . . . . . . . . . . . . . . . . . . . . . . . . . . . . . . . 4.10
Tyre Pressure . . . . . . . . . . . . . . . . . . . . . . . . . . . . . . . . . . . .\
. . . . . . . . . . . . . . . . . . . . . . . . . . . . . . 4.11
Battery . . . . . . . . . . . . . . . . . . . . . . . . . . . . . . . . . . . . \
. . . . . . . . . . . . . . . . . . . . . . . . . . . . . . . . . . . . 4.13
Bodywork maintenance . . . . . . . . . . . . . . . . . . . . . . . . . . . . . . . . . . . . \
. . . . . . . . . . . . . . . . . . . . . . . 4.15
Interior trim maintenance . . . . . . . . . . . . . . . . . . . . . . . . . . . . . . . . . . . . \
. . . . . . . . . . . . . . . . . . . . . . 4.17
Page 184 of 270
4.2
BONNET (1/2)Unlocking the bonnet catch
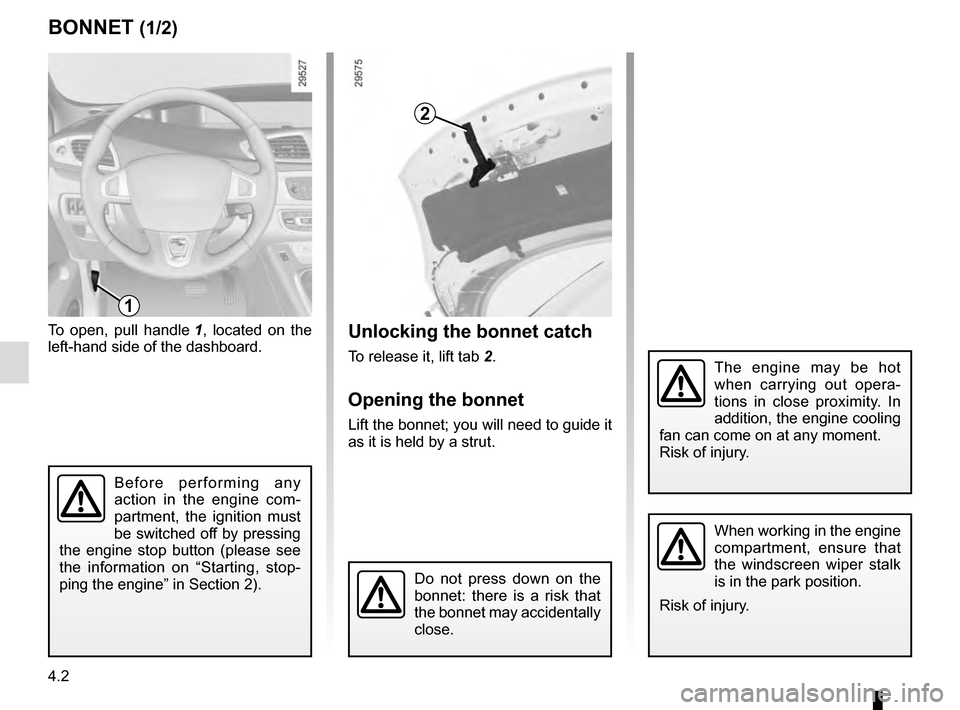
To release it, lift tab 2.
Opening the bonnet
Lift the bonnet; you will need to guide it
as it is held by a strut.
To open, pull handle
1, located on the
left-hand side of the dashboard.
1
2
Do not press down on the
bonnet: there is a risk that
the bonnet may accidentally
close.
The engine may be hot
when carrying out opera-
tions in close proximity. In
addition, the engine cooling
fan can come on at any moment.
Risk of injury.
Before performing any
action in the engine com-
partment, the ignition must
be switched off by pressing
the engine stop button (please see
the information on “Starting, stop-
ping the engine” in Section 2).
When working in the engine
compartment, ensure that
the windscreen wiper stalk
is in the park position.
Risk of injury.
Page 189 of 270
4.7
Never run the engine in an
enclosed space as exhaust
gases are poisonous.
Engine oil change: if you
are changing the oil when
the engine is hot, be careful
not to scald yourself if the
oil overflows.
Filling: take care when
topping up the oil that
no oil drips onto engine
components - risk of fire.
Remember to refit the cap securely
as there is a risk of fire if oil splashes
onto hot engine components.
Consult your approved Dealer at
once if you notice an abnormal or
repeated drop in any of the fluid
levels.
Oil change
Service interval: refer to the
Maintenance Document for your vehi-
cle.
Average capacity for oil
changes
Please refer to the maintenance docu-
ment for your vehicle, or contact an au-
thorised dealer.
Always check the engine oil level using
the dipstick, as explained previously (it
should never fall below the minimum
level, or be over the maximum level on
the dipstick).
Engine oil grade
Refer to the Maintenance Document for
your vehicle.
ENGINE OIL LEVEL: topping up, filling (3/3)/OIL CHANGE
The engine may be hot
when carrying out opera-
tions in close proximity. In
addition, the engine cooling
fan can come on at any moment.
Risk of injury.
Before performing any
action in the engine com-
partment, the ignition must
be switched off by pressing
the engine stop button (please see
the information on “Starting, stop-
ping the engine” in Section 2).
When working in the engine
compartment, ensure that
the windscreen wiper stalk
is in the park position.
Risk of injury.
Exceeding the maximum
engine oil level
Under no circumstances
must the maximum fill level
be exceeded: risk of damage to the
engine and catalytic converter.
If the oil level exceeds the maximum
level, do not start your vehicle and
contact an approved Dealer.
Page 190 of 270
4.8
Replacement intervals
Refer to the Maintenance Document for
your vehicle.
Checking intervals
Check the coolant level regularly
(very severe damage is likely to be
caused to the engine if it runs out of
coolant).
If the level needs to be topped up, only
use products approved by our Technical
Department which ensure:
– protection against freezing;
– anticorrosion protection of the cool- ing system.
LEVELS (1/3)
Coolant
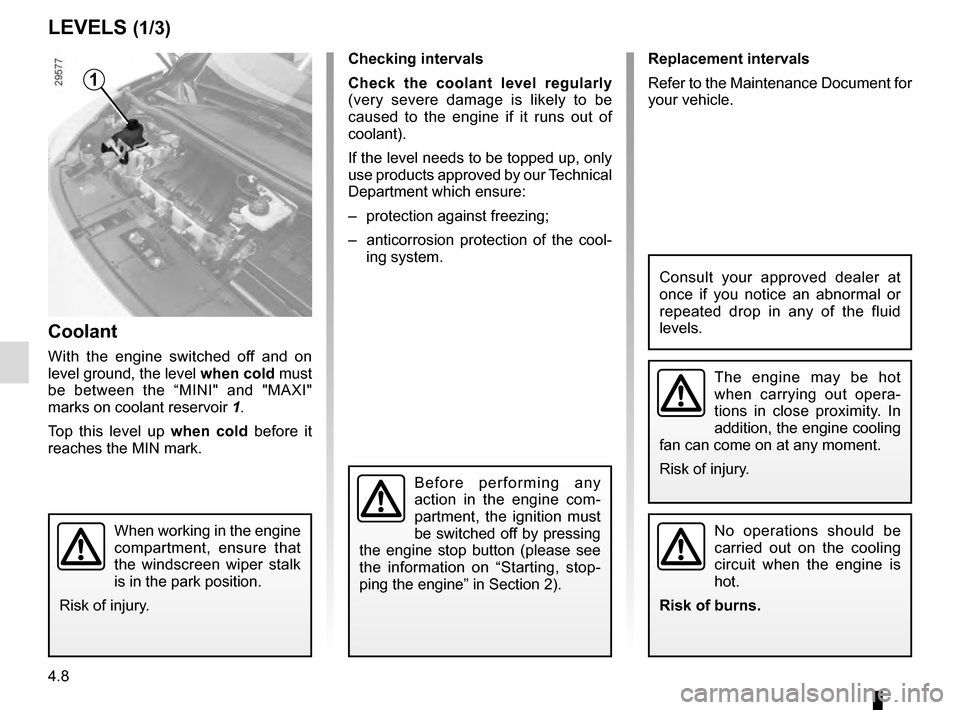
With the engine switched off and on
level ground, the level when cold must
be between the “MINI" and "MAXI"
marks on coolant reservoir 1.
Top this level up when cold before it
reaches the MIN mark.
No operations should be
carried out on the cooling
circuit when the engine is
hot.
Risk of burns.
Consult your approved dealer at
once if you notice an abnormal or
repeated drop in any of the fluid
levels.
The engine may be hot
when carrying out opera-
tions in close proximity. In
addition, the engine cooling
fan can come on at any moment.
Risk of injury.
1
When working in the engine
compartment, ensure that
the windscreen wiper stalk
is in the park position.
Risk of injury.
Before performing any
action in the engine com-
partment, the ignition must
be switched off by pressing
the engine stop button (please see
the information on “Starting, stop-
ping the engine” in Section 2).
Page 192 of 270
4.10
LEVELS (3/3)/FILTERS
Windscreen/headlight washer
reservoir
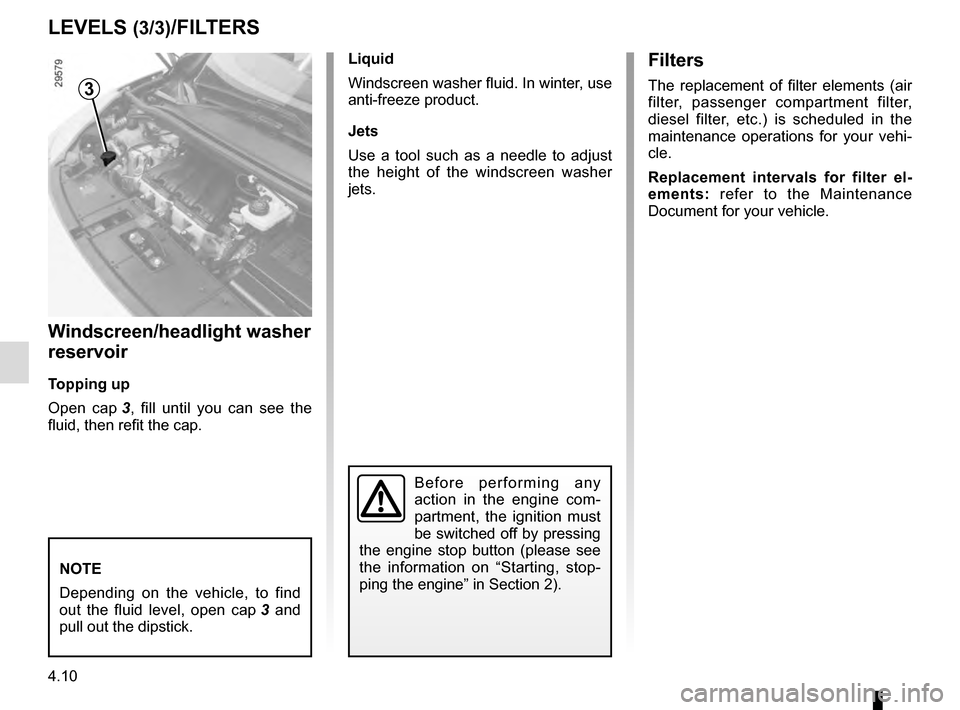
Topping up
Open cap 3, fill until you can see the
fluid, then refit the cap. Liquid
Windscreen washer fluid. In winter, use
anti-freeze product.
Jets
Use a tool such as a needle to adjust
the height of the windscreen washer
jets.
NOTE
Depending on the vehicle, to find
out the fluid level, open cap
3 and
pull out the dipstick.
Filters
The replacement of filter elements (air
filter, passenger compartment filter,
diesel filter, etc.) is scheduled in the
maintenance operations for your vehi-
cle.
Replacement intervals for filter el-
ements: refer to the Maintenance
Document for your vehicle.3
Before performing any
action in the engine com-
partment, the ignition must
be switched off by pressing
the engine stop button (please see
the information on “Starting, stop-
ping the engine” in Section 2).
Page 198 of 270
4.16
Respect local regulations about wash-
ing vehicles (e.g. do not wash your ve-
hicle on a public highway).
Observe the vehicle stopping distances
when driving on gravelled surfaces to
prevent paint damage.
Repair, or have repaired quickly, areas
where the paint has been damaged, to
prevent corrosion spreading.
Remember to visit the body shop pe-
riodically in order to maintain your
anti-corrosion warranty. Refer to the
Maintenance Document.
If it is necessary to clean mechani-
cal components, hinges, etc., spray
them with products approved by our
Technical Department to protect them
after they have been cleaned.
BODYWORK MAINTENANCE (2/2)
We have selected special products
to care for your vehicle and you can
obtain these from the manufactur-
er’s accessory outlets.
Using a roller type car wash
Return the windscreen wiper stalk to
the Park position (refer to the informa-
tion on the “Windscreen washer, wiper”
in Section 1). Check the mounting of
external accessories, additional lights
and mirrors, and ensure that the wiper
blades are secured with adhesive tape.
Remove the radio aerial mast if your
vehicle is fitted with this equipment.
Remember to remove the tape and refit
the antenna after washing.
Cleaning the headlights
As the headlights are made of plastic
“glass”, use a soft cloth or cotton wool
to clean them. If this does not clean
them properly, moisten the cloth with
soapy water, then wipe clean with a soft
damp cloth or cotton wool.
Finally, carefully dry off with a soft dry
cloth.
Cleaning products containing alco-
hol must not be used.
Vehicles with a matte paint
finish
This type of paint requires certain pre-
cautions.
Do not do the following
– use wax-based products (polishing);
– rub hard;
– wash the vehicle in a roller-type car
wash;
– wash the vehicle using a high-pres-
sure device;
– attach stickers to the paintwork (risk
of leaving marks).
You should do the following
Wash the vehicle by hand using plenty
of water, using a soft cloth or a gentle
sponge.
Page 226 of 270

5.26
FUSES (2/2)
Some accessories are protected by
fuses located in the engine compart-
ment in fuse box C.
However, because of their reduced ac-
cessibility, we advise you to have your
fuses replaced by an approved Dealer.Allocation of fuses(the presence of certain fuses depends
on the vehicle equipment level)
1 Electronic parking brake;
2 Brake lights;
3 Automatic door locking;
4 Driver’s window winder;
5 Instrument panel;
6 Direction indicator lights;
7 Navigation system;8 Interior rear-view mirror;
9 Rear screen wiper;
10 and 11
Rear electric windows;
12 ABS/ESC ;
13 Passenger electric window;
14 Windscreen washer;
15 Heated door mirrors;
16 Radio;
17 Luggage compartment accessories
socket;
18 Rear seat accessories socket;
19 Cigarette lighter.
1
2
3
4
5
6
7
8
9
10
11
12
13
14
15
16
17
18
19
C
Page 231 of 270
5.31
WIPER BLADES: replacing
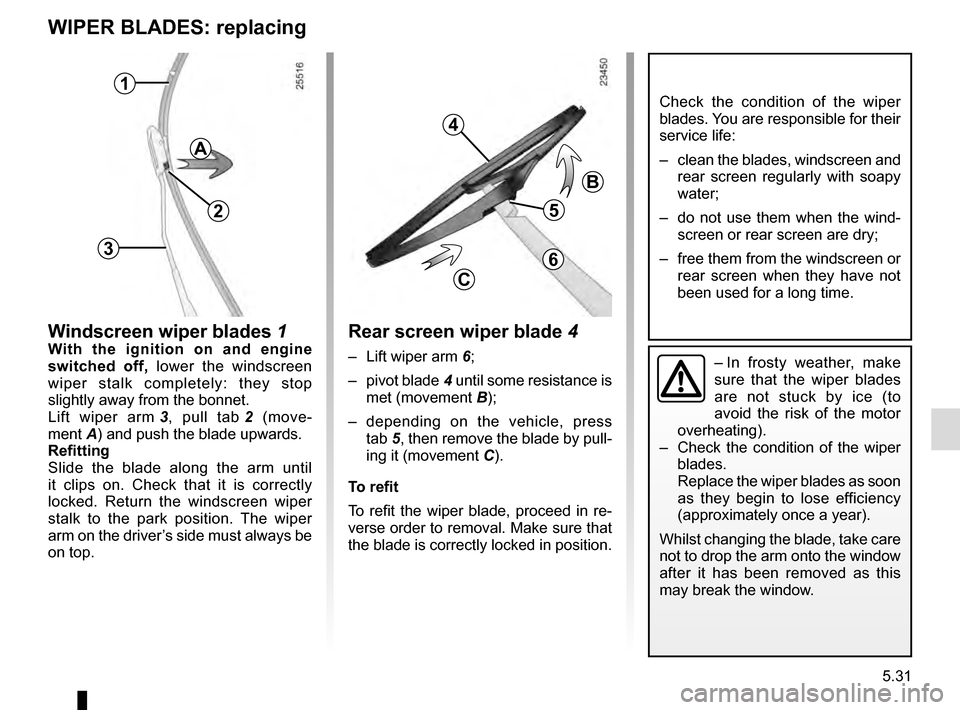
Windscreen wiper blades 1With the ignition on and engine
switched off, lower the windscreen
wiper stalk completely: they stop
slightly away from the bonnet.
Lift wiper arm 3, pull tab 2 (move-
ment A) and push the blade upwards.
Refitting
Slide the blade along the arm until
it clips on. Check that it is correctly
locked. Return the windscreen wiper
stalk to the park position. The wiper
arm on the driver’s side must always be
on top.– In frosty weather, make
sure that the wiper blades
are not stuck by ice (to
avoid the risk of the motor
overheating).
– Check the condition of the wiper
blades.
Replace the wiper blades as soon
as they begin to lose efficiency
(approximately once a year).
Whilst changing the blade, take care
not to drop the arm onto the window
after it has been removed as this
may break the window.
1
2
3
Check the condition of the wiper
blades. You are responsible for their
service life:
– clean the blades, windscreen and rear screen regularly with soapy
water;
– do not use them when the wind- screen or rear screen are dry;
– free them from the windscreen or rear screen when they have not
been used for a long time.
Rear screen wiper blade 4
– Lift wiper arm 6;
– pivot blade 4 until some resistance is
met (movement B);
– depending on the vehicle, press tab 5, then remove the blade by pull-
ing it (movement C).
To refit
To refit the wiper blade, proceed in re-
verse order to removal. Make sure that
the blade is correctly locked in position.
4
5
B
C
A
6