Page 193 of 258

5.9
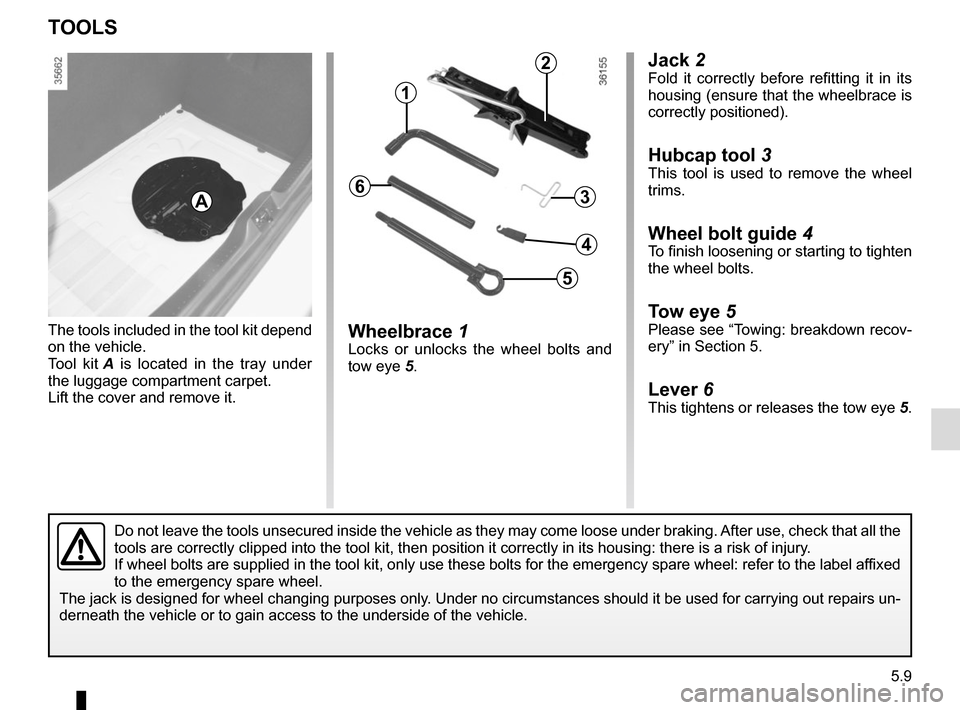
Jack 2Fold it correctly before refitting it in its
housing (ensure that the wheelbrace is
correctly positioned).
Hubcap tool 3
This tool is used to remove the wheel
trims.
Wheel bolt guide 4To finish loosening or starting to tighten
the wheel bolts.
Tow eye 5Please see “Towing: breakdown recov-
ery” in Section 5.
Lever 6This tightens or releases the tow eye 5.
Wheelbrace 1Locks or unlocks the wheel bolts and
tow eye 5.
The tools included in the tool kit depend
on the vehicle.
Tool kit
A is located in the tray under
the luggage compartment carpet.
Lift the cover and remove it.
TOOLS
A
Do not leave the tools unsecured inside the vehicle as they may come loo\
se under braking. After use, check that all the
tools are correctly clipped into the tool kit, then position it correctl\
y in its housing: there is a risk of injury.
If wheel bolts are supplied in the tool kit, only use these bolts for th\
e emergency spare wheel: refer to the label affixed
to the emergency spare wheel.
The jack is designed for wheel changing purposes only. Under no circumstances should it be used for carrying out repairs un-
derneath the vehicle or to gain access to the underside of the vehicle.
2
1
3
5
4
6
Page 195 of 258

5.11
Continue to crank the jack so that the
baseplate is correctly positioned (it
should be underneath the vehicle and
aligned with the jack head).
Turn it a few times to lift the wheel off
the ground.
Switch on the hazard warn-
ing lights.
Keep the vehicle away from
traffic and on a level surface
where it will not slip.
Apply the parking brake and engage
a gear (first or reverse, or P for auto-
matic transmissions).
Ask all the passengers to leave the
vehicle and keep them away from
traffic.
CHANGING A WHEEL (1/2)
2
1
Vehicles equipped with a jack
and wheelbrace
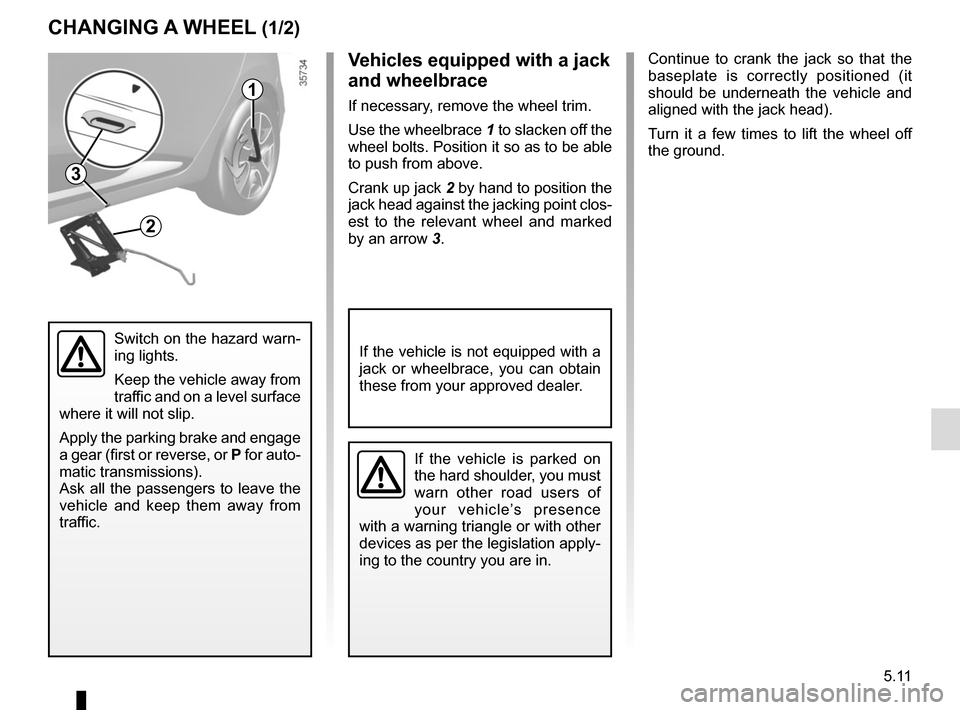
If necessary, remove the wheel trim.
Use the wheelbrace 1 to slacken off the
wheel bolts. Position it so as to be able
to push from above.
Crank up jack 2 by hand to position the
jack head against the jacking point clos-
est to the relevant wheel and marked
by an arrow 3.
If the vehicle is not equipped with a
jack or wheelbrace, you can obtain
these from your approved dealer.
3
If the vehicle is parked on
the hard shoulder, you must
warn other road users of
your vehicle’s presence
with a warning triangle or with other
devices as per the legislation apply-
ing to the country you are in.
Page 196 of 258

5.12
If you have a puncture, re-
place the wheel as soon as
possible.
A tyre which has been punc-
tured should always be inspected
(and repaired, where possible) by a
specialist.
CHANGING A WHEEL (2/2)
Undo the bolts and take off the wheel.
Fit the emergency spare wheel on the
central hub and turn it to locate the
mounting holes in the wheel and the
hub.
Tighten the bolts, checking that the
wheel is correctly positioned on its hub.
Lower the jack.
With the wheel on the ground, tighten
the bolts fully and have the tightness of
the bolts checked and the emergency
spare wheel pressure checked as soon
as possible.
Do not leave the tools un-
secured inside the vehicle
as they may come loose
under braking. After use,
check that all the tools are correctly
clipped into the tool kit, then posi-
tion it correctly in its housing: risk of
injury.
If wheel bolts are supplied in the
tool kit, only use these bolts for the
emergency spare wheel: refer to the
label affixed to the emergency spare
wheel.
The jack is designed for wheel
changing purposes only. Under no
circumstances should it be used for
carrying out repairs underneath the
vehicle or to gain access to the un-
derside of the vehicle.
Vehicle fitted with a tyre pressure
loss warning system
If under-inflated (puncture, low pres-
sure, etc.), the warning light
� on
the instrument panel comes on. See
“Tyre pressure loss warning” in
Section 2.