2016 RENAULT CLIO SPORT TOURER light
[x] Cancel search: lightPage 130 of 258
2.38
Operating principle
Ultrasonic detectors, installed in the
rear bumper (depending on the vehi-
cle), measure the distance between the
vehicle and an obstacle whilst revers-
ing.
This measurement is indicated by
beeps which become more frequent the
closer you come to the obstacle, until
they become a continuous beep when
the vehicle is approximately 30 centi-
metres from the obstacle.
NB: make sure that the ultrasonic sen-
sors are not obscured (by dirt, mud,
snow, etc.).
PARKING DISTANCE CONTROL (1/2)Operation
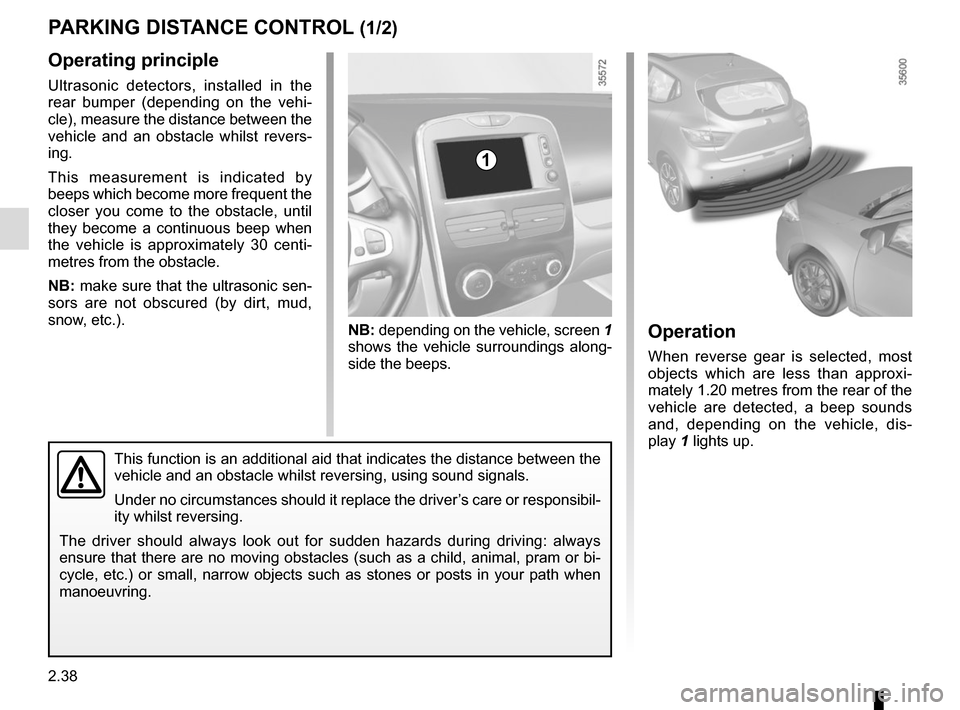
When reverse gear is selected, most
objects which are less than approxi-
mately 1.20 metres from the rear of the
vehicle are detected, a beep sounds
and, depending on the vehicle, dis-
play 1 lights up.
1
NB: depending on the vehicle, screen 1
shows the vehicle surroundings along-
side the beeps.
This function is an additional aid that indicates the distance between t\
he
vehicle and an obstacle whilst reversing, using sound signals.
Under no circumstances should it replace the driver’s care or responsibil-
ity whilst reversing.
The driver should always look out for sudden hazards during driving: alw\
ays
ensure that there are no moving obstacles (such as a child, animal, pra\
m or bi-
cycle, etc.) or small, narrow objects such as stones or posts in your p\
ath when
manoeuvring.
Page 131 of 258
2.39
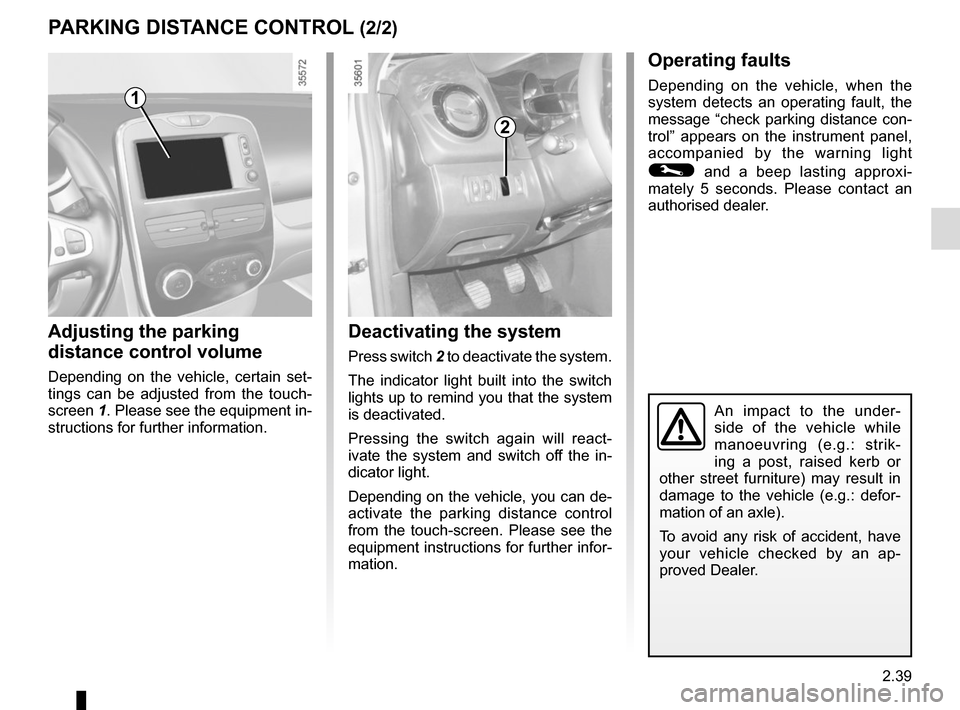
Deactivating the system
Press switch 2 to deactivate the system.
The indicator light built into the switch
lights up to remind you that the system
is deactivated.
Pressing the switch again will react-
ivate the system and switch off the in-
dicator light.
Depending on the vehicle, you can de-
activate the parking distance control
from the touch-screen. Please see the
equipment instructions for further infor-
mation.
2
An impact to the under-
side of the vehicle while
manoeuvring (e.g.: strik-
ing a post, raised kerb or
other street furniture) may result in
damage to the vehicle (e.g.: defor-
mation of an axle).
To avoid any risk of accident, have
your vehicle checked by an ap-
proved Dealer.
PARKING DISTANCE CONTROL (2/2)
Adjusting the parking
distance control volume
Depending on the vehicle, certain set-
tings can be adjusted from the touch-
screen 1. Please see the equipment in-
structions for further information.
1
Operating faults
Depending on the vehicle, when the
system detects an operating fault, the
message “check parking distance con-
trol” appears on the instrument panel,
accompanied by the warning light
© and a beep lasting approxi-
mately 5 seconds. Please contact an
authorised dealer.
Page 132 of 258
2.40
REVERSING CAMERA (1/2)
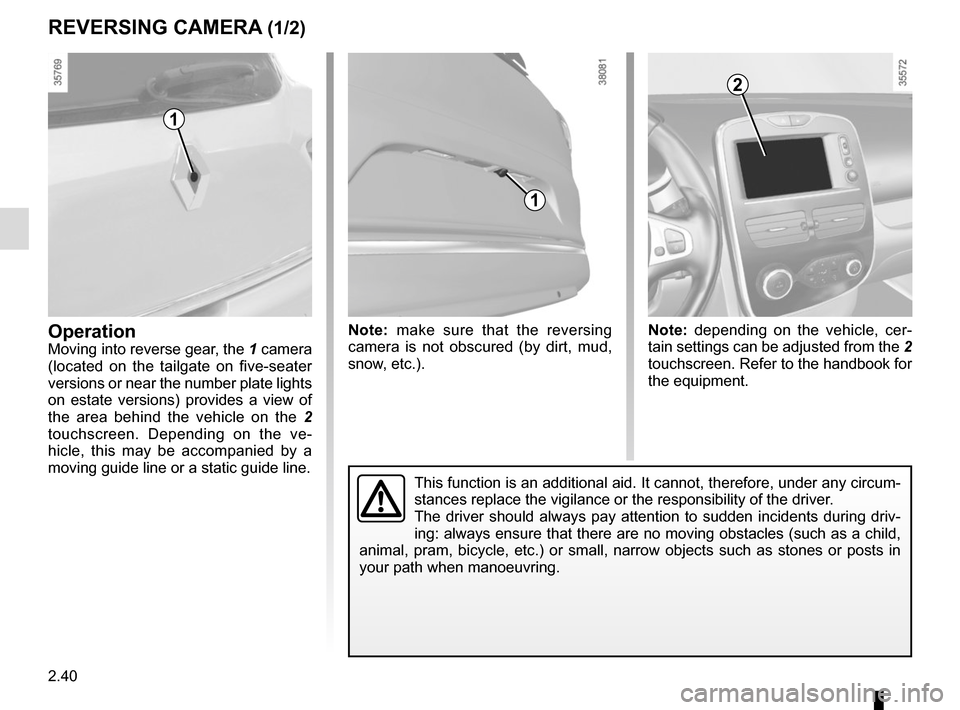
OperationMoving into reverse gear, the 1 camera
(located on the tailgate on five-seater
versions or near the number plate lights
on estate versions) provides a view of
the area behind the vehicle on the 2
touchscreen. Depending on the ve-
hicle, this may be accompanied by a
moving guide line or a static guide line.
1
Note: make sure that the reversing
camera is not obscured (by dirt, mud,
snow, etc.).
2
1
Note: depending on the vehicle, cer-
tain settings can be adjusted from the 2
touchscreen. Refer to the handbook for
the equipment.
This function is an additional aid. It cannot, therefore, under any circ\
um-
stances replace the vigilance or the responsibility of the driver.
The driver should always pay attention to sudden incidents during driv-
ing: always ensure that there are no moving obstacles (such as a child,\
animal, pram, bicycle, etc.) or small, narrow objects such as stones or\
posts in
your path when manoeuvring.
Page 133 of 258
2.41
REVERSING CAMERA (2/2)
The screen shows a reverse image.
The frames are a representation
projected onto flat ground; this in-
formation must not be taken into
account when superimposed on a
vertical object or an object on the
ground.
Objects which appear on the edge
of the screen may be deformed.
In very bright light (snow, vehicle in
sunshine etc.), the camera vision
may be adversely affected.
If the boot is open or poorly closed,
the message “BOOT OPEN” ap-
pears and, depending on the vehi-
cle, the camera display disappears.
3
C
B
A
4
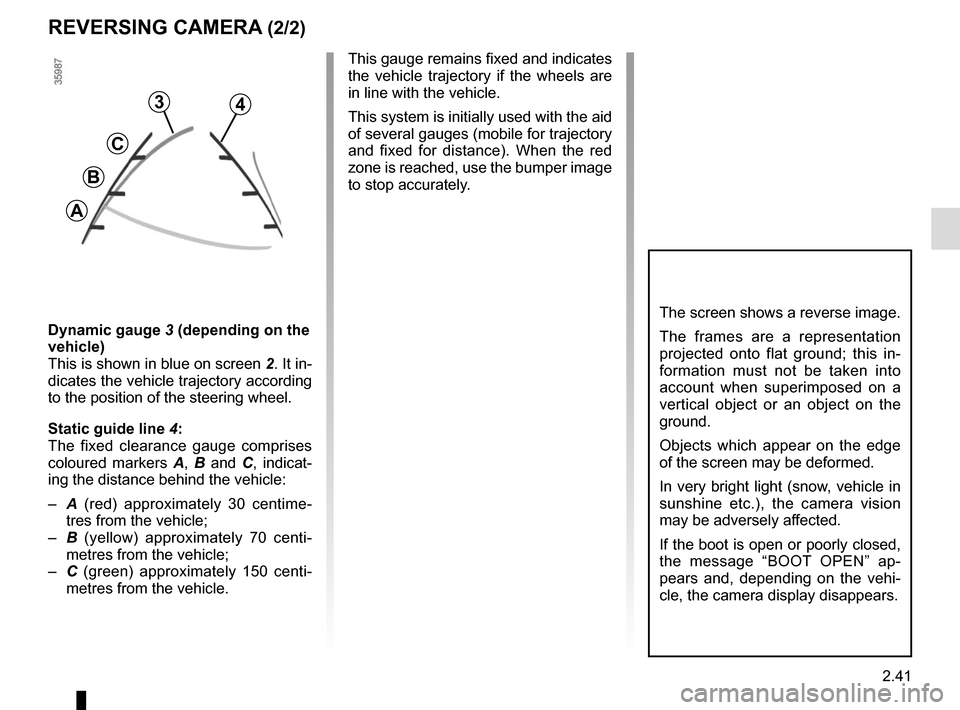
Dynamic gauge 3 (depending on the
vehicle)
This is shown in blue on screen 2. It in-
dicates the vehicle trajectory according
to the position of the steering wheel.
Static guide line 4:
The fixed clearance gauge comprises
coloured markers A, B and C , indicat-
ing the distance behind the vehicle:
– A (red) approximately 30 centime-
tres from the vehicle;
– B (yellow) approximately 70 centi-
metres from the vehicle;
– C (green) approximately 150 centi-
metres from the vehicle. This gauge remains fixed and indicates
the vehicle trajectory if the wheels are
in line with the vehicle.
This system is initially used with the aid
of several gauges (mobile for trajectory
and fixed for distance). When the red
zone is reached, use the bumper image
to stop accurately.
Page 134 of 258
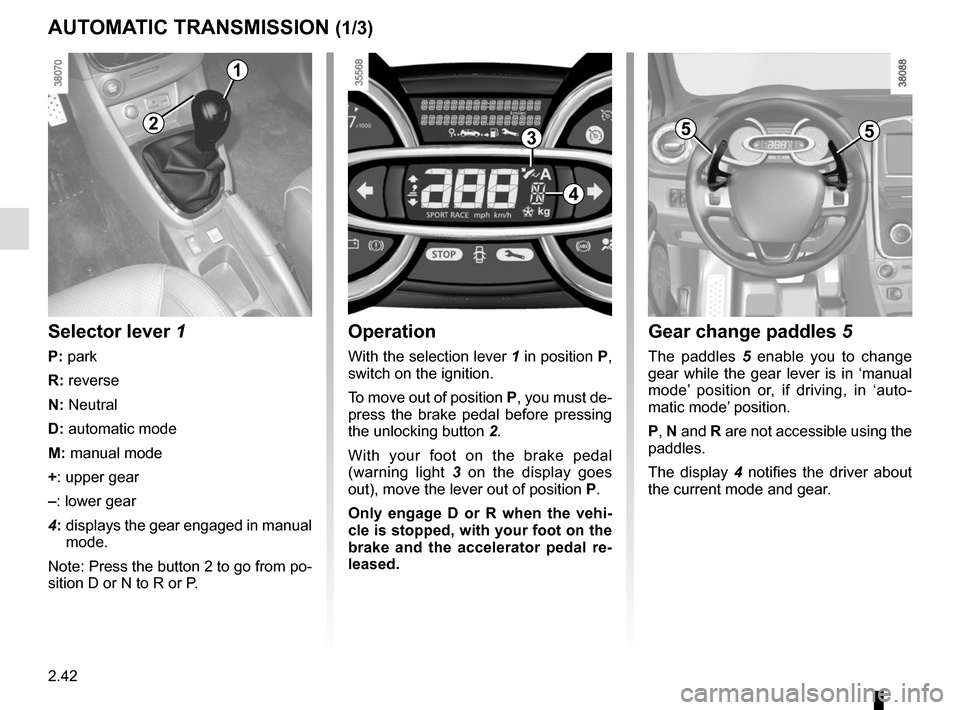
2.42
Operation
With the selection lever 1 in position P,
switch on the ignition.
To move out of position P, you must de-
press the brake pedal before pressing
the unlocking button 2.
With your foot on the brake pedal
(warning light 3 on the display goes
out), move the lever out of position P.
Only engage D or R when the vehi-
cle is stopped, with your foot on the
brake and the accelerator pedal re-
leased.
Selector lever 1
P: park
R: reverse
N: Neutral
D: automatic mode
M: manual mode
+: upper gear
–: lower gear
4: displays the gear engaged in manual
mode.
Note: Press the button 2 to go from po-
sition D or N to R or P.
AUTOMATIC TRANSMISSION (1/3)
1
4
32
Gear change paddles 5
The paddles 5 enable you to change
gear while the gear lever is in ‘manual
mode’ position or, if driving, in ‘auto-
matic mode’ position.
P, N and R are not accessible using the
paddles.
The display 4 notifies the driver about
the current mode and gear.
55
Page 135 of 258
2.43
AUTOMATIC TRANSMISSION (2/3)
Driving in manual modeWith the selector lever in position D,
move the lever to the left into the M po-
sition. Shifting the lever or the paddles
repeatedly allows you to change gears
manually:
– to move down through the gears, push the lever forwards or press the
left-hand paddle;
– to move up through the gears, push the lever backwards or press the
right-hand paddle.
The gear selected is displayed on the
instrument panel.
Special casesIn certain driving conditions (for exam-
ple, engine protection, operation of the
Electronic Stability Programme: the au-
tomatic system may change gear auto-
matically. Likewise, to prevent incorrect
manoeuvres, a gear change may be re-
fused by the automatic system: in this
case the gear display flashes for a few
seconds as a warning.
Special circumstances
– If the bends and road surface do
not allow you to stay in automatic
mode (e.g. in the mountains), we
recommend that you change to
manual mode. This will prevent the
automatic gearbox from changing
gear repeatedly when climbing, and
permit engine braking on long de-
scents.
Driving in automatic mode
Put lever 1 into position D.
In most road conditions you will en-
counter, you will not need to touch your
lever again: the gears will change au-
tomatically at the right time and at the
most suitable engine speed because
the automatic system takes into ac-
count the vehicle load and road contour
and adjusts itself to the particular driv-
ing style you have chosen.
Economical driving
When driving, always leave the lever
in position D, keeping the accelerator
pedal lightly depressed to ensure auto-
matic gear changes at a lower engine
speed.
Accelerating and overtaking
Depress the accelerator pedal firmly
and fully (so that it goes beyond the
kickdown point).
This will enable you to change down
to the optimum gear within the
engine range.
When facing uphill, to remain
stopped, do not keep your foot on
the accelerator.
Risk of overheating the automatic
gearbox.
Page 137 of 258
3.1
Section 3: Your comfort
Air Vents . . . . . . . . . . . . . . . . . . . . . . . . . . . . . . . . . . . .\
. . . . . . . . . . . . . . . . . . . . . . . . . . . . . . . . . . 3.2
Manual air conditioning/heating system . . . . . . . . . . . . . . . . . . . . . . . . . . . . . . . . . . . .\
. . . . . . . . . . 3.4
Automatic climate control . . . . . . . . . . . . . . . . . . . . . . . . . . . . . . . . . . . .\
. . . . . . . . . . . . . . . . . . . . . 3.7
Air conditioning: information and advice on use . . . . . . . . . . . . . . . . . . . . . . . . . . . . . . . . . . . .\
. . . . 3.11
Electric windows . . . . . . . . . . . . . . . . . . . . . . . . . . . . . . . . . . . .\
. . . . . . . . . . . . . . . . . . . . . . . . . . . . 3.12
Roof sun blind . . . . . . . . . . . . . . . . . . . . . . . . . . . . .\
. . . . . . . . . . . . . . . . . . . . . . . . . . . . . . . . . . . . . 3.14
Interior lighting . . . . . . . . . . . . . . . . . . . . . . . . . . . . . . . . . . . . \
. . . . . . . . . . . . . . . . . . . . . . . . . . . . . . 3.15
Passenger compartment storage/fittings . . . . . . . . . . . . . . . . . . . . . . . . . . . . . . . . . . . . \
. . . . . . . . . . 3.16
Ashtray/cigarette lighter . . . . . . . . . . . . . . . . . . . . . . . . . . . . . . . . . . . . \
. . . . . . . . . . . . . . . . . . . . . . . 3.20
Rear bench seat: functions . . . . . . . . . . . . . . . . . . . . . . . . . . . . . . . . . . . .\
. . . . . . . . . . . . . . . . . . . . 3.22
Luggage compartment. . . . . . . . . . . . . . . . . . . . . . . . . . .\
. . . . . . . . . . . . . . . . . . . . . . . . . . . . . . . . . 3.23
Rear parcel shelf . . . . . . . . . . . . . . . . . . . . . . . . . . . . . . . . . . . . \
. . . . . . . . . . . . . . . . . . . . . . . . . . . . 3.24
Luggage compartment storage . . . . . . . . . . . . . . . . . . . . . . . . . . . . . . . . . . . .\
. . . . . . . . . . . . . . . . . 3.26
Transporting objects in the luggage compartment . . . . . . . . . . . . . . . . . . . . . . . . . . . . . . . . . . . .\
. . 3.27
Transporting objects: . . . . . . . . . . . . . . . . . . . . . . . . . . . . . . . . . . . . \
. . . . . . . . . . . . . . . . . . . . . . . . . 3.28 towing, attachments . . . . . . . . . . . . . . . . . . . . . . . . . . . . . . . . . . . . \
. . . . . . . . . . . . . . . . . . . . 3.28
Luggage net . . . . . . . . . . . . . . . . . . . . . . . . . . . . . . . . . . . . \
. . . . . . . . . . . . . . . . . . . . . . . . . . 3.29
Roof bars . . . . . . . . . . . . . . . . . . . . . . . . . . . . . . . . . . . . \
. . . . . . . . . . . . . . . . . . . . . . . . . . . . . . . . . . 3.31
Spoiler . . . . . . . . . . . . . . . . . . . . . . . . . . . . . . . . . . . . \
. . . . . . . . . . . . . . . . . . . . . . . . . . . . . . . . . . . . 3.31
Multimedia equipment . . . . . . . . . . . . . . . . . . . . . . . . . . . . . . . . . . . . \
. . . . . . . . . . . . . . . . . . . . . . . . 3.32
Page 140 of 258
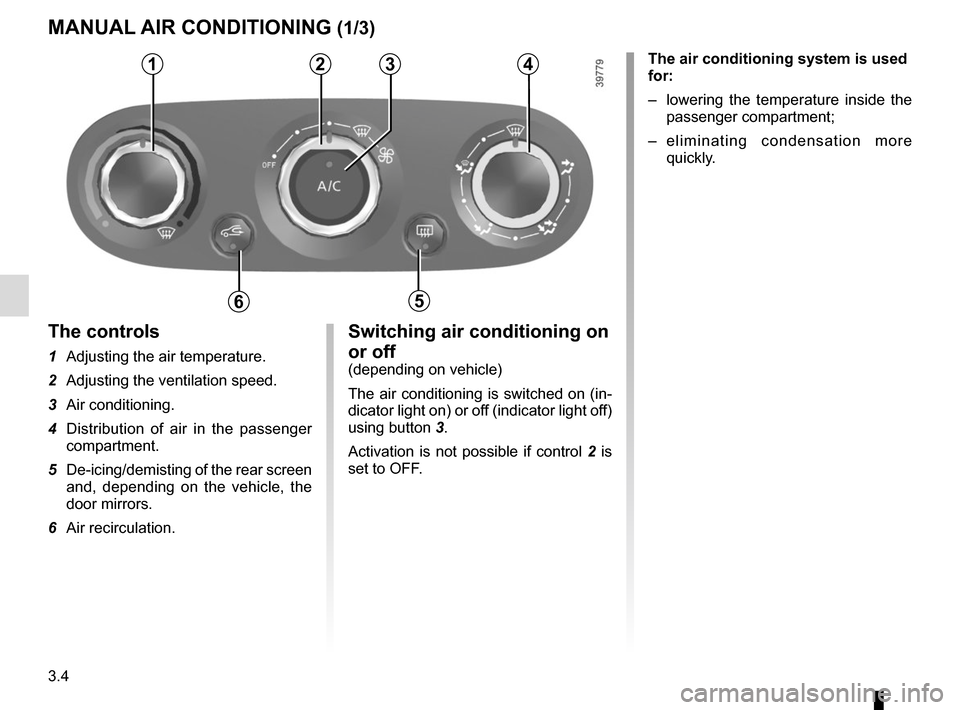
3.4
Switching air conditioning on
or off
(depending on vehicle)
The air conditioning is switched on (in-
dicator light on) or off (indicator light off)
using button 3.
Activation is not possible if control 2 is
set to OFF.
The controls
1 Adjusting the air temperature.
2 Adjusting the ventilation speed.
3 Air conditioning.
4 Distribution of air in the passenger compartment.
5 De-icing/demisting of the rear screen and, depending on the vehicle, the
door mirrors.
6 Air recirculation.
MANUAL AIR CONDITIONING (1/3)
1234
65
The air conditioning system is used
for:
– lowering the temperature inside the
passenger compartment;
– eliminating condensation more quickly.