Page 141 of 258

3.5
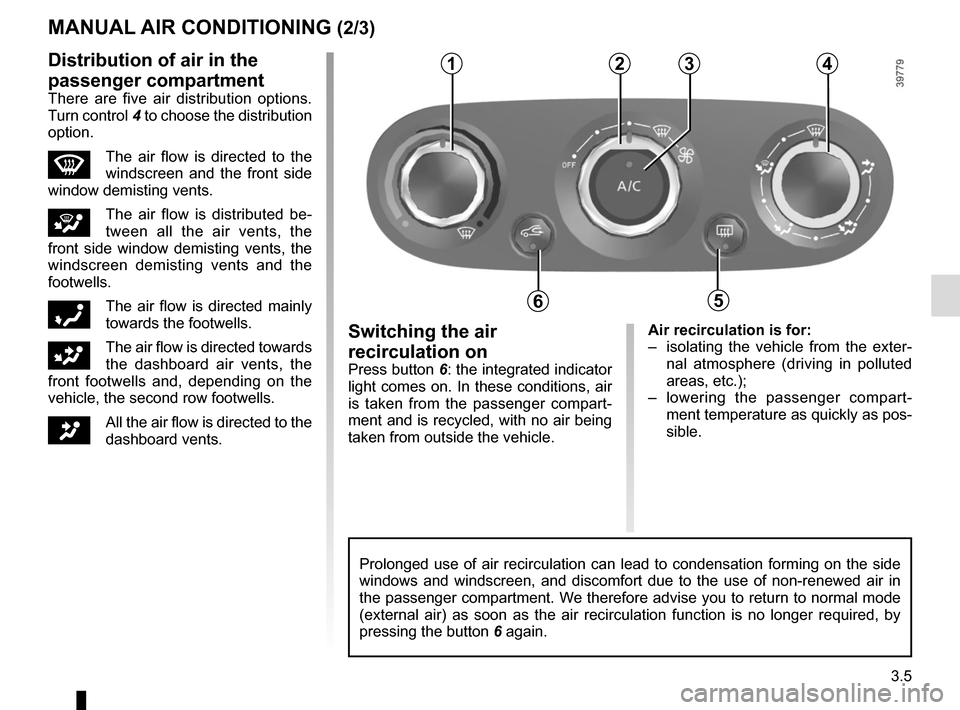
Air recirculation is for:
– isolating the vehicle from the exter-nal atmosphere (driving in polluted
areas, etc.);
– lowering the passenger compart- ment temperature as quickly as pos-
sible.Switching the air
recirculation on
Press button 6: the integrated indicator
light comes on. In these conditions, air
is taken from the passenger compart-
ment and is recycled, with no air being
taken from outside the vehicle.
MANUAL AIR CONDITIONING (2/3)
Prolonged use of air recirculation can lead to condensation forming on t\
he side
windows and windscreen, and discomfort due to the use of non-renewed air\
in
the passenger compartment. We therefore advise you to return to normal mode
(external air) as soon as the air recirculation function is no longer \
required, by
pressing the button 6 again.
1234
65
Distribution of air in the
passenger compartment
There are five air distribution options.
Turn control 4 to choose the distribution
option.
WThe air flow is directed to the
windscreen and the front side
window demisting vents.
iThe air flow is distributed be-
tween all the air vents, the
front side window demisting vents, the
windscreen demisting vents and the
footwells.
óThe air flow is directed mainly
towards the footwells.
GThe air flow is directed towards
the dashboard air vents, the
front footwells and, depending on the
vehicle, the second row footwells.
JAll the air flow is directed to the
dashboard vents.
Page 142 of 258

3.6
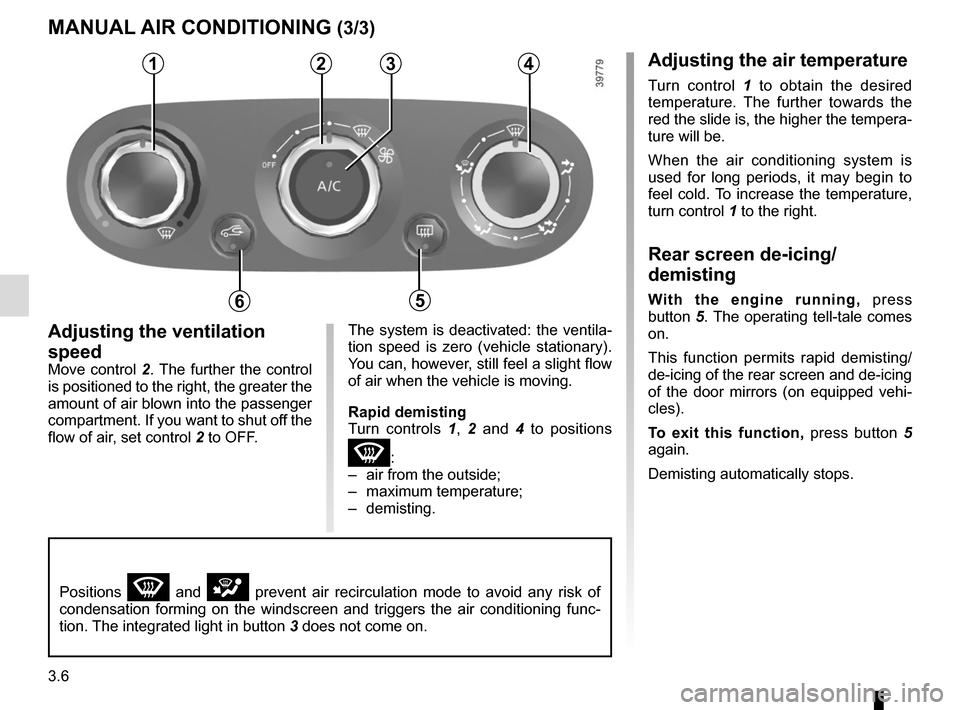
Adjusting the ventilation
speed
Move control 2. The further the control is positioned to the right, the greater the
amount of air blown into the passenger
compartment. If you want to shut off the
flow of air, set control 2 to OFF.
4
5
MANUAL AIR CONDITIONING (3/3)
The system is deactivated: the ventila-
tion speed is zero (vehicle stationary).
You can, however, still feel a slight flow
of air when the vehicle is moving.
Rapid demisting
Turn controls 1, 2 and 4 to positions
W:
– air from the outside;
– maximum temperature;
– demisting.
1234
65
Positions W and i prevent air recirculation mode to avoid any risk of
condensation forming on the windscreen and triggers the air conditioning\
func-
tion. The integrated light in button 3 does not come on.
Adjusting the air temperature
Turn control 1 to obtain the desired
temperature. The further towards the
red the slide is, the higher the tempera-
ture will be.
When the air conditioning system is
used for long periods, it may begin to
feel cold. To increase the temperature,
turn control 1 to the right.
Rear screen de-icing/
demisting
With the engine running, press
button 5. The operating tell-tale comes
on.
This function permits rapid demisting/
de-icing of the rear screen and de-icing
of the door mirrors (on equipped vehi-
cles).
To exit this function, press button 5
again.
Demisting automatically stops.
Page 144 of 258

3.8
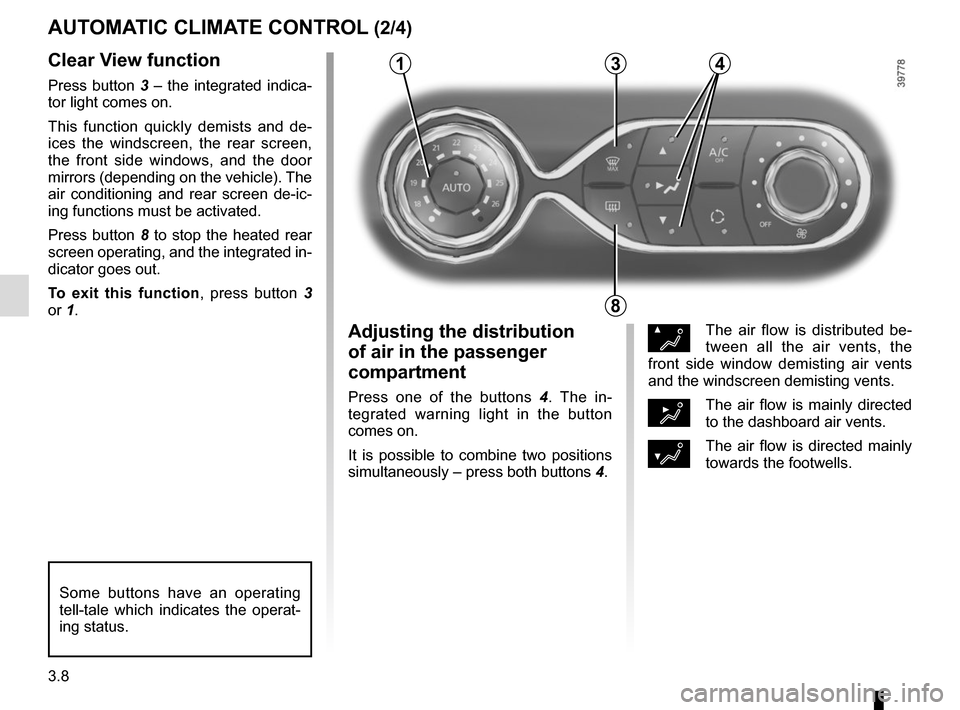
Clear View function
Press button 3 – the integrated indica-
tor light comes on.
This function quickly demists and de-
ices the windscreen, the rear screen,
the front side windows, and the door
mirrors (depending on the vehicle). The
air conditioning and rear screen de-ic-
ing functions must be activated.
Press button 8 to stop the heated rear
screen operating, and the integrated in-
dicator goes out.
To exit this function, press button 3
or 1.
AUTOMATIC CLIMATE CONTROL (2/4)
ØThe air flow is distributed be-
tween all the air vents, the
front side window demisting air vents
and the windscreen demisting vents.
½The air flow is mainly directed
to the dashboard air vents.
¿The air flow is directed mainly
towards the footwells.
Adjusting the distribution
of air in the passenger
compartment
Press one of the buttons 4 . The in-
tegrated warning light in the button
comes on.
It is possible to combine two positions
simultaneously – press both buttons 4.
8
3
Some buttons have an operating
tell-tale which indicates the operat-
ing status.
14
Page 145 of 258
3.9
Rear screen de-icing/
demisting
Press button 8 – the integrated indica-
tor light comes on. This function en-
ables rapid demisting or de-icing of the
rear screen and de-icing of the door
mirrors (on equipped vehicles).
To exit this function, press button 8
again. Demisting automatically stops.
AUTOMATIC CLIMATE CONTROL (3/4)
8
Switching air conditioning on
or off
In automatic mode, the system switches
the air conditioning system on or off,
depending on the climate conditions.
Press button 5 to switch off the air
conditioning; the integrated indicator
comes on.
5
9
Vehicles fitted with the ECO
mode (button 9 ): Once activated,
the ECO mode may reduce the ef-
fective performance of the air condi-
tioning. Please refer to the informa-
tion on “Driving advice, Eco-driving”
in Section 2.
Page 146 of 258
3.10
AUTOMATIC CLIMATE CONTROL (4/4)
76
Air recirculation (isolation of
the passenger compartment)
K
This function is managed automatically
(operation is confirmed by a warning
light on button 7), but you can also acti-
vate it manually.
The system determines whether or not
the air recycling function is used, based
on the quality of the outside air.Stopping the system
Turn control 6
to “OFF” to stop the
system. To start, turn control 6 again
to adjust the blower speed or press
button 1.
1
Manual use
Press button 7 – the integrated indica-
tor light comes on.
Prolonged use of this position may lead
to odours, caused by non-renewal of
air, and the formation of condensation
on the windows.
We therefore advise you to return to au-
tomatic mode as soon as air recircula-
tion is no longer needed, by pressing
button 7.
To exit this function, press button 7
again.
The demisting/de-icing will still take
priority over the air recirculation.
Page 150 of 258
3.14
FIXED SUNROOF/SUN VISOR
Front sun visor
Lower sun visor 2.
Courtesy mirrors
Slide cover 3.
Depending on the vehicle, the light 4
comes on automatically.
2
3
Fixed sunroof blind
– Opening : push handle 1 upwards,
then guide it until it opens fully;
– Closing: pull the handle 1 until it
clicks into the catch.
If the blind becomes skewed when
opening or closing, close fully and then
fully open the blind.
1
4
Page 151 of 258
3.15
Unlocking and opening the doors
or tailgate switches on the timed
courtesy lights and lights.
Boot light 5
Light 5 comes on when the boot is
opened.
Courtesy light
Press switch 2 for:
– permanent lighting;
– intermittent lighting, which comes on when a door is opened. It only
switches off after a time delay and
when the doors concerned have
been closed correctly;
– lighting switches off immediately.
Map reading lights
Press switch 1 for the driver, 3 for the
front passenger.
INTERIOR LIGHTING
1235
Glovebox light 4
Light 4 comes on when the cover is
opened.
4
Page 156 of 258
3.20
Accessories socket 1
It is provided for connecting accessories
approved by our Technical Department.
Cigarette lighter 1
With the ignition on, push in the ciga-
rette lighter 1. It will spring back with a
click when it is ready. Pull it out to use.
After use, replace it without pushing it
all the way in.
Ashtray
It can be housed in either position 2
or 3.
ASHTRAY, CIGARETTE LIGHTER, ACCESSORIES SOCKET
3
Connect accessories with
a maximum power of
120 watts (12 V) only.
When several accessory
sockets are used at the same time,
the total power of the connected
accessories must not exceed
180 watts.
Fire hazard.
If your vehicle is not fitted with a cigar lighter and an ashtray, these can be ob-
tained from an authorised dealer.
1
2