Page 177 of 246

4.17
SEAT COVERINGS (1/5)
Depending on the vehicle, it is possible
to remove the seat covers (cleaning,
customisation, etc.).
Principle of seat cover
removal
Whether it’s for the back or the base,
always remove as shown in the pic-
ture above A : do not rip the self-grip
bands out.
Precautions in use
Once the covers are removed:
– do not use the seats;
– take care with the self-grip bands.
Washing instructions
Follow the washing instructions
shown on the seat covers (labels) in
particular;
– wash the seat covers separately from other materials;
– spin at a maximum speed of 800 rpm;
– do not wash them more than five times.
Once they are dry, do not fold the
seat covers and do not pile them up
(they may show marks).
Serious risk of deterioration.
For safety reasons, carry
out these operations when
the vehicle is stationary.
A
With the seat covers off,
ensure that the seatbelt
buckles and ISOFIX attach-
ments are clear.
Depending on the vehicle, certain
seat covers have markings to show
that the front passenger seat has
ISOFIX attachments. Make sure
when refitting or replacing the seat
cover that it has the same markings
as the original.
Page 178 of 246
4.18
4
SEAT COVERINGS (2/5)
For safety reasons, carry
out these operations when
the vehicle is stationary.
6
Removing the base cover
– Open the zip fastener 4 of the base;
– remove the cover according to the method shown (movement A).
Replacing the base cover
– Position the base cover;
– close the zip fastener 4 for the base;
– attach the self-grip bands 6.
Replacing the seatback cover
– Incline the seatback towards the
rear;
– position the cover on the seatback;
– close the zip fasteners 1 and 3;
– attach the self-grip bands 2;
– attach the self-grip bands 5 between
the seatback and the base;
35
1
2
Front seat
Taking off the seatback cover
– Incline the seatback towards the rear;
– open the zip fasteners 1 and 3 on the
seatback;
– remove the self-grip bands 5 be-
tween the seatback and the base;
– remove the cover according to the method shown (movement A).
With the seat covers off,
ensure that the seatbelt
buckles and ISOFIX attach-
ments are clear.
Page 179 of 246
4.19
Rear bench seat
– Bring the front seats forward;
– reinsert the headrest for the rear bench seat;
– disengage the seat belts.
When moving the rear
seats, ensure that nothing
obstructs the anchorage
points (passenger’s arm or
leg, a pet, gravel, cloth, toys, etc.).
Removing the base cover B
– Open the zip fasteners 7 and 8 for
the base B;
– remove the cover according to the method shown (movement A).
For safety reasons, carry
out these operations when
the vehicle is stationary.
Replacing the base cover B
– Position the cover on the base B;
– close the zip fasteners 7 and 8;
– attach the self-grip bands 9.
SEAT COVERINGS (3/5)
78
99
B
7
8BB
Page 180 of 246

4.20
SEAT COVERINGS (4/5)
Removing the seatback cover C
– fold down the seatback C to the base
using the stalk 11 ;
– remove the self-grip bands 15 be-
tween the seatback and the base;
– reinsert the seatback C and ensure
that it is well locked;
– open the zip fasteners 12 and 14 for
the seat back C;
– remove the cover according to the method shown (movement A).
C1412
1115
C
Replacing the seatback cover C
– Position the cover on the seat- back C;
– keep the rear central seatbelt out of the way to position the cover;
– close the zip fastener 12 and 14 of the seatback C; – attach the self-grip bands;
– ensure that the seatback cover is
correctly positioned C under the
guide of the central seatbelt 10;
– attach the self-grip bands 13;
– slide the lower cover between the seatback C and the base B;
– fold down the seatback C to the base
using the stalk 11 ;
– attach the self-grip bands 15 be-
tween the seatback C and the
base B;
– reinsert the seatback C and ensure
that it is well locked;
10
13
When refitting the seat-
back, make sure it is cor-
rectly locked in place.
If seat covers are fitted ,
make sure these do not prevent the
seatback latch from locking in.
Make sure that the seat belts are
positioned correctly.
Reposition the headrests.
B
With the seat covers off,
ensure that the seatbelt
buckles and ISOFIX attach-
ments are clear.
Page 181 of 246

4.21
Replacing the seatback cover D
– Position the cover on the seat- back D;
– close the zip fastener 20;
– attach the self-grip bands 19;
– slide the lower cover between the seatback D and the base;
– move the seatback D onto the base using the stalk 16;
– close the zip fastener 18 of the seat
back D;
– attach the self-grip bands 17 be-
tween the seatback and the base;
– raise the seatback D completely and ensure that it is well locked.
SEAT COVERINGS (5/5)
– open the zip fastener 20 of the seat
back D;
– remove the cover according to the method shown (movement A).
20
D
18
17
D
16
Removing the seatback cover D
– Fold down the seatback D to the
base using the stalk 16;
– remove the self-grip bands 17 be-
tween the seatback and the base;
– open the zip fastener 18 of the seat
back D;
– reinsert the seatback D and ensure
that it is well locked;
19
When moving the rear
seats, ensure that nothing
obstructs the anchorage
points (passenger’s arm or
leg, a pet, gravel, cloth, toys, etc.).
When refitting the seat-
back, make sure it is cor-
rectly locked in place.
If seat covers are fitted ,
make sure these do not prevent the
seatback latch from locking in.
Make sure that the seat belts are
positioned correctly.
Reposition the headrests.
Page 182 of 246
Page 183 of 246

5.1
Section 5: Practical advice
Puncture, emergency spare wheel . . . . . . . . . . . . . . . . . . . . . . . . . . . . . . . . . . . .\
. . . . . . . . . . . . . . 5.2
Tyre inflation kit . . . . . . . . . . . . . . . . . . . . . . . . . . . \
. . . . . . . . . . . . . . . . . . . . . . . . . . . . . . . . . . . . . . 5.3
Tools . . . . . . . . . . . . . . . . . . . . . . . . . . . . . . . . . . . .\
. . . . . . . . . . . . . . . . . . . . . . . . . . . . . . . . . . . . . 5.6
Wheel trims - wheel . . . . . . . . . . . . . . . . . . . . . . . . . . . . . . . . . . . . \
. . . . . . . . . . . . . . . . . . . . . . . . . . 5.7
Changing a wheel . . . . . . . . . . . . . . . . . . . . . . . . . . . . . . . . . . . .\
. . . . . . . . . . . . . . . . . . . . . . . . . . . 5.8
Tyres (tyre and wheel safety, use in winter) . . . . . . . . . . . . . . . . . . . . . . . . . . . . . . . . . . . .\
. . . . . . . 5.10
Headlights (changing bulbs) . . . . . . . . . . . . . . . . . . . . . . . . . . . . . . . . . . . .\
. . . . . . . . . . . . . . . . . . . 5.13
Rear lights and side lights (changing bulbs) . . . . . . . . . . . . . . . . . . . . . . . . . . . . . . . . . . . .\
. . . . . . . 5.16
Interior lighting (changing bulbs) . . . . . . . . . . . . . . . . . . . . . . . . . . . . . . . . . . . . \
. . . . . . . . . . . . . . . . 5.18
RENAULT card: battery . . . . . . . . . . . . . . . . . . . . . . . . . . . . . . . . . . . . \
. . . . . . . . . . . . . . . . . . . . . . . 5.20
Fuses . . . . . . . . . . . . . . . . . . . . . . . . . . . . . . . . . . . . \
. . . . . . . . . . . . . . . . . . . . . . . . . . . . . . . . . . . . . 5.21
Battery . . . . . . . . . . . . . . . . . . . . . . . . . . . . . . . . . . . . \
. . . . . . . . . . . . . . . . . . . . . . . . . . . . . . . . . . . . 5.24
Fitting a radio . . . . . . . . . . . . . . . . . . . . . . . . . . . . . . . . . . . . \
. . . . . . . . . . . . . . . . . . . . . . . . . . . . . . . 5.26
Accessories . . . . . . . . . . . . . . . . . . . . . . . . . . . . . . . . . . . . \
. . . . . . . . . . . . . . . . . . . . . . . . . . . . . . . . 5.27
Wipers (replacing blades) . . . . . . . . . . . . . . . . . . . . . . . . . . . . . . . . . . . .\
. . . . . . . . . . . . . . . . . . . . . 5.28
Towing . . . . . . . . . . . . . . . . . . . . . . . . . . . . . . . . . . . . \
. . . . . . . . . . . . . . . . . . . . . . . . . . . . . . . . . . . . 5.30
Operating faults . . . . . . . . . . . . . . . . . . . . . . . . . . . . . . . . . . . . \
. . . . . . . . . . . . . . . . . . . . . . . . . . . . . 5.32
Page 184 of 246

5.2
In case of punctureDepending on the vehicle, a tyre infla-
tion kit or emergency spare wheel is
provided (refer to the following pages).
Vehicle fitted with a tyre pressure
loss warning system
If under-inflated (puncture, low pres-
sure, etc.), the warning light
on the instrument panel comes on.
See “Tyre pressure loss warning” in
Section 2.
If the emergency spare wheel has been stored for several years, have it \
checked by your Dealer to ensure that it is
safe to use.
Vehicle fitted with an emergency spare wheel that differs from the other \
wheels:
– Never fit more than one emergency spare wheel to the same vehicle.
– Replace the emergency spare wheel as soon as possible with a wheel ident\
ical to the original one.
– When this is fitted to the vehicle, which must only be a temporary measu\
re, the driving speed must not exceed the speed indicated on the label on the wheel.
– Fitting an emergency spare wheel may alter the way the vehicle usually r\
uns. Avoid sudden acceleration or deceleration and reduce your speed when cornering.
– If you need to use snow chains, fit the emergency spare wheel to the rea\
r axle and check the tyre pressure.
– The warning light
on the instrument panel flashes for several seconds, then stays on.
PUNCTURE, EMERGENCY SPARE WHEEL
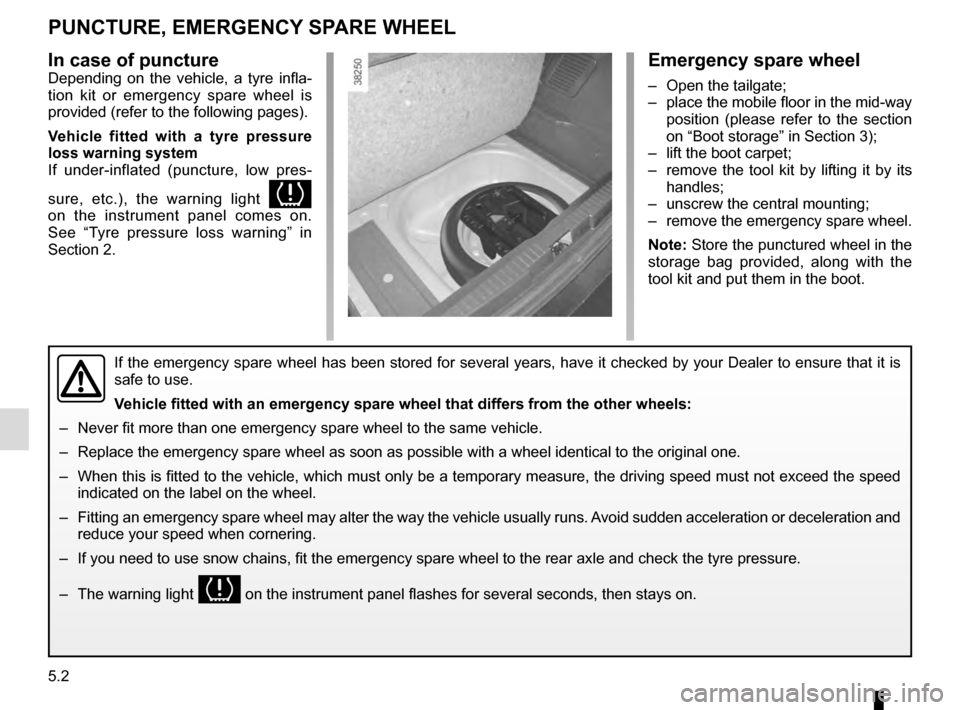
Emergency spare wheel
– Open the tailgate;
– place the mobile floor in the mid-way position (please refer to the section
on “Boot storage” in Section 3);
– lift the boot carpet;
– remove the tool kit by lifting it by its handles;
– unscrew the central mounting;
– remove the emergency spare wheel.
Note: Store the punctured wheel in the
storage bag provided, along with the
tool kit and put them in the boot.