Page 208 of 424

206
508_en_Chap07_info-pratiques_ed01-2016
towbar with quickly detachable towball
Presentation
this towbar allows the towball to be fitted and
removed quickly and easily without the use
of tools. Installed behind the rear bumper, the
towbar is invisible after removing the towball
and folding the trailer harness socket carrier.
1.
Carrier.
2.
P
rotective blanking plug.
3.
S
ecurity ring.
4.
F
olding trailer harness socket.
5.
D
etachable towball.
6.
L
ocking / unlocking wheel.
7.
Sec
urity key lock.
8.
L
ocking wheel protector.
9.
Ba
ll protector.
10.
St
orage bag.A. Locked position
the locking wheel is not in contact with the
towball (gap of about 5 mm).
the
green mark is visible.
th
e lock for the locking wheel is facing
rearward.
th
e bolt is visible and extends beyond the
towball.
B. Unlocked position
the locking wheel is in contact with the towball.then green mark is hidden.
th
e lock for the locking wheel is facing for ward.
th
e peg is not visible. Observe the legislation in force in the
country in which you are driving.
For information on the maximum trailer
weight and the recommended nose
weight, refer to the "
te
chnical data"
section.
For information on safely towing a
trailer, refer to the "
to
wing a trailer"
section.
Practical information
Page 209 of 424

207
508_en_Chap07_info-pratiques_ed01-2016
Before each use
Check that the towball is correctly fitted by verifying the following points:
- t he towball is correctly locked in place (position A ),
-
t
he security key lock is on and the key removed; the locking wheel can no longer be
operated,
-
t
he towball must no longer move at all in its carrier; try to shake it by hand.
During use
Never unlock the towball when a trailer or load carrier is fitted.
Never exceed the maximum authorised weight for the vehicle plus trailer (gr oss tr ain
Weight -
gt
W
).
Before driving, check the adjustment of the headlamp beam height.
For more information on adjusting the headlamps, refer to the corresponding section.
After use
For journeys made without a trailer or load carrier, the trailer harness socket must be folded
away, the towball removed and the protective blanking plug inserted in the carrier. th is
measure applies particularly if the towball could hinder visibility of the number plate or
lighting.
7
Practical information
Page 211 of 424
209
508_en_Chap07_info-pratiques_ed01-2016
Attach the trailer to the towball.
Attach the cable on the trailer to the security
ring located on the carrier.
Lower the trailer harness socket carrier by
pulling down on the ring visible below the
b u m p e r.
Remove the protective cover from the socket
and connect the trailer wiring harness.
Removing the towball
Disconnect the trailer harness from the socket
on the carrier.
Detach the cable on the trailer from the security
ring on the carrier.
un
hook the trailer from the towball.
Return the trailer harness connector carrier to
the folded position. Insert the key into the lock.tu
rn the key clockwise to unlock the towball
fixing mechanism.
7
Practical information
Page 212 of 424

210
508_en_Chap07_info-pratiques_ed01-2016
Maintenance
Correct operation is only possible if the towball
and its carrier remain clean.
Before cleaning the vehicle with a high
pressure jet wash, the towbar harness socket
carrier must be folded away, the towball
removed and the protective blanking plug
inserted in the carrier.
For any work on the towbar, go to a P
e
uge
Ot
dealer or a qualified workshop.
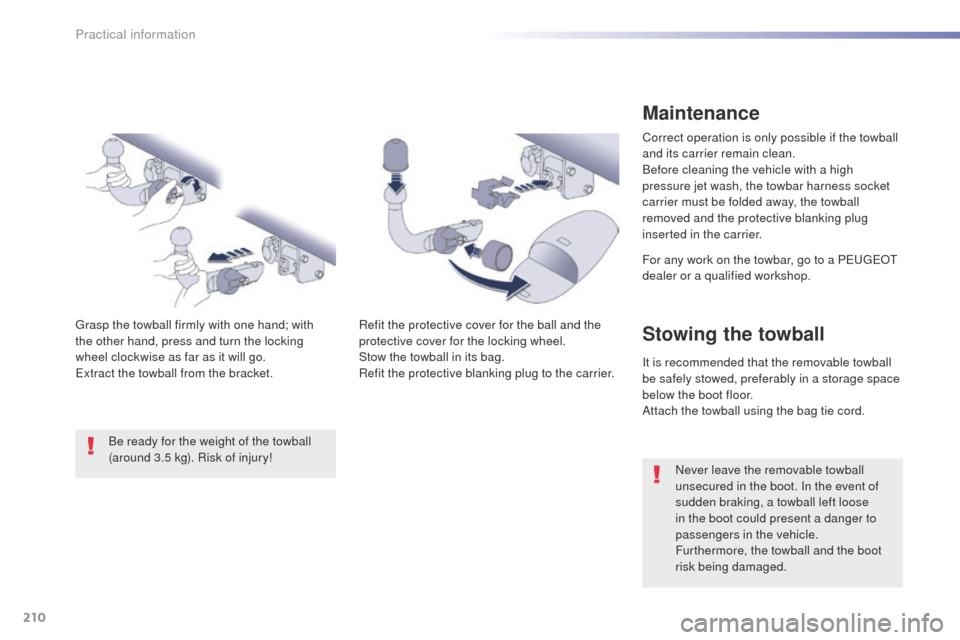
Refit the protective cover for the ball and the
protective cover for the locking wheel.
Stow the towball in its bag.
Refit the protective blanking plug to the carrier.
gr
asp the towball firmly with one hand; with
the other hand, press and turn the locking
wheel
clockwise as far as it will go.
ex
tract the towball from the bracket. Be ready for the weight of the towball
(around 3.5 kg). Risk of injury!
Stowing the towball
It is recommended that the removable towball
be safely stowed, preferably in a storage space
below the boot floor.
Attach the towball using the bag tie cord. Never leave the removable towball
unsecured in the boot. In the event of
sudden braking, a towball left loose
in the boot could present a danger to
passengers in the vehicle.
Furthermore, the towball and the boot
risk being damaged.
Practical information
Page 237 of 424

235
508_en_Chap08_en-cas-de-pannes_ed01-2016
Spare wheel
the tools are installed in the boot under the
f l o o r.
to g
ain access to them:
F
o
pen the boot,
F
p
osition the floor vertically (SW and non-
hybrid R XH: in its guide) for access to the
tools.
Procedure for changing a wheel with punctured tyre for the spare wheel using the tools provided with the vehicle.
List of tools
All of these tools are specific to your
vehicle and can vary according to the level
of equipment. Do not use them for other
purposes.
1.
Wheelbrace.
F
or removing the wheel trim and removing
the wheel bolts.
2.
J
ack with integral handle.
F
or raising the vehicle. 3.
W
heel bolt cover removal tool.
F
or removing the bolt protectors (covers)
on alloy wheels.
4.
S
ocket for the security bolts (located in the
glove box).
F
or adapting the wheelbrace to the special
"security" bolts.
5.
A w
heel chock for immobilising the
vehicle*.
6.
t
o
wing eye.
S
ee "
to
wing the vehicle".
Access to the tools
* Depending on country of sale or equipment.
th
e jack must only be used to change a
wheel with a damaged tyre.
th
e jack conforms to e
u
ropean
legislation, such as defined in the
Machinery Directive 2006/42/C
e.
the jack does not require any maintenance.
8
In the event of a breakdown
Page 238 of 424
236
508_en_Chap08_en-cas-de-pannes_ed01-2016
Wheel with wheel trim
When refitting the wheel, refit the trim
starting by placing its notch facing the
valve and press around its edge with
the palm of your hand.
th
e spare wheel is located in the boot under
t h e f l o o r.
Depending on the country of sale, the spare
wheel may be steel, alloy or of the "space-
saver" type.
Access to the spare wheel
Taking out the wheel
Depending on your vehicle's equipment, the
spare wheel is restrained either by a strap or
a securing nut A and bolt B . For the nut, the
procedure is given below. F
u
n
screw the (coloured) central nut.
F
R
aise the spare wheel towards you from
the rear.
F t
a
ke the wheel out of the boot.
In the event of a breakdown
Page 240 of 424

238
508_en_Chap08_en-cas-de-pannes_ed01-2016
F Place the foot of the jack 2 on the ground and ensure that it is directly below the
front
A or rear B jacking point provided on
the underbody, whichever is closest to the
wheel to be changed.
Removing a wheel
Parking the vehicle
Immobilise the vehicle where it does not
block traffic: the ground must be level,
stable and not slippery.
Apply the parking brake unless it has
been programmed to automatic mode.
Switch off the ignition.
With a manual gearbox, engage first
gear to block the wheels.
With an automatic gearbox, place the
lever in position P to block the wheels.
Check that the braking warning lamp
and the P warning lamp in the parking
brake control lever come on. F
R
emove the wheel bolt cover from each
of the bolts using the tool 3 (according to
equipment).
F
F
it the security socket 4 on the
wheelbrace
1 to slacken the security bolt
(if
fitted).
F
S
lacken the other bolts using the
wheelbrace 1 o n l y.
th
e occupants must get out of the vehicle and wait where they are safe.
Never go underneath a vehicle raised using a jack; use an axle stand.
If your vehicle does not have a jack, contact a P
e
uge
Ot
dealer or a qualified workshop for
the part numbers of the tools needed to change a wheel: jack and wheelbrace.
Do not use:
-
t
he jack for any other purpose than
lifting the vehicle,
-
a j
ack other than the one supplied
by the manufacturer.
In the event of a breakdown
Page 242 of 424

240
508_en_Chap08_en-cas-de-pannes_ed01-2016
Fitting a wheel
Fitting the "space-saver"
spare wheel
If your vehicle is fitted with alloy wheels,
when tightening the bolts on fitting, it
is normal to notice that the washers
do not come into contact with the
"space-saver" spare wheel. t
h
e wheel
is secured by the conical sur face of
each bolt.
After changing a wheel
to store the punctured wheel in the
boot correctly, first remove the central
c ove r.
When using the "space-saver" type
spare wheel, do not exceed 50 mph
(80
km/h).
Have the tightening of the bolts and the
pressure of the spare wheel checked
by a P
e
uge
Ot
dealer or a qualified
workshop without delay.
Have the punctured wheel repaired
and refitted to the vehicle as soon as
possible. F
P
ut the wheel in place on the hub.
F S crew in the bolts fully by hand.
F P re-tighten the security bolt using the
wheelbrace 1 fitted with the security
socket
4.
F
P
re-tighten the other bolts using the
wheelbrace 1 o n l y.
In the event of a breakdown