Page 29 of 398

27
308_en_Chap01_instruments-de-bord_ed02-2015
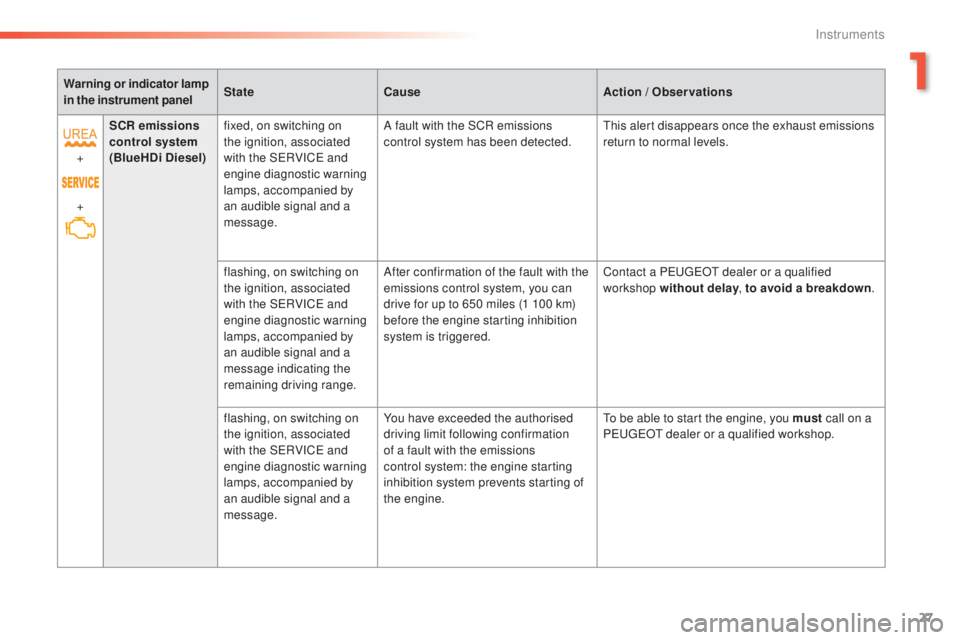
Warning or indicator lamp
in the instrument panelState
Cause Action /
Observations
+
+ SCR emissions
control system
(BlueHDi Diesel) fixed, on switching on
the ignition, associated
with the S
eRV
IC
e a
nd
engine diagnostic warning
lamps, accompanied by
an audible signal and a
message. A fault with the SCR emissions
control system has been detected.
thi
s alert disappears once the exhaust emissions
return to normal levels.
flashing, on switching on
the ignition, associated
with the S
eRV
IC
e a
nd
engine diagnostic warning
lamps, accompanied by
an audible signal and a
message indicating the
remaining driving range. After confirmation of the fault with the
emissions control system, you can
drive for up to 650 miles (1 100 km)
before the engine starting inhibition
system is triggered.
Contact a P
eu
ge
Ot d
ealer or a qualified
workshop without delay , to avoid a breakdown.
flashing, on switching on
the ignition, associated
with the S
eRV
IC
e a
nd
engine diagnostic warning
lamps, accompanied by
an audible signal and a
message. You have exceeded the authorised
driving limit following confirmation
of a fault with the emissions
control system: the engine starting
inhibition system prevents starting of
the
eng
ine.
to be a
ble to start the engine, you must call on a
P
eu
ge
Ot d
ealer or a qualified workshop.
1
Instruments
Page 33 of 398

31
308_en_Chap01_instruments-de-bord_ed02-2015
Engine oil level indicator
On versions fitted with an electric oil gauge,
information on the oil level is displayed in the
instrument panel for a few seconds when the
ignition is switched on, at the same time as the
service information.
the l
evel read will only be correct if
the vehicle is on level ground and the
engine has been off for more than
30
m
inutes.
Oil level correct
this is indicated by a message in the
in strument panel.
Oil level incorrect
this is indicated by a message in the
in strument panel.
If the low oil level is confirmed by a check using
the dipstick, the level must be topped up to
avoid damage to the engine.
Oil level indicator fault
this is indicated by a message in the
i nstrument panel. Contact a Peu geOt d ealer
or a qualified workshop.
Dipstick
there are 2 marks on the
di pstick:
-
A = m
ax; never exceed this
level,
-
B = m
in; top up the level via
the oil filler, using the grade
of oil suited to your engine.
Refer to the petrol or Diesel engine
section to locate the dipstick and the oil
filler cap on your engine.
1
Instruments
Page 35 of 398
33
308_en_Chap01_instruments-de-bord_ed02-2015
Lighting dimmer control
For the manual adjustment of the brightness of
the instrument panel and the touch screen.
Instrument panel
With the exterior lighting on, press this button
to adjust the brightness of the dashboard
lighting, the touch screen and the mood
lighting. As soon as the lighting reaches the
required level of brightness, release the button.
Touch screen
F Press on the "Configuration" menu.
F Ad just the brightness (only on the touch
screen) by pressing on the " +" or " -" buttons.
Operates only when the vehicle's
exterior lighting is on.
1
Instruments
Page 36 of 398
34
System that gives you information on the current journey (range, fuel consumption…).
tr i p c o m p u t e r
Instrument panel screen
Information display
F Press the button on the end of the wiper
control stalk to display the various tabs in
succession. -
t
he c
urrent information tab with:
●
th
e range,
●
th
e current fuel consumption,
●
th
e Stop & Start time counter.
-
tri
p
"1" with:
●
th
e average speed.
●
th
e average fuel consumption,
●
th
e distance travelled,
fo
r the first trip.
-
tri
p
"2" with:
●
th
e average speed,
●
th
e average fuel consumption,
●
th
e distance travelled,
fo
r the second trip.
Depending on version
Trip reset
F When the trip required is displayed, press
the control for more than two seconds
or use the left hand thumb wheel of the
steering mounted controls.
tr
i p s "1" and "2" are independent but their use
is identical.
For example, trip "1" can be used for daily
figures, and trip "2" for monthly figures.
Instruments
Page 55 of 398

53
308_en_Chap02_ouvertures_ed02-2015
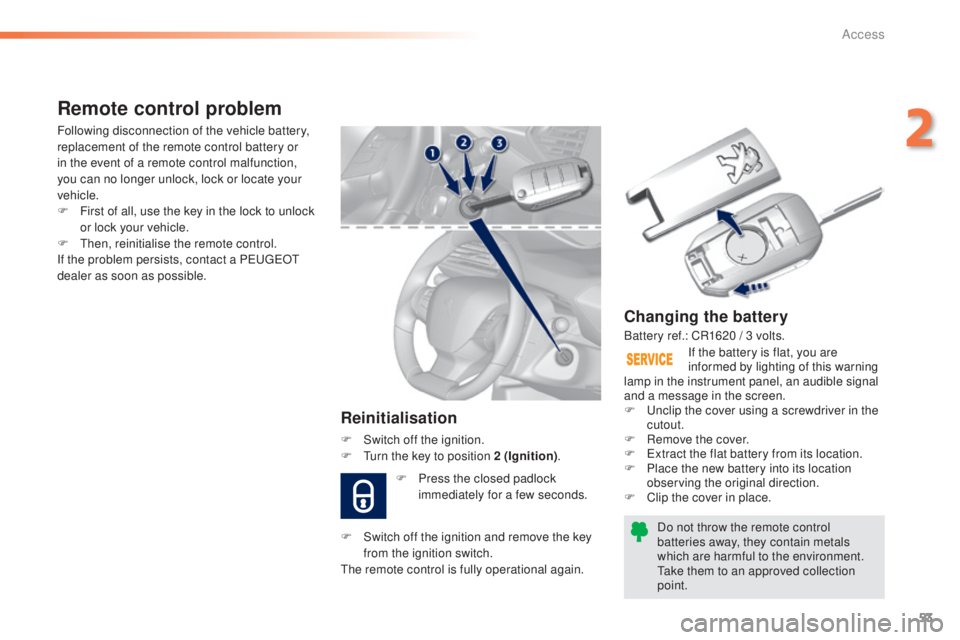
Changing the battery
Do not throw the remote control
batteries away, they contain metals
which are harmful to the environment.
tak
e them to an approved collection
point. If the battery is flat, you are
informed by lighting of this warning
lamp in the instrument panel, an audible signal
and a message in the screen.
F
u
nc
lip the cover using a screwdriver in the
cutout.
F
Re
move the cover.
F
e
xt
ract the flat battery from its location.
F
Pl
ace the new battery into its location
observing the original direction.
F
Cl
ip the cover in place.
Remote control problem
Reinitialisation
F Switch off the ignition.
F tur n the key to position 2 (Ignition) .
Following disconnection of the vehicle battery,
replacement of the remote control battery or
in the event of a remote control malfunction,
you can no longer unlock, lock or locate your
vehicle.
F
Fi
rst of all, use the key in the lock to unlock
or lock your vehicle.
F
t
hen,
reinitialise the remote control.
If the problem persists, contact a P
eu
ge
Ot
d
ealer as soon as possible.
Battery ref.: CR1620 / 3 volts.
F
Pr
ess the closed padlock
immediately for a few seconds.
F
Sw
itch off the ignition and remove the key
from the ignition switch.
the r
emote control is fully operational again.
2
Access
Page 64 of 398

62
308_en_Chap02_ouvertures_ed02-2015
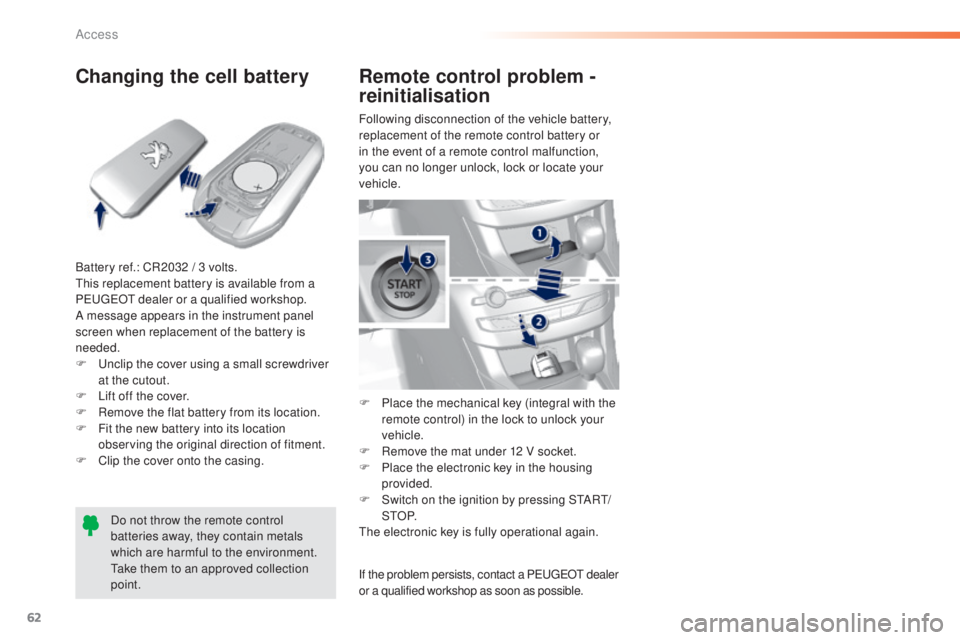
Changing the cell battery
Battery ref.: CR2032 / 3 volts.this replacement battery is available from a
P
eu
ge
Ot d
ealer or a qualified workshop.
A message appears in the instrument panel
screen when replacement of the battery is
needed.
F
u
nc
lip the cover using a small screwdriver
at the cutout.
F
Li
ft off the cover.
F
Re
move the flat battery from its location.
F
Fi
t the new battery into its location
observing the original direction of fitment.
F
Cl
ip the cover onto the casing.Do not throw the remote control
batteries away, they contain metals
which are harmful to the environment.
tak
e them to an approved collection
point. Following disconnection of the vehicle battery,
replacement of the remote control battery or
in the event of a remote control malfunction,
you can no longer unlock, lock or locate your
vehicle.
F
Pl
ace the mechanical key (integral with the
remote control) in the lock to unlock your
vehicle.
F
Re
move the mat under 12 V socket.
F
Pl
ace the electronic key in the housing
provided.
F
Sw
itch on the ignition by pressing S
tARt/
StO P.the
electronic key is fully operational again.
Remote control problem -
reinitialisation
If the problem persists, contact a PeugeOt d ealer
or a qualified workshop as soon as possible.
Access
Page 73 of 398

71
308_en_Chap03_ergonomie-et-confort_ed02-2015
Steering wheel adjustment
F When stationary, l ower the control lever
to release the steering wheel adjustment
mechanism.
F
Ad
just the height and reach to suit your
driving position.
F
Pu
ll the control lever to lock the steering
wheel adjustment mechanism.
As a safety precaution, these
operations should only be carried out
while the vehicle is stationary.
PeugeOt i- Cockpit
Before taking to the road and to make the most
of the special ergonomics of the Peu
geOt
i
- Cockpit, carry out these adjustments in the
following order:
-
head
restraint height,
-
ba
ckrest angle,
-
seat
cushion height,
-
se
at longitudinal position,
-
st
eering wheel reach and then height
-
th
e interior and door mirrors.
Once these adjustments have been made,
ensure that from your driving position you can
see the "head-up" instrument panel clearly,
over the reduced diameter steering wheel.
Before moving the seat backwards,
ensure that there is nothing that might
prevent the full travel of the seat, so
as to avoid the risk of of jamming the
seat caused by the presence of objects
on the floor behind the seat or rear
passengers. If the seat jams, stop the
movement immediately.
3
ease of use and comfort
Page 111 of 398
109
308_en_Chap04_eclairage-et-visibilite_ed02-2015
Model without AUTO lighting
Model with AUTO lighting Selection ring for main lighting
mode
turn the ring to align the desired symbol with
t he marking.
Lighting off (ignition off) / Front daytime
running lamps (engine running).
Automatic illumination of headlamps.
Sidelamps only.
Dipped or main beam headlamps.
Dipping the headlamps
In the lighting off and sidelamps modes, the
driver can switch on the main beam headlamps
temporarily ("headlamp flash") by maintaining a
pull on the stalk.
Displays
Illumination of the corresponding indicator lamp
in the instrument panel confirms the lighting
switched on. Pull the stalk to switch the lighting between
dipped / main beam headlamps.
4
Lighting and visibility