2016 Peugeot 308 fuel consumption
[x] Cancel search: fuel consumptionPage 170 of 398
168
308_en_Chap06_conduite_ed02-2015
F Select position M for sequential c hanging
of the six gears.
F
Pu
ll towards the + sign and release to
change up a gear.
F
Pu
sh towards the - sign and release to
change down a gear.
It is only possible to change from one gear to
another if the vehicle speed and engine speed
permit; otherwise, the gearbox will operate
temporarily in automatic mode.
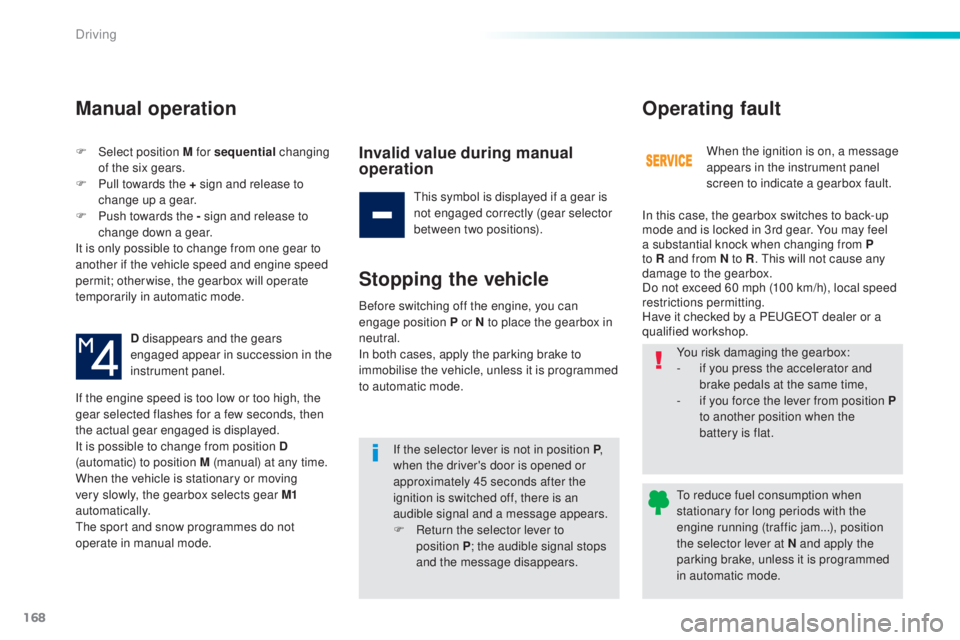
D disappears and the gears
engaged appear in succession in the
instrument panel.
If the engine speed is too low or too high, the
gear selected flashes for a few seconds, then
the actual gear engaged is displayed.
It is possible to change from position D
(automatic) to position M (manual) at any time.
When the vehicle is stationary or moving
very slowly, the gearbox selects gear M1
automatically.
the s
port and snow programmes do not
operate in manual mode.
Manual operation
Invalid value during manual
operation
this symbol is displayed if a gear is
n ot engaged correctly (gear selector
between two positions).
Stopping the vehicle
If the selector lever is not in position P ,
when the driver's door is opened or
approximately 45 seconds after the
ignition is switched off, there is an
audible signal and a message appears.
F
Re
turn the selector lever to
position
P ; t
he audible signal stops
and the message disappears. When the ignition is on, a message
appears in the instrument panel
screen to indicate a gearbox fault.
Operating fault
In this case, the gearbox switches to back-up
mode and is locked in 3rd gear. You may feel
a substantial knock when changing from P
to R and from N to R
.
thi
s will not cause any
damage to the gearbox.
Do not exceed 60 mph (100 km/h), local speed
restrictions permitting.
Have it checked by a P
eu
ge
Ot d
ealer or a
qualified workshop.
Before switching off the engine, you can
engage position P or N to place the gearbox in
neutral.
In both cases, apply the parking brake to
immobilise the vehicle, unless it is programmed
to automatic mode. You risk damaging the gearbox:
-
if y
ou press the accelerator and
brake pedals at the same time,
-
if y
ou force the lever from position
P
to another position when the
battery is flat.
to re
duce fuel consumption when
stationary for long periods with the
engine running (traffic jam...), position
the selector lever at N and apply the
parking brake, unless it is programmed
in automatic mode.
Driving
Page 172 of 398

170
308_en_Chap06_conduite_ed02-2015
Stop & Start
Operation
Going into engine STOP mode
the "ECO" warning lamp comes on
in the instrument panel and the engine
goes into standby automatically:
-
Wi
th a manual gearbox , at speeds below
12 mph (20 km/h) or vehicle stationary
(depending on the engine), when you place
the gear lever in neutral, and you release
the clutch pedal.
Never refuel with the engine in S
tOP
m
ode; you must switch off the ignition
with the button. For your comfort, during parking
manoeuvres, S
tOP m
ode is not
available for a few seconds after
coming out of reverse gear.
S
tOP m
ode does not affect the
functionality of the vehicle, such as for
example, braking, power steering...
A slight delay between the vehicle
stopping and the engine cutting out may
be noticed.
Special cases: STOP mode not
available
StOP mode is not invoked principally when:
- th e vehicle is on a steep slope (up or down),
-
the
driver's door is open,
-
th
e driver's seat belt is not fastened,
-
th
e vehicle has not exceeded 6 mph
(10
k
m/h) since the last engine start by the
driver,
-
th
e electric parking brake is applied or
being applied,
-
th
e engine is needed to maintain a
comfortable temperature in the passenger
compartment,
-
dem
isting is active,
-
som
e special conditions (battery charge,
engine temperature, braking assistance,
ambient temperature...) where the engine is
needed to assure control of a system.
If your vehicle is fitted with Stop & Start,
a time counter calculates the time spent
in S
tOP m
ode during a journey.In this case, the "ECO" warning
lamp flashes for a few seconds then
goes
o
ff.
This operation is perfectly normal.
the S
top & Start
s
ystem puts the engine temporarily into standby - S
tOP m
ode - during stops in the traffic (red lights, traffic jams, or other...).
the e
ngine restarts automatically - S
tARt m
ode - as soon as you want to move off.
the r
estart takes place instantly, quickly and
silently.
Per fect for urban use, the Stop & Start system reduces fuel consumption and exhaust emissions as well as the noise level when stationary.
Stop & Start time
counter
(minutes / seconds or hours / minutes) -
Wi
th an automatic gearbox
, vehicle
stationary, when you press the brake
pedal or place the gear selector lever in
position
N .
I
t resets to zero every time the ignition is
switched on.
Driving
Page 211 of 398
209
308_en_Chap06_conduite_ed02-2015
Under-inflation detection
the system monitors the pressures in the
f our t yres, once the vehicle is moving.
It compares the information given by the four
wheel speed sensors with reference values,
which must be reinitialised ever y time the
tyre pressures are adjusted or a wheel
changed .
the s
ystem triggers an alert as soon as it
detects a drop in the inflation pressure of one
or more tyres.the u nder-inflation detection system
does not replace the need for vigilance
on the part of the driver.
thi
s system does not avoid the need to
check the tyre pressures (including the
spare wheel) every month as well as
before a long journey.
Driving with under-inflated tyres impairs
road holding, extends braking distances
and causes premature tyre wear,
particularly under arduous condition
(high loading, high speed, long journey).
System which automatically checks the pressures of the tyres while driving.the i
nflation pressures defined for
your vehicle can be found on the tyre
pressure label.
For more information on the
identification markings, refer to the
corresponding section.
tyr
e pressures should be checked
when the tyres are "cold" (vehicle
stopped for 1 hour or after a journey of
less than 6 miles (10 km) at moderate
speeds).
Other wise (when hot), add 0.3 bar to
the pressures shown on the label.
Driving with under-inflated tyres
increases fuel consumption.
Snow chains
the system does not have to be
r einitialised after fitting or removing
snow chains.
6
Driving
Page 237 of 398
235
308_en_Chap07_info-pratiques_ed02-2015
AdBlue® additive and SCR system
for BlueHDi Diesel engines
to assure respect for the environment and
c onformity with the new eur o 6 emissions
standard, without adversely affecting the
per formance or fuel consumption of Diesel
engines, P
eu
ge
Ot h
as taken the decision to
equip its vehicles with an effective system that
associates SCR (Selective Catalytic Reduction)
with a particle filter (FAP) for the treatment of
exhaust gases.
Presentation of the SCR system
using an additive called AdBlue® containing
urea, a catalytic converter turns up to 85%
of nitrous oxides (NOx) into nitrogen and
water, which are harmless to health and the
environment.
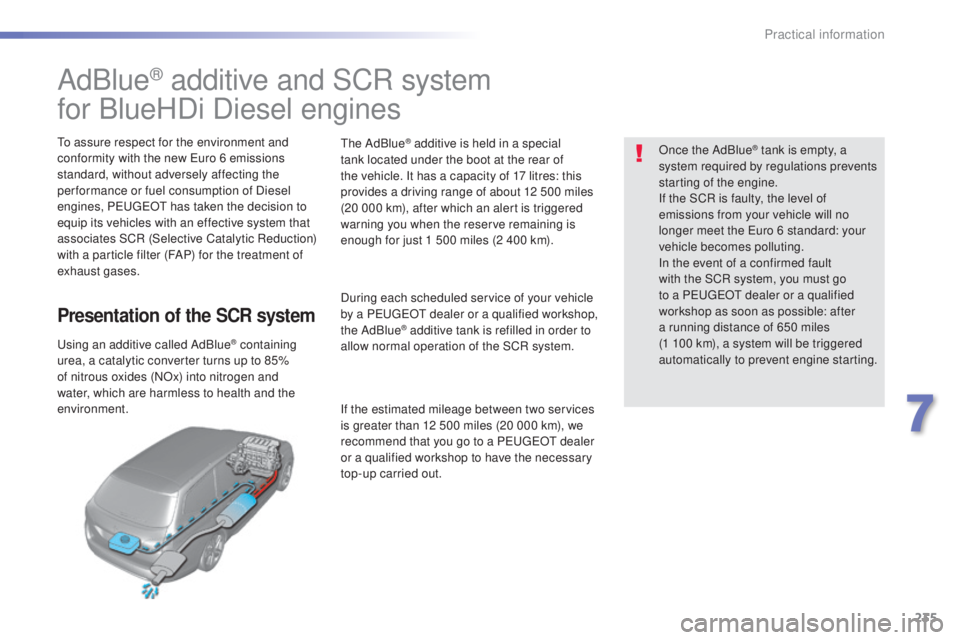
the
AdBlue
® additive is held in a special
tank located under the boot at the rear of
the vehicle. It has a capacity of 17 litres: this
provides a driving range of about 12 500 miles
(20 000 km), after which an alert is triggered
warning you when the reserve remaining is
enough for just 1 500 miles (2 400 km).
During each scheduled service of your vehicle
by a P
eu
ge
Ot d
ealer or a qualified workshop,
the AdBlue
® additive tank is refilled in order to
allow normal operation of the SCR system.
If the estimated mileage between two services
is greater than 12 500 miles (20 000 km), we
recommend that you go to a P
eu
ge
Ot d
ealer
or a qualified workshop to have the necessary
top-up carried out. Once the AdBlue
® tank is empty, a
sy
stem required by regulations prevents
starting of the engine.
If the SCR is faulty, the level of
emissions from your vehicle will no
longer meet the
eur
o 6 standard: your
vehicle becomes polluting.
In the event of a confirmed fault
with the SCR system, you must go
to a P
eu
ge
Ot d
ealer or a qualified
workshop as soon as possible: after
a running distance of 650 miles
(1
1
00 km), a system will be triggered
automatically to prevent engine starting.
7
Practical information
Page 297 of 398
295
308_en_Chap09_caracteristiques-techniques_ed02-2015
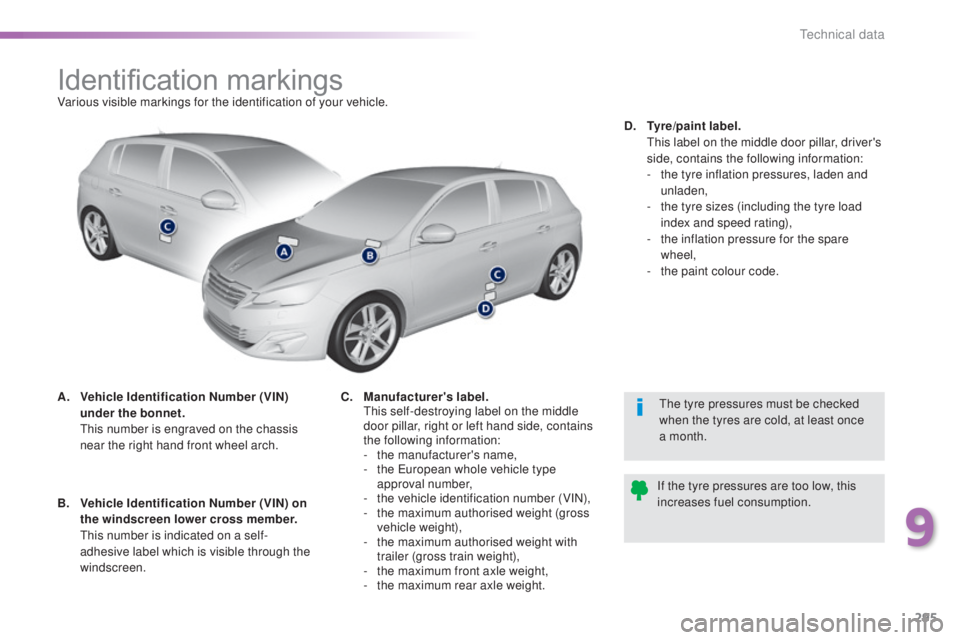
Identification markingsVarious visible markings for the identification of your vehicle.
A.
Ve
hicle Identification Number (VIN)
under the bonnet.
thi
s number is engraved on the chassis
near the right hand front wheel arch.
the t
yre pressures must be checked
when the tyres are cold, at least once
a month.
If the tyre pressures are too low, this
increases fuel consumption.
B.
Ve
hicle Identification Number (VIN) on
the windscreen lower cross member.
thi
s number is indicated on a self-
adhesive label which is visible through the
windscreen. C.
Ma
nufacturer's label.
thi
s self-destroying label on the middle
door pillar, right or left hand side, contains
the following information:
-
the
manufacturer's name,
-
th
e
eur
opean whole vehicle type
approval number,
-
th
e vehicle identification number (VIN),
-
th
e maximum authorised weight (gross
vehicle weight),
-
th
e maximum authorised weight with
trailer (gross train weight),
-
th
e maximum front axle weight,
-
th
e maximum rear axle weight.D.
Tyr
e/paint label.
thi
s label on the middle door pillar, driver's
side, contains the following information:
-
th
e tyre inflation pressures, laden and
unladen,
-
th
e tyre sizes (including the tyre load
index and speed rating),
-
th
e inflation pressure for the spare
wheel,
-
th
e paint colour code.
9
technical data
Page 339 of 398
337
308_en_Chap10c_SMegplus_ed02-2015
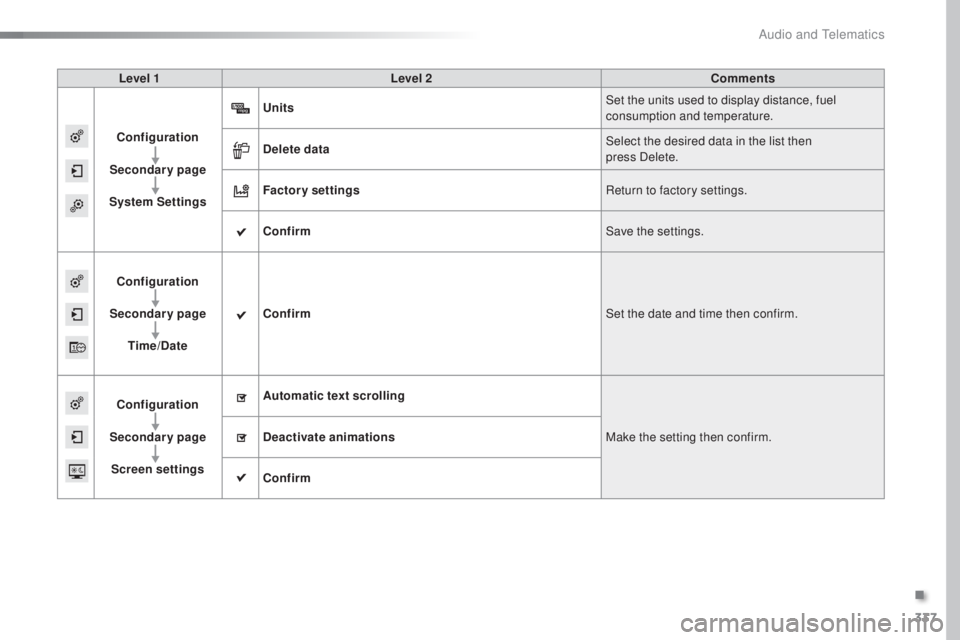
Level 1Level 2 Comments
Configuration
Secondary page
System Settings Units
Set the units used to display distance, fuel
consumption and temperature.
Delete data Select the desired data in the list then
press
D
elete.
Factory settings Return to factory settings.
Confirm Save the settings.
Configuration
Secondary page Time/Date Confirm
Set the date and time then confirm.
Configuration
Secondary page Screen settings Automatic text scrolling
Make the setting then confirm.
Deactivate animations
Confirm
.
Audio and telematics
Page 344 of 398
342
308_en_Chap10c_SMegplus_ed02-2015
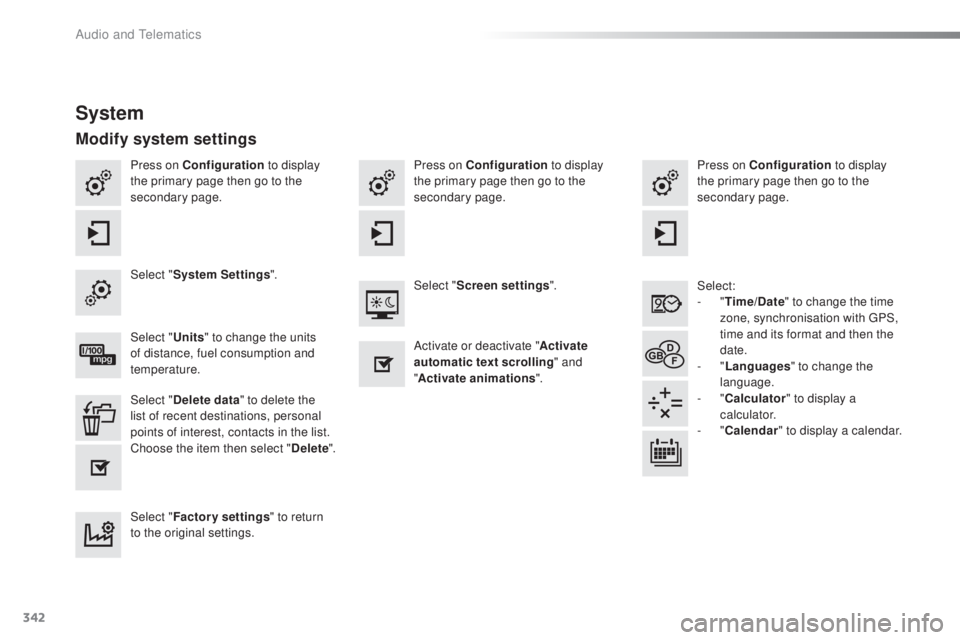
Press on Configuration to display
the primary page then go to the
secondary page. Press on Configuration
to display
the primary page then go to the
secondary page.
Press on Configuration
to display
the primary page then go to the
secondary page.
Select:
-
"T
ime/Date" to change the time
zone, synchronisation with
gPS
,
time and its format and then the
date.
-
" L
anguages" to change the
language.
-
" C
alculator" to display a
calculator.
-
" C
alendar" to display a calendar.
Select "
System Settings ".
Select "Screen settings ".
Select " Units" to change the units
of distance, fuel consumption and
temperature. Activate or deactivate "
Activate
automatic text scrolling " and
" Activate animations ".
Select " Delete data " to delete the
list of recent destinations, personal
points of interest, contacts in the list.
Choose the item then select " Delete".
Select " Factory settings " to return
to the original settings.
System
Modify system settings
Audio and telematics
Page 378 of 398
376
308_en_Chap10d_RD45_ed02-2015
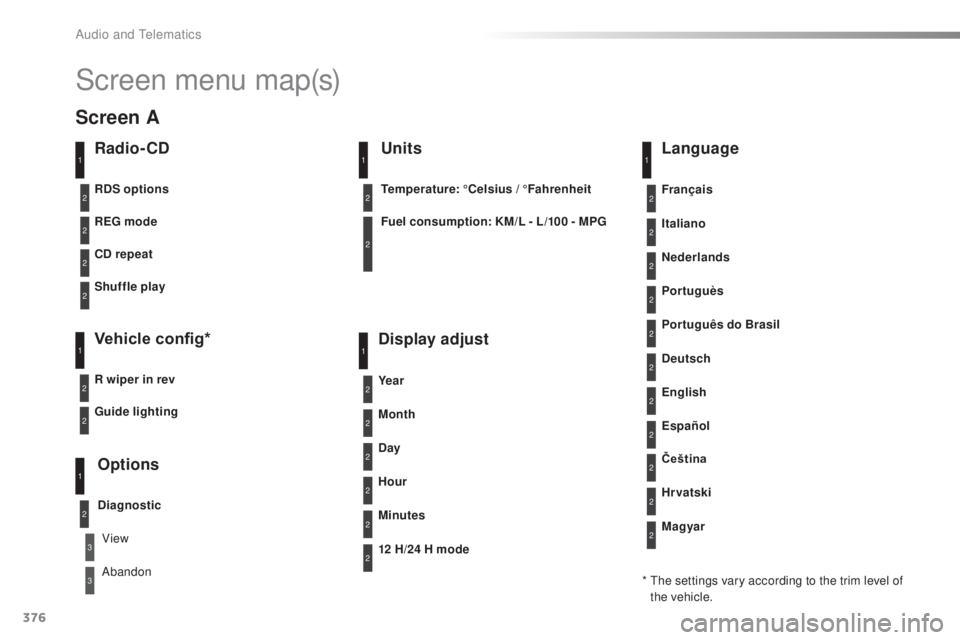
Screen menu map(s)
Radio- CD
REG mode
CD repeat
Shuffle play
Vehicle config*
R wiper in rev
Options
Diagnostic
RDS options
View
Abandon
1
2
3
3
1
2
2
2
2
1
2
Screen A
* the settings vary according to the trim level of
t he vehicle.
Guide lighting
2
Units
Temperature: °Celsius / °Fahrenheit
Fuel consumption: KM/L - L/100 - MPG
1
2
2
Display adjust
Month
Day
Hour
Minutes Ye a r
12 H/24 H mode
Language
Italiano
Nederlands
Portuguès
Português do Brasil Français
Deutsch
Čeština English
Hr vatski Español
Magyar
1
2
2
2
2
2
2
2
1
2
2
2
2
2
2
2
2
2
2
Audio and telematics